读书笔记《hands-on-full-stack-development-with-spring-boot-2-0-and-react》保护和测试您的后端
在前面章节中创建的 Spring Boot 应用程序是必要的。
Spring Security (https://spring.io/projects/spring-security ) 为基于 Java 的 Web 应用程序提供 security 服务。 Spring Security 项目始于 2003 年,之前被命名为 Acegi Security弹簧系统。
- An
AuthenticationManagerbean with an in-memory single user. The username isuserand the password is printed to the console output. - Ignored paths for common static resource locations, such as
/css,/images, and more. - HTTP basic security for all other endpoints.
- Security events published to Spring
ApplicationEventPublisher. - Common low-level features are on by default (HSTS, XSS, CSRF, and so forth).
您可以通过将以下依赖项添加到 pom.xml 文件中来在应用程序中包含 Spring Security:
当你启动你的应用程序时,你可以从控制台看到 Spring Security 已经创建了一个用户名为 user 的内存用户。用户的密码可以在控制台输出中看到:

如果您向您的 API 端点发出 GET 请求,您将看到它现在是安全的,并且您将得到一个 401 Unauthorized
错误:

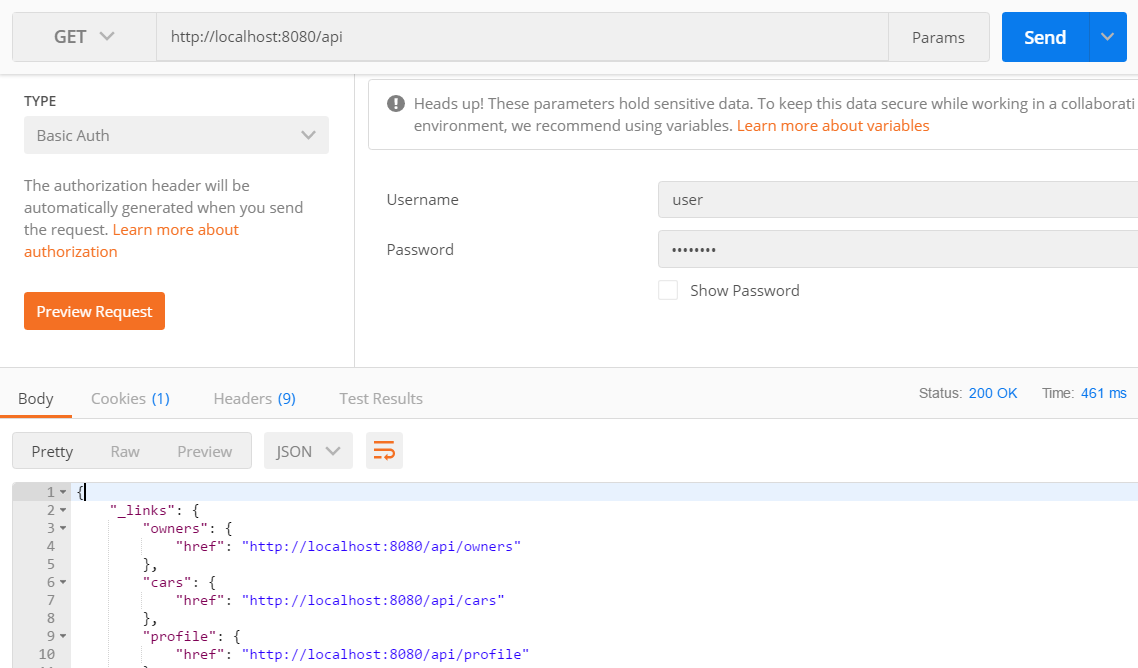
为了能够成功发出 GET 请求,我们必须使用基本身份验证。以下屏幕截图显示了如何使用 Postman 执行此操作。现在,通过身份验证,我们可以看到状态为 200 OK 并发送响应:
要配置 Spring Security 的行为方式,我们必须添加一个新的配置类来扩展 WebSecurityConfigurerAdapter。在您的应用程序根包中创建一个名为 SecurityConfig 的新类。以下源代码显示了安全配置类的结构。 @Configration 和 @EnableWebSecurity 注解关闭了默认的网络安全配置,我们可以在这个类中定义我们自己的配置。在 configure(HttpSecurity http) 方法中,我们可以定义应用程序中的哪些端点是安全的,哪些不是。我们实际上还不需要这种方法,因为我们可以使用所有端点都受到保护的默认设置:
我们还可以通过将 userDetailsService() 方法添加到我们的 SecurityConfig 类中来将内存用户添加到我们的应用程序中。以下是该方法的源代码,它将使用用户名 user 和密码 password:
内存用户的使用在开发阶段很好,但真正的应用程序应该将用户保存在数据库中。要将用户保存到数据库中,您必须创建用户实体类和存储库。密码不应以纯文本格式保存到数据库中。 Spring Security 提供了多种哈希算法, 如 BCrypt,可用于对密码进行哈希处理。以下步骤显示了如何实现它:
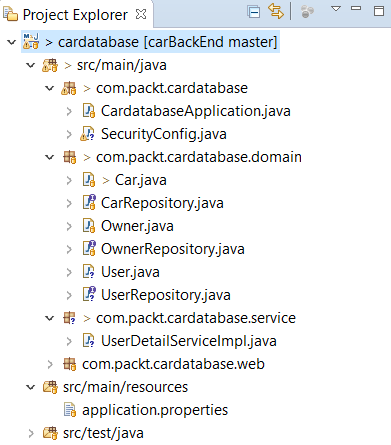
- Create a new class called
Userin thedomainpackage. Activate thedomainpackage and right click your mouse. SelectNew|Classfrom the menu and give the nameUserto a new class. After that, your project structure should look like the following screenshot:
- Annotate the
Userclass with the@Entityannotation. Add the class fields—ID, username, password, and role. Finally, add the constructors, getters, and setters. We will set all fields to be nullable and that the username must be unique, by using the@Columnannotation. See the followingUser.javasource code of the fields and constructors:
以下是带有 getter 和 setter 的 User.java 源代码的其余部分:
- Create a new class called
UserRepositoryin thedomainpackage. Activate thedomainpackage and right click your mouse. SelectNew|Classfrom the menu and give the nameUserRepositoryto the new class. - The source code of the repository class is similar to what we have done in the previous chapter, but there is one query method,
findByUsername, that we need in the next steps. See the followingUserRepositorysource code:
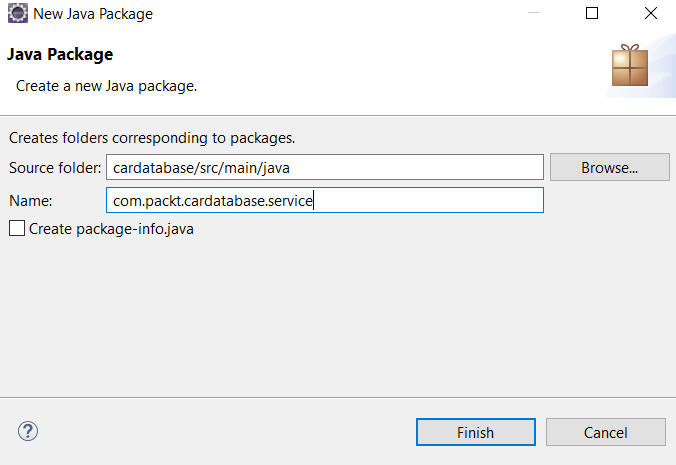
- Next, we create a class that implements the
UserDetailsServiceinterface provided by Spring Security. Spring Security uses this for user authentication and authorization. Create a new package in the root package calledservice. Activate the root package and right click your mouse. SelectNew|Packagefrom the menu and give the nameserviceto a new package:
- We have to inject the
UserRepositoryclass into theUserDetailServiceImplclass because that is needed to fetch the user from the database when Spring Security handles authentication. TheloadByUsernamemethod returns theUserDetailsobject, which is needed for authentication. Following is the source code ofUserDetailServiceImpl.java:
- In our security configuration class, we have to define that Spring Security should use users from the database instead of in-memory users. Delete the
userDetailsService()method from theSecurityConfigclass to disable in-memory users. Add a newconfigureGlobalmethod to enable users from the database. We shouldn't ever save the password as plain text to the database. Therefore, we will define a password hashing algorithm in theconfigureGlobalmethod. In this example, we are using the BCrypt algorithm. This can be easily implemented with the Spring SecurityBCryptPasswordEncoderclass. Following is theSecurityConfig.javasource code. Now, the password must be hashed using BCrypt before it's saved to the database:
- Finally, we can save a couple of test users to the database in our
CommandLineRunner. Open theCardatabaseApplication.javafile and add following code at the beginning of the class to injectUserRepositoryinto the main class:
- Save the users to the database with hashed passwords. You can use any BCrypt calculator found on the internet:
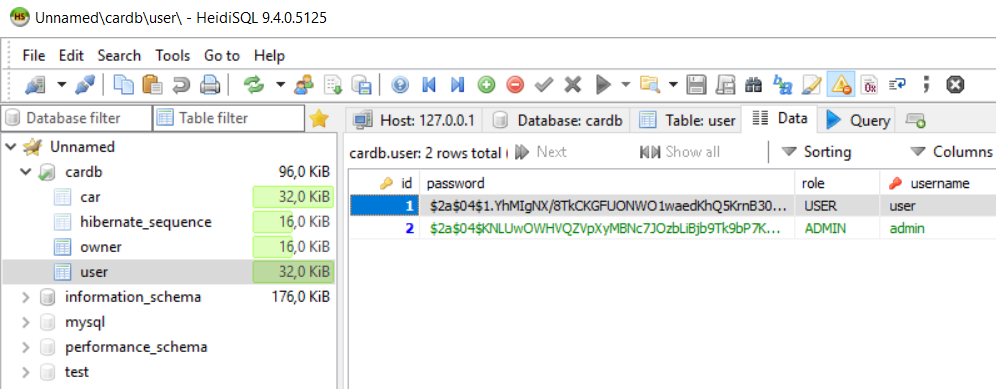
运行应用程序后,您会看到数据库中现在有一个 user 表,并保存了两条用户记录:
现在,如果您尝试向 /api 端点没有身份验证。您应该进行身份验证才能发送成功的请求。与上一个示例的不同之处在于我们使用 来自数据库的用户进行身份验证。
您可以使用 admin<查看对 /api端点的 GET请求/code> 用户在以下屏幕截图中:

在上一节中,我们介绍了如何 使用 RESTful Web 服务的基本身份验证。当我们要使用 React 开发自己的前端时,这是不可用的。我们将使用 JSON Web Tokens (JWT)在我们的应用程序中进行身份验证。 JWT 是一种在现代 web 应用程序中实现身份验证的紧凑方式。 JWT 的体积非常小,因此可以在 URL、POST 参数或标头内发送。它还包含有关用户的所有必需信息。
JSON Web 令牌包含由点分隔的三个不同部分。第一部分是定义令牌类型和散列算法的标头。第二部分是有效负载,通常在身份验证的情况下包含有关用户的信息。第三部分是用于验证令牌在此过程中未被更改的签名。您可以看到以下 JWT 令牌示例:
下图展示了 JWT 认证过程的主要思想:
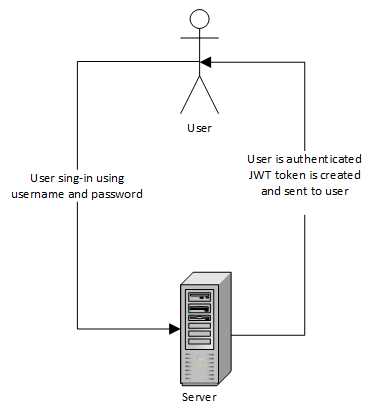
认证成功后,用户发送的请求应该始终包含认证中收到的 JWT 令牌。
我们将使用 Java JWT 库(https://github.com/jwtk/jjwt),是Java和Android的JSON Web Token库;因此,我们必须将以下依赖项添加到 pom.xml 文件中。 JWT 库用于创建和解析 JWT 令牌:
以下步骤显示了如何在我们的后端启用 JWT 身份验证:
- Create a new class called
AuthenticationServicein theservicepackage. In the beginning of the class we will define a few constants;EXPIRATIONTIMEdefines the expiration time of the token in milliseconds.SIGNINGKEYis an algorithm-specific signing key used to digitally sign the JWT. You should use a base64 encoded string. PREFIX defines the prefix of the token and the Bearer schema is typically used. TheaddTokenmethod creates the token and adds it to the request'sAuthorizationheader. The signing key is encoded using the SHA-512 algorithm. The method also addsAccess-Control-Expose-Headersto the header with theAuthorizationvalue. This is needed because we are not able to access theAuthorizationheader through a JavaScript frontend by default. ThegetAuthenticationmethod gets the token from the responseAuthorizationheader using theparser()method provided by thejjwtlibrary. The wholeAuthenticationServicesource code can be seen here:
- Next, we will add a new simple POJO class to keep credentials for authentication. Create a new class called
AccountCredentialsin thedomainpackage. The class has two fields—usernameandpassword. The following is the source code of the class. This class doesn't have the@Entityannotation because we don't have to save credentials to the database:
- We will use filter classes for login and authentication. Create a new class called
LoginFilterin the root package that handlesPOSTrequests to the/loginendpoint. TheLoginFilterclass extends the Spring SecurityAbstractAuthenticationProcessingFilter, which requires that you set theauthenticationManagerproperty. Authentication is performed by theattemptAuthenticationmethod. If the authentication is successful, thesuccesfulAuthenticationmethod is executed. This method will then call theaddTokenmethod in our service class and the token will be added to theAuthorizationheader:
- Create a new class called
AuthenticationFilterin the root package. The class extendsGenericFilterBean, which is a generic superclass for any type of filter. This class will handle authentication in all other endpoints except/login. TheAuthenticationFilteruses theaddAuthenticationmethod from our service class to get a token from the requestAuthorizationheader:
- Finally, we have to make changes to our
SecurityConfigclass'sconfiguremethod. There, we define that thePOSTmethod request to the/loginendpoint is allowed without authentication and that requests to all other endpoints need authentication. We also define the filters to be used in the/loginand other endpoints by using theaddFilterBeforemethod:
- We will also add a CORS (Cross-Origin Resource Sharing) filter in our security configuration class. This is needed for the frontend, that is sending requests from the other origin. The CORS filter intercepts requests, and if these are identified as cross origin, it adds proper headers to the request. For that, we will use Spring Security's
CorsConfigurationSourceinterface. In this example, we will allow all HTTP methods and headers. You can define the list of allowed origins, methods, and headers here, if you need more finely graded definition. Add the following source into yourSecurityConfigclass to enable the CORS filter:
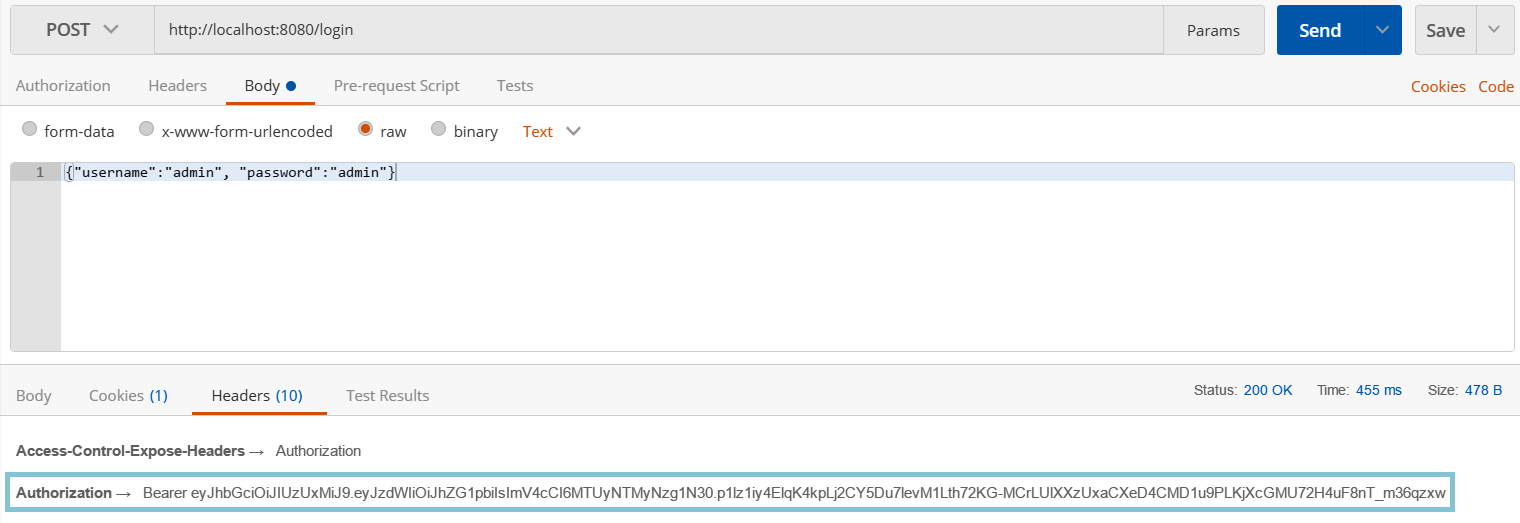
现在,在您运行应用程序之后,我们可以使用 POST 方法调用 /login 端点,在这种情况下成功登录后,我们将在 Authorization 标头中收到 JWT 令牌:
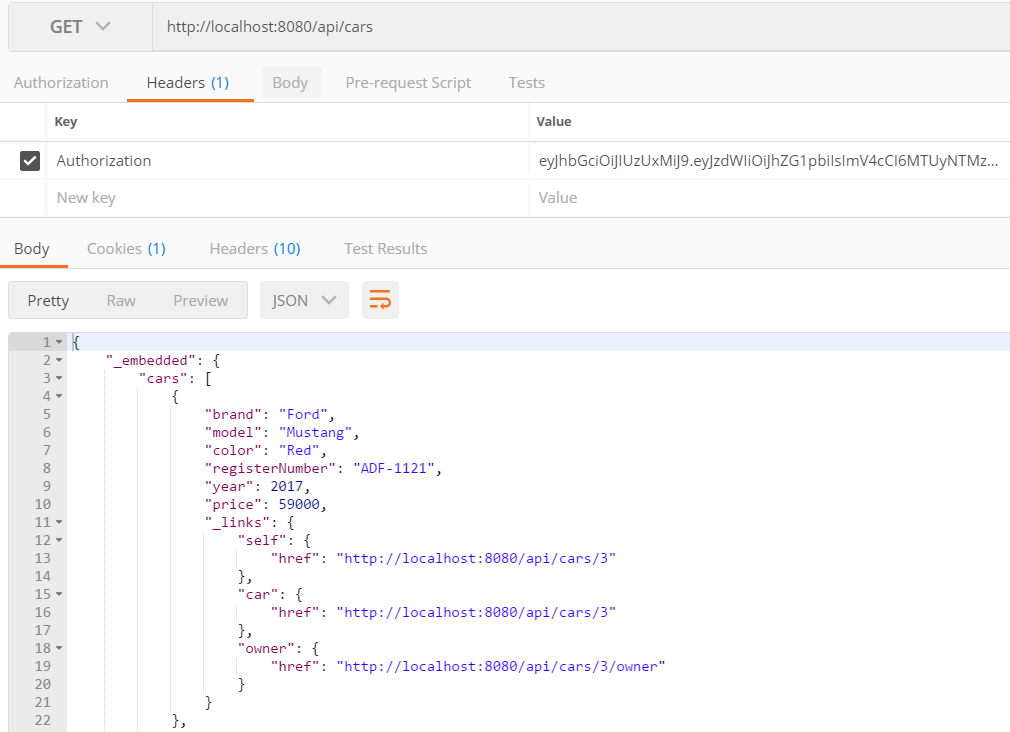
登录成功后,我们可以通过发送在授权 标头。请参阅以下屏幕截图中的示例:
现在,我们的后端已经实现了所有需要的功能。接下来,我们将继续进行后端单元测试。
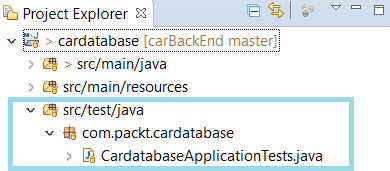
Spring Boot 测试启动器 package 被 Spring 添加到 pom.xml我们创建项目时的 Initializr。这是自动添加的,无需在 Spring Initializr 页面中进行任何选择:
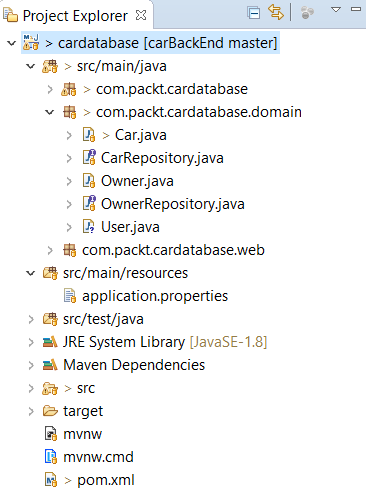
Spring Boot 测试启动器提供了许多方便的测试库,例如 JUnit、Mockito、AssertJ 等。如果您看一下,您的项目结构已经为测试类创建了自己的包:
默认情况下,Spring Boot 使用内存数据库进行测试。我们现在使用的是 MariaDB,但也可以通过将以下依赖项添加到 pom.xml 文件中来使用 H2 进行测试。范围定义 H2 数据库将仅用于运行测试;否则,应用程序将使用 MariaDB 数据库:
如果还想使用默认数据库进行测试,可以使用 @AutoConfigureTestDatabase注解。
对于单元测试,我们使用 JUnit,它是一个流行的基于 Java 的单元测试库。以下源代码显示了 Spring Boot 测试类的示例框架。 @SpringBootTest 注释指定 该类是常规测试类运行基于 Spring Boot 的测试。 @Test 方法之前的注释向 JUnit 定义了该方法可以作为测试用例运行。 @RunWith(SpringRunner.class) 注释提供 Spring ApplicationContext 并将 bean 注入到您的测试实例中:
首先,我们将创建我们的第一个测试用例,它将在创建任何正式的测试用例之前测试您的应用程序的主要功能。打开已经为您的应用程序创建的 CardatabaseApplicationTest 测试类。有一种称为 contextLoads 的测试方法,我们将在其中添加测试。以下测试检查控制器实例是否已成功创建和注入:
要在 Eclipse 中运行测试,请在 Project Explorer 中激活测试类并右键单击鼠标。选择运行 作为 | JUnit 测试 从菜单中。您现在应该在 Eclipse 工作台的下部看到 JUnit 选项卡。测试结果显示在此选项卡中,并且测试用例已通过:

接下来,我们将为我们的汽车存储库创建单元测试以测试 CRUD 操作。在根测试包中创建一个名为 CarRepositoryTest 的新类。如果测试只关注 JPA 组件,则可以使用 @DataJpaTest 代替 @SpringBootTest注解。使用此注解时,会自动配置 H2 数据库、Hibernate 和 Spring Data 以进行测试。 SQL 日志记录也将打开。 测试 默认情况下是事务性的,并在测试用例结束时回滚。 TestEntityManager 用于处理持久实体,旨在用于测试。您可以在下面看到 JPA 测试类骨架的源代码:
我们将添加第一个测试用例来测试将新车添加到数据库中。使用 提供的 。然后,如果保存成功,我们检查汽车 ID 不能为空。以下源代码显示了测试用例方法。将以下方法代码添加到您的 persistAndFlush 方法创建一个新的 car 对象并保存到数据库中测试实体管理器CarRepositoryTest 类中:
第二个测试用例将测试从数据库中删除汽车。一个新的 car 对象被创建并保存到数据库中。然后,从数据库中删除所有汽车,最后 findAll() 查询方法应该返回一个空列表。以下源代码显示了测试用例方法。将以下方法代码添加到您的 CarRepositoryTest 类中:
运行测试用例并在 Eclipse JUnit 选项卡上检查测试是否通过:

接下来,我们将展示如何测试您的 RESTful Web 服务 JWT 身份验证功能。为了测试控制器或任何暴露的端点,我们可以使用 MockMvc。通过使用 MockMvc,服务器没有启动,但是tests在 Spring 处理 HTTP 请求的层中执行,因此它模拟真实情况。 MockMvc 提供了 执行发送请求的方法。要测试身份验证,我们必须将凭据添加到请求正文。我们执行两个请求;第一个具有正确的凭据,我们检查状态是否为 OK。第二个请求包含不正确的凭据,我们检查是否收到 4XX HTTP 错误:
现在,当我们运行身份验证测试时,我们可以看到测试通过了:

现在,我们已经介绍了 Spring Boot 应用程序中的测试基础知识,您应该具备为您的应用程序实现更多测试用例所需的知识。
Packt 有其他很好的资源来学习 Spring 安全和测试: