读书笔记《developing-java-applications-with-spring-and-spring-boot-ebook》春云
Spring Cloud family 项目为各种框架的 Spring Boot 提供集成扩展,提供分布式服务发现、配置、路由、服务调用等。通过使用统一的 API,我们可以将这些概念添加到我们的应用程序中,并且以后可以在需要时灵活地更改特定的实现,而无需对我们的代码库进行深入的更改。
我们将首先使用基础 Spring Cloud 模块增强我们的 BookPub 项目,方法是将它们添加到主构建配置中:
- Add the following content to the
build.gradlefile located at the root of the project:
- Create a
bootstrap.propertiesfile under thesrc/main/resourcesdirectory from the root of our project with the following content (the same properties should be commented out insideapplication.propertiesat this point):
- Start the application by running
./gradlew clean bootRun - After the application has been started, open our browser at
http://localhost:8081/envand we will see new property sources appear:
在深入了解 things 的工作原理之前,让我们回顾一下我们对项目所做的更改。第一步是通过导入 Bill of Material
build.gradle 构建配置用于 Spring Cloud 发布火车的strong> (BOM) 声明—mavenBom 'org .springframework.cloud:spring-cloud-dependencies:Finchley.BUILD-SNAPSHOT'。虽然我们可以有选择地导入显式定义的 spring-cloud-context 和 spring -cloud-commons 库,通过依赖打包的 BOM,我们确信我们将使用经过兼容性测试的不同工件的正确版本 彼此。
我们首先添加对 spring-cloud-context和spring-cloud-commons<的依赖/span> 库,用于说明 Spring Cloud 提供的基本常用设施,然后再深入了解特定的启动器集成,例如 spring-cloud-netflix
或 spring-cloud-consul。这些基本库提供了用于在所有不同的特定于云的集成中构建的接口和通用功能的基础。以下是他们的目的:
spring-cloud-commons: This provides a collection of shared common interfaces and base classes that define the notions of service discovery, service routing, load balancing, circuit breaking, feature capabilities, and some basic configuration. For example, this is the library that autoconfigures the environment with thespringCloudClientHostInfoproperty source.spring-cloud-context: This is the base foundation that is responsible for bootstrapping and configuring the various integrations, such as a specific implementation of service discovery like Consul, or a specific implementation of circuit breaker like Hystrix. This is achieved by creating an isolated Bootstrap application context, which is responsible for loading and configuring all the components before the main application is started.
引导应用程序上下文在应用程序启动周期的早期创建,它由一个单独的文件配置 - bootstrap.properties(还支持 YAML 变体)。由于在云中运行的应用程序非常典型地依赖于许多外部配置源、服务查找等,因此 Bootstrap 上下文的目的是配置这些功能并从外部获取所有必要的配置。
为了清楚地将应用程序配置与 Bootstrap 分开,我们将描述应用程序的内容、配置外部配置或其他环境变量(例如在何处调用服务发现)放入 bootstrap.properties
而不是 application.properties。在我们的示例中,我们将 spring.application.name 配置放入 bootstrap.properties, 因为在引导阶段需要这些信息;它可用于从远程配置存储中查找配置。
由于 Bootstrap 应用上下文确实是真正的 Spring 应用上下文,所以两者之间存在父子关系,其中 Bootstrap 应用上下文成为 Spring Boot 应用上下文的父级。这意味着在 Bootstrap 上下文中定义的所有 bean 和属性源也可以在应用程序上下文中使用。
当 Spring Cloud 添加到应用程序时,它会自动为特定的 Spring Cloud 模块提供集成框架,例如 Spring Cloud Consul,通过使用现在众所周知的 spring.factories 配置声明。 spring-cloud-commons内部提供的注解,即@SpringCloudApplication、@EnableDiscoveryClient、@EnableCircuitBreaker 和 @BootstrapConfiguraion 和 PropertySourceLocator 接口 spring-cloud-context 库,旨在定义用于自我配置特定组件的集成点,例如 Consul 等发现客户端、Hystrix 等断路器或远程配置 来源,例如ZooKeeper。
让我们详细检查一下:
@SpringCloudApplication: This annotation is like@SpringBootApplication, meta-annotation in nature, except it also wraps the@EnableDiscoveryClientand@EnableCircuitBreakerannotations in addition to also being meta-annotated with@SpringBootApplication. It is a good idea to use this annotation when you want to enable both the discovery client and the circuit breaker functionality in your application.@EnableDiscoveryClient: This annotation is used to indicate that Spring Cloud should initialize the provided discovery client for service registry, depending on the included integration library, such as Consul, Eureka, ZooKeeper, and so on.
@EnableCircuitBreaker: This annotation is used to indicate that Spring Cloud should initialize the circuit breaker capabilities, based on the specific dependency of the integration library, such as Hystrix.PropertySourceLocator: This is used by the integration libraries to implement specific functionality of how to extract remote configuration from the provided datastore. Each integration module, providing ability to load remote configuration, would register an implementing bean of this type that exposes an implementation ofPropertySourcethat is backed by the integration.@BootstrapConfiguration: This annotation is like the@ManagementContextConfigurationannotation, and is (mostly) a marker annotation geared to identify the key inside thespring.factoriesdescriptor to indicate which configuration classes should be loaded during the Spring Cloud Bootstrap process and be part of the Bootstrap application context. Those configurations are read byBootstrapApplicationListenerduring startup and initialize the specified configurations. Typically, this is where the configuration classes, which define and exposePropertySourceLocator—implementing beans, are configured.
在分布式计算的世界中,服务成为一次性非常常见 商品。一个服务的典型生命周期可以用天来衡量,如果不是几个小时的话,并且实例由于某种原因而崩溃并不是闻所未闻的,只是在几秒钟后自动出现一个新的实例。当应用程序的状态如此短暂时,维护静态连接的架构变得非常困难,因为拓扑总是在变化,服务知道其依赖服务的确切位置。
为了帮助解决这个问题,服务发现层开始发挥作用,维护服务注册的集中和分布式状态,随时准备使用最新信息按需回复。应用程序在启动时注册自己,提供有关其位置以及可能有关其功能、服务级别、健康检查状态等的信息。
在本书前面的第25章中,< span>应用打包和部署,我们被介绍给Consul,并将其用于外部应用配置 消费。在这个秘籍中,我们将继续深入了解 Consul 的功能,并学习如何使用 spring-cloud-consul 模块自动向 Consul 注册我们的应用程序。
请看以下设置服务发现的步骤:
- Replace the
spring-cloud-commonsandspring-cloud-contextmodules withspring-cloud-starter-consul-allby modifying thebuild.gradlefile located in the root of our project with the following content:
- With Consul dependencies added, we will proceed with enabling our application to automatically register with the local agent upon startup by modifying the
BookPubApplication.javafile located under thesrc/main/java/com/example/bookpubdirectory from the root of our project with the following content:
- Given that Consul was successfully installed using the steps described in the Setting up Consul recipe in Chapter 25, Application Packaging and Deployment, we should be able to start it by running
consul agent -server -bootstrap-expect 1 -data-dir /tmp/consuland our Terminal window should display the following output:
- After the Consul agent is up and running successfully, we will proceed by starting our application by running
./gradlew clean bootRun - As we watch the startup logs scroll by, there are a couple of interesting entries that indicate the application is interacting with the agent, so watch for the following content in the logs:
- Just to verify that our application has registered and is in communication with the local Consul agent, let's open
http://localhost:8081/actuator/consulin the browser to see the Consul agent information, as shown in the following screenshot:
当我们添加 spring-cloud-starter-consul-all 作为构建依赖项时,它会自动提取所有必要的组件来为我们的应用程序启用 Consul 功能.我们自动得到了 spring-cloud-consul-binder, spring-cloud-consul-core 、spring-cloud-consul-config、 和 spring- cloud-consul-discovery 工件添加到我们的类路径中。让我们来看看它们:
spring-cloud-consul-core: This artifact provides base autoconfiguration to expose genericConsulProperties, as well as theConsulClientinitialization and setting of the/consulmanagement endpoint, if the Spring Boot Actuator functionality is enabled.spring-cloud-consul-config: This provides theConsulPropertySourceLocatorimplementation, used during Bootstrap, to configure theConsulPropertySourcebean, which allows remote configuration consumption from the Consul key/value store. It also sets up aConfigWatchchange observer, which firesRefreshEventto the application context, if a configuration key value changes in Consul key/value store while the application is running. This allows for a possible configuration properties reload without having to redeploy and restart the application.spring-cloud-consul-discovery: This provides all the functionality and implementations needed for service discovery, service registration, and service invocation.spring-cloud-consul-binder: This provides integration of Consul event functionality with Spring Cloud Stream Framework, enabling it to send and receive events from Consul and respond to them within the application. While outside of the scope of this chapter, more information can be obtained from http://cloud.spring.io/spring-cloud-stream/.
在类路径中添加 spring-cloud-consul-config 会自动注册 ConsulPropertySource,spring-cloud-consul-discovery 模块并非如此。服务发现功能更具侵入性,因此需要开发人员额外的确认步骤,以表明它确实是需要的。这是通过在主应用程序类中添加 @EnableDiscoveryClient注解来实现的;在我们的例子中是 BookPubApplication。
一旦添加了 @EnableDiscoveryClient注解,Spring Cloud (EnableDiscoveryClientImportSelector 来自 spring-cloud-commons 模块的类,更准确地说)扫描所有 spring .factories 文件用于 org.springframework.cloud.client.discovery.EnableDiscoveryClient 键的存在,以及将所有关联的配置加载到主应用程序上下文中。如果我们查看位于 spring-cloud-consul-中的 JAR,我们会看到如下入口:spring.factories文件在 META-INF/目录下发现
这告诉我们,当 discovery 客户端启用时,ConsulDiscoveryClientConfiguration
将被使用,其所有定义的 bean 将被添加到应用程序上下文中。
如果正在使用自定义服务发现 mechanism,则可以使用类似的方法。需要创建一个自定义配置类,公开 DiscoveryClient 接口的自定义实现,并在 spring.factories 文件捆绑在档案中。加载该 JAR 后,如果启用了 discovery 客户端功能,则会自动使用配置。
Note
Spring Cloud Consul 库提供了非常细粒度的功能来配置和挑选所选功能,如果不是全部适用于特定用例的话。有关各种配置和使用选项的详细信息,请参阅 http:// cloud.spring.io/spring-cloud-consul/。
在上一个秘籍中, 我们研究了如何启用service 发现我们的应用程序的能力,以便能够向世界注册我们的服务,并了解存在哪些其他服务以及它们的位置。这个秘籍将帮助我们更好地与这些信息交互并使用这些服务,而无需显式地编写任何逻辑来处理服务发现以及随之而来的所有相关问题。
为了实现这个目标,我们将看看另一个 Spring Cloud 集成,它是由 Spring Cloud Netflix 模块系列——Netflix Feign 提供的。 Feign,它使编写 Java HTTP 客户端更容易。其目的是简化将服务 API 调用绑定到相应的 HTTP API 对应项的过程。它提供自动服务映射和发现、将 Java 类型转换为 HTTP 请求 URL 路径、参数和响应有效负载的能力,以及错误处理。
为了简单起见,在这个秘籍中,我们将创建一个 Client 控制器,它将充当我们 BookPub
应用服务,通过Feign注解的Java服务接口调用我们的API,依赖Consul提供服务发现功能。
- We will start by adding Netflix Feign module dependencies to our project. Let's modify our
build.gradlefile located in the root of our project with the following content:
- With the dependency added, our next step is to create a Java API interface describing how we want to define our interaction with the
BookPubservice. Let's create anapipackage under thesrc/main/java/com/example/bookpubdirectory from the root of our project. - Inside the newly-created
apipackage, let's create our API class file namedBookPubClient.javawith the following content:
- After we have defined the API, it is time to tell our application that we want to enable Feign support. We will do that by making a change to the
BookPubApplication.javafile located under thesrc/main/java/com/example/bookpub directoryfrom the root of our project with the following content:
- Finally, let's create a client controller to invoke
BookPubClientby making a new file namedClientController.javaunder thesrc/main/java/com/example/bookpub/controllersdirectory from the root of our project with the following content:
- With everything set and done, let's start the application by executing the
./gradlew clean bootRuncommand.
- Once the application is up and running, let's open
http://localhost:8080/client/book/978-1-78528-415-1in the browser to see the Consul agent information, as shown in the following screenshot:
- If we look at the application console logs, we will also see entries indicating that our Feign client is initialized and functioning. You should see something similar to this:
- One last thing that we should do is to get our tests to work with all the newly added frameworks. Because Spring Cloud does not add itself to the test life cycle, we should explicitly disable any reliance on beans created by Spring Cloud libraries during tests. To do so let's add to our
application.propertiesfile located under thesrc/test/resourcesdirectory from the root of the project of the following properties:
- We also need to add a Mock dependency on
BookPubClientinto theJpaAuthorRepositoryTests.javaandWebMvcBookControllerTests.javafiles located under thesrc/test/java/com/example/bookpubdirectory from the root of the project with the following content:
与我们在上一节中看到的类似,在主应用程序类 @EnableFeignClients 注解>BookPubApplication,明确告诉 Spring Cloud 它应该扫描所有带有 @FeignClient 注释的接口和根据其定义创建服务客户端实现。 @EnableFeignClients 注解本质上类似于 @ComponentScan
一,提供属性来控制扫描哪些包以查找 @FeignClient 注释类或明确列出应该使用的 API 类。
开箱即用,所有 Feign 客户端实现都使用 FeignClientsConfiguration 类中定义的组件进行配置,但可以使用 < @EnableFeignClients 注释的 code class="literal">defaultConfiguration 属性。
简而言之,每一个使用@FeignClient注解的接口定义,都会得到一个由Java动态代理对象组成的服务实现,该对象处理所有接口方法调用(通常使用 FeignInvocationHandler 来处理所有请求)。调用处理程序负责做一些事情。
一旦调用了任何方法,首先使用提供的发现客户端(在我们的例子中是 ConsulDiscoveryClient)基于 @FeignClient 注释的 ="literal">name 属性。在我们的示例中,我们将 name 属性的值声明为 http://BookPub- ch9,因此注册表中所有名称设置为 BookPub-ch9 的服务实例将是作为可能的候选人返回。这个名称可以只是一个服务名称本身,或者,就像我们在示例中所做的那样,可以指定一个可选协议。这是一个有用的功能,因为并非所有服务发现提供者都支持准确指定服务应该如何调用的能力,所以如果我们想使用 HTTPS 进行安全调用,我们可以明确指定协议以帮助 Feign 进行正确的调用。
注解上还有许多其他可用的配置属性,例如,告诉 Feign 直接调用指定的 URL 而不是进行服务查找,有一个 url 可以配置的属性。
Note
要查看可能属性及其用例的完整列表,请转到 https://cloud.spring.io/spring-cloud-netflix/single/spring-cloud-netflix.html#spring-cloud-feign .
given 服务的实例列表由另一个 Netflix 库 - Ribbon 提供的内部负载均衡器包装。如果 discovery 客户说他们不健康。
Note
要查看负载平衡规则和其他设置等可能配置选项的完整列表,请转到 https://cloud.spring.io/spring-cloud-netflix/single/spring-cloud-netflix.html#spring -cloud-ribbon.
确定特定实例后,将使用标准 Spring 创建一个 HTTP request HttpMessageConverter beans 将方法参数转换为 HTTP 请求路径变量和查询参数。完成所有这些之后,使用配置的 HTTP 客户端发送请求,并且使用相同的转换器将响应转换为在 API 接口上声明的返回类型。
现在我们知道了 @FeignClient 注释的全部内容以及一旦调用 API 定义的方法会发生什么,让我们来看看如何注释应该转换为远程服务调用的接口方法。在 @Controller 中声明控制器映射时,我们可以方便地并且有意这样做,使用与我们已经习惯的完全相同的注解带注释的类。我们想要映射到远程服务的 API 接口中的每个方法都应该使用 @RequestMapping 注释进行注释。 path 属性对应于我们要调用的远程服务的 URL 路径。
在我们的示例中,我们要调用 BookController.getBook(...) 方法,该方法转换为 /books/{isbn} URL 路径。这正是我们为 path 属性设置的值,并确保我们还注释了 isbn 参数在我们的 findBookByIsbn(...) 方法中使用 @PathVariable("isbn") 将其链接到映射模板中的 {isbn} 占位符。
作为一般的经验法则,@RequestMapping 注释的功能与在控制器中使用时完全相同,除了配置与传出有关请求而不是入站请求。在配置注解的consumes属性时可能会特别混乱,即consumes = " application/json",因为它表明它是一个远程端,期望 JSON 作为负载的 content-type。
我们已经了解了如何使用 HashiCorp Consul 进行服务发现并将其与我们的应用程序集成。这个秘籍将介绍 Netflix-Eureka 中一个非常流行的服务发现框架的替代方案。 Eureka 由 Netflix 开发,旨在帮助解决其在 AWS 中的 RESTful 服务的服务发现、健康检查和负载平衡问题。
与 Consul 不同,Eureka 只专注于 service 发现,并且不提供许多附加功能,例如键/值存储服务或事件传递。然而,它非常擅长它所做的事情,应该被认为是服务发现解决方案的可行候选者。
在我们开始将 Eureka 添加到我们的应用程序之前,我们需要让 Eureka 服务本身启动并运行。值得庆幸的是,Spring Cloud 的开发人员提供了一个示例项目,让创建 Eureka 服务器实例和运行它变得轻而易举。让我们看一下以下步骤:
- To get things up and running just go to https://github.com/spring-cloud-samples/eureka and git clone the
[email protected]:spring-cloud-samples/eureka.gitrepository to your machine. - After that's done, run
./gradlew clean bootRunto start the server: - Once the server is up and running, we need to add the following dependencies to the
build.gradlefile located at the root of our project:
- Ironically, that’s all we had to do, at this point, we just restart our application by executing the
./gradlew clean bootRuncommand.
- Once the application is up and running, let's open
http://localhost:8080/client/book/978-1-78528-415-1in the browser and we should see exactly the same response as in our previous recipe.
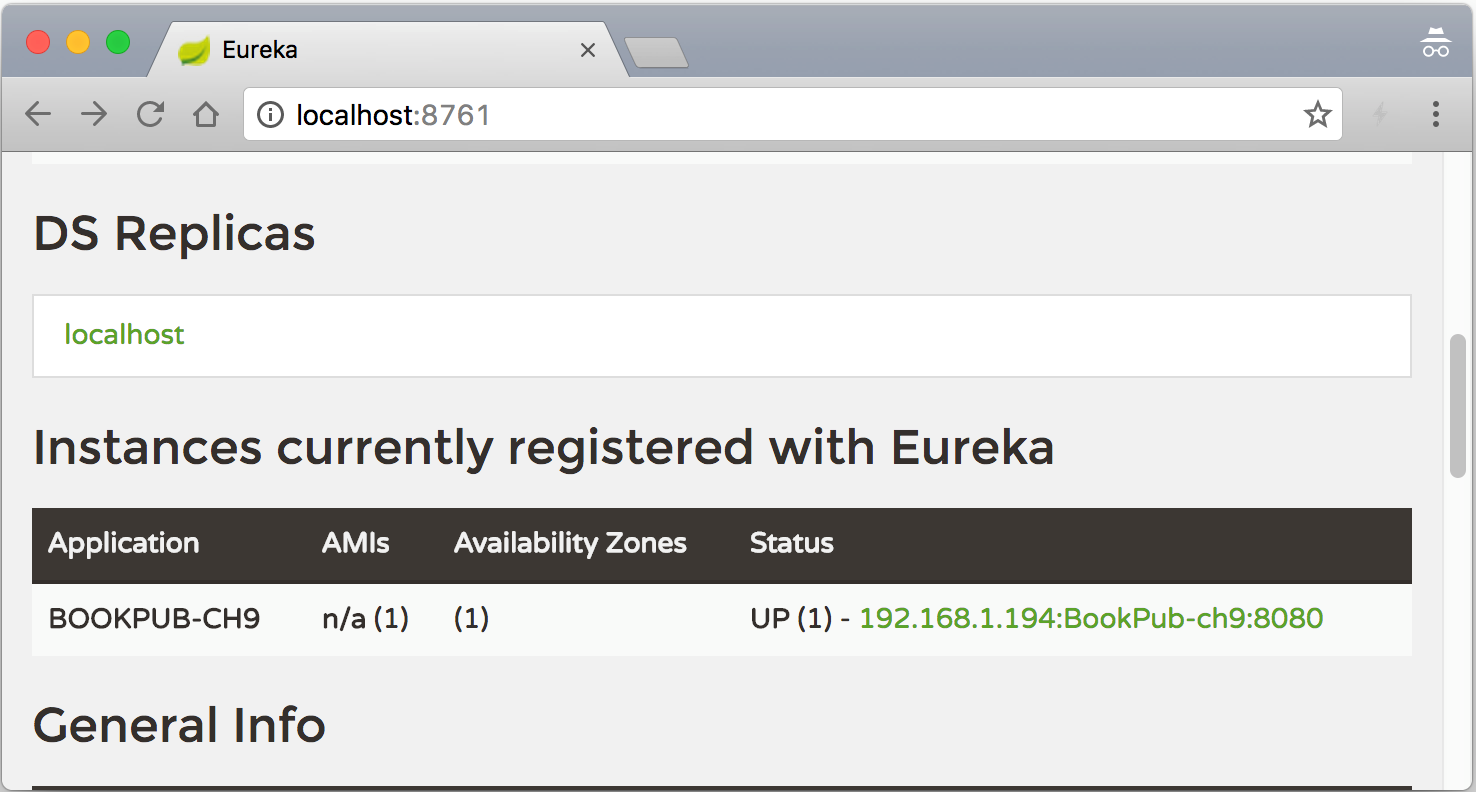
- Just to see that our application did indeed register with Eureka, we can open the browser at the
http://localhost:8761URL and we should see our service listed under instances list:
通过看似毫不费力的更改,我们将一个服务发现提供者 Consul 换成了另一个 Eureka。表面上看起来没有太大变化的东西实际上在引擎盖下做了很多工作。我们能够如此轻松地做到这一点的原因是 spring-cloud-commons 和 spring-cloud-context 基础库。通过 spring.factores 描述符的自动模块加载支持允许在不同服务发现提供者的初始化中进行透明替换。只要我们在 BookPubApplication 上保留 @EnableDiscoveryClient 注释类,Spring Cloud 完成了繁重的工作,负责加载适当的自动配置文件并设置所有正确的 bean 以使我们的应用程序与 Eureka 一起工作。
我们必须在配方的第一步从类路径中删除 Consul 依赖项,这是为了消除 DiscoveryClient 的歧义执行。如果不这样做,我们的应用程序上下文将最终得到 DiscoveryClient 接口的两种不同实现,这本身不会很糟糕,除了Spring Cloud 必须消除歧义并选择一个,并且可能不会选择我们想要的那个。
如果我们在 build.gradle< 中保留 文件,并尝试运行应用程序,它会在启动过程中失败,在日志中我们将看到以下条目:spring-cloud-starter-consul-all 依赖项/span>
从异常中可以看出,Spring 自动装配无法决定应该使用哪一个服务注册表。这是因为 Eureka 和 Consul 都自动创建了 Registration 的实例,而自动装配只需要一个。
由于只有一个注册表是硬性要求,因此最好不要配置多个发现客户端依赖库以避免错误。如果由于某种原因,多个库必须驻留在类路径中,则应该使用配置属性来显式启用/禁用特定的客户端实现。例如,Consul 和 Eureka 都提供了切换状态的配置。我们可以在 spring.cloud.consul.discovery.enabled=true 和 eureka.client.enabled=false ="literal">application.properties 如果我们更喜欢使用 Consul 来提供服务发现功能。
在本章中我们研究了在云环境中成功运行微服务应用程序的所有方面。我们已经了解了如何更好地集成到动态变化的生态系统中、使用远程配置属性、注册服务以及发现和调用其他服务。在这个秘籍中,我们将了解在分布式、高度易变的云环境中操作断路器的另一个非常重要的方面。
我们将要研究的断路器功能的特定实现是 Netflix Hystrix。它提供了一种非常强大和方便的方式来注释我们的服务调用和处理远程服务故障、队列备份、过载、超时等事情。通过在应用程序中设置断路器,如果特定服务端点因请求过载或遇到任何类型的中断,开发人员可以确保整体应用程序的稳定性。
- To get started with Hystrix we need to add the
spring-cloud-starter-hystrixlibrary to our project. Let's modify ourbuild.gradlefile located in the root of our project with the following content:
- After adding the Hystrix dependency, we need to enable Hystrix for our application. Similar to how we enabled service discovery, we will do that by making a change to the
BookPubApplication.javafile located under thesrc/main/java/com/example/bookpubdirectory from the root of our project with the following content:
- Now, let's make a few changes to
BookController.java, located under thesrc/main/java/com/example/bookpub/controllersdirectory from the root of our project, with the following content:
- Due to Hystrix internal functionality, we also need to modify our entity models to have them eager-load the relational associations. In the
Author.java,Book.java, andPublisher.javafiles located under thesrc/main/java/com/example/bookpub/entitydirectory from the root of our project, let's make the following changes:
- In
Author.java, make the following change:
- In
Book.java, make the following change:
- In
Publisher.java, make the following change:
- Finally, we are ready to restart our application by executing the
./gradlew clean bootRuncommand.
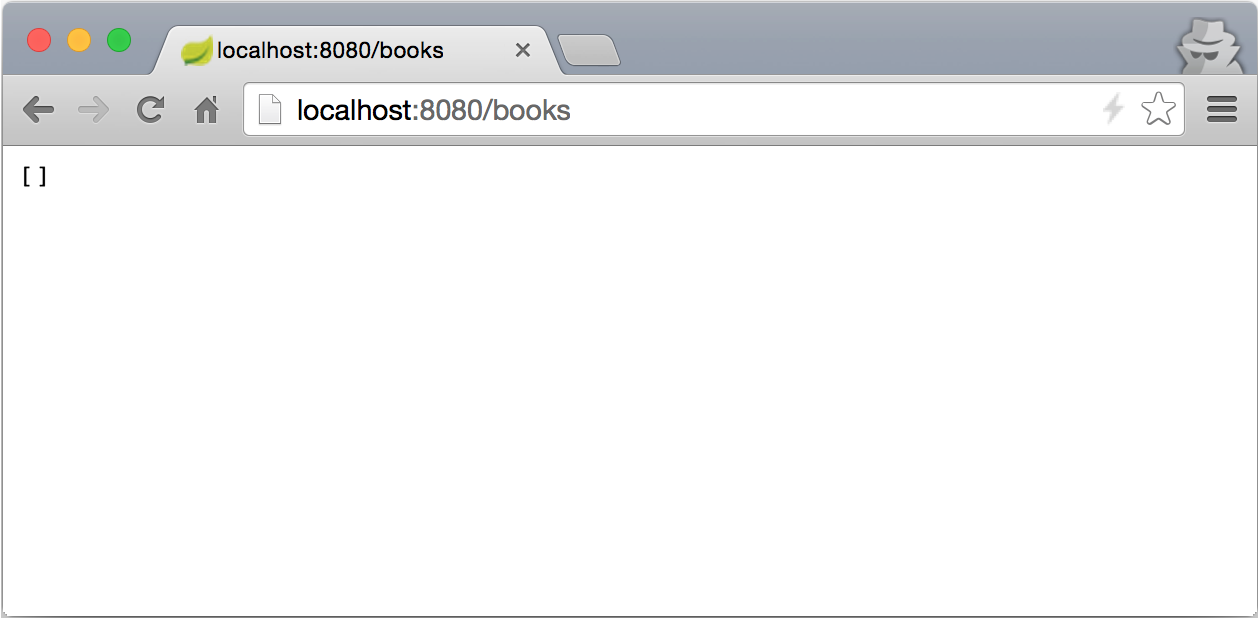
- When the application has started, let's open
http://localhost:8080/booksin the browser and we should see an empty JSON list as a result:
在这个秘籍中,我们在将Hystrix依赖库添加到我们的项目后做了三件事。因此,让我们详细了解每个步骤,以了解究竟发生了什么:
- The
@EnableCircuitBreakerannotation, similar to@EnableDiscoveryClient, or@EnableFeignClients, which explicitly indicates that we want Spring Cloud to load appropriate configurations fromspring.factoriesfrom all the libraries which have theorg.springframework.cloud.client.circuitbreaker.EnableCircuitBreakerkey defined.
- In the case of Hystrix, it will load
HystrixCircuitBreakerConfiguration, which provides the necessary configuration to enable the Hystrix functionality within the application. One of the beans it creates, is theHystrixCommandAspectclass. It's purpose is to detect all the methods which are annotated with the@HystrixCommandannotation and wrap them with a handler to detect errors, timeouts, and other ill-behaviors, and deal with them appropriately, based on configuration. - This
@HystrixCommandannotation, provided by the Hystrix library, is designed to mark methods which representHystrix-guarded commands, that is, methods which we want to protect using Hystrix against cascading failures and overloads. This annotation has a number of attributes and can be configured in a variety of different ways, depending on the desired behavior. - In our example we have used the most typical attribute—
fallbackMethod, which allows us to configure an alternative method, with matching signature, which can be automatically called if the real method fails the invocation for whatever reason. This is the prime use-case, and it provides the ability to specify graceful degradation of service, using sensible defaults, if possible, instead of blowing up exceptions up the stack. - We used it to direct failed calls to the
getEmptyBooksList()method, which returns a static empty list. This way, when the realgetAllBooks()method fails, we gracefully degrade and return an empty collection, which renders nicely as a response JSON. In the situations when we do indeed desire a particular type of exception to be propagated up the stack, we can configure those explicitly using theignoreExceptionsattribute and set it to the desired exception classes. - To configure the circuit breaker behavior of a particular command, we can set a number of different options using the
commandPropertiesorthreadPoolPropertiesattributes. There we can set things like execution timeouts, size of backup queues, and many others.
Note
有关可用属性的完整列表,请参阅 https://github.com/Netflix/Hystrix/tree/master/hystrix-contrib/hystrix-javanica#configuration.
最后要讨论的一件事是我们对实体模型进行的修改,以设置关系关联注释以使用fetch = FetchType.EAGER。我们必须这样做的原因是由于 Hibernate 处理关联加载的方式。默认情况下,这些是使用 FetchType.LAZY 设置加载的,这意味着 Hibernate 只会建立关系,但数据的加载会在调用 getter 方法之前不会发生。使用 Hystrix,默认情况下,这可能会导致如下所示的错误:
这是由于 Hystrix 默认使用 ThreadPool 来执行方法调用,并且由于延迟加载的数据在调用时需要访问数据存储区,因此 Hibernate 需要一个为了处理请求而存在的活动会话。由于 Hibernate 将会话存储在 ThreadLocal 中,因此它显然不存在于 Hystrix 在调用期间使用的池执行器线程中。
一旦我们将获取更改为急切,所有数据都会在原始 Hibernate 线程中的存储库交互期间加载。或者,我们可以通过以下配置配置我们的 @HystrixCommand 注释以使用相同的执行线程:
虽然 Hystrix 强烈建议使用默认的 THREAD 策略,但在我们绝对需要驻留在同一个调用者线程中的情况下,SEMAPHORE 可以帮助我们。
或者,我们可以使用 hystrix.command.default 在我们的 ,或者,如果我们想具体只配置特定的 application.properties 文件中设置相同的配置.execution.isolation.strategy=SEMAPHORE@HystrixCommand ,我们可以使用 commandKey属性的值,默认为注解方法的名称,而不是default< /span> 部分的属性名称。对于来自 BookController 检测方法的具体示例,配置键看起来像 hystrix.command。 getAllBooks.execution.isolation.strategy=SEMAPHORE.
这要归功于 Spring Cloud-Netflix Archaius 桥,它使所有 Spring 环境属性对 Archaius 配置管理器可见,因此所有 Netflix 组件都可以访问。
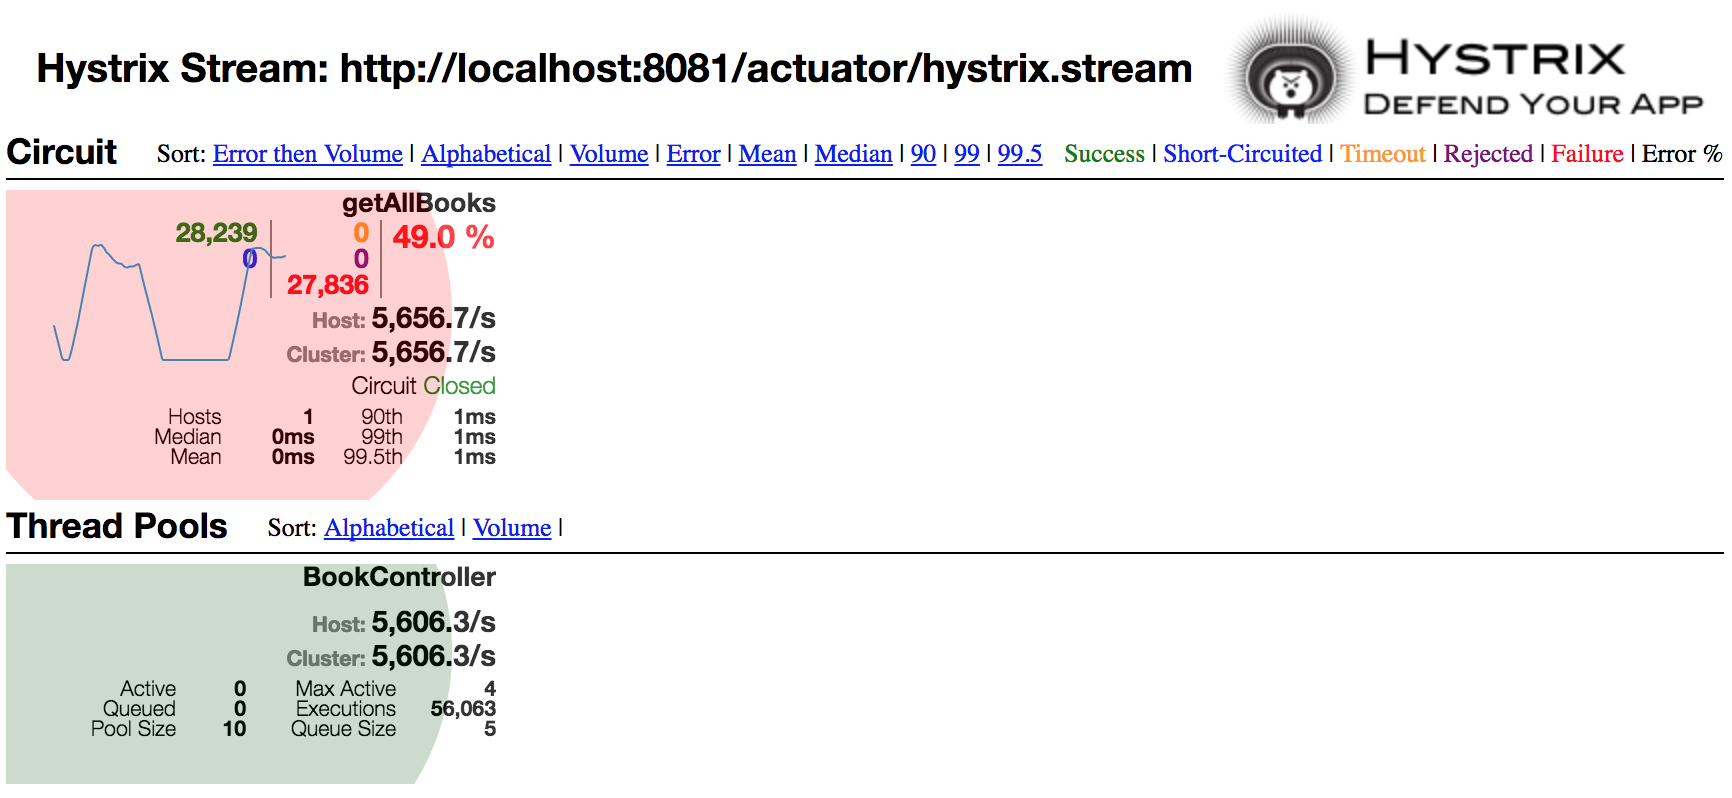
Spring Cloud Hystrix 集成还提供了一个 /hystrix.stream 执行器端点,Hystrix 仪表板可以使用该端点来可视化所有断路器的状态在一个应用程序中。
为了让仪表板快速运行,Spring Cloud 提供了一个示例应用程序,可以在 https://github.com/spring-cloud-samples/hystrix-dashboard:
相同的流也可以输入 Netflix Turbine Stream Aggregator,可在 https://github.com/Netflix/Turbine,用于跨多个实例的数据聚合,稍后可以使用相同的实例进行可视化仪表板。