读书笔记《developing-java-applications-with-spring-and-spring-boot-ebook》带弹簧靴子的反应式网络
我使用#SpringBoot的次数越多,我就越喜欢它。
– Derek Stainer @dstainer
在上一章中,我们看到了只需几行代码就可以快速创建一个应用程序。在本章中,我们将踏上一段旅程。我们将构建一个社交媒体应用程序,用户可以在其中上传图片和发表评论。
在本章中,我们将为我们的社交媒体应用程序构建 Web 层,执行以下操作:
- Creating a reactive web application with Spring Initializr
- Learning the tenets of reactive programming
- Introducing Reactor types
- Switching from Apache Tomcat to Embedded Netty
- Comparing reactive Spring WebFlux against classic Spring MVC
- Showing some Mono/Flux-based endpoints
- Creating a reactive ImageService
- Creating a reactive file controller
- Showing how to interact with a Thymeleaf template
- Illustrating how going from async to sync can be easy, but the opposite is not
在上一章中,我们进行了 quick 游览 through http://start.spring 的 Spring Initializr 站点.io。让我们返回 返回 并选择一些基本要素,通过选择所需的选项来开始构建我们的社交媒体网站,如下所示截屏:
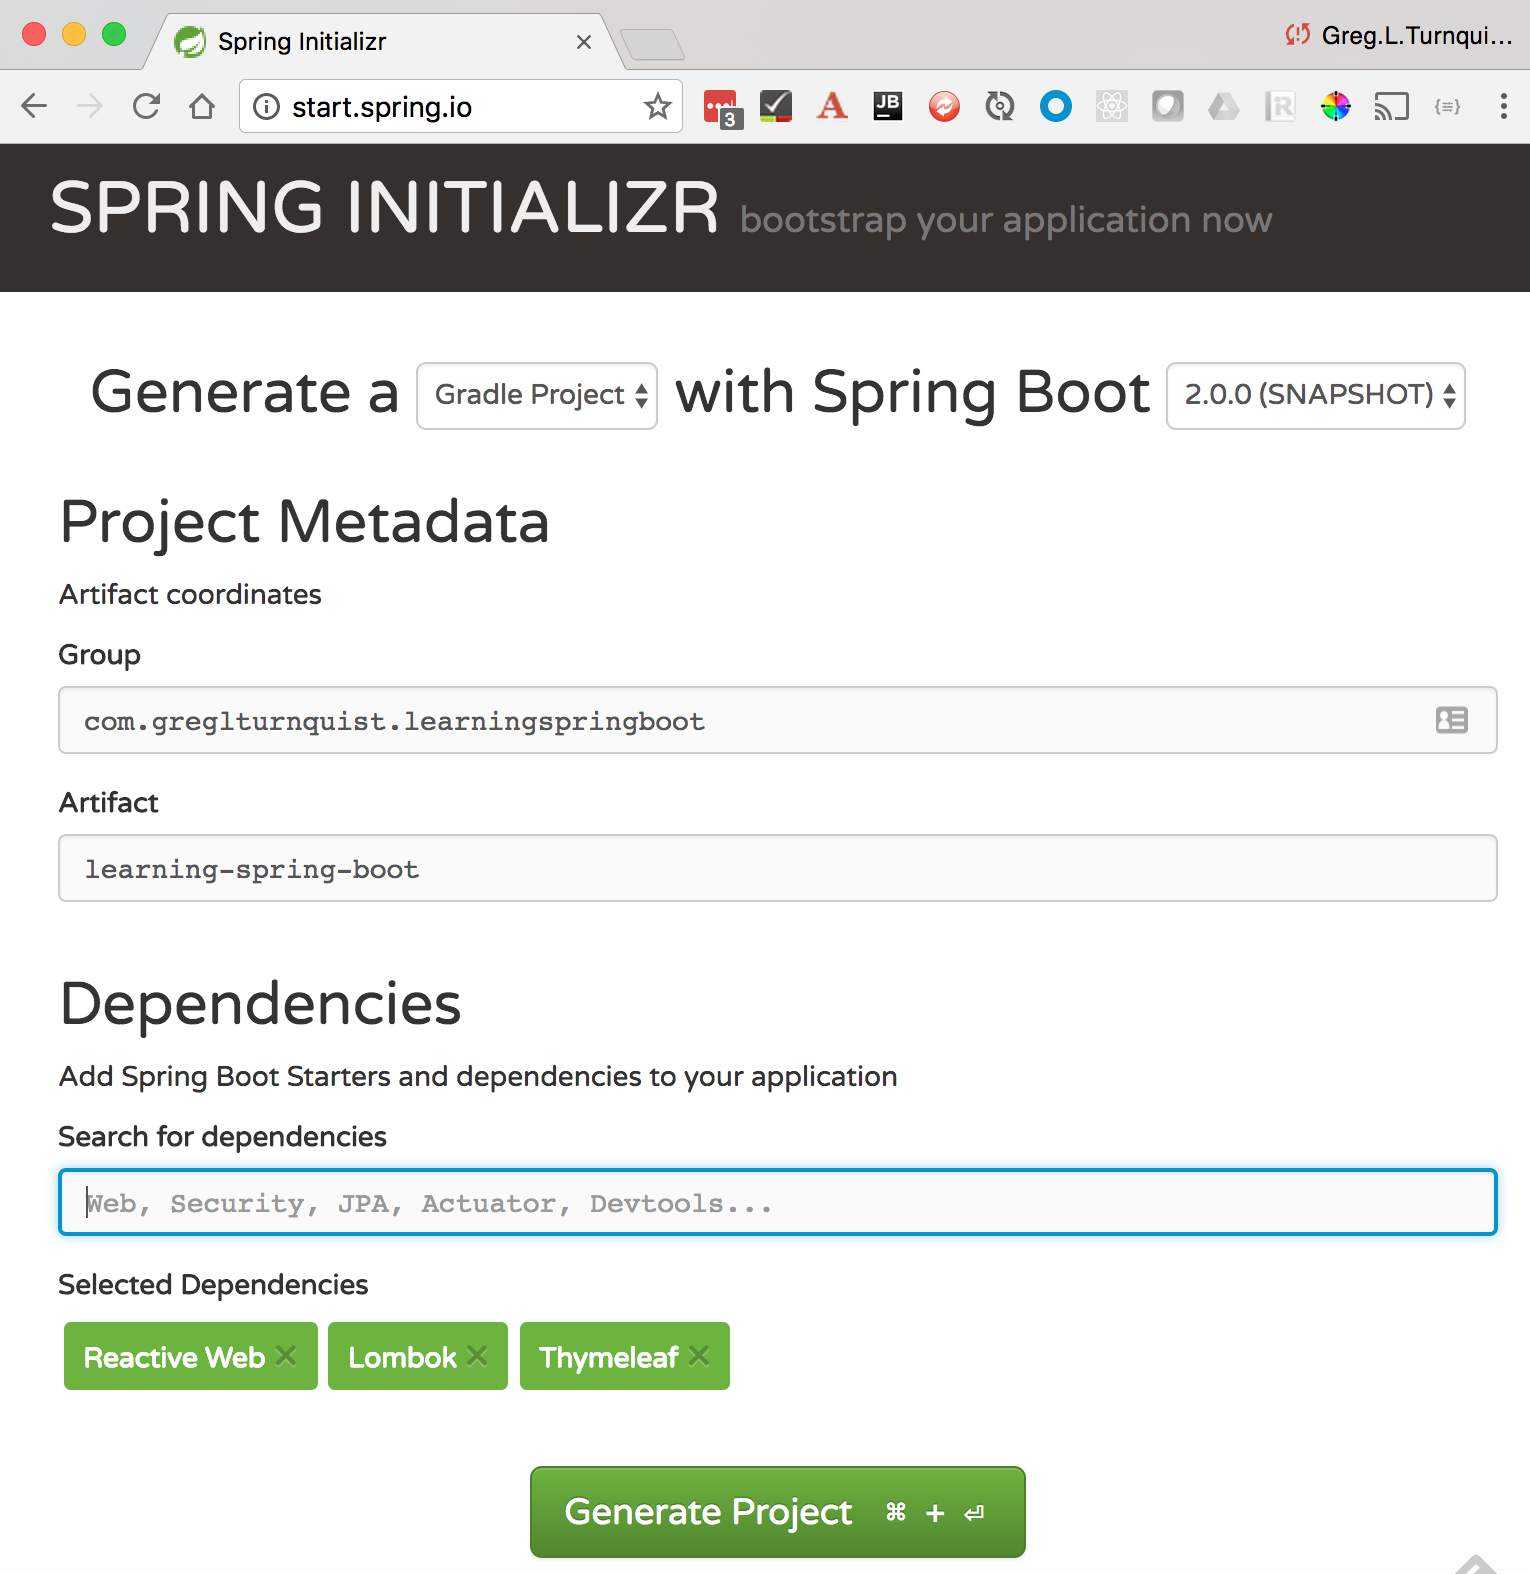
如前面的屏幕截图所示,我们选择了以下选项:
Build system: GradleSpring Boot Version: 2.0Group:com.greglturnquist.learningspringbootArtifact:learning-spring-boot
对于依赖项,我们将使用这些:
Reactive Web: This pulls in Reactive Spring, something we'll explore here and through the rest of this bookLombok: This is a tiny library that keeps Java interesting by handling getters, setters,toString,equals,hashCode, and moreThymeleaf: This is not Boot's only supported template library, but a powerful one that includes reactive support as well as strict HTML compliance.
从这里,我们只需要点击 Generate Project 按钮,就会下载一个压缩的项目。将其导入到我们的 IDE 中,我们就可以开始使用了。
(我们将在后面的章节中为我们的项目添加更多依赖项。)
我们不会列出站点生成的整个 Gradle 构建文件,但列出的依赖项如下:
构建文件中包含以下依赖项:
spring-boot-starter-webflux: This is the foundation for a Reactive Spring web applicationsspring-boot-starter-thymeleaf: This brings in Thymeleaf's template enginenio-multipart-parser: This is a third-party library fromSynchronoss, which supports reactivemultipartfile uploadslombok: This is a convenient library to create mutable and immutable value objects among other thingsspring-boot-starter-test: This is a collection of test libraries including JUnit, Spring Boot Test, Mockito, AssertJ, JSONassert, and Hamcrest
我们使用的是什么版本的 Spring Boot?可以看到 toward 顶部 build.gradle 里面的 < code class="literal">buildscript 片段,如下所示:
该版本在顶部指定以提供 spring-boot-gradle-plugin 以及依赖项。
Gradle 构建还使用 Spring 团队的依赖管理 Gradle 插件(可在此处获得:https://github.com/spring-gradle-plugins/dependency-management-plugin ),其中包括几个类似 Maven 的依赖项管理功能。它包括使用任何 Maven Bills of Materials(BOM) 同时还处理直接和传递依赖。
有了我们的构建文件,我们现在可以深入了解反应式编程。
为了启动这些东西,我们将利用 Spring Boot 最热门的新特性之一——Spring Framework 5 的响应式支持。整个 Spring 产品组合都采用 响应式应用程序的范式,我们将关注这意味着什么以及我们如何兑现在不破坏银行的情况下。
在我们这样做之前,问题出现了—— 是什么反应式应用程序?
简单来说,反应式应用程序涉及非阻塞、异步操作的概念。异步意味着答案稍后出现,无论是通过轮询还是通过推送给我们的事件。非阻塞意味着不等待响应,这意味着我们可能必须轮询结果。无论哪种方式,在形成结果时,我们都不会阻止线程,允许它为其他调用提供服务。
这两个特性的副作用是应用程序能够利用现有资源完成更多工作。
可追溯到 1970 年代的 反应式应用程序有多种风格,但当前获得共鸣的是 Reactive Streams 由于引入了 backpressure。
背压是 of 表示音量控制的另一种方式。消费者通过使用基于拉的机制而不是传统的基于推送的解决方案来控制发送多少数据。例如,想象一下从系统请求一组图像。你可以收到一个或十万个。为了防止在后一种情况下内存不足的风险,人们经常编写基于页面的解决方案。这会影响代码库,导致 API 发生变化。它引入了另一层处理。
为了扩展此示例,以下解决方案将描述有风险的收集:
前面的存储库确实可以返回一个 Image 或十万个。没有办法说。如前所述,最常见的解决方案是改用以下方式:
第一个解决方案很简单。我们知道如何迭代它。第二种方案也是可迭代的(Spring Data Commons的Page类型实现了Java的Iterable接口),但是需要传入一个参数给我们的API,指定页面有多大以及我们想要哪个页面。虽然不难,但它在我们的 API 中引入了根本性的变化。
Reactive Streams 要简单得多——返回一个容器,让客户端选择要带多少项目。无论是一个还是数千个,客户端都可以使用完全相同的机制,并且可以使用它准备好的任意数量。为此,我们将使用以下方法签名:
Flux(我们将在下一节中更详细地探讨)与 Java 8 Stream 非常相似。我们可以根据需要获取任意数量的内容,它会懒惰地等待我们订阅它以产生任何内容。无需将 PageRequest 放在一起,从而可以无缝地将控制器、服务甚至远程调用链接在一起。
我们几乎没有详细地提到过响应式流。 有一个 Reactive Streams 规范 (http://www.reactive-streams.org/),但重要的是要了解它是 相当原始。事实上,它是如此原始,以至于它对于构建应用程序并不是很有效。这听起来可能违反直觉,但它并不是为最终用户编写的,而是为框架开发人员编写的。为了构建响应式应用程序,我们将使用 Project Reactor (http://projectreactor.io/ ),Spring Framework 5 用于其 reactive 编程模型的核心库。
为了介绍 Reactor 的核心类型,我们将从上一节中刚刚看到的 Flux 开始,以及一些类似这样的代码:
这个 Reactor Flux 的简单创建可以详细如下:
Fluxis Reactor's base type, a container holding 0..N items, none of which will be reached until the client calls the reactive stream'ssubscribe()method. In this case, the container holds a set of strings.just()is a static helper method to construct a fixed collection. Other static helpers are also available, likefromArray(),fromIterable(), andfromStream(). This makes it easy to bridge existing Java collections.
Flux 究竟体现了什么?它与 Java List 或 Stream 有何不同? Flux 敏锐地表示将来异步出现的多个值。没有指定这些值何时到来,也不能假设它们都到达同一个线程。
过去,Java 已经可以表示单个值或现在在同步阻塞 API 中出现的值的集合。我们还为异步值提供了单值类型(Future 和 CompletableFuture)。但是 Java 还没有为多个异步值创建值类型。这就是 Project Reactor 和 Reactive Streams 的全部意义所在——以一种内聚的方式处理多个异步非阻塞值。
要使用 Flux,我们必须 subscribe 或让框架 do 给我们。以下是订阅结果的示例:
最后一段代码创建了一个包含三个项目的 Flux,订阅结果,并将每个值打印到屏幕上,如下所示:
这可能看起来并不令人印象深刻,尤其是与现有的 Java 集合构建器(如 Arrays.asList("alpha", "bravo", "charlie") 相比)。看起来一样,对吧?
当我们开始利用 Java 8 lambdas 和函数类型时,可以看到不同之处。那时我们可以将一系列函数调用链接在一起,所有这些调用都会延迟,直到提取出确切的元素。看下面的片段:
这个 Flux 包含与我们之前的 Flux.just() 等效的值,除了每个都包装在 Java 8 中code class="literal">供应商。这意味着,实际上,检索每个值都会延迟到订阅,并且只有当每个单独的值通过 Reactor 的 onNext() 方法。这也称为 lazy。
当然这个例子是人为的,但是当我们在本书中探索响应式编程时,我们会看到更多这种范式。
Project Reactor 的另一个方面是根植于函数式编程的 160 多个操作,包括一些最著名的操作,例如 map、flatMap 、filter 和 then。
为了结束本节,让我们选择一个更复杂一点的例子。如果我们获取我们一直在研究的样本数据并计算我们拥有的每个字母的数量会怎样。一探究竟:
我们可以将前面的流程拆开如下:
- This flow starts with the same values as shown earlier in this chapter,
alpha,bravo, andcharliebundled into a ReactorFlux. - Each entry is converted to uppercase using
String::toUpperCaseensuring we'll count lowers and uppers together. - The entries are then flatMapped into individual letters. To visualize flatMapping, look at this example--
["alpha", "bravo"]is mapped bys.split("")into a collection of collections,[["a", "l", "p", "h", "a"], ["b", "r", "a", "v", "o"]], and then flattened into a single collection,["a", "l", "p", "h", "a", "b", "r", "a", "v", "o"]. - Then we group by the string value, which will combine all the
"a"entries into one subgroup, and so on and so forth. - Next, we sort by the key value, because the group type doesn't implement
Comparable.
- We flatMap the group's key and count value into a pair of
Monoobjects. (More onMonofurther in this chapter.) - We unpack the tuple, and convert it into a string showing key and count.
- We subscribe to the entire flow, printing out the results.
输出可见如下:
Note
现在有很多东西要一次性吸收。 Reactor 流,很像 Java 8 流,可以打包很多功能。但这是他们的主要优势。通过在语言仪式上花费很少的时间,我们反而专注于强大的功能定义。如果需要,可以方便地再次阅读该流程中的每个步骤,使用项目符号来帮助对其进行解码。
在讨论了 Flux 及其所有操作之后,我们的代码中泄露了一些东西——Mono。那是什么?它是 0..1 项的 Reactor 容器,是 Flux 的子集。它实现了相同的 Reactive Streams 接口,Publisher,这意味着我们只有在调用 subscribe() 时才能得到它的结果。它与 Flux 有一些 API 差异,例如 flatMap() 与 flatMapMany()
,但除此之外,并不难理解。
事实证明,很多用例都涉及处理单个值,因此值得捕获这种类型。在我们刚刚走过的流程中,原来组的 count() 存储在 Mono
鉴于我们刚刚完成了一系列 Reactor 操作,review 一些最常用的操作很方便。看看这个快速指南:
操作 |
说明 |
|
使用应用于每个元素的函数将一个 |
|
通过 firstFlux 转换为另一个不同大小的 |
|
|
|
|
|
将一个 |
Mono 也存在上表中列出的这些操作中的一些。还有其他的,但这些是大的。
这一切的大局是什么?本质上,此流程的每一步可能都是对另一个服务的异步、非阻塞远程调用。使用 Reactor,我们不必担心线程管理,除非我们真的想进入它。这是为我们处理的。很快,我们将开始这样做。
Note
有一个神话可能与 Java 本身一样古老:为了让事情运行得更快,我们必须使用线程。推论是:线程越多,速度越快。但这并非源于实证研究。事实上,使用线程会导致并发错误,使用过多线程会引入上下文切换开销。 JavaScript 开发人员在只有一个线程的环境中开发了许多反应式解决方案,这些解决方案在处理事情时非常有效。这是因为将队列和事件循环与不占用线程的异步、非阻塞 API 相结合,实际上可以用很少的资源完成很多工作。
如果这个 Project Reactor、Flux 和 Mono 的介绍仍然令人困惑,请阅读 the 以下博客文章了解有关反应式编程的更多详细信息:
默认情况下,Spring Boot 准备 使用嵌入式 Netty (http://netty.io)。为什么?因为它是响应式应用程序最流行的解决方案之一。当涉及到 反应式应用程序时,整个堆栈都必须是反应式的。
但是,有可能 to 切换到另一个嵌入式容器。我们可以尝试使用 Apache Tomcat 及其异步 Servlet 3.1 API。我们要做的就是对build.gradle中的依赖设置做一些调整,如下:
前面的代码发生了什么?这可以解释如下:
spring-boot-starter-webfluxexcludesspring-boot-starter-reactor-netty, taking it off the classpathspring-boot-starter-tomcatis added to the classpath- Spring Boot's
TomcatAutoConfigurationkicks in, and configures the container to work usingTomcatReactiveWebServerFactory
重要的是要指出还有这些其他容器可用:
- Jetty
- Undertow
对于本标题的其余部分,我们将坚持使用 Spring Boot 的默认设置 Netty。
Note
将这些称为容器很有趣,因为它们在我们的应用程序中包含。安装 Apache Tomcat(或我们选择的任何容器)并将应用程序安装到其中曾经是标准做法。但是 Spring Boot 已经将嵌入式容器作为核心特性,颠倒了应用程序在容器内的概念,而是将容器放在应用程序内。有关此更改如何席卷 Java 社区的有趣演示,请查看 Eberhard Wolff 的 Java Application Servers Are Dead (http://www.slideshare.net/ewolff/java-application-servers-are-dead) 演示文稿。
听说过 Spring MVC 吗?它是 Java 社区使用的最流行的 web 框架之一。从 Spring Framework 3 开始,它采用了注解驱动的编程风格,有时称为 @MVC。
但我们不会在本书中使用它。相反,我们将使用新的东西,Spring WebFlux。 WebFlux 是 Spring 框架中的一个替代模块,专注于响应式处理 Web 请求。一个巨大的好处是它使用与 @MVC 相同的注解,以及许多相同的范例,同时还支持 Reactor 类型(Mono
和 Flux) 在输入和输出上。这在 Spring MVC 中不可用。要理解的重要一点是它只是一个模块名称——spring-webflux 与 spring-webmvc。
Spring MVC 建立在 Java EE 的 Servlet 规范之上。该规范本质上是阻塞和同步的。以后的版本中增加了异步支持,但是 servlets 在等待响应时仍然可以在池中保持线程,无视我们的需要非阻塞。要构建反应式堆栈,事情需要从上到下都是反应式的,这需要新的合同和期望。
某些东西,例如 HTTP 状态代码、ResponseBody 和 @GetMapping/@PostMapping /@DeleteMapping/@PutMapping 注解被两个模块使用。但是引擎盖下的其他东西必须从头开始重写。重要的一点是这不会影响最终开发人员。
通过切换到 Reactive Spring,我们可以立即开始使用 Flux 和 Mono 进行编码,而不必停下来学习全新的网络堆栈。相反,我们可以使用流行的基于注释的编程模型,同时我们将努力学习如何使事物反应。同样重要的是要知道 Spring MVC 不会消失或计划结束生命。 Spring WebFlux 和 Spring MVC 都将作为 Spring 产品组合中积极支持的选项。
让我们从一个简单的 HTTP GET 开始。与 Spring MVC 端点类似,Spring WebFlux 支持 Flux 操作,如下所示:
前面的控制器可以描述如下:
- Using the same
Flux.just()helper, we return a rather contrived list - The Spring controller returns a
Flux<Image>Reactor type, leaving Spring in charge of properly subscribing to this flow when the time is right
在我们可以move 前进之前,我们需要定义这个Image 数据类型像这样:
前面的 POJO 类可以描述如下:
@Datais a Lombok annotation that generates getters,toString,hashCode,equalsas well as setters for all non-final fields@NoArgsConstructoris a Lombok annotation to generate a no-argument constructor- It has
idandnamefields for storing data - We have crafted a custom constructor to load up fields of data
使用这种简单的数据类型,我们现在可以专注于与它们进行反应式交互。
如果不创建新数据,一切都不会简单。为此,我们可以编写一个 HTTP POST 操作,如下所示:
最后的代码可以描述如下:
@PostMappingindicates this method will respond to HTTPPOSTcalls. The route is listed in the annotation.@RequestBodyinstructs Spring to fetch data from the HTTP request body.- The container for our incoming data is another
FluxofImageobjects. - To consume the data, we map over it. In this case, we simply log it and pass the original
Imageonto the next step of our flow. - To wrap this logging operation with a promise, we invoke
Flux.then(), which gives usMono<Void>. Spring WebFlux will make good on this promise, subscribing to the results when the client makes a request.
如果我们运行这段代码并提交一些 JSON,我们可以检查 out 结果。
首先,让我们使用 HTTPie(https://httpie.org):
详细结果易于阅读,如下所示:
在这种情况下,HTTPie 很好地发送了一个项目,我们的 Spring WebFlux 控制器完美地解析了它,如下所示:
单条目 Flux 处理得很好。
如果我们想发送一个 JSON 数组,我们可以将 JSON 数组嵌入到文件中,也可以直接使用 curl 发送,如下所示:
达达!
Note
无论我们发送单个 JSON 项还是一组 JSON 项,Spring WebFlux 都可以毫无问题地映射到 Reactor 的 Flux 上。在经典的 Spring MVC 中,我们必须选择 Image 或 List<Image> 并正确编码或编写两个处理程序.
想要调高日志级别?使用 Spring Boot,调整 日志记录级别是轻而易举的事。将 start.spring.io 提供的 application.properties 文件重命名为 application.yml< /code>,然后将其编辑为如下所示:
前面的代码将打通 Netty 和 Project Reactor 以吐出 DEBUG 级别的消息。
如果我们再次获取图像列表(http localhost:8080/api/images),我们可以在服务器日志中看到如下内容:
这显示了对 GET /api/images 的传入 Web 请求、标头和所有内容。也可以读取输出,但考虑到来自 Netty 的数据量,它的详细输出不会显示。然而,这些日志级别提供了一种方便的方式来调试线路上的流量。
构建 Web 应用程序时的第一条经验法则是 to 使 Spring 控制器尽可能轻巧。我们可以将它们视为 HTTP 流量和我们的系统之间的转换器。
为此,我们需要到创建一个单独的ImageService,如图在这里,让它完成所有工作:
最后这个 Spring 服务可以这样描述:
@Service: This indicates this is a Spring bean used as a service. Spring Boot will automatically scan this class and create an instance.UPLOAD_ROOT: This is the base folder where images will be stored.ResourceLoader: This is a Spring utility class used to manage files. It is created automatically by Spring Boot and injected to our service via constructor injection. This ensures our service starts off with a consistent state.
现在我们可以开始创建服务应用程序所需的各种实用方法。
让我们通过加载一些加载了测试数据的模拟图像文件来开始。为此,我们可以在新创建的 ImageService 类的底部添加以下方法:
前面的初始化代码小块描述如下:
@Beanindicates that this method will return back an object to be registered as a Spring bean at the time thatImageServiceis created.- The bean returned is a
CommandLineRunner. Spring Boot runs ALLCommandLineRunnersafter the application context is fully realized (but not in any particular order). - This method uses a Java 8 lambda, which gets automatically converted into a
CommandLineRunnervia Java 8 SAM (Single Abstract Method) rules. - The method deletes the
UPLOAD_ROOTdirectory, creates a new one, then creates three new files with a little bit of text.
有了测试数据,我们可以通过获取 UPLOAD_ROOTreactively 中的所有现有文件来开始与它交互span> 通过将以下方法添加到我们的 ImageService 中:
让我们探索前面的代码:
- This method returns
Flux<Image>, a container of images that only gets created when the consumer subscribes. - The Java NIO APIs are used to create a
PathfromUPLOAD_ROOT, which is used to open a lazyDirectoryStreamcourtesy ofFiles.newDirectoryStream().DirectoryStreamis a lazy iterable, which means that nothing is fetched untilnext()is called, making it a perfect fit for our ReactorFlux. Flux.fromIterableis used to wrap this lazy iterable, allowing us to only pull each item as demanded by a reactive streams client.- The
Fluxmaps over the paths, converting each one to anImage. - In the event of an exception, an empty
Fluxis returned.
重要的是要重复目录路径流以及 Flux 本身是惰性的。这意味着在客户端订阅之前什么都不会发生,也就是说,开始拉取图像。此时,我们刚刚编写的流程将反应,并开始执行我们的数据转换。并且它只会在每个条目被拉出时处理每个条目。
我们在 ImageService 中需要的下一部分是获取单个图像以便显示的能力,我们可以使用它来做到这一点:
最后的代码可以很容易地描述如下:
- Since this method only handles one image, it returns a
Mono<Resource>. Remember,Monois a container of one.Resourceis Spring's abstract type for files. resourceLoader.getResource()fetches the file based onfilenameandUPLOAD_ROOT.- To delay fetching the file until the client subscribes, we wrap it with
Mono.fromSupplier(), and putgetResource()inside a lambda.
到目前为止,我们已经看到 Mono.just() 用于说明 Reactor 初始化单个项目的方式。但是,如果我们编写 Mono.just(resourceLoader.getResource(...)),资源获取将在方法被调用时立即发生。通过将它放在 Java 8 Supplier 中,在调用 lambda 之前不会发生这种情况。而且因为它是由 Mono 包装的,所以在客户端订阅之前不会发生调用。
Note
还有一个Mono操作和fromSupplier()很相似——defer()
。不同之处在于 Mono.defer() 由每个下游订阅者单独调用。它最好不要用于获取像我们的情况这样的资源,而是用于轮询状态之类的东西。
在编写了获取所有图像和单个图像的代码之后,是时候介绍创建新图像的能力了。以下代码显示了处理此问题的反应式方法:
最后的代码可以描述如下:
- This method returns a
Mono<Void>indicating that it has no resulting value, but we still need a handle in order to subscribe for this operation to take place - The incoming
FluxofFilePartobjects are flatMapped over, so we can process each one - Each file is tested to ensure it's not empty
- At the heart of our chunk of code, Spring Framework 5's
FileParttransfers the content into a new file stored inUPLOAD_ROOT then()lets us wait for the entireFluxto finish, yielding aMono<Void>
我们最后添加到 ImageService 的基于图像的操作是实现删除图像的方法,如下所示:
上述代码可以描述如下:
- Because this method doesn't care about return values, its return type is
Mono<Void>. - To hold off until subscribe, we need to wrap our code with
Mono.fromRunnable(), and use a lambda expression to coerce aRunnable. This lets us put our code off to the side until we're ready to run it. - Inside all of that, we can use Java NIO's handy
Files.deleteIfExists().
有了我们的响应式图像服务,我们就可以开始在 响应式文件控制器上工作。
首先,让我们创建一个 HomeController,如下所示:
上述代码可以描述如下:
@Controller: This indicates that it is a web controller, and will be registered by Spring Boot to handle web requests.BASE_PATH: This is a static string used to define the base of many routes.FILENAME: This is a pattern for filenames where the "." is included. Otherwise, Spring WebFlux will use the suffix as part of content negotiation (for example,.jsonwould try to fetch a JSON response, while.xmlwould try to fetch an XML response).ImageService: This is injected via constructor injection so that we can tap our reactive image handling code we just wrote.
有了这个,我们可以编写处理程序以在 on 网页上显示单个图像,如下所示:
最后的代码可以解释如下:
@GetMappingdefines a route mapping forGET BASE_PATH + "/" + FILENAME + "/raw". It also sets theContent-Typeheader to properly render it as an image.@ResponseBodyindicates that this method's response will be written directly into the HTTP response body.@PathVariableflags that the inputfilenamewill be extracted from the route's{filename}attribute.Mono<ResponseEntity<?>>shows that we are returning a single response, reactively.ResponseEntity<?>describes a generic HTTP response.- The code taps our image service's
findOneImage()usingfilename.
这一控制器处理程序方法演示了 Reactive Spring 提供的许多特性。我们看到路由处理、委托给单独的服务、将响应转换为适合客户端的格式以及错误处理。
此代码还显示它是被动完成的。生成 HTTP OK / HTTP BAD REQUEST 响应没有直到 map() 被执行。这链接到从磁盘获取文件的图像服务。在客户订阅之前,这一切都不会发生。在这种情况下,当请求进来时,订阅由框架处理。
Note
我以为你说过要让控制器保持轻便!确实如此。也许这看起来不那么轻?采用 ResponseEntity 包装并将其移动到 ImageService 是错误的,因为该服务对网络一无所知层。此控制器的重点是使数据可呈现给 Web 客户端,这正是我们编写的代码。
我们可以添加到 HomeController 的下一个控制器方法是用于上传新文件的处理程序,如下所示:
上述方法描述如下:
- A collection of incoming
FilePartobjects is represented as aFlux - The flux of files is handed directly to the image service to be processed
.then()indicates that once the method is complete, it will then return aredirect:/directive (wrapped in aMono), issuing an HTML redirect to/
重要的是要记住,我们不是针对文件流发出 .then() 。相反,图像服务会返回一个 Mono
Mono 我们链接了一个额外的调用以返回重定向。
接下来我们需要添加到 HomeController 的能力是处理请求 for< /a> 删除图像。这是按如下方式完成的:
前面的代码可以这样描述:
- Using Spring's
@DeleteMappingannotation, this method is ready for HTTPDELETEoperations - It's keyed to the same
BASE_PATH + "/" + FILENAMEpattern - It taps the image service's
deleteImage()method - It uses
then()to wait until the delete is done before returning back a mono-wrappedredirect:/directive
添加到我们的 HomeController 的最后一点是在模板中提供图像列表的调用。为此,我们需要这个通用的 GET 根处理程序:
前面的处理程序可以描述如下:
@GetMappingis used to explicitly map the"/"route.- It accepts a
Modelobject, giving us a place to load data reactively. addAttribute()lets us assign the image service'sfindAllImages() Fluxto the template model'simagesattribute.- The method returns
"index"wrapped in aMono, ensuring the whole thing is chained together, top to bottom, to kick off when Spring WebFlux subscribes to render the template.
重要的是要了解我们不会将图像列表分配给模板模型的 images 属性。我们分配了一个惰性图像 Flux,这意味着在 Reactive Spring 订阅数据之前,模型不会填充真实数据。只有这样,代码才会真正开始获取图像数据。
Note
也许,在这个阶段,您想知道在所有 lambda、Fluxes、Monos 和订阅中,从线程的角度来看究竟发生了什么。 Project Reactor 是并发无关。它不强制执行某种并发模型,而是让您掌控一切。 Reactor 有几个支持多种选项的调度程序。这包括在当前线程中运行、在单个工作线程中运行、在每次调用专用线程上运行、弹性线程池、为并行工作调整的固定工作线程池以及能够调度的时间感知调度程序未来的任务。此外,Reactor 允许从任何 ExecutorService 创建调度程序。我们不会在这项工作中深入研究它,但是当您构建一个真正的应用程序并想要控制事物的扩展方式时,这绝对是需要研究的东西。
在这个阶段,您已经很好地了解了如何 来创建一个文件处理控制器,并将其连接到一种将文件读取和写入磁盘的服务。但是经常出现的问题是为什么我需要被动地这样做?
使用命令式编程,获取输入、构建中间集合和其他步骤的过程通常会给我们留下很多中间状态——其中一些可能会在不好的地方阻塞。
使用我们迄今为止探索过的函数式风格可以避免低效地构建这种状态的风险,而是转向构建数据流。 Reactor 的操作让我们让一个流以多种不同的方式馈送另一个流。我们可以合并流、过滤流和转换流。
当我们从事反应式编程时,抽象级别会上升一个级别。我们发现自己专注于创建微小的函数来执行各种操作,并将它们链接在一起。我们更多地考虑流中项目的集成,而不是较低级别的实现细节。
通过构建这些链式操作流程,将输入与输出联系起来,Reactor 能够在需要时完成调用代码的繁重工作,并尽可能有效地请求/释放资源。
此外,由于具有固有的异步、非阻塞特性,我们选择的框架(Reactor)能够为我们管理与调度程序的对话。我们可以关注什么在框架处理何时 它发生了。
对于描述链接在一起的反应性操作的另一个比喻,想象一列有很多车厢的火车。每辆车都是要应用于我们的数据的不同操作,我们可以轻松查看事情发生的顺序。我们可以按照明确的用途仔细布置每辆汽车,但在机车移动之前,什么都不会移动。然后,整个汽车链按预期移动。添加/删除/插入汽车是构建反应性数据流的本质。
总而言之,反应式编程在以下方面帮助我们:
- Avoid inefficient, intermediate state
- Focus on building streams of data
- Gives us ability to merge, filter, and transform streams of data
- Focus on what happens at each step while Reactor decides when
将 Thymeleaf 放入类路径后,已经为我们配置了整个反应式 view 解析器。为我们的社交媒体平台整合 Web 层的最后一步是创建 Thymeleaf 模板本身。我们可以通过将以下内容放入 /src/main/resources/templates 下的 index.html 中:
此处描述了上述模板的关键部分:
- All of the Thymeleaf directives are tagged with a
thprefix, making the entire template HTML compliant <tr th:each="image : ${images}" />is Thymeleaf'sfor-eachdirective, where we readimagesfrom the template model and iterate over it, forming one table row element per image<a th:href="@{'/images/' + ${image.name} + '/raw'}">shows how to create a link by splicing together strings with theimage.nameattribute- The whole thing builds a table with a row for each image, showing ID, name, image, and a delete button
- At the bottom is a single upload form for creating new images
需要记住的关键是模板的名称必须是 index.html,与控制器返回的 Mono.just("index" ) 结合 Spring Boot for Thymeleaf 的默认配置设置。
Note
Spring Boot 根据我们选择的模板解决方案自动配置视图解析器。 Spring Boot 支持很多,包括 Thymeleaf、Mustache、Groovy 模板,甚至 Apache FreeMarker。默认情况下,它们都带有放置模板的常规位置,在本例中为 src/main/resources/templates/
.html
。
由于我们需要少量的 CSS,我们可以将以下内容放入 src/main/resources/static/main.css:
让我们把前面的一小段 CSS 拆开:
- The borders of the table are collapsed
- A little spacing is defined for the table entries
- A special class is created to render images with a small thumbnail size
当然,这是原始的 CSS,但我们的重点是学习 Spring Boot 而不是 CSS3。这里要注意的重要一点是,Spring Boot 会自动将 src/main/resources/static 下的所有内容作为 Web 资源提供。我们可以为我们的网站放置 CSS、JavaScript、网站图标和图像。任何需要静态服务的东西都可以放在这里,并且可以从 Web 应用程序的上下文路径的根目录中获得。
在本书中,我们将在此网页中添加内容,以增强用户体验。但就目前而言,我们应该拥有足以起步。
唯一剩下的就是编写一个 public static void main();但是,我们不必! Spring Initializr 站点已经为我们创建了一个,如下:
最后一段代码几乎与我们在 第 10 章< /a>,Java 快速入门。但是有一个区别——我们必须添加一个 HiddenHttpMethodFilter Spring bean 才能使 HTTP DELETE 方法正常工作。
总是会出现一个问题——我需要同步还是异步 API?
重要的是要了解响应式编程不是非常有效,除非整个< /em> 堆栈是反应式的。否则,我们只是在某个时候阻塞,这会导致背压无法实现。这是一种冗长的说法,如果底层服务不响应,那么使 Web 层具有响应性就没有什么价值。
但是,非常很可能我们可能会生成一大段代码,必须由非反应层挖掘,因此,我们必须包装我们的异步、非阻塞代码具有阻塞的手段。
让我们通过创建 BlockingImageService 来探索异步同步。基本上,该服务将利用已经编写好的 ImageService,但 不 包括任何 Reactor 的 < code class="literal">Flux 或 Mono 类型在其方法签名中。
我们可以从类定义开始,如下所示:
前面的类定义可以描述如下:
- The class has no annotation, hence, it won't be automatically scanned and activated by Spring Boot. However, it can appear in a configuration class somewhere via a
@Bean-annotated method. - It will contain a constructor injected
ImageService.
有了这个,我们可以看看用阻塞语义包装 findAllImages() 方法,像这样:
让我们深入研究最后一段代码的细节:
ImageService.findAllImages()has no arguments, and returns aFlux<Image>. The simplest mechanism iscollectList(), which transforms it into aMono<List<Image>>. This means that instead of signaling the arrival of each image, there is one single (Mono) for a list of ALL images.- To ask for the result, we use
block(). Reactor'sblock()can either wait forever for the next signal, or we can supply it with a timeout limit. In this case, we have selected ten seconds as the longest that we'll wait.
Reactor 的 block() API 是我们想要将 Mono<T> 转换为 T。这是一个简单的一对一概念。在方法内部,它调用响应式流的 subscribe() API,这意味着它将导致任何操作链生效。
Flux 没有 block() 因为它代表多个值。 Fluxdoes 带有 blockFirst()和 blockLast() 如果我们想要第一项或最后一项。但是要获得整个集合需要更大的语义范围。因此,需要将 collectList() 转换为 Mono,然后对其进行阻塞。
获取单个图像有点简单,可以使用以下代码完成:
ImageService.findOneImage() 有一个参数,即文件名,但它不包含任何 Reactor 类型。返回类型是 Mono
block() 就可以将它转换成
资源。在这种情况下,我们选择了 30 秒作为等待答案的最长时间。
在上传新图像时,这有点复杂。
最后的代码可以描述如下:
- The image service's input is
Flux<FilePart>and the return type isMono<Void>. This makes things doubly interesting, having to massage both the input and the output. - The preceding code assumes we are uploading multiple files. To transform it into a
Flux, we useFlux.fromIterable(files). If the input had been a singleFilePart, we could have usedFlux.just(file). - The return type is
void, meaning we don't have to return anything. Simply invoking image service'screate()method may seem hunky dory. But remember--nothing happens with Reactor types until we subscribe, so it's critical that we invokeblock()even if we aren't going to return it.
我们将把它作为练习留给读者实现 deleteImage() 的阻塞版本。