读书笔记《building-restful-web-services-with-spring-5-second-edition》测试REST风格的Web服务
在前面的章节中,我们讨论了如何创建 REST API 并在 REST API 和服务方法中应用业务逻辑。但是,为了确定我们的业务逻辑,我们可能需要编写适当的测试用例并使用其他测试方法。测试我们的 REST API 将帮助我们在将应用程序部署到生产环境时保持应用程序的清洁和功能。我们编写的单元测试用例或其他测试方法越多,就越有利于我们将来维护我们的应用程序。
在本章中,我们将讨论示例 RESTful Web 服务的以下测试策略:
- JUnit testing on Spring controllers
- MockMvc (mocking on controllers)
- Postman REST client
- SoapUI REST client
- jsoup reader as a client
JUnit 是 Java 和 Spring 应用程序的最简单和最首选的测试框架。通过为我们的应用程序编写 JUnit 测试用例,我们可以提高应用程序的质量并避免出现错误情况。
在这里,我们将讨论一个简单的 JUnit 测试用例,即调用 userService 中的 getAllUsers 方法。我们可以检查以下代码:
@RunWith(SpringRunner.class)
@SpringBootTest
public class UserTests {
  @Autowired
  UserService userSevice;
  @Test
  public void testAllUsers(){
    List<User> users = userSevice.getAllUsers();
    assertEquals(3, users.size());
  }
}
在前面的代码中,我们调用了 getAllUsers 并验证了总数。让我们在另一个测试用例中测试单用户方法:
// other methods
@Test
public void testSingleUser(){
    User user = userSevice.getUser(100);
    assertTrue(user.getUsername().contains("David"));
}
在前面的代码片段中,我们只是测试了我们的服务层并验证了业务逻辑。但是,我们可以使用模拟方法直接测试控制器,这将在本章后面讨论。
MockMvc主要用于通过控制器测试代码。通过直接调用控制器(REST 端点),我们可以从 MockMvc 测试本身覆盖整个应用程序。此外,如果我们保留任何 authentication 或对控制器的限制,它也将包含在 MockMvc 测试用例中。
以下代码将使用 MockMvc 标准测试我们的基本 API (localhost:8080/):
import static org.hamcrest.Matchers.is;
import static org.springframework.test.web.servlet.result.MockMvcResultMatchers.jsonPath;
import static org.springframework.test.web.servlet.result.MockMvcResultMatchers.status;
import org.junit.Before;
import org.junit.Test;
import org.junit.runner.RunWith;
import org.springframework.beans.factory.annotation.Autowired;
import org.springframework.boot.test.context.SpringBootTest;
import org.springframework.test.context.junit4.SpringJUnit4ClassRunner;
import org.springframework.test.web.servlet.MockMvc;
import org.springframework.test.web.servlet.MvcResult;
import org.springframework.test.web.servlet.request.MockMvcRequestBuilders;
import org.springframework.test.web.servlet.setup.MockMvcBuilders;
import org.springframework.web.context.WebApplicationContext;
@SpringBootTest
@RunWith(SpringJUnit4ClassRunner.class)
public class UserMockMVCTests {
  @Autowired
  private WebApplicationContext ctx;
  private MockMvc mockMvc;
  @Before
  public void setUp() {
    this.mockMvc = MockMvcBuilders.webAppContextSetup(this.ctx).build();
  }
  @Test
  public void testBasicMVC() throws Exception {
    MvcResult result = mockMvc
        .perform(MockMvcRequestBuilders.get("/"))
        .andExpect(status().isOk())
        .andExpect(jsonPath("result", is("Aloha")))
        .andReturn();
    String content = result.getResponse().getContentAsString();
     System.out.println("{testBasicMVC} response : " + content);
  }
}
在前面的代码中,我们只在 setUp() 方法中初始化了 Web 应用程序。此外,我们使用 @Autowired 注释绑定了 WebApplicationContext。设置完成后,我们创建一个名为 testBasicMVC 的方法来测试我们的普通 API (localhost:8080),它将返回“结果:阿罗哈”。
一旦我们完成了代码,如果我们通过选择 Run As 在 Eclipse 上运行它。 JUnit test,前面的方法会被执行并显示结果。我们可以在 Eclipse 的一个 JUnit 窗口中查看成功的测试用例结果。
到目前为止,我们只测试了一个普通的 REST API。在这里,我们可以 one 更进一步,通过从 用户ID
。以下代码将带我们完成获取单个用户的实现:
import static org.hamcrest.Matchers.is;
import static org.springframework.test.web.servlet.result.MockMvcResultMatchers.jsonPath;
import static org.springframework.test.web.servlet.result.MockMvcResultMatchers.status;
import org.junit.Before;
import org.junit.Test;
import org.junit.runner.RunWith;
import org.springframework.beans.factory.annotation.Autowired;
import org.springframework.boot.test.context.SpringBootTest;
import org.springframework.test.context.junit4.SpringJUnit4ClassRunner;
import org.springframework.test.web.servlet.MockMvc;
import org.springframework.test.web.servlet.MvcResult;
import org.springframework.test.web.servlet.request.MockMvcRequestBuilders;
import org.springframework.test.web.servlet.setup.MockMvcBuilders;
import org.springframework.web.context.WebApplicationContext;
@SpringBootTest
@RunWith(SpringJUnit4ClassRunner.class)
public class UserMockMVCTests {
  @Autowired
  private WebApplicationContext ctx;
  private MockMvc mockMvc;
  @Before
  public void setUp() {
    this.mockMvc = MockMvcBuilders.webAppContextSetup(this.ctx).build();
  }
  @Test
  public void testBasicMVC() throws Exception {
    MvcResult result = mockMvc
        .perform(MockMvcRequestBuilders.get("/"))
        .andExpect(status().isOk())
        .andExpect(jsonPath("result", is("Aloha")))
        .andReturn();
    String content = result.getResponse().getContentAsString();
     System.out.println("{testBasicMVC} response : " + content);
  }
  @Test
  public void testSingleUser() throws Exception {
    MvcResult result = mockMvc
        .perform(MockMvcRequestBuilders.get("/user/100"))
        .andExpect(status().isOk())
        .andExpect(jsonPath("userid", is(100)))
        .andExpect(jsonPath("username", is("David")))
        .andReturn();
    String content = result.getResponse().getContentAsString();
    System.out.println("{testSingleUser} response : " + content);
  }
}
在前面的代码(testSingleUser)中,我们可以看到我们期待 status, userid 和 username 为 Ok、100 和 < code class="literal">David,分别。此外,我们打印从 REST API 获得的结果。
我们已经在之前的章节中使用过Postman来测试我们的REST API。当我们需要完全测试应用程序时,Postman 会很有帮助。在 Postman 中,我们可以编写测试套件来验证我们的 REST API 端点。
http://localhost:8080/user
较早的方法将获取所有用户。获取所有用户的 Postman 截图如下:
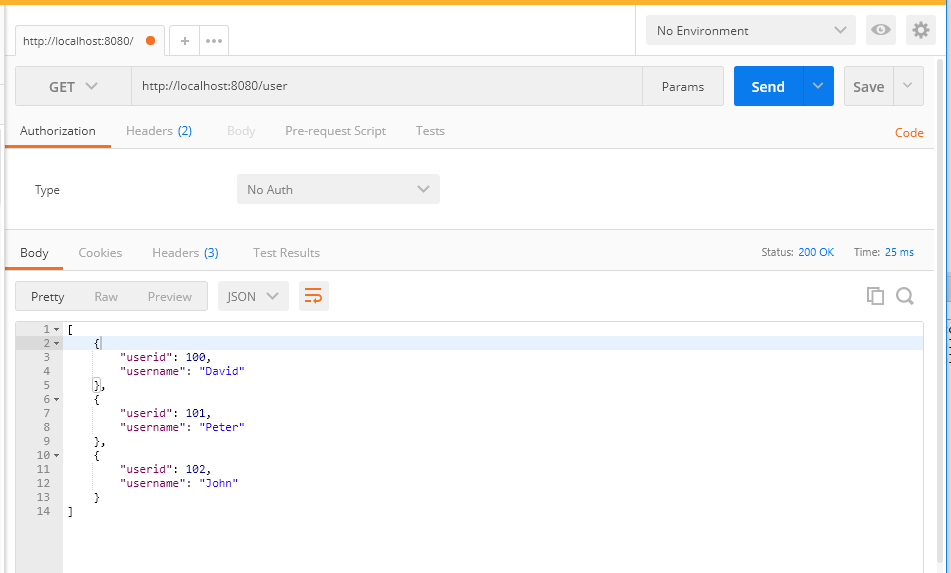
在前面的屏幕截图中,我们可以看到我们获得了之前添加的所有用户。我们使用 GET 方法来调用这个 API。
http://localhost:8080/user
添加用户,如以下屏幕截图所示:
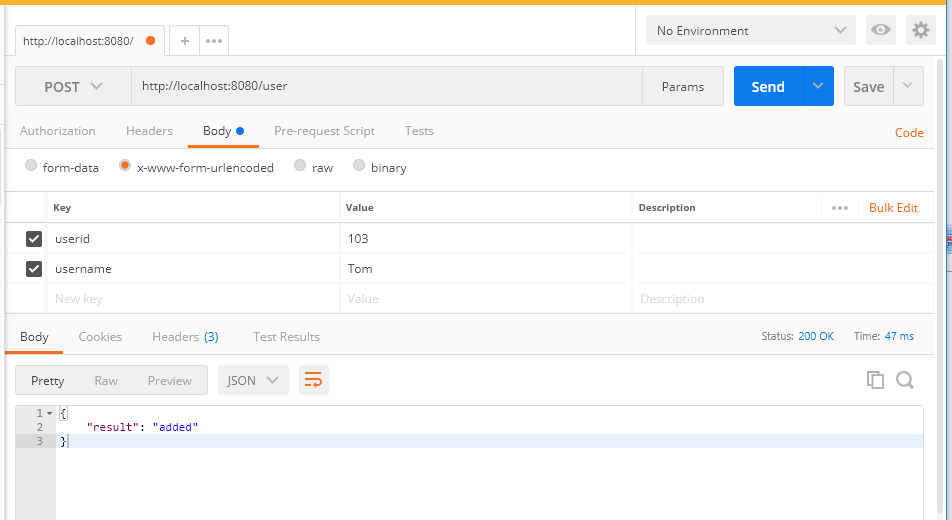
在上述结果中,我们可以看到 JSON 输出:
{
     "result" : "added"
}


与 Postman 一样,SoapUI 是另一个用于测试 Web 服务的开源工具。 SoapUI 有助于 Web 服务调用、模拟、模拟、负载测试和功能测试。 SoapUI 大量用于负载测试,它具有 lots 控件,使负载测试变得容易。
SoapUI 非常容易安装在 Windows 和 Linux 等操作系统中。它的用户界面为我们提供了很大的灵活性来构建复杂的测试场景。另外,SoapUI支持TestMaker和Agiletestware等第三方插件,易于与NetBeans、Eclipse等IDE集成.
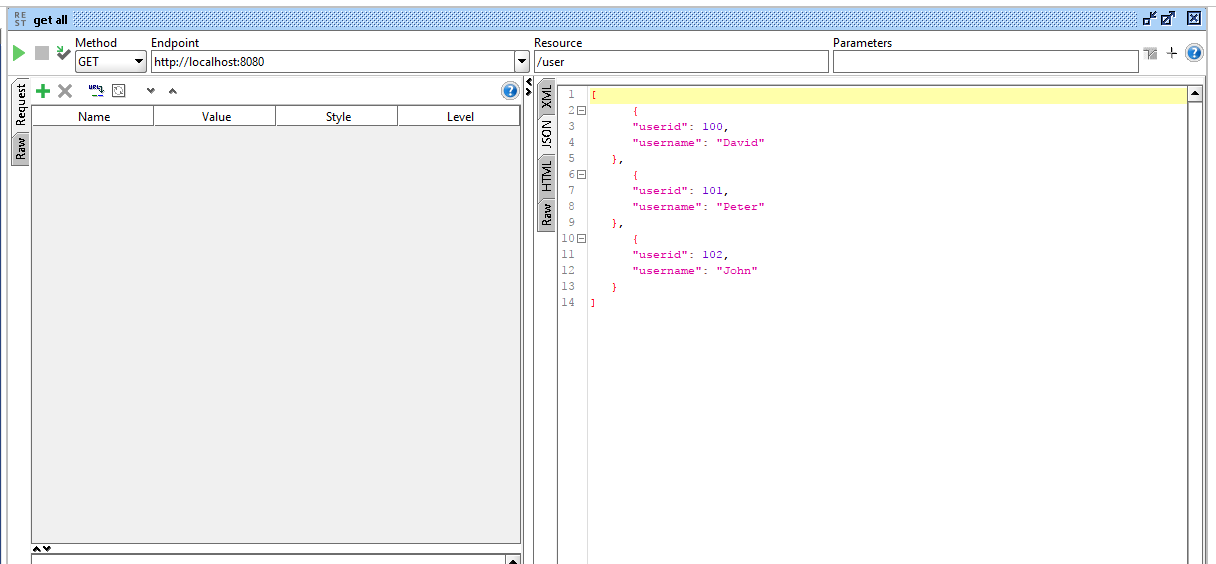
我们将使用 SoapUI 来测试我们的基本 API (/user)。当我们在 SoapUI 中使用 GET 方法时,以下方法将获取所有用户:
http://localhost:8080/user
获取所有用户的 SoapUI 截图如下:
我们将尝试使用 POST 方法添加用户:
http://localhost:8080/user
添加的用户截图如下:
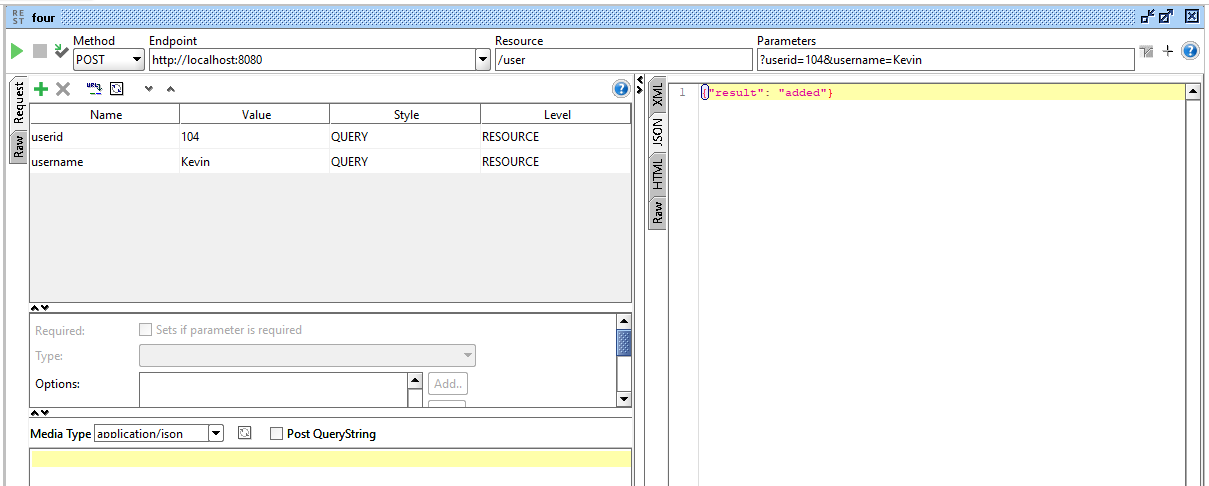
在这个结果中,我们可以看到 JSON 输出:
{"result" : "added"}
http://localhost:8080/security/generate/token
在 SoapUI 中,我们使用 subject 作为参数。我们可以在以下屏幕截图中看到这一点:
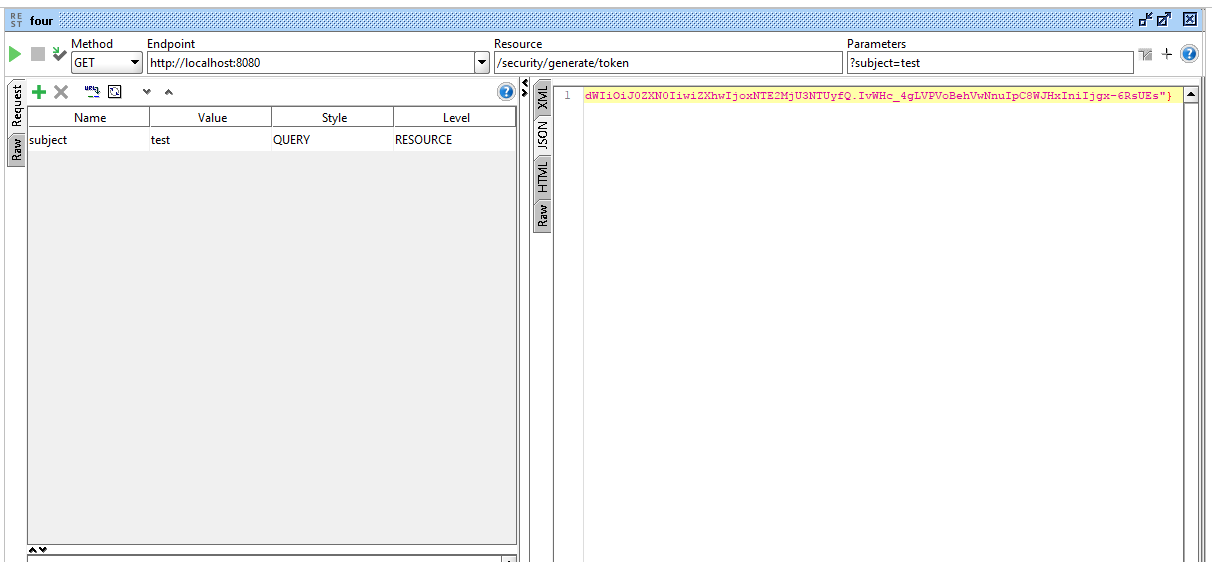
我们可以清楚地看到我们在正文中使用了subject来生成token。此外,我们可以在 SoapUI 中将 Style 视为 QUERY。这将使我们的 Value (test) 作为 API 的参数。
一旦我们调用 API,我们将获得令牌。我们可以在前面的屏幕截图中检查令牌。
现在我们可以从之前生成的令牌中获取主题。我们可能需要将令牌作为参数传递来获取主题。
当我们在 SoapUI 中调用 API 使用 GET 方法:
http://localhost:8080/security/get/subject
虽然我们可以在前面的 API 调用中使用 POST 方法,但为了简化流程,我们只使用了 GET 方法,如图在以下屏幕截图中:
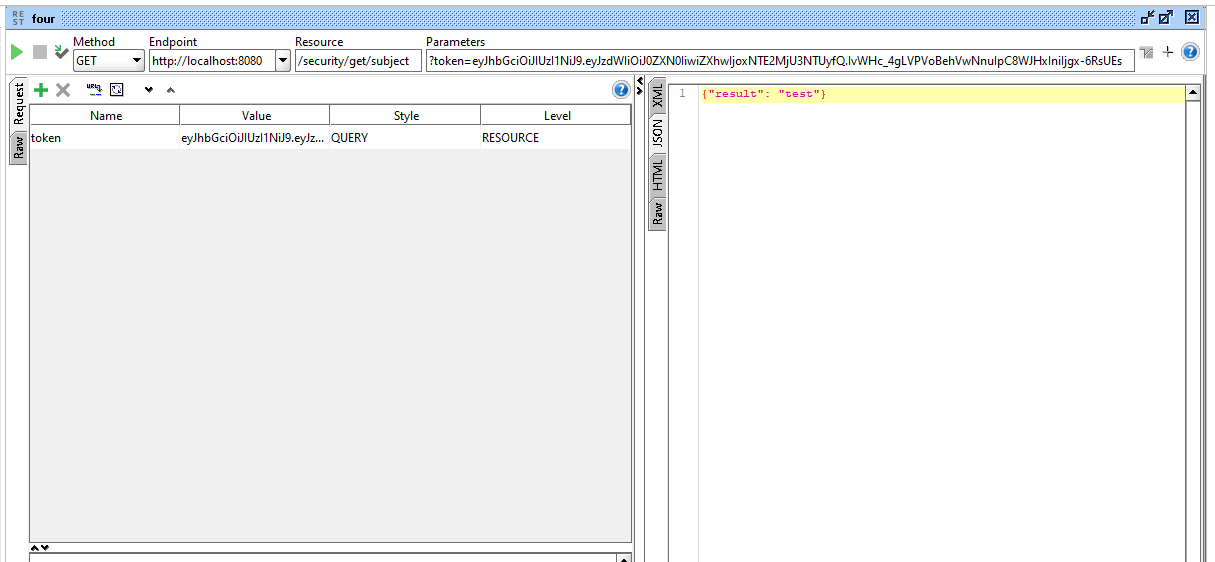
在前面的 API 调用中,我们发送了 API 中的令牌来获取主题。我们可以在生成的 JSON 中看到主题。
到目前为止,我们已经在 SoapUI 的帮助下测试了我们的 API。虽然 SoapUI 看起来比 Postman 难一些,但在我们做企业级的负载测试和安全测试时,它可能会很有帮助。
jsoup 是一个 Java 库,用于提取 HTML documents 并从 HTML DOM 中获取详细信息。 jsoup 使用 DOM、CSS 和类似 jQuery 的方法从任何网页检索信息。尽管 jsoup 主要用于 HTML document 解析,但在我们的应用程序中,我们将使用它进行 API 测试。
首先,我们将在 jsoup 中调用 REST API 并将结果转换为 JSON。要将字符串转换为 JSON,我们将使用 Gson 库。
对于 jsoup 和 Gson 库,我们可能必须在 pom.xml 中添加依赖项。以下是 jsoup 和 Gson 依赖项的代码:
    <dependency>
      <groupId>org.jsoup</groupId>
      <artifactId>jsoup</artifactId>
      <version>1.8.2</version>
    </dependency>
    <dependency>
        <groupId>com.google.code.gson</groupId>
        <artifactId>gson</artifactId>
        <version>2.8.2</version>
    </dependency>
我们将在测试资源中使用 jsoup REST 消费者,以便更容易测试:
String doc = Jsoup.connect("http://localhost:8080/user").ignoreContentType(true).get().body().text();
以下代码将以 HTML 形式调用 REST API 并以文本形式获取正文。通过这样做,我们将只获得 REST API 结果作为 JSON 文本。 JSON文本如下:
[{"userid":100,"username":"David"},{"userid":101,"username":"Peter"},{"userid":102,"username":"John"}]
获得 JSON 文本后,我们可以使用 JsonParser 类将它们转换为 JSON 数组。以下代码将解析 JSON 文本并将其转换为 JsonArray 类:
JsonParser parser = new JsonParser();
JsonElement userElement = parser.parse(doc);
JsonArray userArray = userElement.getAsJsonArray();
一旦我们得到 JSON 数组,我们可以简单地检查数组大小来验证我们的 REST API。以下代码将测试我们的 REST API 的大小:
assertEquals(3, userArray.size());
这是上面提到的代码的完整类:
import static org.junit.Assert.assertEquals;
import java.io.IOException;
import org.jsoup.Jsoup;
import org.junit.Test;
import org.junit.runner.RunWith;
import org.slf4j.Logger;
import org.slf4j.LoggerFactory;
import org.springframework.boot.test.context.SpringBootTest;
import org.springframework.test.context.junit4.SpringRunner;
import com.google.gson.Gson;
import com.google.gson.JsonArray;
import com.google.gson.JsonElement;
import com.google.gson.JsonParser;
import com.packtpub.model.User;
@RunWith(SpringRunner.class)
@SpringBootTest
public class JsoupUserTest {
  private final Logger _log = LoggerFactory.getLogger(this.getClass());
  @Test
  public void testUsersJsoup() throws IOException{
    String doc = Jsoup.connect("http://localhost:8080/user").ignoreContentType(true).get().body().text();
    _log.info("{test} doc : "+doc);
    JsonParser parser = new JsonParser();
    JsonElement userElement = parser.parse(doc);
    JsonArray userArray = userElement.getAsJsonArray();
    _log.info("{test} size : "+userArray.size());
assertEquals(3, userArray.size());
  }
}
在前面的方法中,我们使用了记录器来打印大小。此外,我们使用了 assertEquals 方法来检查用户数组的大小。
由于这类似于 JUnit 测试,我们可能需要使用 Eclipse 中的 JUnit Test 选项进行测试。我们只需右键单击该文件,然后单击 Run As | JUnit 测试。
在前面的方法中,我们测试了在 REST API 中获取所有用户。现在,我们可以检查单个用户和详细信息。以下代码将测试单用户 REST API:
  @Test
  public void testUserJsoup() throws IOException{
    String doc = Jsoup.connect("http://localhost:8080/user/100").ignoreContentType(true).get().body().text();
    Gson g = new Gson();
    User user = g.fromJson(doc, User.class);
    assertEquals("David", user.getUsername());
  }
上述代码将调用 REST API,获取文本格式的 JSON,然后将其转换为 User 类。一旦我们将它们转换为 User 类,我们可以通过 assertEquals 来检查用户名。
让我们尝试通过添加一个新用户来使用 jsoup 中的 POST 方法。在这个 REST API(添加用户)中,我们可能需要向 REST API 传递一些参数。以下代码将调用添加用户 API 并获取结果:
@Autowired
UserService userSevice;
@Test
public void testUserAdditionJsoup() throws IOException{
    String doc = Jsoup.connect("http://localhost:8080/user/")
        .data("userid", "103")
        .data("username", "kevin")
        .ignoreContentType(true)
        .post().body().text();
    Gson g = new Gson();
    Map<String, Object> result = g.fromJson(doc, Map.class);
    _log.info("{test} result : "+result);
    assertEquals("added", result.get("result"));
    // user should be deleted as we tested the case already
    userSevice.deleteUser(103);
}
在前面的代码中,我们使用了 .post() 方法来调用 API。另外,我们使用了 .data() 方法来传递参数。通过添加 .ignoreContentType() 我们告诉 Jsoup 库我们不关心 API 返回的内容类型。此外,body().text() 会将正文作为文本获取。
通过检查 assertEquals 中的结果,我们确保 API 工作正常。
