vlambda博客
学习文章列表

读书笔记《building-restful-web-services-with-spring-5-second-edition》Plain REST(无反应)和文件上载中的CRUD操作

Chapter 5. CRUD Operations in Plain REST (Without Reactive) and File Upload

在上一章中,我们探索了一个支持 Reactive 的 CRUD 操作。由于 Spring 开发团队仍在更新更多的 Reactive 实体,因此 Reactive 支持还没有达到他们的水平。尽管 Spring 5 Reactive 支持运行良好,但他们仍需要对其进行改进以使其稳定。在考虑了这些指示之后,我们计划避免响应式支持,以使您更简单。

在本章中,我们将介绍 Spring 5(无 Reactive)REST 中的基本 CRUD(创建、读取、更新和删除)API。在本章之后,您将能够在没有 Reactive 支持的情况下在 Spring 5 中进行简单的 CRUD 操作。另外,我们将讨论 Spring 5 中的文件上传选项。 

在本章中,我们将介绍以下方法:

  • Mapping CRUD operations to HTTP methods
  • Creating a user
  • Updating a user
  • Deleting a user
  • Reading (selecting) a user
  • File uploads in Spring

Mapping CRUD operations to HTTP methods


在上一章中,您看到了控制器中的 CRUD 操作。在本章中,我们将进行相同的 CRUD 操作;但是,我们排除了所有反应组件。 

Creating resources


要创建基本的 Spring project 资源,您可以使用 Spring Initializr (https://start.spring.io/ )。在 Spring Initializr 中,提供必要的详细信息:

使用 Java 和 Spring Boot Maven 项目 ="userinput">1.5.9

com.packtpub.restapp

Artifact票务管理

搜索依赖项: 选择 Web(使用 Tomcat 和 Web MVC 进行全栈 Web 开发)  依赖关系 

填写详细信息后,点击Generate Project;然后它将以 ZIP 格式创建 Spring 基本资源。我们可以通过将它们导入 Eclipse 来开始使用该项目。 


Spring 5 POM 文件将如下所示:

<?xml version="1.0" encoding="UTF-8"?>
<project xmlns="http://maven.apache.org/POM/4.0.0" xmlns:xsi="http://www.w3.org/2001/XMLSchema-instance" xsi:schemaLocation="http://maven.apache.org/POM/4.0.0 http://maven.apache.org/xsd/maven-4.0.0.xsd">
  <modelVersion>4.0.0</modelVersion>
  <groupId>com.packtpub.restapp</groupId>
  <artifactId>ticket-management</artifactId>
  <version>0.0.1-SNAPSHOT</version>
  <packaging>jar</packaging>
  <name>ticket-management</name>
  <description>Demo project for Spring Boot</description>
  <parent>
    <groupId>org.springframework.boot</groupId>
    <artifactId>spring-boot-starter-parent</artifactId>
    <version>1.5.9.RELEASE</version>
    <relativePath/> <!-- lookup parent from repository -->
  </parent>
  <properties>
    <project.build.sourceEncoding>UTF-8</project.build.sourceEncoding>
    <project.reporting.outputEncoding>UTF-8</project.reporting.outputEncoding>
  </properties>
  <dependencies>
    <dependency>
      <groupId>org.springframework.boot</groupId>
      <artifactId>spring-boot-starter-web</artifactId>
    </dependency>
    <dependency>
      <groupId>org.springframework.boot</groupId>
      <artifactId>spring-boot-starter-test</artifactId>
      <scope>test</scope>
    </dependency>
  </dependencies>
  <build>
    <plugins>
      <plugin>
        <groupId>org.springframework.boot</groupId>
        <artifactId>spring-boot-maven-plugin</artifactId>
      </plugin>
    </plugins>
  </build>
</project>

让我们删除父级以简化 POM:

  <parent>
    <groupId>org.springframework.boot</groupId>
    <artifactId>spring-boot-starter-parent</artifactId>
    <version>1.5.9.RELEASE</version>
    <relativePath/> <!-- lookup parent from repository -->
  </parent>

当我们删除父级时,我们可能需要在所有依赖项中添加版本。让我们在依赖项中添加版本:

<dependencies>
    <dependency>
      <groupId>org.springframework.boot</groupId>
      <artifactId>spring-boot-starter-web</artifactId>
      <version>1.5.9.RELEASE</version>
    </dependency>
    <dependency>
      <groupId>org.springframework.boot</groupId>
      <artifactId>spring-boot-starter-test</artifactId>
      <scope>test</scope>
      <version>1.5.9.RELEASE</version>
    </dependency>
  </dependencies>

由于依赖神器spring-boot-starter-web version 1.5.9 是基于Spring 4.3.11 ,我们将不得不升级到 Spring 5。让我们清理并升级我们的 POM 文件以引入 Spring 5 更新:

<?xml version="1.0" encoding="UTF-8"?>
<project xmlns="http://maven.apache.org/POM/4.0.0" xmlns:xsi="http://www.w3.org/2001/XMLSchema-instance" xsi:schemaLocation="http://maven.apache.org/POM/4.0.0 http://maven.apache.org/xsd/maven-4.0.0.xsd">
  <modelVersion>4.0.0</modelVersion>
  <groupId>com.packtpub.restapp</groupId>
  <artifactId>ticket-management</artifactId>
  <version>0.0.1-SNAPSHOT</version>
  <packaging>jar</packaging>
  <name>ticket-management</name>
  <description>Demo project for Spring Boot</description> 
  <properties>
    <project.build.sourceEncoding>UTF-8</project.build.sourceEncoding>
    <project.reporting.outputEncoding>UTF-8</project.reporting.outputEncoding>
  </properties>
  <dependencies>
    <dependency>
      <groupId>org.springframework.boot</groupId>
      <artifactId>spring-boot-starter-web</artifactId>
      <version>1.5.9.RELEASE</version>
    </dependency>
    <dependency>
      <groupId>org.springframework.boot</groupId>
      <artifactId>spring-boot-starter-test</artifactId>
      <scope>test</scope>
      <version>1.5.9.RELEASE</version>
    </dependency>
  </dependencies>
  <build>
    <plugins>
      <plugin>
        <groupId>org.springframework.boot</groupId>
        <artifactId>spring-boot-maven-plugin</artifactId>
      </plugin>
    </plugins>
  </build>
</project>

您可以在前面的 POM 文件中看到 Spring 5 相关的依赖项。让我们使用 REST 端点来测试它们。首先,创建一个 Spring Boot 主文件来初始化 Spring Boot:

@SpringBootApplication
public class TicketManagementApplication {  
  public static void main(String[] args) {
    SpringApplication.run(TicketManagementApplication.class, args);
  }
}

您可以通过右键单击项目并选择 Run As | 开始在 Eclipse 上运行 Spring Boot Spring Boot 应用。如果这样做,您将在 Eclipse 控制台中看到日志。

Note

如果看不到控制台,可以通过 Window | 显示视图 | 控制台

以下是示例日志。您可能看不到完全匹配;但是,您将了解服务器运行日志的外观:

  . ____ _ __ _ _
 /\\ / ___'_ __ _ _(_)_ __ __ _ \ \ \ \
( ( )\___ | '_ | '_| | '_ \/ _` | \ \ \ \
 \\/ ___)| |_)| | | | | || (_| | ) ) ) )
  ' |____| .__|_| |_|_| |_\__, | / / / /
 =========|_|==============|___/=/_/_/_/
 :: Spring Boot :: (v1.5.7.RELEASE)

2017-11-05 15:49:21.380 INFO 8668 --- [ main] c.p.restapp.TicketManagementApplication : Starting TicketManagementApplication on DESKTOP-6JP2FNB with PID 8668 (C:\d\spring-book-sts-space\ticket-management\target\classes started by infoadmin in C:\d\spring-book-sts-space\ticket-management)
2017-11-05 15:49:21.382 INFO 8668 --- [ main] c.p.restapp.TicketManagementApplication : No active profile set, falling back to default profiles: default
2017-11-05 15:49:21.421 INFO 8668 --- [ main] ationConfigEmbeddedWebApplicationContext : Refreshing org.springframework.boot.context.embedded.AnnotationConfigEmbeddedWebApplicationContext@5ea434c8: startup date [Sun Nov 05 15:49:21 EST 2017]; root of context hierarchy
2017-11-05 15:49:22.205 INFO 8668 --- [ main] s.b.c.e.t.TomcatEmbeddedServletContainer : Tomcat initialized with port(s): 8080 (http)
2017-11-05 15:49:22.213 INFO 8668 --- [ main] o.apache.catalina.core.StandardService : Starting service [Tomcat]
...
..

...
...
2017-11-05 15:49:22.834 INFO 8668 --- [ main] o.s.j.e.a.AnnotationMBeanExporter : Registering beans for JMX exposure on startup
2017-11-05 15:49:22.881 INFO 8668 --- [ main] s.b.c.e.t.TomcatEmbeddedServletContainer : Tomcat started on port(s): 8080 (http)

您应该在日志的最后几行中看到 Tomcat 在端口(s):8080 上启动。

当您检查 URI http://localhost:8080 时,您将看到以下错误:

Whitelabel Error Page

This application has no explicit mapping for /error, so you are seeing this as a fallback.

Sun Nov {current date}
There was an unexpected error (type=Not Found, status=404).
No message available

上面的错误是说应用程序中没有配置相应的URI。让我们通过在 com.packtpub.restapp 包下创建一个名为 HomeController 的控制器来解决这个问题:

package com.packtpub.restapp;
import java.util.LinkedHashMap;
import java.util.Map;
import org.springframework.web.bind.annotation.RequestMapping;
import org.springframework.web.bind.annotation.ResponseBody;
import org.springframework.web.bind.annotation.RestController;
@RestController
@RequestMapping("/")
public class HomeController {
  @ResponseBody
  @RequestMapping("")
  public Map<String, Object> test(){
    Map<String, Object> map = new LinkedHashMap<>();
    map.put("result", "Aloha");    
    return map;
  }
}

在前面的代码中,我们使用 simpleHomeController 的虚拟控制器>map 结果。此外,我们添加了新的控制器,我们需要让这些类被我们的主应用程序自动扫描,在我们的例子中是 TicketManagementApplication 类。我们将通过在主类中添加 @ComponentScan("com.packtpub") 来告诉他们。最后,我们的主类将如下所示:

package com.packtpub.restapp.ticketmanagement;
import org.springframework.boot.SpringApplication;
import org.springframework.boot.autoconfigure.SpringBootApplication;
import org.springframework.context.annotation.ComponentScan;
@ComponentScan("com.packtpub")
@SpringBootApplication
public class TicketManagementApplication {
  public static void main(String[] args) {
    SpringApplication.run(TicketManagementApplication.class, args);
  }
}

当您重新启动 Spring Boot 应用程序时,您将看到 REST 端点工作(localhost:8080):

{
  result: "Aloha"
}

CRUD operation in Spring 5 (without Reactive)


让我们执行用户 CRUD 操作。正如我们之前讨论过 CRUD 概念一样,这里我们将只讨论 Spring 5 上的用户管理(没有 Reactive 支持)。让我们为 CRUD 端点填写所有虚拟方法。在这里,我们可以创建 UserContoller 并填写所有用于 CRUD 用户操作的方法:

package com.packtpub.restapp;
import java.util.LinkedHashMap;
import java.util.Map;
import org.springframework.web.bind.annotation.PathVariable;
import org.springframework.web.bind.annotation.RequestMapping;
import org.springframework.web.bind.annotation.RequestMethod;
import org.springframework.web.bind.annotation.ResponseBody;
import org.springframework.web.bind.annotation.RestController;
@RestController
@RequestMapping("/user")
public class UserController {  
  @ResponseBody
  @RequestMapping("")
  public Map<String, Object> getAllUsers(){
    Map<String, Object> map = new LinkedHashMap<>();
    map.put("result", "Get All Users Implementation");    
    return map;
  }  
  @ResponseBody
  @RequestMapping("/{id}")
  public Map<String, Object> getUser(@PathVariable("id") Integer id){
    Map<String, Object> map = new LinkedHashMap<>();
    map.put("result", "Get User Implementation");    
    return map;
  } 
  @ResponseBody
  @RequestMapping(value = "", method = RequestMethod.POST)
  public Map<String, Object> createUser(){
    Map<String, Object> map = new LinkedHashMap<>();
    map.put("result", "Create User Implementation");    
    return map;
  }  
  @ResponseBody
  @RequestMapping(value = "", method = RequestMethod.PUT)
  public Map<String, Object> updateUser(){
    Map<String, Object> map = new LinkedHashMap<>();
    map.put("result", "Update User Implementation");    
    return map;
  }
  @ResponseBody
  @RequestMapping(value = "", method = RequestMethod.DELETE)
  public Map<String, Object> deleteUser(){
    Map<String, Object> map = new LinkedHashMap<>();
    map.put("result", "Delete User Implementation");    
    return map;
  }
}

我们已经为所有 CRUD 操作填充了基本端点。如果您在 Postman 上使用适当的方法调用它们,例如 GETPOSTPUT< /code> 和 DELETE, 您将看到提及相应消息的结果。

例如,对于 getAllUsers API (localhost:8080/user),您将获得:

{
  result: "Get All Users Implementation"
}

getAllUsers – implementation

让我们实现 getAllUsers API。对于这个 API,我们可能需要创建一个名为User的模型类 在包com.packtpub.model下:

package com.packtpub.model;
public class User {
  private Integer userid;  
  private String username;   
  public User(Integer userid, String username){
    this.userid = userid;
    this.username = username;
  }  
  // getter and setter methods 
}

现在,我们将为 getAllUsers 实现添加代码。由于这是业务逻辑,我们将创建一个单独的 UserServiceUserServiceImpl 类。通过这样做,我们可以将业务逻辑保留在不同的位置,以避免代码复杂性。 

UserService 界面如下所示:

package com.packtpub.service;
import java.util.List;
import com.packtpub.model.User;
public interface UserService {
  List<User> getAllUsers();
}

UserServiceImpl 类的实现如下:

package com.packtpub.service;
import java.util.LinkedList;
import java.util.List;
import org.springframework.stereotype.Service;
import com.packtpub.model.User;
@Service
public class UserServiceImpl implements UserService {
  @Override
  public List<User> getAllUsers() {    
    return this.users;
  }  
  // Dummy users
  public static List<User> users; 
  public UserServiceImpl() {
    users = new LinkedList<>();   
    users.add(new User(100, "David"));
    users.add(new User(101, "Peter"));
    users.add(new User(102, "John"));
  }
}

在前面的实现中,我们在构造函数中创建了虚拟用户。当类由 Spring 配置初始化时,这些用户将被添加到列表中。

UserController类调用 getAllUsers 方法如下:

@Autowired
UserService userSevice;
@ResponseBody
@RequestMapping("")
public List<User> getAllUsers(){
    return userSevice.getAllUsers();
}

在前面的代码中,我们通过在控制器文件中自动装配来调用 getAllUsers 方法。 @Autowired 将在幕后完成所有的实例化魔法。 

如果您现在运行该应用程序,您可能会遇到以下错误:

***************************
APPLICATION FAILED TO START
***************************

Description:

Field userSevice in com.packtpub.restapp.UserController required a bean of type 'com.packtpub.service.UserService' that could not be found.


Action:

Consider defining a bean of type 'com.packtpub.service.UserService' in your configuration.

此错误背后的原因是您的应用程序无法识别 UserService,因为它位于不同的包中。我们可以通过在 TicketManagementApplication 类中添加 @ComponentScan("com.packtpub") 来解决这个问题。这将识别不同子包中的所有 @service 和其他 bean:

@ComponentScan("com.packtpub")
@SpringBootApplication
public class TicketManagementApplication {  
  public static void main(String[] args) {
    SpringApplication.run(TicketManagementApplication.class, args);
  }
}

现在您可以在调用 API 时看到结果(http://localhost:8080/user):

[
  {
    userid: 100,
    username: "David"
  },
  {
    userid: 101,
    username: "Peter"
  },
  {
    userid: 102,
    username: "John"
  }
]

getUser – implementation

就像我们之前在 第 4 章中所做的,Spring REST 中的 CRUD 操作 我们要去在这个实现getUser业务逻辑部分。让我们使用 Java 8 Streams 在此处添加 getUser 方法。

UserService 界面如下所示:

User getUser(Integer userid);

 UserServiceImpl class 实现如下:

@Override
public User getUser(Integer userid) {     
    return users.stream()
    .filter(x -> x.getUserid() == userid)
    .findAny()
    .orElse(new User(0, "Not Available")); 
}

在之前的 getUser 方法实现中,我们使用 Java 8 Streams 和 lambda 表达式通过 userid 获取用户。与使用传统的 for 循环不同,lambda 表达式更容易获取详细信息。在前面的代码中,我们通过过滤条件检查用户。如果用户匹配,则返回具体用户;否则,它将创建一个带有 "Not available" 消息的虚拟用户。 

 getUser方法的UserController类如下:

@ResponseBody
@RequestMapping("/{id}")
public User getUser(@PathVariable("id") Integer id){  
  return userSevice.getUser(100);
}

您可以通过在客户端访问 http://localhost:8080/user/100 来验证 API(使用 Postman 或 SoapUI 进行测试):

{
  userid: 100,
  username: "David"
}

createUser – implementation

现在我们可以添加代码来创建 用户选项。

 UserService 界面如下所示:

void createUser(Integer userid, String username);

 UserServiceImpl class 实现如下:

@Override
public void createUser(Integer userid, String username) {    
    User user = new User(userid, username); 
    this.users.add(user); 
}

 createUser方法的UserController类如下:

@ResponseBody
  @RequestMapping(value = "", method = RequestMethod.POST)
  public Map<String, Object> createUser(
    @RequestParam(value="userid") Integer userid,
    @RequestParam(value="username") String username
    ){    
    Map<String, Object> map = new LinkedHashMap<>(); 
    userSevice.createUser(userid, username);    
    map.put("result", "added");
    return map;
}

前面的代码会将用户添加到我们的地图中。在这里,我们使用了 useridusername作为方法参数。 您可以在以下 API 调用中查看 useridusername

读书笔记《building-restful-web-services-with-spring-5-second-edition》Plain REST(无反应)和文件上载中的CRUD操作

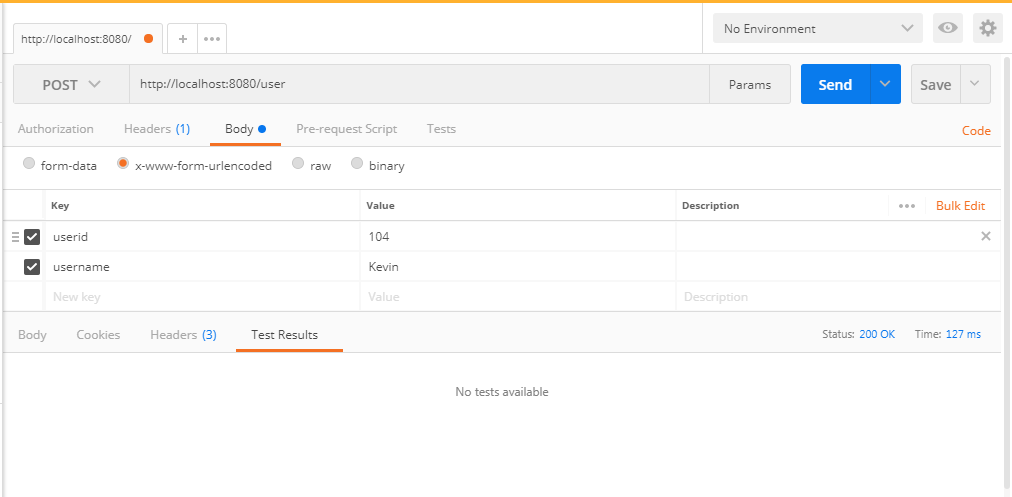
当您使用 SoapUI/Postman 调用此方法时,您将得到以下结果。在这种情况下,我们使用参数(userid, username)而不是 JSON 输入。这只是为了简化过程:

{"result": "added"}

updateUser – implementation

现在我们可以为 update 用户选项添加代码。

 UserService 界面如下所示:

void updateUser(Integer userid, String username);

 UserServiceImpl class 实现如下:

@Override
public void updateUser(Integer userid, String username) {
    users.stream()
        .filter(x -> x.getUserid() == userid)
        .findAny()
        .orElseThrow(() -> new RuntimeException("Item not found"))
        .setUsername(username); 
}

在前面的方法中,我们使用了基于 Java Streams 的实现来更新用户。我们只需应用过滤器并检查用户是否可用。如果 userid 不匹配,则会抛出 RuntimeException。如果用户可用,我们会得到对应的用户,然后我们更新username

 updateUser方法的UserController类如下:

@ResponseBody
  @RequestMapping(value = "", method = RequestMethod.PUT)
  public Map<String, Object> updateUser(
      @RequestParam(value="userid") Integer userid,
      @RequestParam(value="username") String username
    ){
    Map<String, Object> map = new LinkedHashMap<>();
    userSevice.updateUser(userid, username);    
    map.put("result", "updated");    
    return map;
  }

我们将尝试将 usernameDavid 更新为 Sammy on < code class="literal">userid 值为 100。我们可以从以下屏幕截图中查看 API 详细信息:

读书笔记《building-restful-web-services-with-spring-5-second-edition》Plain REST(无反应)和文件上载中的CRUD操作

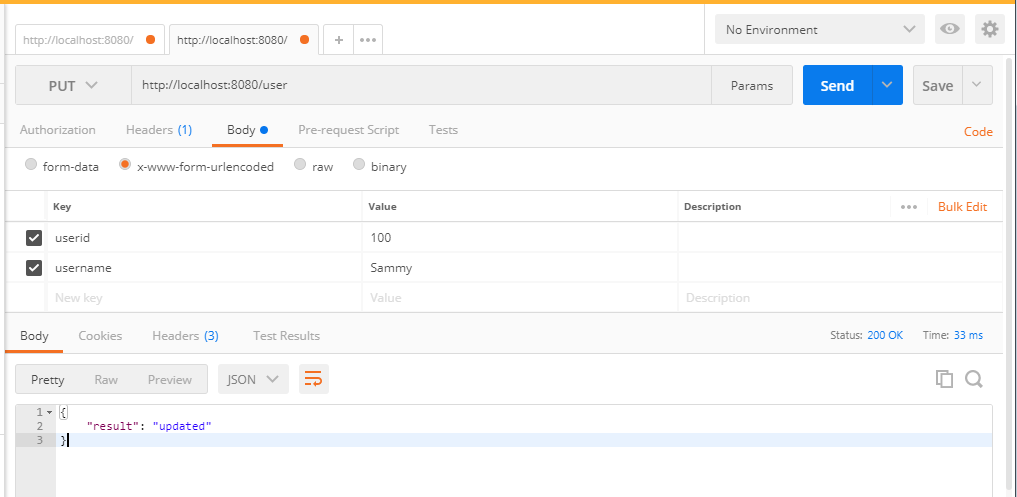
当我们使用 SoapUI/Postman 扩展 (http://localhost:8080/userUPDATE 方法) >),我们将得到以下结果:

{"result": "updated"}

您可以通过检查 Postman 扩展 (http://localhost:8080/user);你会得到以下结果:

[
  {
    "userid": 100,
    "username": "Sammy"
  },
  {
    "userid": 101,
    "username": "Peter"
  },
  {
    "userid": 102,
    "username": "John"
  },
  {
    "userid": 104,
    "username": "Kevin"
  }
]

deleteUser – implementation

现在我们可以为 deleteUser 选项添加代码。

 UserService 接口如下所示:

void deleteUser(Integer userid);

 UserServiceImpl class 实现如下:

@Override
public void deleteUser(Integer userid) { 

   users.removeIf((User u) -> u.getUserid() == userid);

}

 deleteUser方法的UserController类如下:

@ResponseBody
@RequestMapping(value = "/{id}", method = RequestMethod.DELETE)
public Map<String, Object> deleteUser(
      @PathVariable("id") Integer userid) {
    Map<String, Object> map = new LinkedHashMap<>(); 
      userSevice.deleteUser(userid); 
      map.put("result", "deleted");
      return map;
}

当您使用 Postman 扩展 (http://localhost:8080/user/100< /code>),您将得到以下结果:

{"result": "deleted"}

您还可以检查 getAllUsers 方法来验证您是否已删除用户。

File uploads – REST API


在 NIO libraries 和 Spring 的 MultipartFile 选项的支持下,文件上传变得非常容易。在这里,我们添加文件上传代码。 

FileUploadService 界面如下所示:

package com.packtpub.service;
import org.springframework.web.multipart.MultipartFile;
public interface FileUploadService {
  void uploadFile(MultipartFile file) throws IOException;
}

在前面的代码中,我们只是定义了让具体类(实现类)覆盖我们的方法的方法。我们使用了 MultipartFile 这里转发一个文件,比如一个媒体文件来完成我们的业务逻辑。

FileUploadServerImpl类实现 如下: 

package com.packtpub.service;
import java.io.IOException;
import java.nio.file.Files;
import java.nio.file.Path;
import java.nio.file.Paths;
import java.nio.file.StandardCopyOption;
import org.springframework.stereotype.Service;
import org.springframework.util.StringUtils;
import org.springframework.web.multipart.MultipartFile;
@Service
public class FileUploadServerImpl implements FileUploadService {
  private Path location;  
  public FileUploadServerImpl() throws IOException {
    location = Paths.get("c:/test/");
    Files.createDirectories(location);
  }
  @Override
  public void uploadFile(MultipartFile file) throws IOException {
    String fileName = StringUtils.cleanPath(file.getOriginalFilename());
    if (fileName.isEmpty()) {
      throw new IOException("File is empty " + fileName);
    } try {
      Files.copy(file.getInputStream(), 
            this.location.resolve(fileName),     
            StandardCopyOption.REPLACE_EXISTING);
    } catch (IOException e) {
      throw new IOException("File Upload Error : " + fileName);
    }
  }
}

前面的代码中,我们在构造函数中自己设置了位置,所以在Spring Boot App初始化的时候,会设置正确的路径;如果需要,它将在上述位置创建一个特定文件夹。

在 uploadFile 方法中,我们首先获取文件并清理它们。我们使用名为 StringUtils 的 Spring 实用程序类来清理文件路径。您可以在此处查看清洁过程:

String fileName = StringUtils.cleanPath(file.getOriginalFilename());

如果文件为空,我们只需抛出一个异常。您可以在此处检查异常:

    if(fileName.isEmpty()){
      throw new IOException("File is empty " + fileName);
    }

然后是真正的文件上传逻辑!我们只需使用 Files.copy 方法将文件从客户端复制到服务器位置。如果发生任何错误,我们会抛出 RuntimeException

try {
      Files.copy(
        file.getInputStream(), this.location.resolve(fileName),  
        StandardCopyOption.REPLACE_EXISTING
      );
    } catch (IOException e) { 
      throw new IOException("File Upload Error : " + fileName);
    }

由于主要实现由具体类完成,控制器只需将 MultipartFile 传递给服务。我们在这里使用了 POST 方法,因为它将是上传文件的完美方法。此外,您可以看到我们使用 @Autowired 选项来使用 service 方法。

 uploadFile方法的FileController类如下:

package com.packtpub.restapp;
import java.io.IOException;
import java.util.LinkedHashMap;
import java.util.Map;
import org.springframework.beans.factory.annotation.Autowired;
import org.springframework.web.bind.annotation.RequestMapping;
import org.springframework.web.bind.annotation.RequestMethod;
import org.springframework.web.bind.annotation.RequestParam;
import org.springframework.web.bind.annotation.ResponseBody;
import org.springframework.web.bind.annotation.RestController;
import org.springframework.web.multipart.MultipartFile;
import com.packtpub.service.FileUploadService;
@RestController
@RequestMapping("/file")
public class FileController {  
  @Autowired
  FileUploadService fileUploadSevice;
  @ResponseBody
  @RequestMapping(value = "/upload", method = RequestMethod.POST)
  public Map<String, Object> uploadFile(@RequestParam("file") MultipartFile file) {
    Map<String, Object> map = new LinkedHashMap<>();
    try {
      fileUploadSevice.uploadFile(file);      
      map.put("result", "file uploaded");
    } catch (IOException e) {
      map.put("result", "error while uploading : "+e.getMessage());
    }    
    return map;
  }
} 

Testing the file upload

您可以创建一个 HTML 文件作为 follows 并测试文件上传 API。您还可以使用任何 REST 客户端对此进行测试。我给了你这个 HTML 文件来简化测试过程:

<!DOCTYPE html>
<html>
<body>
<form action="http://localhost:8080/file/upload" method="post" enctype="multipart/form-data">
    Select image to upload:
    <input type="file" name="file" id="file">
    <input type="submit" value="Upload Image" name="submit">
</form>
</body>
</html>

Summary


在本章中,我们从基本资源开始并自定义它们,介绍了 Spring 5(没有 Reactive 支持)中的 CRUD 操作。此外,我们还学习了如何在 Spring 中上传文件。在下一章中,我们将详细了解 Spring Security 和 JWT(JSON Web Token)。