读书笔记《building-distributed-applications-in-gin》第7章测试Gin HTTP路由
Chapter 7: Testing Gin HTTP Routes
在本章中,您将学习如何测试基于 Web 的 Gin 应用程序,包括运行 Go 单元和集成测试。在此过程中,我们将探索如何集成外部工具来识别您的 Gin Web 应用程序中的潜在安全漏洞。最后,我们将介绍如何使用 Postman Collection Runner 功能测试 API HTTP 方法。
因此,我们将涵盖以下主题:
- Testing Gin HTTP handlers
- Generating code coverage reports
- Discovering security vulnerabilities
- Running Postman collections
在本章结束时,您应该能够从头开始为 Gin Web 应用程序编写、执行和自动化测试。
Technical requirements
要遵循本章中的说明,您将需要以下内容:
- A complete understanding of the previous chapter—this chapter is a follow-up of the previous one and it will use the same source code. Hence, some snippets won't be explained, to avoid repetition.
- Previous experience using the Go testing package.
本章的代码包托管在 GitHub 上,地址为 https: //github.com/PacktPublishing/Building-Distributed-Applications-in-Gin/tree/main/chapter07。
Testing Gin HTTP handlers
到目前为止,我们已经学习了如何使用 Gin 框架设计、构建和扩展分布式 Web 应用程序。在本章中,我们将介绍如何集成不同类型的测试以消除发布时可能出现的错误。我们将从单元测试开始。
笔记
值得一提的是需要采用测试驱动开发(TDD) 在编写可测试代码时提前采取方法。
为了说明如何 为 Gin Web 应用程序编写单元测试,您需要直接进入一个基本示例。让我们以 第 2 章中的 hello world 示例为例, 设置 API 端点。路由器声明和 HTTP 服务器设置已从 main 函数中提取以准备测试,如下面的代码片段所示:
运行 应用程序,然后 在 GET 请求“文字”>本地主机:8080。将返回一个 hello world 消息,如下所示:
完成重构后,在Go编程中编写一个单元测试语。为此,请应用以下步骤:
- Define a
main_test.gofile with the following code in the same project directory. TheSetupServer()method we previously refactored is injected into a test server:每个测试方法必须以一个
Test前缀开头——所以,对于<一个 id="_idIndexMarker568">示例,TestXYZ将是一个有效的测试。前面的代码使用 Gin 引擎设置了一个测试服务器并发出GET请求。然后,它检查状态代码和响应负载。如果实际结果与预期结果不符,则会抛出错误。因此,测试将失败。 - To run tests in Golang, execute the following command:

图 7.1 – 测试执行
虽然您有 使用测试包编写完整测试的能力,但您可以安装第三方包,例如 testify 使用高级断言。为此,请按照下列步骤操作:
- Download testify with the following command:
- Next, update
TestIndexHandlerto use theassertproperty from the testify package to make some assertions about the correctness of the response, as follows: - Execute the
go testcommand and you will have the same results.
让我们向前移动 并为前面章节中介绍的 RESTful API 的 HTTP 处理程序编写单元测试。提醒一下,以下架构说明了 REST API 公开的操作:
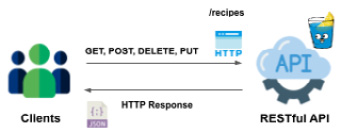
图 7.2 – API HTTP 方法
笔记
API 源代码位于 chapter07 文件夹下的 GitHub 存储库中。建议根据存储库中可用的源代码开始本章。
图像中的 操作在 Gin 默认路由器中注册并分配给不同的 HTTP 处理程序,如下所示:
从 main_test.go 文件开始,并定义一个方法来返回 Gin 路由器的实例。然后,为每个 HTTP 处理程序编写一个测试方法。例如,TestListRecipesHandler 处理程序显示在以下代码片段中:
它在 GET /recipes 资源上注册 ListRecipesHandler 处理程序,然后它发出 GET 请求。然后将请求有效负载编码为 recipes 切片。如果 recipes 的数量等于 492 并且状态码是 200-OK 响应,则认为测试成功.否则会抛出错误,测试会失败。
然后,发出 go test 命令,但这一次,禁用 Gin 调试日志并使用 -v 标志启用详细模式, 如下:
命令输出如下所示:

图 7.3 – 运行带有详细输出的测试
笔记
在第 10 章,捕获 Gin 应用程序指标中,我们将介绍如何自定义 Gin 调试日志以及如何将它们发送到集中式日志平台。
同样,为 NewRecipeHandler 处理程序编写一个测试。它只会发布一个新配方并检查返回的响应代码是否为 200-OK 状态。 TestNewRecipeHandler 方法是,如以下代码片段所示:
在前面的测试方法中,您使用 Recipe 结构声明了一个配方。然后将该结构编组 为 JSON 格式并作为 NewRequest< 的第三个参数添加/代码>函数。
执行测试,TestListRecipesHandler 和 TestNewRecipeHandler 都应该成功,如下:

图 7.4 – 运行多个测试
您现在熟悉为 Gin HTTP 处理程序编写单元测试。继续为其余的 API 端点编写测试。
Generating code coverage reports
在本节中,我们将介绍如何使用 Go 生成覆盖率报告。测试覆盖率描述了通过运行包的测试执行了多少包代码。
运行以下命令以生成一个文件,该文件包含有关您在上一节中编写的测试所覆盖的代码量的统计信息:
该命令将运行测试并显示这些测试覆盖的语句的百分比。在以下示例中,我们覆盖了 16.9% 的语句:

图 7.5 – 测试覆盖率
生成的 coverage.out 文件包含单元测试覆盖的行数。为简洁起见,已对完整代码进行了裁剪,但您可以在此处查看说明:
您可以使用超文本标记语言(HTML) 演示,使用 go tool 命令,如下:
该命令将在您的默认浏览器上打开 HTML 演示文稿,以绿色显示覆盖的源代码,以红色显示未覆盖的代码,如下面的屏幕截图所示:
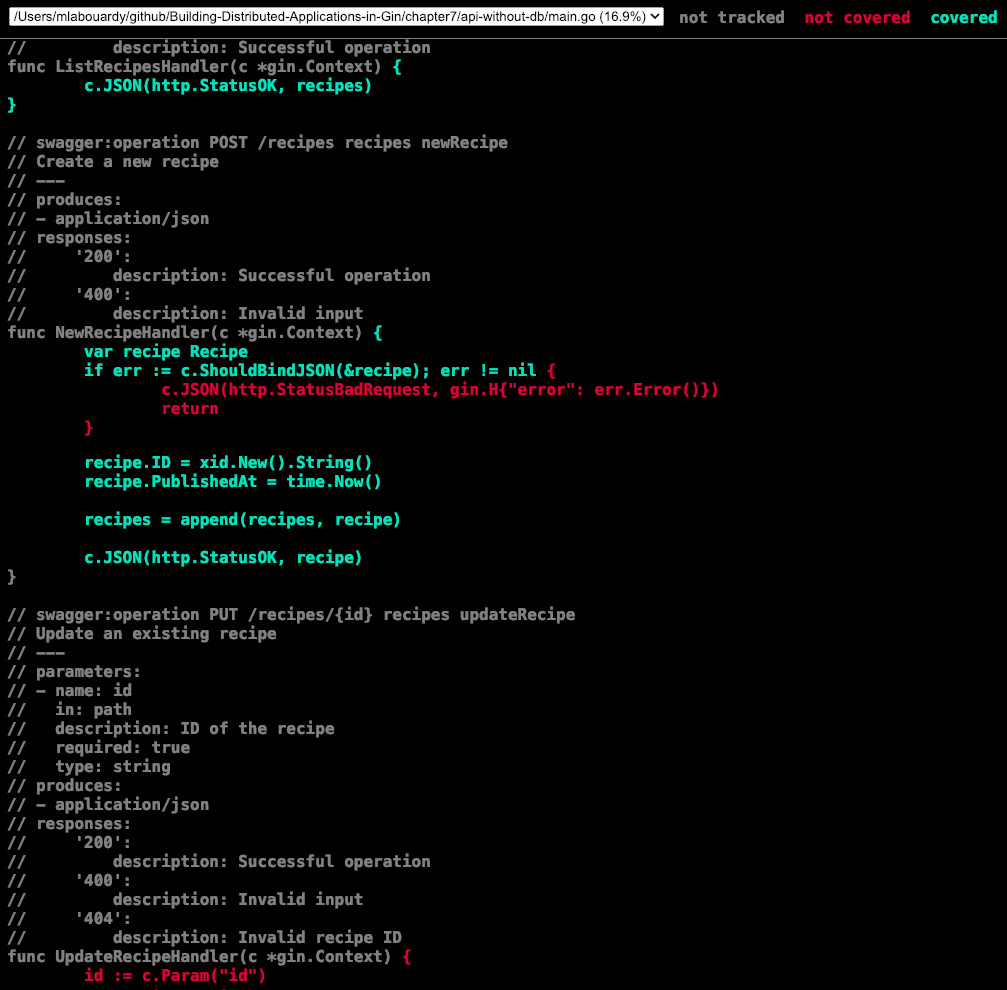
图 7.6 – 查看结果
现在更容易发现测试涵盖了哪些方法,让我们为 HTTP 处理程序编写一个额外的测试,负责更新现有的配方。为此,请执行以下操作:
- Add the following code block to the
main_test.gofile:该代码发出两个 HTTP
PUT请求。其中之一具有有效的配方 ID 并检查 HTTP 响应代码 (
200-OK)。 - Re-execute the tests, and the coverage percentage should increase from 16.9% to 39.0%. The following output confirms this:
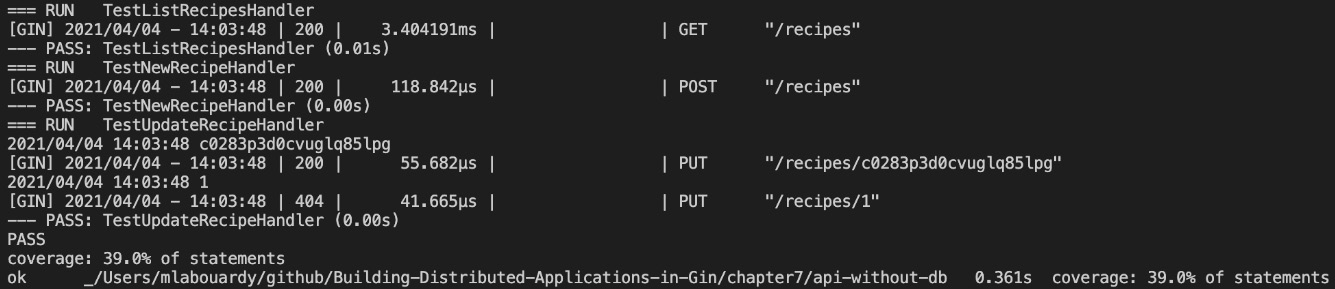
图 7.7 – 更多的代码覆盖率
惊人的!您现在可以运行单元测试并获得代码覆盖率报告。所以,继续前进,测试并覆盖。
虽然单元测试是软件开发的重要组成部分,但同样重要的是,您编写的代码不能单独进行测试。集成和端到端测试通过一起测试应用程序的各个部分,为您提供额外的信心。这些部分可能单独工作得很好,但在大型系统中,代码单元很少单独工作。这就是为什么在下一节中,我们将介绍如何编写和运行集成测试。
Performing integration tests with Docker
集成测试的目的是验证独立开发的组件是否可以协同工作适当地。与单元测试不同,集成测试可以依赖于数据库和外部服务。
到目前为止编写的分布式 Web 应用程序与外部服务 MongoDB 和 Reddit 交互,如以下屏幕截图所示:
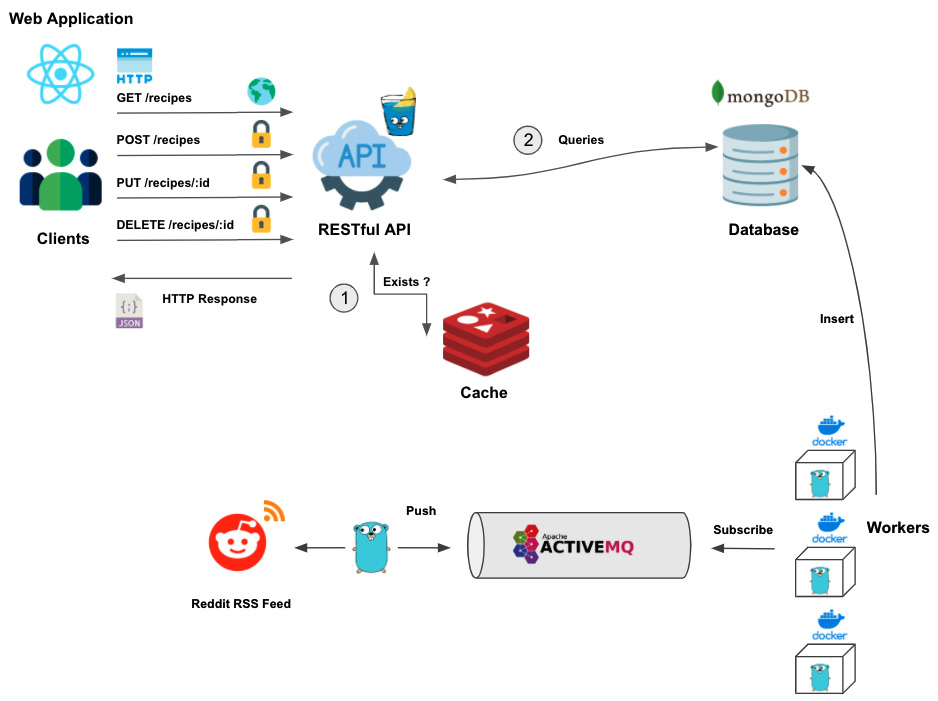
图 7.8 – 分布式 Web 应用程序
- Run the needed services for our integration tests with Docker Compose. The following
docker-compose.ymlfile will start a MongoDB and Redis container: - Now, test each endpoint exposed by the RESTful API. For example, to test out the endpoint responsible for listing all recipes, we can use the following code block:
- To run tests, provide the MongoDB Uniform Resource Identifier (URI) and database before the
go testcommand, as follows:
伟大的!测试将成功通过,如下所示:

图 7.9 – 运行集成测试
测试在 /recipes 端点上发出 GET 请求,并验证端点返回的食谱数是否等于 10 .
另一个重要但被忽视的测试是安全测试。必须确保您的应用程序没有重大安全漏洞,否则数据泄露和数据泄露的风险很高。
Discovering security vulnerabilities
有许多 工具可帮助您识别 Gin Web 应用程序中的主要安全漏洞。在本节中,我们将介绍在构建 Gin 应用程序时可以采用的两种工具:Snyk 和 Golang Security Checker (Gosec)。
在接下来的部分中,我们将演示如何使用这些工具来检查 Gin 应用程序中的安全漏洞。
Gosec
Gosec 是一个 用 Golang 编写的工具,用于检查源代码是否存在安全问题 通过扫描 Go 抽象语法树 (AST)。在我们检查 Gin 应用程序代码之前,我们需要安装 Gosec 二进制文件。
可以使用以下 cURL 命令下载二进制文件。这里使用的是 2.7.0 版本:
安装命令后,在项目文件夹中运行以下命令。 ./... 参数设置为递归扫描所有 Go 包:
该命令将识别与未处理错误相关的三个主要问题(Common Weakness Enumeration (CWE) 703 (https://cwe.mitre.org/data/definitions/703.html),如下图所示:
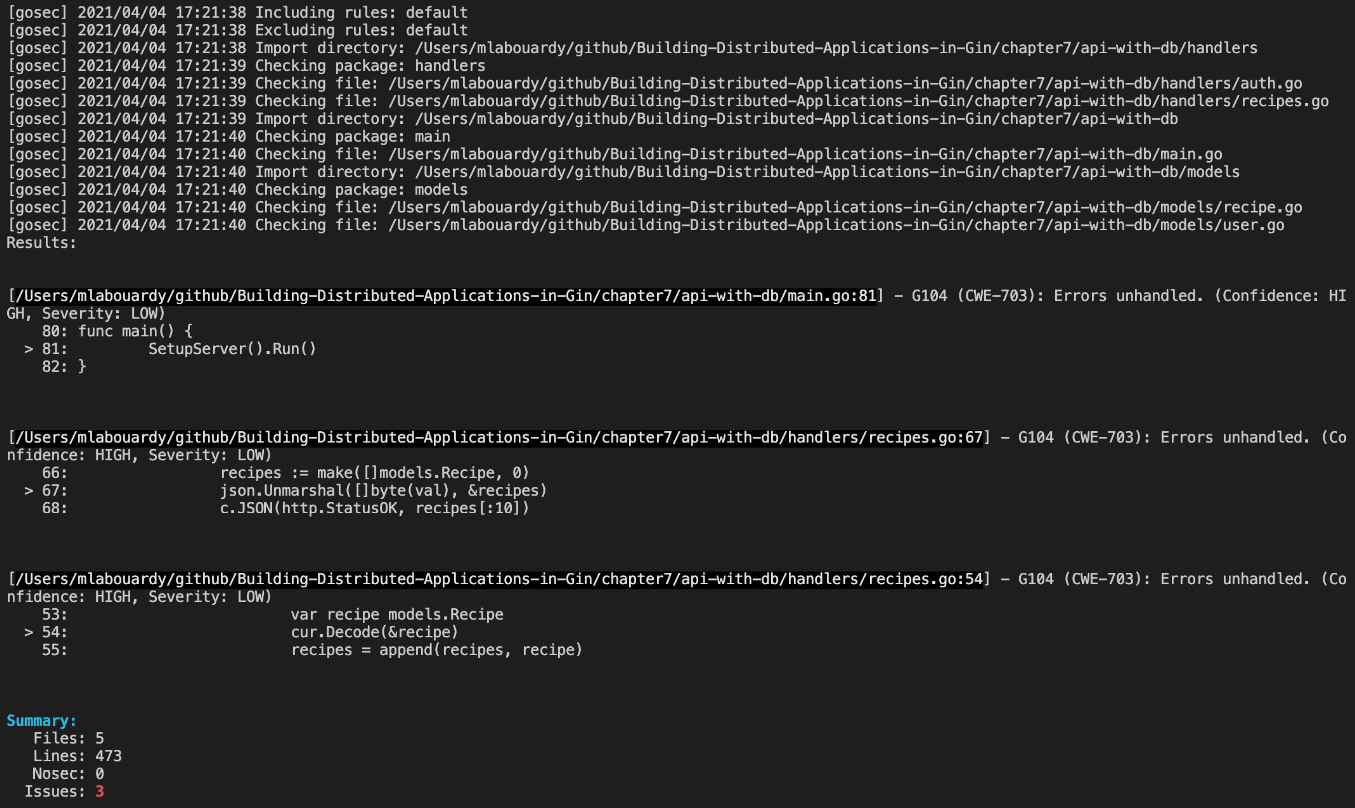
图 7.10 – 未处理的错误
默认情况下,Gosec 将扫描您的项目并根据规则对其进行验证。但是,可以排除某些规则。例如,要排除导致错误未处理问题的规则,请发出以下命令:
笔记
可在此处找到可用规则的完整列表:
https://github.com/securego/gosec#available-rules
命令输出如下所示:
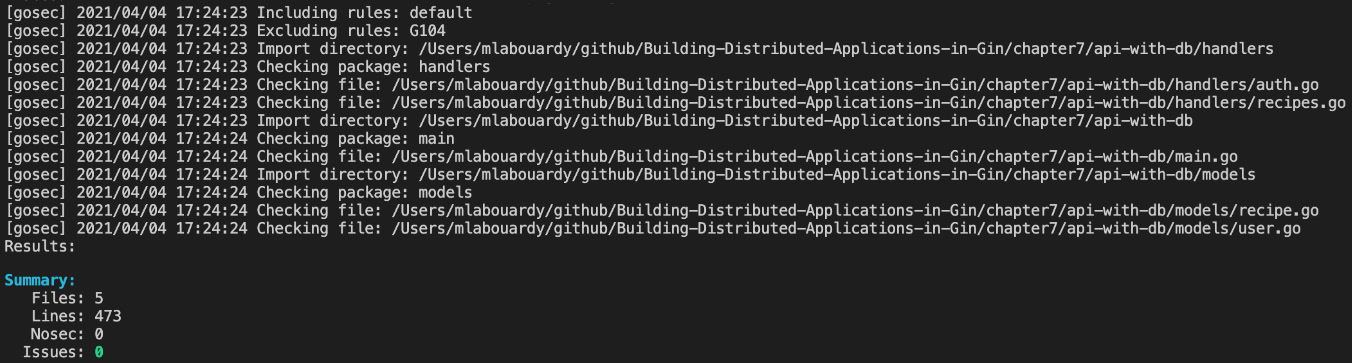
图 7.11 – 排除 Gosec 规则
您现在应该能够扫描您的应用程序源代码以查找潜在的安全漏洞或错误来源。
Securing Go modules with Snyk
检测潜在安全漏洞的另一种方法是扫描 Go 模块。 go.mod 文件 包含 Gin Web 应用程序使用的所有依赖项。 Snyk (https://snyk.io) 是一个 软件即服务 (SaaS) 解决方案,用于识别和修复安全性 Go 应用程序中的漏洞。
笔记
Snyk 支持所有主要的编程语言,包括 Java、Python、Node.js、Ruby、Scala 等。
解决方案非常简单。要开始,请执行以下操作:
- Create a free account by signing in with your GitHub account.
- Then, install the Snyk official command-line interface (CLI) using Node Package Manager (npm), as follows:
- Next, associate your Snyk account with the CLI by running the following command:
上述命令将打开一个浏览器选项卡并重定向您以使用您的 Snyk 帐户对 CLI 进行身份验证。
- Now, you should be ready to scan the project vulnerabilities with the following command:
前面的命令将列出所有已识别的漏洞(主要或次要),包括其路径和修复指南,如以下屏幕截图所示:

图 7.12 – Snyk 漏洞发现
- According to the output, Snyk identified two major issues. One of them is with the current version of the Gin framework. Click on the
InfoURL—you will be redirected to a dedicated page where you can learn more about the vulnerability, as illustrated in the following screenshot:
图 7.13 – HTTP 响应拆分页面
- Most security vulnerabilities can be fixed by upgrading the packages to the latest stable version. Run the following command to upgrade your project dependencies:
go.mod文件中列出的所有依赖项都将升级到最新的可用版本,如以下屏幕截图所示:
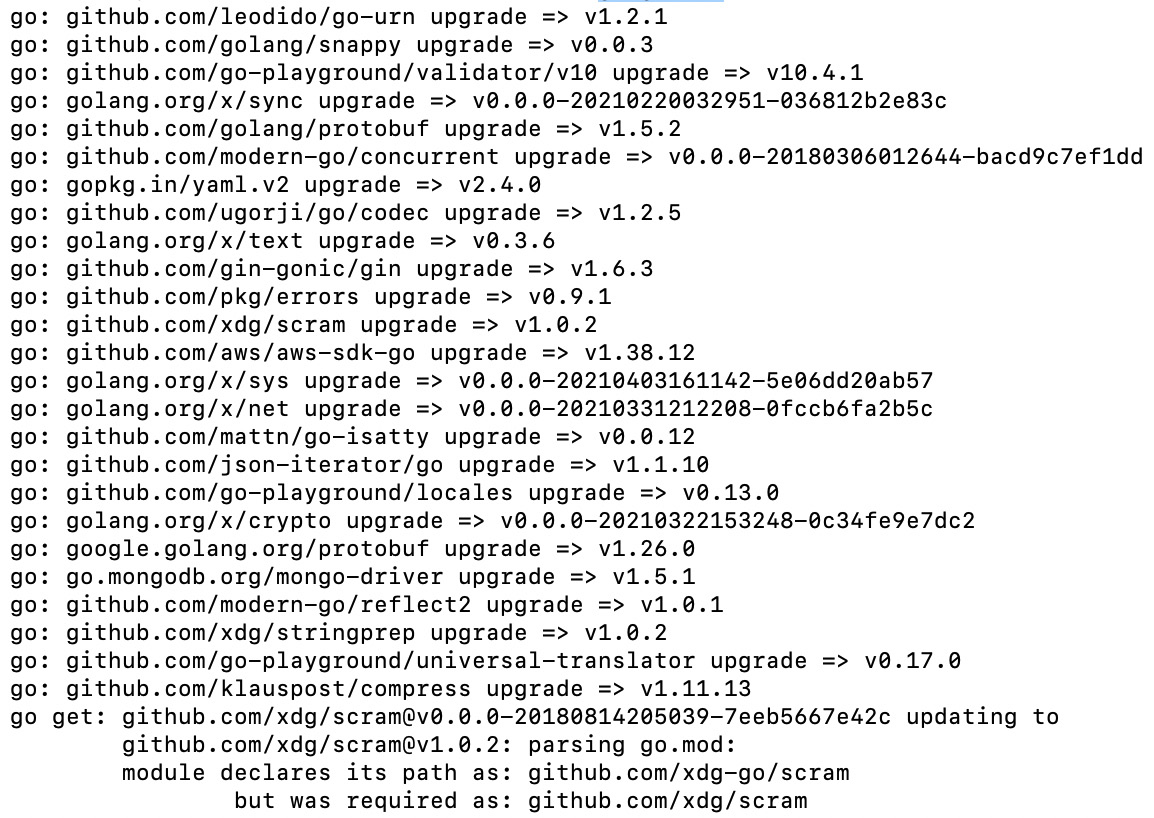
图 7.14 – 升级 Go 包
对于 发现的漏洞,GitHub 上有一个 open pull 请求,该请求已合并并在 Gin 1.7 版本中可用,如图所示以下屏幕截图:
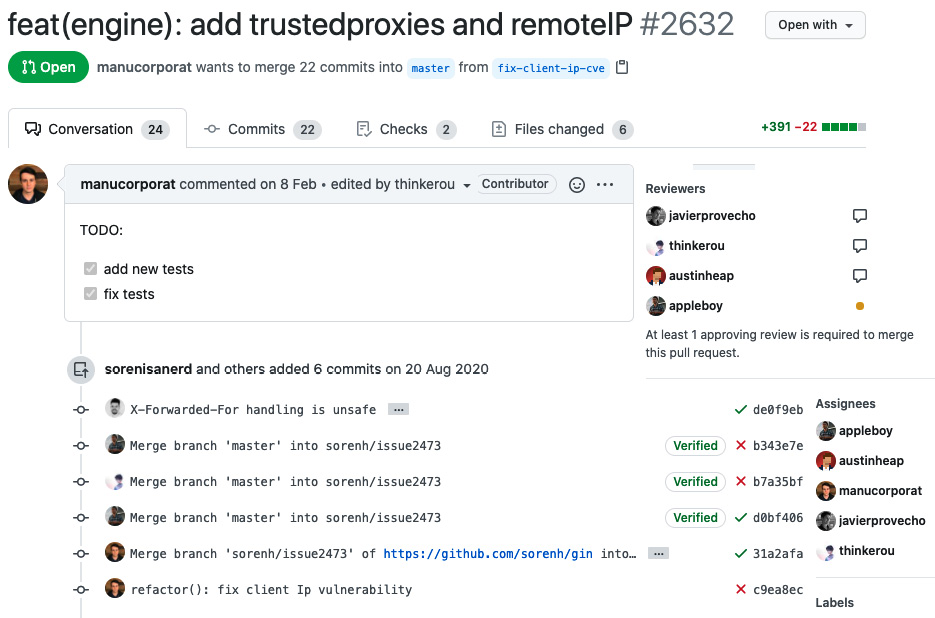
图 7.15 – 漏洞修复
就是这样——您现在也知道如何使用 Snyk 扫描您的 Go 模块了!
笔记
我们将介绍如何在 持续集成/持续部署 (CI/CD) 管道中嵌入 Snyk "B17115_09_Final_JM_ePub.xhtml#_idTextAnchor146">第 9 章,实施 CI/CD 管道,持续检查应用程序的安全漏洞源代码。
Running Postman collections
在本书中,您学习了如何使用Postman REST 客户端来测试API 端点。除了发送 API 请求外,Postman 还可以通过在集合中定义一组 API 请求来构建测试套件。
要进行此设置,请执行以下操作:
- Open the Postman client and click on the New button from the header bar, then select Collection, as illustrated in the following screenshot:

图 7.16 – 新 Postman 集合
- A new window will pop up— name your collection
Recipes APIand click on the Create button to save the collection. Then, click on Add request to create a new API request and call itList Recipes, as illustrated in the following screenshot:
图 7.17 – 新请求
- Click on the Save button—a new tab will open with your given request name. Enter
http://localhost:8080/recipesin the address bar and select aGETmethod.
好的——现在,一旦 完成,您将在 Tests 部分编写一些 JavaScript 代码。
在 Postman 中,您可以编写将在发送请求(预请求脚本)之前或收到响应之后执行的 JavaScript 代码。让我们在下一节探讨如何实现这一目标。
Scripting in Postman
测试脚本 可用于测试您的 API 是否相应地工作,或检查新功能是否未影响现有请求的任何功能。
- Click on the Tests section and paste the following code:
该脚本将检查 API 请求返回的配方数量是否等于 10 个配方,如以下屏幕截图所示:

图 7.18 – Postman 中的脚本
- Press the Send button and check the Postman console, which is shown in the following screenshot:

图 7.19 – 运行测试脚本
您可以在 图 7.19 中看到测试脚本已通过。
您可能已经注意到地址栏中的 API URL 是硬编码的。虽然 这工作正常,但如果您要维护多个环境(沙盒、暂存和生产),则需要一些方法来测试您的 API 端点,而无需重复收集请求.幸运的是,您可以在 Postman 中创建环境变量。
要使用 URL 参数,请执行以下操作:
- Click the eye icon available in the top-right corner and click on Edit. In the VARIABLE column, set the name and the URL, which is
http://localhost:8080, as illustrated in the following screenshot. Click on Save:
图 7.20 – 环境变量
- Go back to your
GETrequest and use the following URL variable. Make sure to select the Testing environment from the drop-down menu in the top-right corner, as illustrated in the following screenshot:
图 7.21 – 参数化请求
- Now, go ahead and add another test script for the API request. The following script will look for a particular recipe in the response payload:
- Press the Send button, and both test scripts should be successful, as depicted here:
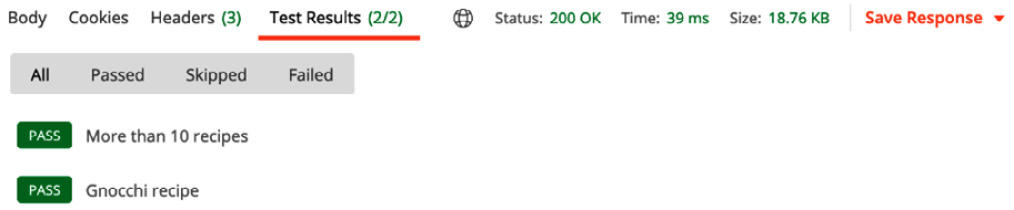
图 7.22 – 运行多个测试脚本
让我们更进一步,创建另一个 API 请求,这次是针对负责添加新配方的端点,如以下屏幕截图所示:
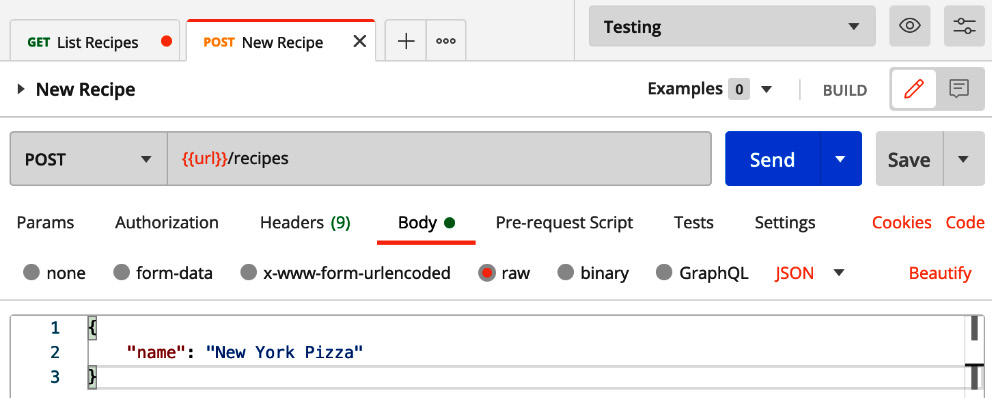
图 7.23 – 新配方请求
为此,请执行以下操作:
- Define a test script to check if the HTTP status code returned upon successful insert operation is a
200-OKcode, as follows: - Define another one to check if the ID of inserted is a string of 24 characters, as follows:
- Click the Send button. The test script will fail because the actual status code is
401 – Unauthorized, which is normal because the endpoint expects an authorization header in the HTTP request. You can see the output in the following screenshot:
图 7.24 – 401 未经授权的响应
笔记
要了解有关 API 身份验证的更多信息,请返回 第 4 章,构建API 身份验证,获取分步指南。
- Add an
Authorizationheader with a valid JSON Web Token (JWT). This time, the test scripts pass successfully! - You now have two different API requests in a collection. Run the collection by clicking on the Run button. A new window will pop up, as illustrated in the following screenshot:

图 7.25 – 收集运行器
- Click on the Run Recipes API button, and both API requests will be executed sequentially, as illustrated in the following screenshot:

图 7.26 – 运行结果屏幕
- You can export the collection and all API requests by clicking the Export button. A JSON file should be created with the following structure:
导出 Postman 集合 后,您可以使用 从终端运行它纽曼 (https://github.com/postmanlabs/newman )。
在下一节中,我们将使用 Newman CLI 运行之前的 Postman 集合。
Running collections with Newman
定义了所有 测试后,让我们使用Newman 命令行来执行它们。值得一提的是,您可以更进一步,在您的 CI/CD 工作流程中运行这些测试作为集成后测试,以确保新的 API 更改并且这些功能不会产生任何回归。
要开始,请执行以下操作:
- Install Newman with npm. Here, we are using version 5.2.2:
- Once installed, run Newman with the exported collection file as an argument, as follows:
API 请求应该失败,因为没有定义 URL 参数,如以下屏幕截图所示:

图 7.27 – 测试失败的集合
- You can set its value using a
--env-varflag, as follows:如果所有调用都通过,这应该是输出:
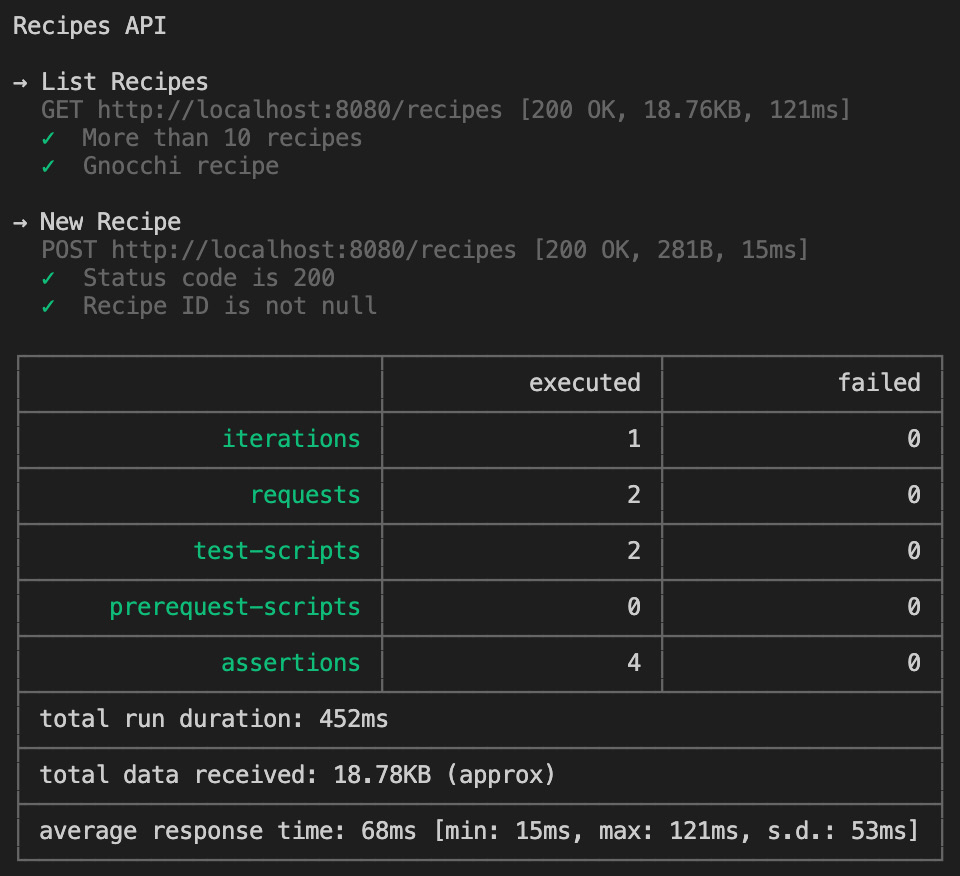
图 7.28 – 成功测试的集合
您现在应该能够使用 Postman 自动化您的 API 端点测试 。
笔记
在第 10 章,捕获 Gin 应用程序指标中,我们将介绍如何在成功发布应用程序后在 CI/CD 管道中触发 newman run 命令。
Further reading
Go 设计模式 作者:Mario Castro Contreras,Packt Publishing