读书笔记《cloud-native-applications-in-java》扩展您的云本地应用程序
了解了设计原理后,我们再来看看第2章中开发的骨架服务,写法您的第一个云原生应用程序,并对其进行一些实际工作以使其可以投入生产。
我们定义了两个获取服务; getProduct 用于给定产品 ID,getProducts 用于给定类别。这两个服务具有高度的非功能性需求。它们必须始终可用并以尽可能低的延迟提供数据。以下步骤将带我们到达那里:
- Accessing data: Service access to data across various resources
- Caching: Options to do caching and their considerations
- Applying CQRS: Enable us to have different data models to service different requests
- Error handling: How to recover, what return codes to send, and implementation of patterns such as a circuit breaker
我们还将研究添加方法来修改数据,例如 insert、update 和 删除
。在本章中,我们将介绍:
- Validations: Ensuring that the data is clean before being processed
- Keeping two models of CQRS in sync: For data consistency
- Event driven and asynchronous updates: How it scales the architecture and decouples it at the same time
以我们在Chapter 2中开发的product项目为例,编写您的第一个云原生应用程序,转发。我们将在讨论 概念的同时逐步增强它。
让我们仔细考虑一下我们两个服务的数据库。 getProduct 返回产品信息,而 getProducts 搜索属于此类别的产品列表。首先,对于简单和标准的要求,两个查询都可以由关系数据库中的单个数据模型来回答:
- You would store a product in a product table with a fixed number of columns.
- You would then index the category so that the queries against it can run quickly.
现在,这种设计可以满足普通公司的大多数要求。
让我们在 standard 关系数据库中使用产品表,并在我们的服务中使用 Spring<一个 id="id288599446" class="indexterm"> 数据。 Spring Data 提供了出色的抽象来使用 Java Persistence API (JPA) 并使编码数据访问对象 (DAO)更轻松。 Spring Boot 进一步帮助编写最少的代码 开始并随着我们继续进行扩展。
Spring Boot 可以使用嵌入式数据库,例如 H2、HSQLDB 或外部数据库。进程内嵌入式数据库从我们的 Java 服务开始在一个进程中,然后在进程终止时终止。这很好开始。稍后,可以将依赖项和 URL 更改为指向实际数据库。
您可以从 第 2 章中获取项目,编写您的第一个云原生应用程序, 并添加以下步骤,或者直接从 GitHub (https://github.com/PacktPublishing/Cloud-Native-Applications-in-Java):
- Maven POM: Including POM dependencies:
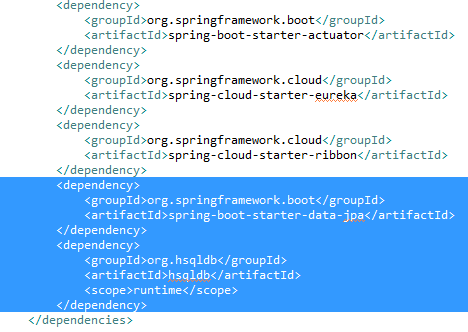
这将告诉 Spring Boot 包含 Spring Boot 启动器 JPA 并在嵌入式模式下使用 HSQLDB。
- Entity: As per the JPA, we will start using the concept of entity. We already have a domain object named
Productfrom our previous project. Refactor it to put in an entity package. Then, add the notations of@Entity,@Id, and@Column, as shown in the followingProduct.javafile:
其余代码,例如构造函数和 getter/setter,保持不变。
- Repository: Spring Data provides a repository, which is like a DAO class and provides methods to do Create, Read, Update, and Delete (CRUD) operations on the data. A lot of standard operations are already provided in the
CrudRepositoryinterface. We will be using only the query operations from now on. In our case, since our domain entity isProduct, the repository will beProductRepository, which extends Spring'sCrudRepository, and manages theProductentity. During extension, the entity and the data type of the primary key needs to be specified using generics, as shown in the followingProductRepository.javafile:
想到的第一个问题是这段代码是否足以工作。它只有一个接口定义。如何处理我们的两个方法,即 getProduct(给定产品 ID)和 getProducts(给定类别)?
魔术发生在 Spring Data 中,它有助于样板代码。 CrudRepository 接口带有一组默认方法来实现最常见的操作。这些包括 save、delete、find、count,并且 exists 操作足以满足大多数查询和更新任务。我们将在本章的后半部分介绍 update 操作,但让我们先关注查询操作。
在 CrudRepository 中已经作为 findOne 方法来查找给定 ID 的产品的操作。因此,我们不需要显式调用它。
为给定类别查找产品的任务由我们的 ProductRepository 接口中的 findByCatId 方法完成。 Spring Data 存储库基础结构中内置的查询构建器机制对于在存储库的实体上构建查询很有用。机制剥离前缀,如find、read、query、 count 和 get 从方法中开始根据实体解析其余部分。这种机制非常强大,因为关键字和组合的选择意味着方法名称足以完成大部分查询操作,包括运算符(and/or) 不同的子句,等等。请参考 Spring Data 参考文档 ( https://docs.spring.io/spring-data/jpa/docs/current/reference/html/)查看详细信息。
这些约定允许 Spring Data 和 Spring Boot 基于解析接口注入方法的实现。
- Changing the service: In Chapter 2, Writing Your First Cloud-Native Application, our
productservice was returning dummy hard-coded data. Let's change it to something useful that goes against the database. We achieve this by using theProductRepositoryinterface that we defined earlier, and injecting it through@Autowiringannotation into ourProductServiceclass, as shown in the followingProductService.javafile:
存储库中的 findOne 方法获取给定主键的对象,而我们定义的 findByCatId 方法有助于查找给定主键的产品类别。
- Schema definition: For now, we will leave the schema creation to the
hibernatecapability to auto generate a script. Since we do want to see what script got created, let's enableloggingfor the classes as follows in theapplication.propertiesfile:
- Leave Spring Data and Spring Boot to figure out the rest: But in a production application, we would want to have fine-grained control over the connection URL, user ID, password, connection pool properties, and so on.
- Fire up the Eureka server (as we did in Chapter 2, Writing Your First Cloud-Native Application) using the
EurekaApplicationclass. We are going to keep the Eureka service running at all times. - Once the
Eurekaproject starts, run theproductservice.
注意 hibernate 生成的日志。它首先自动使用 HSQLDB 方言,然后创建并运行 Product 表 SQL,如下所示:
一旦服务开始侦听端口,请在浏览器中触发查询: http://localhost:8082/product/1。这将返回以下内容:
当您看到日志时,您将观察到在后台运行的 SQL:
现在,触发另一个返回给定类别产品的查询: http://localhost:8082/products?id=1。这将返回以下内容:
针对这种情况运行的 SQL 如下:
尝试使用不同的类别 http://localhost:8082/products?id=2 将返回如下内容:
这样就完成了针对数据源的简单查询服务。
出于生产目的,这将需要增强以将标准数据库用作 Oracle、PostgreSQL 或 MySQL 数据库。您将在类别列上引入索引,以便查询运行得更快。
- The scalability of a relational database (in terms of volume of products and number of concurrent requests) becomes a bottleneck.
- The product structure is different based on the category and is difficult to model in a fixed schema of a relational database.
- The search criteria starts increasing in scope. As of now, we are searching only by category; later on, we might want to search by product description, filter fields, and also by category description.
单个关系数据库是否足以满足所有要求?
让我们用一些设计技术来解决这些问题。
随着服务在数量数据和请求并发方面的扩展,数据库将开始成为瓶颈。为了扩展,我们可以采用缓存解决方案,如果缓存中的值可用,则通过服务来自缓存的请求来减少对数据库的命中次数。
Spring 提供了通过注解包含caching 的机制,这样Spring 就可以返回缓存的值,而不是调用实际的处理或检索方法。
从概念上讲,缓存有两种类型,如以下部分所述。
本地缓存与服务存在于同一 JVM 中。它的范围是有限的,因为它可以由服务实例访问,并且必须完全管理 由服务实例。
让我们首先让我们的产品可缓存在本地缓存中。
Spring 3.1 引入了自己的用于返回缓存条目、驱逐或填充条目的符号。但后来,JSR 107 JCache 引入了不同的符号。 Spring 4.1 及更高版本也支持这些。
让我们使用 Spring 符号开始:
- Tell the Spring application to enable caching and look for cacheable instances. This is a one-time declaration and hence is best done in the start-up class. Add the
@EnableCachingannotation into the main class:
- Enable the cache in our
ProductRepositoryfor getting products by category, by adding a cacheable notation. We will give a cache name that is explicit and will be used for this method:
现在,再次运行该服务并在浏览器中运行以下一组查询时观察日志:
http://localhost:8082/products?id=1http://localhost:8082/products?id=2http://localhost:8082/products?id=1http://localhost:8082/products?id=2
您将看到以下 SQL 仅被触发了两次:
这意味着存储库仅在未在缓存中找到类别条目时才执行 findByCatId 方法。
虽然 Spring 处理了很多问题 很好,例如底层的缓存实现,但了解什么是重要的发生并意识到限制。
在内部,缓存由缓存管理器和缓存解析器等内部类实现。当没有提供缓存产品或框架时,Spring 默认使用 ConcurrentHashMap。 Spring 的缓存实现了许多其他的本地缓存,例如 EHCache、Guava 和 Caffeine。
查看 Spring 文档 (https://docs.spring.io/spring/docs/current/javadoc-api/org/springframework/cache/annotation/Cacheable.html) 了解更多复杂性,例如 sync=true 和条件缓存。
分布式 cache(例如 Hazelcast、Gemfire 和/或 Coherence)具有网络感知能力,并且缓存实例可以作为 in - 进程模型(对等模型),其中缓存是服务运行时的一部分,或客户端-服务器模型,其中缓存请求从服务转到单独的专用缓存实例。
对于这个例子,我们选择了 Hazelcast,因为它是一个非常轻量但强大 分布式缓存解决方案。它还与 Spring Boot 很好地集成在一起。方法如下:
- In the POM (Maven file), add a dependency to
hazelcast-spring. Thehazelcast-springhas aHazelcastCacheManagerthat configures a Hazelcast instance to be used:
- Since Hazelcast is a distributed cache, it needs the elements to be serializable. Hence, we need to ensure that our
Productentity is serializable:
- A simplified Hazelcast configuration file that tells the various Hazelcast instances to discover and synchronize with each other:
现在,让我们测试这些更改。为此,我们必须运行 product 服务的两个实例来检查它是否有效。我们可以通过更改端口号来运行两个实例:
- Run the service with port
8082(which is configured). - Change the
application.propertiesto8083. - Run the service again.
您将在一项启动的服务上看到 Hazelcast 消息,如下所示:
但是一旦启动第二个服务,成员定义就会被 2 更新:
现在,在浏览器上,运行以下查询并观察控制台中的日志:
http://localhost:8082/products?id=1http://localhost:8082/products?id=2http://localhost:8082/products?id=1http://localhost:8082/products?id=2http://localhost:8083/products?id=1http://localhost:8083/products?id=2
您会发现在 SQL 中,调试日志在第一个服务中仅出现两次。另外四次,缓存条目是从 Hazelcast 中挑选出来的。与之前的本地缓存不同,缓存条目在两个实例之间是同步的。
分布式 cache 是解决扩展问题的一种方法。但是,它引入了某些挑战,例如缓存陈旧(保持缓存与数据库同步)和 additional 内存要求。
此外,缓存是向 CQRS 范式过渡的开始。重温我们在第 3 章中讨论的 CQRS 概念, 设计您的云原生应用程序。
查询是从缓存中回答的(除了第一次命中),这是查询与来自记录系统(即数据库)的命令的隔离,并稍后更新查询模型(缓存更新)。
让我们在 CQRS 中进行下一步,以干净地进行这种隔离。 CQRS 引入的复杂性是:
- Having two (or multiple) models to maintain instead of one
- Overheads of updating all models when the data changes
- Consistency guarantees between the different models
因此,仅当用例要求分离高并发、大容量和快速敏捷性要求时,才应遵循此模型。
物化视图是 CQRS 的 最简单 形式。如果我们假设与产品和类别的读取相比,产品更新发生的频率较低,那么我们可以有两个不同的模型支持 getProduct(对于一个 ID)和getProducts(对于给定的类别)。
搜索查询 getProducts 与此观点背道而驰,而传统的基于主键的 getProduct 则进入常规表。
如果 Oracle 等数据库支持,这应该很容易。如果数据库默认不支持物化视图,如果需要可以手动完成,通过在使用触发器或更好的事件驱动架构(例如业务事件)更新主产品表时手动更新统计信息或汇总表.我们将在本章的后半部分看到这一点,当我们将 addProduct 功能添加到我们的服务集时。
为了解决灵活模式、高搜索能力和更高volume id288340516" class="indexterm"> 处理,我们可以选择 NoSQL 技术:
也很有可能想到这些选项:
- Elasticsearch is typically a complementary technology and not used as a master database. Hence, the product information should be maintained in a reliable, relational, or NoSQL database.
- A document database such as MongoDB can build indexes too. However, the performance or indexing capability cannot equal Elasticsearch.
这是适合目的的经典示例。您的选择将取决于您的用例:
- Whether you have flexible schema needs
- Scalable and high volume applications
- Highly flexible search requirements
保持 REST 接口 the 相同,让我们将内部实现从使用关系数据库(在我们的示例中为 HSQLDB)更改为 MongoDB .而不是running MongoDB 在诸如 HSQLDB 之类的进程中,我们将它作为服务器单独运行。
- Install MongoDB. It is fairly easy to follow the instructions for various platforms on the MongoDB website (https://www.mongodb.com/).
- Run
mongod.exeto start an instance of MongoDB. - Create a test file with our sample data (similar to
import.sql). This time, however, we will keep the data in JSON format instead of SQL statements. Theproducts.jsonfile is as follows:
注意 _id,它是 MongoDB 的主键符号。如果您不提供 _id,MongoDB 将使用 ObjectId 定义自动生成该字段。
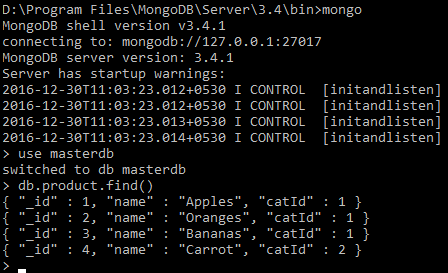
- Load the sample data into MongoDB. We will create a database called
masterdband load into a collection calledproduct:
- Check whether the data got loaded on the command line, by using the
db.product.find()command, afteruse masterdbas follows:
- It is better to start with a clean slate. Copy your project from the earlier example with Hazelcast and HSQLDB or pull from the GitHub repository (https://github.com/PacktPublishing/Cloud-Native-Applications-in-Java).
- Adjust the Maven POM file to have the following dependencies. Remove the other ones since they are not required for our small example:
- The
Productentity should just have an@Idfield. It is optional to put a@Documentannotation at the class level. If not, the first insert performance suffers. For now, let's have the annotation in theProduct.javafile:
注意这里的 id 是 String 而不是 int。原因是 NoSQL 数据库在将 ID 生成为字符串 (GUID) 方面比在数据库等关系系统中递增整数要好得多。原因是数据库变得更加分散,因此与生成 GUID 相比,可靠地生成递增数字要困难一些。
- The
ProductRepositorynow extends theMongoRepositorywhich has methods for retrieving the product from MongoDB as follows in theProductRepository.javafile:
- We just add one property to
application.propertiesto tell the service to get our data from themasterdbdatabase in MongoDB. Also, it is probably better to run it on a different port so that we can run the services in parallel if we want to do so later:
ProductService 类没有改变,因为接口没有改变。
现在,启动 Eureka 服务器,然后启动服务,并在浏览器中触发以下查询:
http://localhost:8085/products?id=1http://localhost:8085/products?id=2http://localhost:8085/product/1http://localhost:8085/product/2
您将获得与以前相同的 JSON。这是微服务的内部实现更改。
让我们从学习的角度来看一个 the 建议分离的简单实现。由于我们将主模型和搜索模型分开,因此拆分服务是有意义的,因为可以将搜索功能视为 Product 主。
类别的 getProducts 函数是搜索功能的一部分,它本身可以成为一个复杂且独立的业务领域。因此,是时候重新考虑将它们保留在同一个微服务中还是将它们拆分为核心 Product 服务和 产品搜索服务。
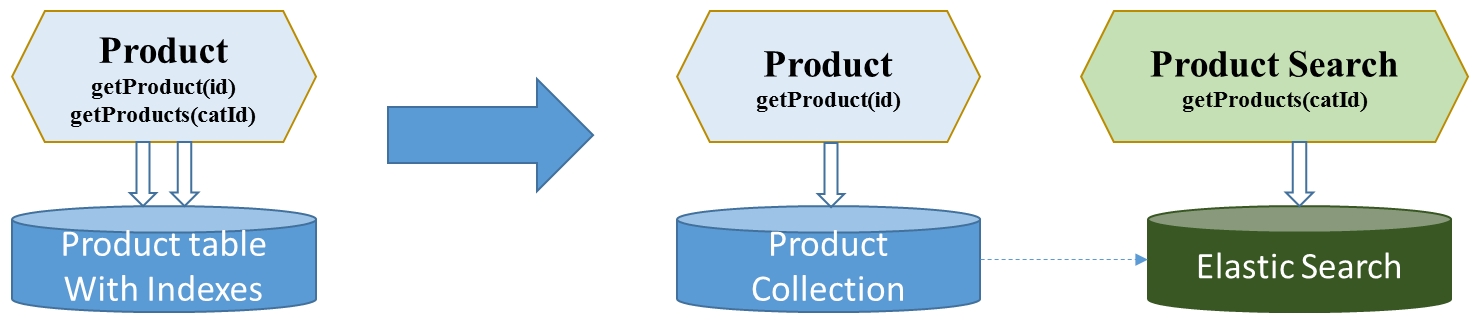
让我们创建一个专门用于高速、大容量搜索的新微服务。支持搜索微服务的搜索数据存储不必是 产品数据的主人,但可以充当补充搜索模型. Elasticsearch 在各种搜索用例中都非常受欢迎,并且适合极端搜索要求的need。
以下是使 Elasticsearch 准备好测试数据的步骤:
- Install the Elastic version. Use version 2.4.3, since the recent 5.1 versions are not compatible with Spring Data. Spring Data uses Java drivers that communicate on port
9300with the server, and hence having the same version on the client and server is important. - Create a test file with our sample data (similar to
products.json). The format is only slightly different from the previous case, but for Elasticsearch instead of MongoDB. Theproducts.jsonfile is as follows:
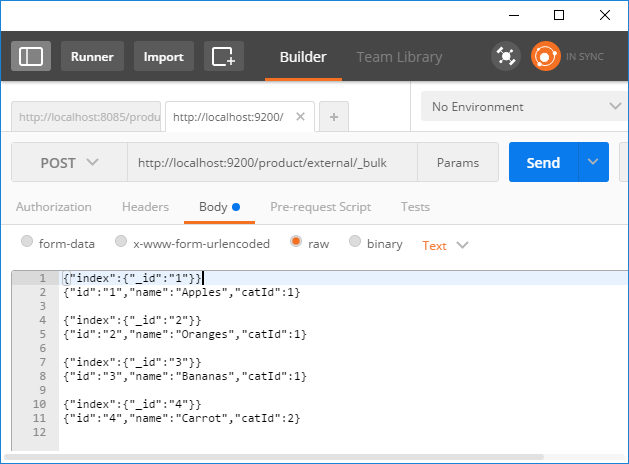
- Use Postman or cURL to call a REST service on Elasticsearch to load the data. See the following screenshot for output in the Postman extension. In Elasticsearch, the equivalent of a database is an index, and we can name our index
product. Elasticsearch also has a concept of type, but more on that later:
- Check whether the data got loaded by running a simple
*query in Postman, the browser, or cURL:
结果,您应该添加了四种产品。
到目前为止已经完成了两个数据库,您现在必须熟悉。它与我们为 HSQLDB 和 MongoDB 所做的并没有太大区别。复制 Mongo 项目以创建 productsearch 服务并像以前一样对 Maven POM、实体、存储库类和应用程序属性进行更改:
- In the Maven POM,
spring-boot-starter-data-elasticsearchreplacesspring-boot-starter-data-mongodborspring-boot-starter-data-jpain the earlier two service examples.
- In the
Productentity,@Documentnow represents an Elasticsearch document. It should have anindexandtypedefined the same since we used to load the test data as shown in theProduct.javafile:
- The
ProductRepositorynow extendsElasticsearchRepositoryas shown in theProductRepository.javafile:
- Make changes in the
application.propertiesto indicate a server model ofelasticsearch(versus the embedded model, like we did for HSQLDB):
现在,启动 Eureka 服务器,然后启动 productsearch 服务,并按以下顺序在浏览器中触发以下查询:
http://localhost:8085/products?id=1.http://localhost:8085/products?id=2.
您将获得与以前相同的 JSON。这是第2章中硬编码实现的微服务内部实现变化, 编写您的第一个云原生应用程序, 到 HSQLDB、MongoDB,现在是 Elasticsearch。
由于 Spring Data 框架,访问驱动程序并与之通信的代码已经被我们大量抽象出来,所以我们需要做的就是添加以下内容:
- Dependencies in the Maven POM file.
- Base class to extend from in the case of a repository.
- Annotations to use for the entities.
- Properties to configure in application properties.
到目前为止,我们已经查看了 getting 数据。我们来看一些数据修改操作,例如创建、更新和删除(CRUD 操作)。
鉴于 REST 在基于云的 API 操作中的流行,我们将通过 REST 方法进行数据操作。
让我们选择本章之前使用的带有 Hazelcast 的 HSQLDB 示例。
GET 方法很简单,但是 choice创建、插入和删除等操作的方法需要深思熟虑。我们将按照行业指南遵循约定:
网址 |
HTTP 操作 |
服务方法 |
说明 |
|
|
|
获取给定 ID 的产品 |
|
|
|
插入产品并返回新 ID |
|
|
|
使用请求正文中的数据更新给定 ID 的产品 |
|
|
|
使用提供的 ID 删除产品 |
让我们看看 ProductService 类中的实现。我们已经有了本章前面的 getProduct 实现。让我们添加其他方法。
暂且不说 validations (我们稍后会介绍),实现 REST 接口的插入看起来非常简单.
我们将 POST 操作映射到 insertProduct 方法,在实现中,我们只需调用 save 在已定义的存储库上:
请注意与我们之前编写的 getProduct 方法的一些区别:
- We have added a
POSTmethod in@RequestMappingso that the URL will map to theinsertProductmethod when HTTPPOSTis used. - We are capturing the
productdetails from the@RequestBodyannotation. This is expected to be supplied when inserting a new product. Spring does the job of mapping JSON (or XML) to theProductclass for us. - We are returning a
ResponseEntityinstead of just aProductobject as we did in thegetProductmethod. This allows us to customize the HTTP responses and headers, which is important in REST architecture. For a successful insert, we are returning an HTTPOK(200) response, telling the client that his request to add a product was successful.
测试我们的 insertProduct 方法的步骤如下:
- Start the Eureka server, then the
productservice (assuming it is listening on8082). - Note that a browser will not suffice now, as we want to indicate the HTTP methods and provide a response body. Use Postman or cURL instead.
- Set the content-type to
application/json, since we will be submitting the new product information as a JSON. - Provide the production information in JSON format, such as
{"name":"Grapes","catId":1}. Note we are not providing a product ID:
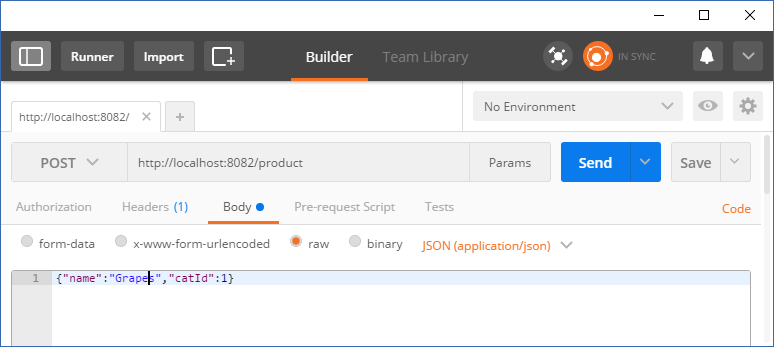
- Hit
Send. You will get a response with the product JSON. This time, an ID will be populated. This is the ID generated by the repository (which in turn got it from the underlying database).
在这里,我们将使用 PUT 方法代替 POST indicating 要在 URL 模式中更新的产品的 ID。与 POST 方法一样,@RequestBody 注解中提供了要更新的产品的详细信息:
实施包括:
- Retrieving an existing product from the repository.
- Making changes to it as per business logic.
- Saving it back to the repository.
- Returning the updated product (for client verification) with an
OKstatus as before.
如果您没有注意到,最后两个步骤与插入盒完全一样。只是产品的检索和更新是新的步骤。
测试我们的 insertProduct 方法的步骤如下:
- As we did for inserting a product, fire up Eureka and
ProductServiceagain. - Let's change the product description of the first product to
Fuji Apples. So, our JSON looks like{"id":1,"name":"Fuji Apples","catId":1}. - Prepare Postman to submit the
PUTrequest as follows:
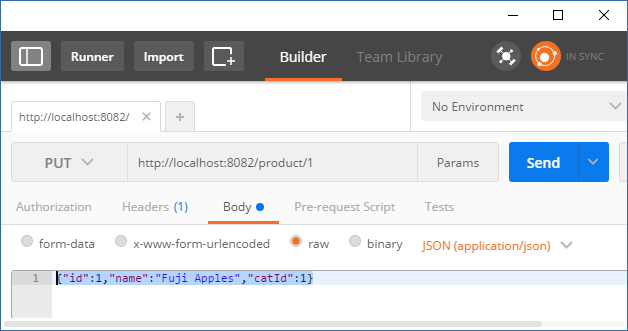
- Hit
Send. You will get a response200 OKwith the body containing the JSON{"id":1,"name":"Fuji Apples","catId":1}. - Fire a
GETrequesthttp://localhost:8082/product/1to check the change. You will findappleschanged toFuji Apples.
我们在存储库上调用 delete 操作并将 OK 返回给客户端,假设一切正常。

如果您执行填充缓存的 get 操作,则缓存更新或失效必须在 PUT/POST/DELETE 操作会更新数据。
如果您还记得,我们有一个缓存,其中包含与 category ID 对应的产品。当我们使用为插入、更新和删除而创建的 API 添加和删除产品时,需要刷新缓存。我们的首选是检查是否可以更新缓存条目。但是,拉取缓存对应的类别的业务逻辑存在于数据库中(通过 WHERE 子句)。因此,最好在产品更新发生时使包含关系的缓存无效。
缓存用例的一般假设是读取远高于插入和更新。
要启用缓存驱逐,我们必须在 ProductRepository 类中添加方法并提供注释。因此,除了现有的 findByCatId 方法外,我们在接口中添加了两个新方法,并将 eviction 标记为 false:
虽然前面的代码是一个有效的解决方案,但它并不高效。它清除整个缓存。我们的缓存可能有 100 多个类别,清除与插入、更新或删除的产品无关的类别是不对的。
我们可以更聪明一点,只清除与正在操作的类别相关的条目:
由于 Spring 表达式语言 (SpEL
),以及 CacheEvict 的文档:
keyindicates what cache entry we want to clear.#resultindicates the return result. We extract thecatIdout of it and use it to clear the data.#p0indicates the first parameter in the method called. This is theproductobject that we want to use the category from and then delete the object.
要测试缓存删除是否正常工作,请启动服务和 Eureka,触发以下请求,并观察结果:
请求 |
结果 |
|
获取分类 |
|
从缓存中获取产品。 SQL 中没有更新的条目。 |
将 |
将新的 Mango 产品添加到数据库中。 |
|
反映新添加的芒果。 SQL 表示数据已刷新。 |
到目前为止,我们一直在非常 安全的领域和假设幸福的道路。但并非everything 总是正确的。有很多场景,例如:
GET,PUT,DELETErequests for products that don't exist.PUTandPOSTmissing critical information, for example, no product name or category.- Business validations, such as products, should belong to known categories and names should be more than 10 characters.
- Incorrect formats of the data submitted, such as alphanumeric for category ID where only an integer was expected.
这些并不详尽。因此,当出现问题时,进行验证并返回适当的错误代码和消息总是很重要的。
如果请求在请求主体 being 提交的格式中存在错误(例如,无效的 JSON),那么 Spring 会抛出一个在到达方法之前出错。
例如,对于 http://localhost:8082/product 的 POST 请求,如果提交的正文缺少逗号,如{"id":1 "name":"Fuji Apples" "catId":1},则返回的错误为400< /code> 如下。这表明这是一个格式错误的请求:
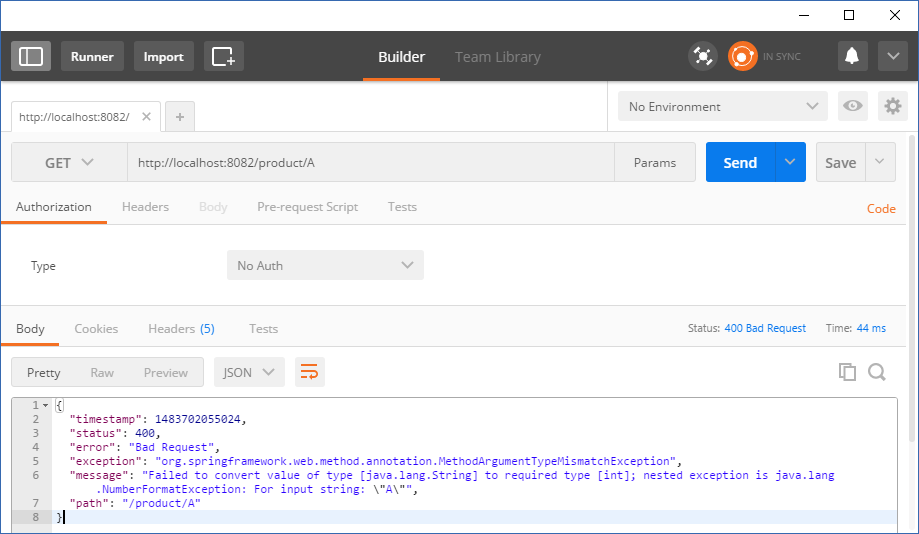
同样,一个字母而不是数字,例如 ID 中的,将足够早地被捕获。例如,http://localhost:8082/product/A 将导致 Failed to convert value 错误:
在 entity 级别可以捕获一些错误,如果它们是不允许的。例如,当我们将 Product 实体注释如下时,不提供产品描述:
这将导致在尝试保存请求中提供的不带名称的产品时出现错误消息,例如 {"id":1, "catId":1}。
服务器返回 500 内部服务器错误,并给出如下详细信息:
这不是返回给客户端的非常干净的消息。因此,最好提前捕获验证并将 400 错误代码返回给客户端。
如果出现错误,begin 最简单的方法是指示错误message 告诉我们出了什么问题,尤其是在输入请求或业务验证错误的情况下,因为客户端(或请求者)可能不知道出了什么问题。例如,在上述情况下,返回 NOT_FOUND 状态码,但未提供其他详细信息。
Spring 提供了有趣的符号,例如 ExceptionHandler 和 ControllerAdvice 来处理这个错误。让我们看看这是如何工作的。
其次,之前的服务方法是通过发送HTTP代码直接操作ResponseEntity。我们会将其还原为返回业务对象,例如 Product 而不是 ResponseEntity,使其更像 POJO。将前面讨论的 deleteProduct 代码还原为以下内容:
在前面的代码中:
- We are returning
Productinstead ofResponseEntity, as handling error codes and responses will be done externally. - An exception is thrown (a runtime exception or its extended version) that tells us what was wrong in the request.
- The scope of the
Productmethod ends here.
BadRequestException 类是一个提供 ID 并从 RuntimeException 类扩展而来的简单类:
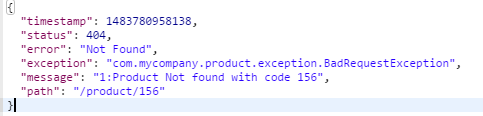
当您现在执行该服务时,我们将收到一条正确的消息,指示出了什么问题,而不是仅仅获得 404 Not Found 状态。查看发送的请求和收到的异常的屏幕截图:
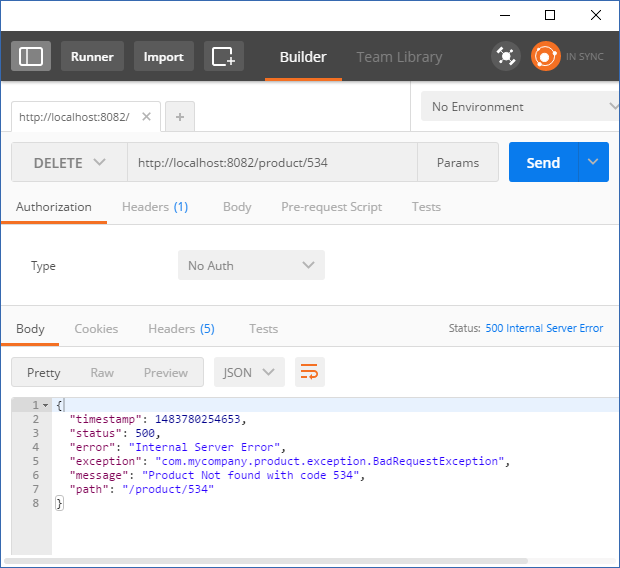
但是,发送 500 并在日志中获取异常堆栈并不干净。 500 表明错误处理不可靠并且堆栈跟踪被抛出。
因此,我们应该捕获并处理这个错误。 Spring 提供了可以在服务中使用的 @ExceptionHandler。方法上的这个注解使 Spring 能够调用该方法来处理错误:
当我们现在执行服务,并使用不可用的产品 ID 调用 DELETE 方法时,错误代码变得更加具体并且看起来足够干净:
现在,更进一步,如果我们希望所有服务都遵循引发 BadRequestException 并返回正确错误代码的模式怎么办? Spring 提供了一种称为 ControllerAdvice 的机制,当在类中使用时,类中的异常处理程序可以普遍应用于范围内的所有服务。
新建一个类如下,放入异常包中:
这允许以一致的方式跨服务处理异常。
正如上一章所讨论的,我们在上一节中看到,CQRS 模式提供了一种高效且适合用于分别处理命令和查询的目的数据模型。回顾一下,我们在 MongoDB 中有一个灵活的文档模型来处理带有事务保证的命令模式。我们在 Elasticsearch 中有一个灵活的查询模型来处理复杂的搜索条件。
尽管由于适合目的查询模型,这种模式允许更轻松的查询,但挑战来自于跨各种模型更新数据。在上一章中,我们讨论了在模型中保持信息更新的多种机制,例如分布式事务,以及使用发布-订阅消息传递的最终一致模型。
在接下来的部分中,我们将研究使用消息传递和更新数据的异步机制。
HTTP/REST 提供了请求response 机制来执行服务。客户端等待(或者更确切地说,阻塞)直到处理完成并使用服务结束时提供的结果。因此,处理被称为是同步的。
在异步处理中,客户端不等待响应。异步处理可用于两种场景,如fire-and-忘记和请求/响应。
在“一劳永逸”中,客户端向下游服务发送命令或请求,然后不需要响应。它通常用于管道 processing 架构中,其中一个服务对请求进行丰富和处理并将其发送到另一个服务,它发送到第三个服务,依此类推。
在异步请求/响应中,客户端向服务发送请求,但与同步处理不同的是,它不会等待或阻塞响应。当服务完成处理时,它必须通知客户端,以便客户端可以使用响应。
在 CQRS 中,我们使用消息传递向各种服务发送更新事件,以便可以更新读取或查询模型。
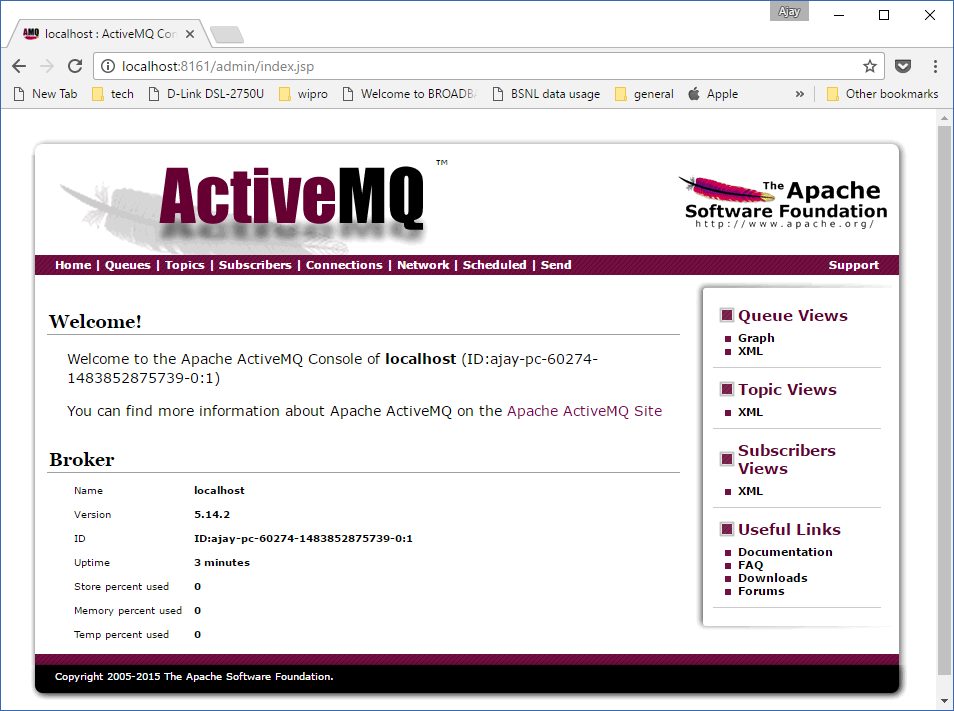
首先,我们将在本章中使用 ActiveMQ 作为可靠的消息传递机制,然后在后面的章节中将 Kafka 视为可扩展的分布式消息传递系统。
- Download ActiveMQ from the Apache website (http://activemq.apache.org/).
- Unzip it to a folder.
- Navigate to the
binfolder. - Run the
activemq startcommand.
打开控制台查看消息并在 http://localhost:8161/admin 管理 ActiveMQ 并使用 admin/admin 登录.您应该看到 UI 界面如下:

当 CQRS 中有多个模型时,我们遵循 golden 源模式,如前所述:
- Once the update is complete, a broadcast message is put on a topic.
- If there is an error in putting the message on topic, the transaction is rolled back and the client is sent an error.
我们使用 MongoDB 和 Elasticsearch 进行了 CQRS 实现。在我们的例子中,MongoDB 是产品数据的黄金来源(也是命令模型)。 Elasticsearch 是包含从搜索角度组织的数据的查询模型。
我们先来看看更新命令模型还是黄金源。

当插入、删除或更新 操作 发生时,对于 golden 源系统广播更改,以便可以发生很多下游操作。这包括:
- Cache clearance by dependent systems.
- Update of the local data models in the system.
- Doing further business processing, for example, sending emails to interested customers on the addition of a new product.
- Include Spring starter for ActiveMQ in our POM file:
- We have to enable JMS support for our Spring application. Therefore, include an annotation in the
ProductSpringApp.javafile as follows, and provide a message converter. The message converter will help convert objects to JSON and vice versa:
- Create an entity that encapsulates the
Productand the action, so that whoever gets the product message will also know if the action performed was delete or insert/update, by adding the entity in theProductUpdMsg.javafile as follows:
如果还有更多操作,请随时根据您的用例将 isDelete 标志更改为字符串动作标志。
- Configure the JMS properties in the
application.propertiesfile. Thepub-sub-domainindicates a topic should be used instead of a queue. Note that by default, the message is persistent:
- Create a message producer component that will do the job of sending messages:
- This is based on Spring's
JmsMessagingTemplate - Uses
JacksonJmsMessageConverterto convert from object to message structure
- This is based on Spring's
ProductMsgProducer.java 文件如下:
- Finally, in your service, declare the
producerand invoke it after finishing the insert, update, and delete operations and before returning the response. TheDELETEmethod is shown in the following, where the flagisDeleteis true. The other methods will have the flag as false. TheProductService.javafile is as follows:
这将发送有关该主题的消息,您可以在管理控制台的主题部分下看到该消息。
在 productsearch 项目中,我们必须进行 更改 来更新Elasticsearch 中的记录。
- MongoDB methods had stringent validations. Validations are not required for Elasticsearch as the master (command model or golden source) is assumed to be updated and we have to apply the updates to the query model.
- Any error in updating the query model has to be alerted, and should not go unnoticed. We will look at that aspect in the chapters ahead.
- We do not separate the insert and update method. The single save method suffices for both purposes due to our
ProductRepositoryclass. - Also, these methods do not have to be exposed as REST HTTP services, as they might not be called directly other than through message updates. We do that here only for convenience.
- In the
product-nosql(MongoDB) project, we called ourProductMsgProducerclass from theProductServiceclass. In thisproductsearch-nosqlproject, it will be the other way around, with theProductUpdListenercalling the service methods.
以下是更改:
- Maven POM—dependency on the ActiveMQ:
- Application properties to include the topic and connection details:
Productservice to include calls to repository save and delete methods:
JMS相关的类和变化如下:
- In
ProductSpringApp, include annotationEnableJms, as done in the MongoDB project. - Create a
ProductUpdListenerclass that calls the service:
- Start the three server processes on a local machine, such as Elasticsearch, MongoDB, and ActiveMQ, as discussed earlier.
- Start the Eureka server.
- Start the two applications, one connecting to MongoDB (golden source, command model), listening on
8085and the other connecting to Elasticsearch (query model), listening on8086. - Test the
GETrequest on Elasticsearch—http://localhost:8086/products?id=1, and note the IDs and descriptions. - Now, change the product description on the golden source by issuing the following on your Postman, assuming the service is listening on port
8085:

- Test the
GETrequest on Elasticsearch again—http://localhost:8086/products?id=1. You will find the product description in Elasticsearch is updated.
在本章中,我们介绍了很多核心概念,首先是添加一个常规关系数据库来支持我们的 get 请求。我们通过本地缓存和分布式缓存 Hazelcast 增强了它的性能。我们还研究了 CQRS 模式,将我们的关系数据库替换为 MongoDB 以实现灵活的模式,并用 Elasticsearch 来实现灵活的搜索和查询功能。
我们向 product 服务添加了插入、更新和删除操作,并确保在关系项目的情况下发生必要的缓存失效。我们向我们的 API 添加了输入验证和正确的错误消息。我们介绍了事件以确保查询模型与命令模型保持同步。这是通过发送更改广播的命令模型服务和侦听更改并更新其数据模型的查询模型服务来实现的。
接下来,我们将研究如何使这些项目足够健壮以在运行时环境中工作。