读书笔记《developing-java-applications-with-spring-and-spring-boot-ebook》应用程序测试
在本章中,我们将介绍以下主题:
- Creating tests for MVC controllers
- Configuring a database schema and populating it
- Creating tests using an in-memory database
- Creating tests using mock objects
- Creating a JPA component test
- Creating a WebMvc component test
- Writing tests using Cucumber
- Writing tests using Spock
在前面的章节中,我们做了很多编码。我们从头开始创建了一个新的 Spring Boot 应用程序,添加了一个 MVC 组件和一些数据库服务,对应用程序行为进行了一些调整,甚至编写了我们自己的 Spring Boot 启动器。现在是时候进行下一步了,了解 Spring Boot 在测试所有这些代码时提供了哪些工具和功能,以及它与其他流行测试框架的集成程度。
我们将看到如何使用 Spring JUnit 集成来创建单元测试。接下来,我们将探索使用测试数据设置数据库以对其进行测试的选项。我们将然后看看行为驱动开发< /span> (BDD) 工具 Cucumber 和 Spock 并了解它们如何与 Spring Boot 集成。
在previous章节中,我们逐渐 创建我们的应用程序,但是我们怎么知道它实际上做了我们想要它做的事情呢?更重要的是,我们如何确定在六个月后,甚至一年后,它仍会继续做我们一开始期望它做的事情?最好通过创建一组测试来回答这个问题,最好是自动化的,这些测试对我们的代码运行一组断言。这确保了我们在给定特定输入的情况下不断获得相同和预期的输出。测试给了我们急需的安心,我们的应用程序不仅编码优雅并且看起来很漂亮,而且它还可以可靠地执行并且尽可能地无错误。
在 第 23 章中,编写自定义 Spring Boot Starters< /em>,我们离开了配备自定义编写的 Spring Boot 启动器的 Web 应用程序。我们现在将创建一些基本测试来测试我们的 Web 应用程序并确保所有控制器都公开预期的 RESTful URL,我们可以将其作为服务 API 依赖。这种类型的测试有点超出通常所说的单元测试,因为它测试整个 web 应用程序,它要求应用程序上下文完全初始化,并且所有的 bean 应该连接在一起 才能工作。这种测试有时被称为集成< /span> 或 服务测试。
- Spring Boot gets us going by creating a placeholder test file,
BookPubApplicationTests.java, in thesrc/test/java/com/example/bookpubdirectory at the root of our project with the following content:
- In
build.gradle, we also get a test dependency onspring-boot-starter-test, as follows:
- Execute the tests by running
./gradlew clean test. - By looking at the console output, we can tell that our tests have succeeded and are running, but we don't really see much information besides the following lines (truncated for brevity):
- Better insight can be gathered by viewing the HTML reports that are generated by Gradle, which can be opened in the browser and reside in
build/reports/tests/index.html, as shown in the following screenshot:

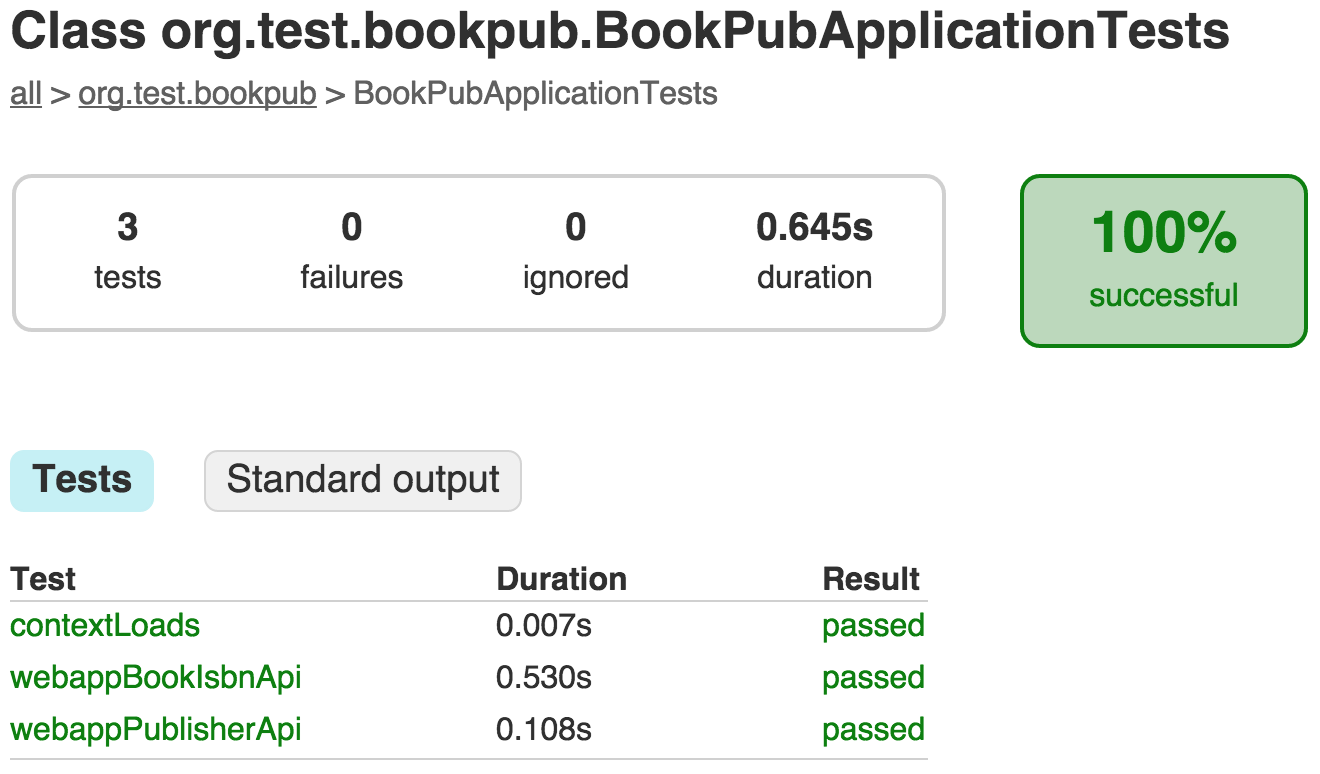
- The more curious minds can also click on the
Standard outputbutton in order to see the runtime application logs that are produced during the execution of the test.
现在我们已经创建了第一个测试,让我们详细检查代码。
我们将首先查看为 BookPubApplicationTests 类声明的以下注解:
@RunWith(SpringRunner.class): This is a standard JUnit annotation that we can configure so as to use theSpringRunner, providing functionality to bootstrap the Spring Boot framework to the standard JUnit tests.@SpringBootTest(webEnvironment=SpringBootTest.WebEnvironment.RANDOM_PORT): This is an annotation that marks the class as a Spring Boot test. It will use the Spring Boot framework to configure the test class instance, provide appropriate configuration, autowiring, and so on. ThewebEnvironment=SpringBootTest.WebEnvironment.RANDOM_PORTattribute means that the current test is going to use a real, running service instance and will require a complete context initialization and application startup, as if it were the real deal. TheRANDOM_PORTvalue is used to tell Spring Boot to start the Tomcat server on a randomly-chosen HTTP port, which we will later obtain by declaring the@LocalServerPortprivate int port;value field. This ability to select a random HTTP port is very handy when running tests on a Jenkins or any other CI server where, if multiple jobs are running in parallel, you could encounter port collision.
类注解魔法解除后,让我们看一下类本身的内容。由于这是一个 Spring Boot 测试,我们可以在执行期间将 Spring 管理的任何对象声明为 @Autowired 或使用 @Value 注释。在我们的测试中,我们自动装配了 WebApplicationContext 和 BookRepository 对象,以及 的一个实例TestRestTemplate,我们将在执行标准 JUnit @Test 带注释的测试用例时使用它。
在第一个 test 案例中,contextLoads() 方法,我们将只需断言我们已经建立了 BookRepository 连接并且它包含一个书籍条目。
我们的第二个 test 将确保我们的 Web 应用程序响应 Book< 的 RESTful URL /code> 通过 ISBN - "/books/{isbn}" 查找。对于这个测试,我们将使用 TestRestTemplate 的实例,并在随机选择的端口上对正在运行的实例进行 RESTful 调用。 Spring Boot 提供了 port 字段的值。
Note
在 webappBookIsbnApi 测试中,我们使用了一个完整的 URL,其起始部分是 "http://localhost:" + port ,如果 TestRestTemplate 是由 Spring Boot 自动装配和注入的,这在技术上不是必需的。在这种情况下,可以使用相对 URL,类似于 Book book = restTemplate.getForObject("/books/978-1-78528-415-1", Book.class); 和 TestRestTemplate 将自动确定正在运行的测试服务器实例的端口。
或者,我们可以通过 MockMvc 对象执行相同风格的测试。这是由 Spring Test Framework 提供的,允许您执行 MVC 测试,而无需通过 RestTemplate 实际执行基于客户端的测试,而是完全在服务器端执行控制器请求从与测试应用程序相同的上下文中执行。
为了使用 MockMvc,我们将使用 MockMvcBuilders 实用程序使用 @ 构建实例自动装配的 WebApplicationContext。我们将在 setup 方法中执行此操作,这样我们就不必在每个测试中明确地执行此操作。
Note
如果我们使用 WebEnvironment.MOCK 来注释我们的测试,也可以让 Spring Boot 自动创建 MockMvc 的实例RANDOM_PORT。该配置只会使测试在模拟上下文中运行,并且不会启动真正的服务器。我们的示例展示了如何在同一个测试类中结合拥有一个真实的服务器实例和 MockMVC。
MockMvc 为我们提供了一套非常广泛的功能,以便对几乎所有与 Web 请求相关的事物执行断言。它被设计为以方法链方式使用,允许我们将各种测试链接在一起并形成一个很好的、连续的逻辑链:
perform(get(...)): This method sets up the web request. In our particular case, we perform a GET request but theMockMvcRequestBuildersclass provides us with static helper functions for all the common method calls.
andExpect(...): This method can be invoked multiple times, where each call represents an evaluation of a condition against the result of theperform(...)call. The argument of this call is any implementation of theResultMatcherinterface along with many stock ones that are provided by theMockMvcResultMatchersstatic utility class. This really opens up the possibility of having an infinite number of different checks such as verifying the response status, content type, values stored in a session, flash scope, verify redirects, contents of the rendering model or headers, and much more. We will use a third-partyjson-pathadd-on library (which is automatically brought as aspring-boot-testdependency) to test the JSON response data in order to ensure that it contains the right elements in the right tree hierarchy.andExpect(jsonPath("$.name").value("Packt"))validates that we have a name element at the root of the JSON document with a value ofPackt.
Note
要了解更多关于 MockMvc 中可用的各种可能性,可以参考https://github.com/spring-projects/spring-mvc-showcase/tree/master/src/test/java/org/springframework/样本/mvc。
在本书前面的第21章中,配置Web 应用程序,我们在 StartupRunner 的 run(...) 方法中手动向数据库添加了一些条目。虽然 doing 以编程方式可能是一种快速简便的方法,但从长远来看,它不是这样做确实是个好主意,尤其是在处理大量数据时。将 database 准备、更改和其他配置与其余正在运行的应用程序代码(甚至如果它正在设置测试用例。值得庆幸的是,Spring 为您提供了支持,使这项任务变得相当简单明了。
我们将继续使用我们在上一个秘籍中留下的应用程序的状态。 Spring 为我们提供了几种方法来定义如何在数据库中填充结构和数据。第一种方法依赖于使用 Hibernate 通过从我们定义的 @Entity 对象推断它并使用 import.sql
文件来填充数据。第二种方法是使用普通的旧 Spring JDBC 功能,它依赖于使用 schema.sql 文件,该文件包含数据库表定义和相应的 data.sql 包含数据的文件。
- First, we will remove the programmatic database population which we created in Chapter 21, Configuring Web Applications. So let's comment out the following code from the
StartupRunner's run(...)method:
- If we were to run our tests, they might fail if the
test.h2.dbfile is missing because they expect the data to be in the database. We will populate the database by creating a Hibernateimport.sqlfile in thesrc/main/resourcesdirectory at the root of our project with the following content:
- Another way to do this is to use the Spring JDBC support for
schema.sqlanddata.sql. Let's rename the newly-createdimport.sqlfile todata.sqland create aschema.sqlfile in the same directory with the following content:
- As we are now manually creating the database schema, we will need to tell the Hibernate mapper not to automatically derive one from the entities and populate the database with it. So, let's set the
spring.jpa.hibernate.ddl-auto=noneproperty in theapplication.propertiesfile in thesrc/main/resourcesdirectory at the root of our project. - Execute the tests by running
./gradlew clean testand they should get passed.
在这个秘籍中,我们实际上探索了两种实现相同目标的方法,这在你生活在春天生态系统。根据使用的组件,它是普通的 Spring JDBC、带有 Hibernate 的 Spring JPA,还是 Flyway 或 Liquibase 迁移,填充和初始化 数据库不同,但最终结果几乎相同。
Note
Flyway 和 Liquibase 都是提供增量数据库迁移功能的框架。当人们想要以编程的、可描述的方式维护数据库更改的增量日志时,这非常方便,并且能够快速将数据库置于特定版本的所需状态。虽然这些框架在提供此类支持方面的方法不同,但它们的目的是相似的。更详细的信息可以在他们各自的网站上获得,http://flywaydb.org< /a> 和 http://www.liquibase.org .
在前面的示例中,我们探索了填充和初始化数据库的两种不同方法。
在这种方法中,大部分工作实际上是由 Hibernate 库完成的,我们只需设置适当的配置并创建 Hibernate 完成工作所需的常规预期文件:
- The
spring.jpa.hibernate.ddl-auto=create-dropsetting instructs Hibernate to use the@Entitymodels and, based on their structure, automatically deduces the database schema. Upon starting the application, the calculated schema will be used to preinitialize the database table structure; when the application is shut down, it will all be destroyed. Even in the event that the application was forcefully terminated or it abruptly crashed, upon startup, if the existing tables are detected, they will be dropped and recreated from scratch. So it's probably not a good idea to rely on this for a production environment.
- Hibernate expects that the
import.sqlfile is residing in the root of the classpath. This is used to execute the declared SQL statements upon application startup. While any valid SQL statement can go in the file, it is recommended that you put in the data-importing statements such asINSERTorUPDATEand steer clear of table structure mutations, as the schema definition is already taken care of by Hibernate.
如果 application 不使用 JPA,或者您不想 depend 关于 Hibernate 功能,Spring 为您提供了另一种设置数据库的方法,只要 spring-boot-starter-存在 jdbc 依赖项。因此,让我们看看我们为使其正常工作所做的工作,如下面的列表所示:
- The
spring.jpa.hibernate.ddl-auto=nonesetting tells Hibernate not to do any automatic handling of the database if the Hibernate dependency also exists, as it does in our case. This setting is good practice for a production environment as you probably don't want to get all of your database tables wiped clean inadvertently. That would be one hell of a disaster, that's for sure! - The
schema.sqlfile is expected to exist in the root of the classpath. It is executed by Spring during the schema creation of the database upon every startup of the application. However, unlike Hibernate, this will not drop any of the existing tables automatically, so it might be a good idea to either useDROP TABLE IF EXISTSto delete an existing table before creating the new one, or useCREATE TABLE IF NOT EXISTSas part of the table creation SQL if you only want to create new tables when they don't already exist. This makes it a lot more flexible to declare the database structure evolution logic, thus making it safer to be used in production as well. - The
data.sqlfile is expected to exist in the root of the classpath. This is used to execute the data population SQL, so this is where all theINSERT INTOstatements go.
鉴于这是 Spring 的原生功能,我们还将获得不仅可以在全局范围内定义模式和数据文件的能力,还可以根据特定的数据库平台来定义模式和数据文件。例如,我们可以有一组可用于 Oracle 的文件 schema-oracle.sql 和另一组用于 MySQL 的文件 架构-mysql.sql。这同样适用于 data.sql 变体;但是,不必为每个平台定义它们,因此虽然您可能有特定于平台的模式文件,但可能有一个共享数据文件。 spring.datasource.platform 如果你想覆盖 Spring Boot 的自动推导值,可以显式设置配置值。
Note
如果想要覆盖 schema.sql 和 data.sql 的默认名称,Spring Boot 提供了配置属性,其中我们可以使用 spring.datasource.schema 和 spring.datasource.data 来控制。
在前面的秘籍中,我们探索了如何获取我们的数据库 设置所需的表并填充所需的数据。在测试方面,典型的挑战之一是正确和可预测地设置环境,以便在执行测试时,我们可以以确定性的方式安全地断言行为。在连接到数据库的应用程序中,确保数据库包含可以评估断言的确定性数据集非常重要。对于精心设计的测试套件,还需要能够根据测试刷新或更改该数据集。值得庆幸的是,Spring 有一些很好的工具可以帮助您完成这项任务。
我们将从我们的 BookPub 应用程序的状态中获取我们在上一个秘籍中留下的状态。此时,我们有了定义所有表的 schema.sql 文件,并且我们还需要在 中定义的带有一些起始数据的数据库数据.sql。在这个秘籍中,我们将扩展我们的测试以使用为特定测试套件量身定制的特定数据夹具文件。
- We now need a way to load this file when our test runs. We will modify our
BookPubApplicationTestsclass in the following way:
- Execute the tests by running
./gradlew clean test, and they should continue to get passed despite us adding another book and its author to the database.
- We can also use the method of populating the database that we learned in the previous recipe. As the test code has its own
resourcesdirectory, it is possible to add anotherdata.sqlfile to it, and Spring Boot will use both the files to populate the database. Let's go ahead and create thedata.sqlfile in thesrc/test/resourcesdirectory at the root of our project with the following content:
Note
由于 Spring Boot 从类路径中收集所有出现的数据文件,因此可以将数据文件放在 JAR 或不同的物理位置中,这些位置最终都位于类路径的根目录下。同样重要的是要记住,这些脚本的加载顺序不是确定性的,如果您依赖某些引用 ID,最好使用 select 来获取它们而不是做出假设。
- As we added another book to the database and we now have three of them, we should fix the assertion in our
contextLoads()test method:
- Execute the tests by running
./gradlew clean testand they should continue to get passed. - It would be a fair statement to say that when running unit tests, an in-memory database is probably more suitable for the role than a persistent one. Let's create a dedicated test configuration instance of the
application.propertiesfile in thesrc/test/resourcesdirectory at the root of our project with the following content:
Note
重要的是要知道 Spring Boot 只从类路径加载一个application.properties 文件。当我们在src/test/resources中创建另一个application.properties时,前一个来自 src/main/resources 不再加载,因此其中定义的所有属性都没有合并到环境中。因此,您应该配置所有必需的属性值。在我们的例子中,我们必须重新定义 spring.jpa.hibernate.dll-auto 属性,即使它已经在 src/ main/resources/application.properties 位置。
- Execute the tests by running
./gradlew clean testand the tests should continue to get passed.
在这个秘籍中,我们依赖于 Spring id326349802" class="indexterm"> 初始化和填充数据库,以便让我们的数据库填充运行测试和断言所需的数据。但是,我们还希望能够使用一些仅与特定测试套件相关的数据。为此,我们使用 ResourceDatabasePopulator 和 DatabasePopulatorUtils 类在测试执行之前插入所需的数据。这些与 Spring 内部用于处理 schema.sql 和 data.sql 文件的类完全相同,除了现在,我们明确定义了我们想要执行的脚本文件。
因此,让我们逐步分解我们所做的事情,如下所示:
- We created a setup method named
loadDataFixtures(), which we annotated with a@Beforeannotation to tell JUnit to run it before every test. - In this method, we obtained a resource handle to the
classpath:/test-data.sqldata file that resides in our application's classpath and where we store our test data and execute it against@Autowired DataSource ds. - As Spring can only autowire dependencies in the instances of the class, and the
@Beforeannotated setup methods get executed for every test, we had to get a little creative in order to avoid repopulating our database with the duplicate data for every test instead of once per test suite/class. To achieve this, we created astatic boolean loadDataFixturesvariable that retained its state for every instance of theBookPubApplicationTestsclass, thus ensuring that we executedDatabasePopulatorUtilsonly once. The reason that the variable has to be static is as a new instance of the test class gets created for every test method that it runs in the class; having thebooleanflag at the instance level will not do the trick.
Note
或者,我们可以使用 @Sql 注释而不是 loadDataFixtures() 方法并标记我们的 BookPubApplicationTests 类作为 @Transactional 以确保 test-data.sql 文件在每个运行测试方法。然后我们可以回滚到数据库的执行前状态。
这使得测试设置有点 simpler 并且事务部分允许 have 测试可以改变数据库中的数据而不用担心竞争条件,但是这样做的缺点是在每次测试之前执行 SQL 填充,这会增加一些额外的延迟。
为了完成这项工作,我们需要删除 loadDataFixtures() 方法并将以下注释添加到 BookPubApplicationTests 类:
- For the finishing touch, we decided to have a separate
application.propertiesfile to be used for testing purposes. We added this to oursrc/test/resourcesclasspath with a testing configuration of the in-memory database instead of using the file-based persistent one.
与
application.properties不同,其中只能从类路径加载一个文件,Spring 支持许多将合并在一起的配置文件配置。因此,与其声明一个完全独立的application.properties文件,我们可以创建一个application-test.properties文件并设置一个运行测试时要测试的活动配置文件。
在上一个秘籍中,我们使用 一个数据夹具文件来填充内存数据库,以便在可预测的情况下运行我们的测试和静态数据集。虽然这使得测试一致 并且具有确定性,但我们仍然付出了必须创建数据库、填充数据的代价,并初始化所有 JPA 和连接组件,这可能被视为测试的多余步骤。幸运的是,Spring Boot 提供了内部支持,能够模拟 bean 并将它们作为组件注入测试中以进行设置,并进一步用作应用程序上下文中的依赖项。
让我们看看如何使用 Mockito 的强大功能,这样我们就完全不需要依赖数据库了。我们将学习如何使用 Mockito 框架优雅地模拟 Repository 实例对象和一些 @MockBean 注解技巧。
- Execute the tests by running
./gradlew clean testand the tests should get passed
这里发生了一些神奇的事情。让我们从我们放入 MockPublisherRepositoryTests 类的注释开始:
- The
@SpringBootTestannotation'swebEnvironmentattribute was replaced withWebEnvironment.NONE. This is to inform Spring Boot that we don't want a full application web server to be initialized for this test, since we will only be interacting with the repository object, without making calls to controllers or using any part of the WebMvc stack. We did this to save test startup time, and if one is curious to see the difference, just simply switching it back to theWebEnvironment.RANDOM_PORTvalue and rerunning the test would show that the time has almost doubled. (On my beefy MacBook Pro, it increased from 5 seconds to almost 9.)
通过检查应用程序更改,现在让我们看看我们在 MockPublisherRepositoryTests 类本身中做了什么:
- The
@MockBeanannotation instructs Spring that this dependency is not a real instance, but amockobject currently backed by the Mockito framework. This has an interesting effect in that it actually replaces ourPublisherRepositorybean instance in the context with the mock one, so, everywhere within the context, all dependencies forPublisherRepositoryget wired with the mocked version instead of a real, database-backed one.
现在我们知道了 PublisherRepository 的模拟实例是如何被注入到我们的测试中的,让我们来看看新创建的测试设置方法。特别感兴趣的两个方法是 setupPublisherRepositoryMock() 和 resetPublisherRepositoryMock()。它们描述如下:
- The
setupPublisherRepositoryMock()method is annotated with@Before, which tells JUnit to execute this method before running every@Testmethod in the class. We will use the Mockito framework in order to configure the behavior of our mocked instance. We configure it such, that when therepository.count()method is called, it will return5as a result. The Mockito, Junit, and Hamcrest libraries provide us with many convenient DLS-like methods, which we can use to define such rules with an English-like, easy-to-read style. - The
resetPublisherRepositoryMock()method is annotated with@After, which tells JUnit to execute this method after running every@Testmethod in the class. At the end of every test, we will need to reset the mocked behavior, so we will use thereset(...)method call to clear out all of our settings and get the mock ready for the next test, which can be used in another test suite altogether.
Note
理想情况下,不需要在测试运行结束时重置mock对象,因为每个测试类都会生成自己的上下文,因此在测试类之间模拟不共享。创建许多较小的测试而不是单个大型测试被认为是一种很好的做法。然而,有一些用例需要在通过容器注入管理模拟时重置模拟,所以我认为值得一提。有关使用reset(...) 的最佳实践,请参阅 https://github.com/mockito/mockito/wiki/FAQ#can-i-reset-a-mock。
我们之前的大多数测试示例都有 来启动整个应用程序并配置所有bean 以便执行。虽然这对于我们的代码很少的简单应用程序来说不是什么大问题,但对于一些更大、更复杂的企业级服务来说,这可能是一个昂贵且冗长的过程。考虑到具有良好测试覆盖率的关键方面之一是执行时间短,我们可能希望选择不必引导整个应用程序以仅测试一个组件,或者 slice,正如 Spring Boot 所指的那样。
在这个秘籍中,我们将尝试创建一个与之前的 PublisherRepository 类似的测试,但不会启动整个容器并初始化所有 bean。方便的是,Spring Boot 为我们提供了 @DataJpaTest 注解,我们可以将它放在我们的测试类中,它会自动配置 JPA 功能所需的所有组件,但不是整个上下文。因此,控制器、服务等 bean 将丢失。该测试非常擅长快速测试实体域对象绑定的有效性,以确保已正确配置字段名称、关联等。
- Execute the tests by running
./gradlew clean testand the tests should continue to pass
与我们的 previous 测试的主要区别在于缺少 @SpringBootTest注释,已被 @DataJpaTest 注释取代。由于 @DataJpaTest 注释执行了大量声明和工作量来配置测试环境,因此测试类本身的明显简单性成为可能。如果我们查看注解定义,我们会看到无数不同的内部注解配置了所有必要的组件。重要的是 @AutoConfigure* 注释,例如 @AutoConfigureDataJpa 或 @AutoConfigureTestDatabase< /代码>。这些注释本质上指示 Spring Boot 在引导测试时导入必要的组件配置。例如,在 @DataJpaTest 中,只有 Cache, DataJpa, TestDatabase 和 TestEntityManager 组件将被配置并可用,这显着减少了测试占用空间,包括内存以及启动和执行次数。然后,正如我们之前所见,从各种工件提供的 META-INF/spring.factories 描述符中加载特定的配置类。
初始化正确的组件后,我们可以利用一些预配置的 bean,例如 TestEntityManager,它使我们能够与数据库的测试实例交互,预初始化其内容的期望状态,并操纵测试数据。这为我们提供了保证,在每个测试套件执行完成后,我们将为下一组测试获得一个干净的状态,而无需显式清理。这使得编写测试变得更容易,而不必担心执行顺序和从一个测试套件到另一个测试套件的更改的潜在过度,避免了导致测试不一致的无意脏状态。
*Test 切片的另一个collection 是@WebMvcTest,它允许我们为应用程序的 WebMvc 部分创建测试,快速测试控制器、过滤器等,同时提供使用 @MockBean 的能力 配置必要的依赖项,例如服务、数据存储库等。
这是 Spring Boot 测试框架提供的另一个非常有用的测试切片,我们将在这个秘籍中探索它的使用,看看我们如何为我们的 BookController
文件,使用预定义的数据集模拟 BookRepository 服务,并确保返回的 JSON 文档是我们基于该数据所期望的。
- Execute the tests by running
./gradlew clean testand the tests should continue to pass
@WebMvcTest 的功能与我们在previous中看到的@DataJpaTest注解非常相似 食谱。区别实际上只是在测试引导期间初始化的一组组件。与 @DataJpaTest 不同,这次没有为我们提供数据库组件,而是获得了 WebMvc 和 MockMvc 配置,它为初始化控制器、过滤器、拦截器等提供了所有必要的基础。出于这个原因,我们必须将 AuthorRepository 和 PublisherRepository 作为模拟 bean 添加到我们的测试代码中,否则测试将失败start 因为 Spring Boot 将无法满足 StartupRunner 类对这两个存储库的 bean 依赖关系。
Note
这个问题的另一个解决方案可能是从StartupRunner类中移除对这两个存储库的依赖,因为我们已经在本章前面注释掉了使用它们的代码,在< span class="emphasis">配置数据库架构并填充它配方。如果这不可行,我想演示如何处理在其他类中有 bean 依赖项的情况,这些依赖项与测试无关,但在初始化和执行期间导致启动失败。
正如我们所看到的,与我们之前的配方测试不同,我们没有使用任何 bean 模拟,因为它正在测试一个没有进一步依赖关系的低层组件,这次我们需要提供一个 BookRepository
mock,我们的 BookController 类正在使用它,我们正在测试它的功能。
我们已经看到如何在 MockPublisherRepositoryTests 类中使用 @Before 注解来预配置 mock 对象,所以这次我们在做直接在 webappBookApi 测试方法中进行配置,类似于我们学习使用 Spock 框架编写测试时将看到的样式。
在 given(...) 调用中,我们预先配置了 BookRepository 模拟对象的行为,指示它返回一个特定的 Book 实例,当它的 findBookByIsbn 方法被调用 "978-1-78528- 415-1" 作为参数。
我们下一次使用 /books/978-1-78528-415-1 调用 mockMvc.perform 会触发 mockMvc.perform code class="literal">BookControllergetBook方法,委托< /a> bookRepository的预连线模拟实例,并使用我们预先配置的Book对象实例来运行验证逻辑。
从日志中可以明显看出,我们可以看到只有 WebMvc 层被引导。没有初始化数据库或其他组件,这大大节省了运行时间,与之前完整的应用程序引导测试所需的 9 秒相比,仅需 3 秒。
单元测试一直是预期软件开发 生命周期已经有很长一段时间了,很难想象没有单元测试的情况下编写代码。测试的艺术并没有保持不变,测试哲学的进步进一步扩展了单元测试的概念,引入了诸如服务测试、集成测试之类的东西,最后,提出了创建测试的所谓 BDD描述整个应用程序行为的套件,而无需深入到代码较低级别的微小实现细节。 Cucumber BDD 就是这样一个框架,它首先在 Ruby 世界中广受欢迎,后来扩展到包括 Java 在内的其他语言。
就本秘籍而言,我们将继续我们的 previous 示例,并通过添加 Cucumber- 继续增强测试套件JVM 实现,它将为我们提供原始 Ruby Cucumber 框架的基于 Java 的版本,并创建一些测试以展示与 Spring Boot 应用程序的功能和集成点。
Note
本秘籍绝不打算涵盖 Cucumber 测试框架提供的全部功能,主要关注 Cucumber 和 Spring Boot 的集成点。要了解有关 Cucumber-JVM 的更多信息,您可以转到 https://cukes .info/docs#cucumber-implementations 或 https://github.com/cucumber/cucumber-jvm 了解详情。
- Next, we will need to create a test driver class to run Cucumber tests. Let's create a
RunCukeTests.javafile in thesrc/test/java/com/example/bookpubdirectory at the root of our project with the following content:
- With the driver class created, we are ready to start writing what Cucumber refers to as Step Definitions. I will talk briefly about what these are in the How it works... section of this recipe. For now, let's create a
RepositoryStepdefs.javafile in thesrc/test/java/com/example/bookpubdirectory at the root of our project with the following content:
- Lastly, we will create one more data SQL file named
packt-books.sqlin thesrc/test/resourcesdirectory at the root of our project with the following content:
- Execute the tests by running
./gradlew clean testand the tests should get passed.
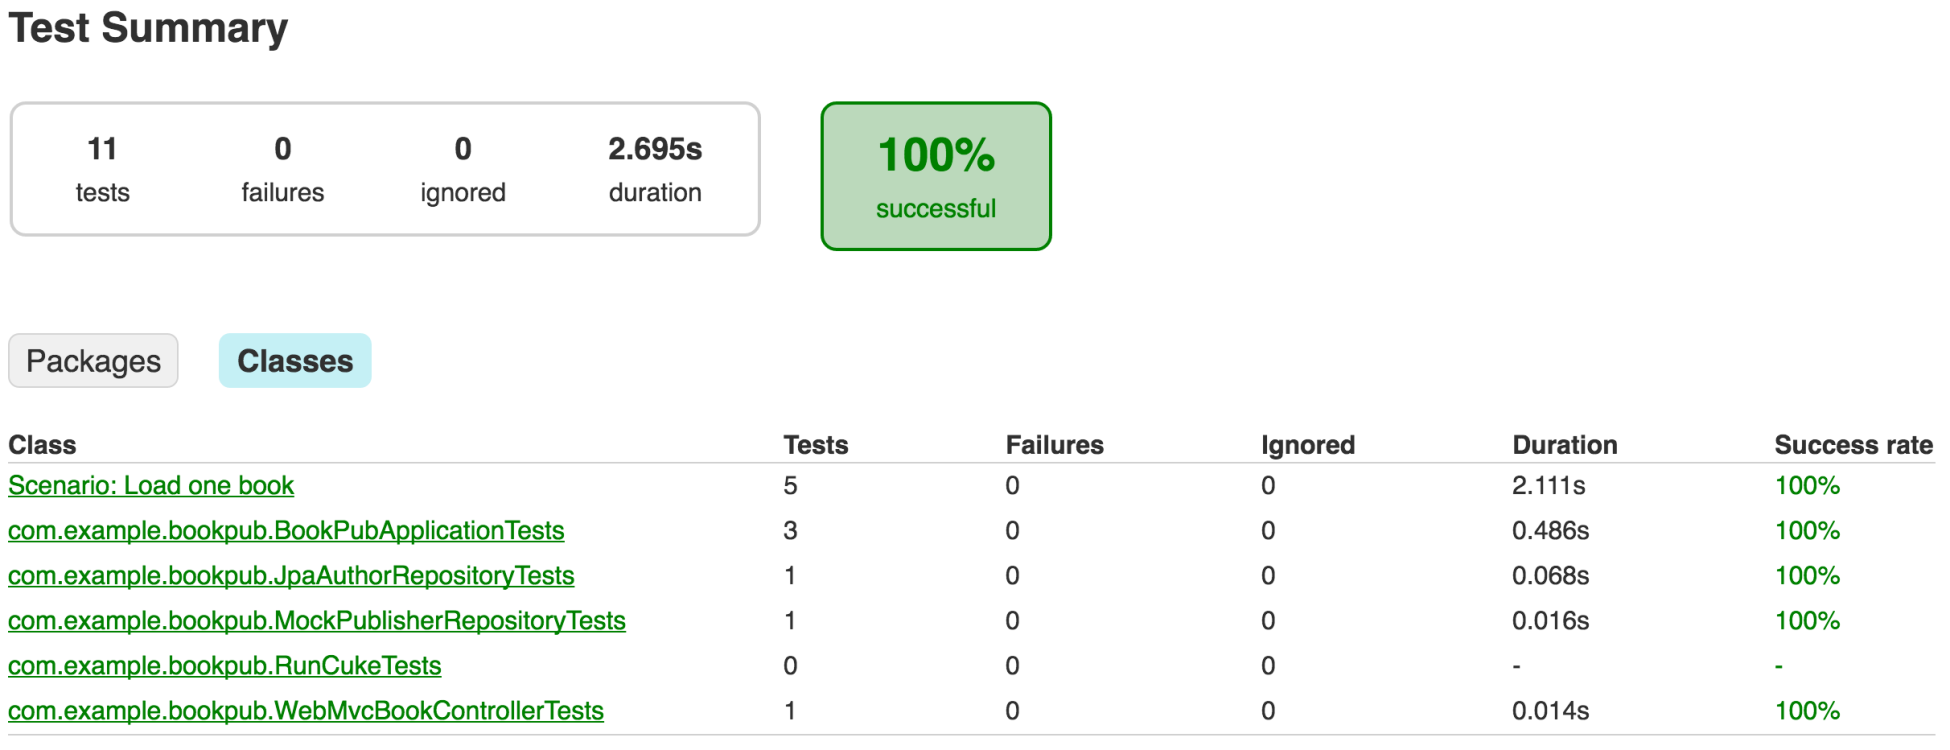
- With the addition of Cucumber, we also get the results of the tests in both the JUnit report and Cucumber-specific report HTML files. If we open
build/reports/tests/index.htmlin the browser and click on theClassesbutton, we will see our scenario in the table, as shown in the following screenshot:
- Selecting the
Scenario: Load one booklink will take us to the detailed report page, as shown in the following screenshot:
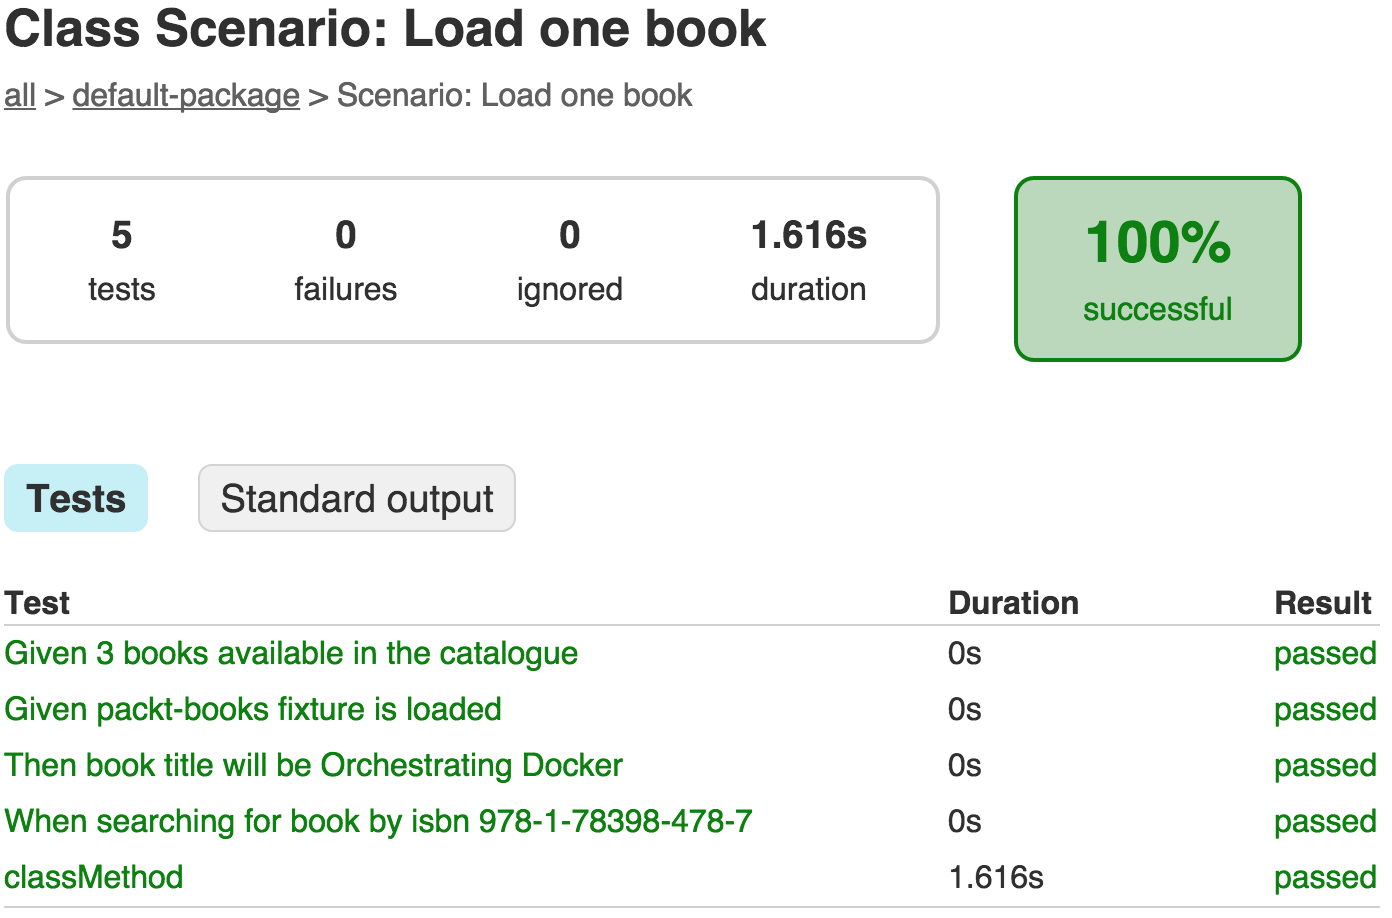
- As we can see, the descriptions are nicer than the class and method names that we saw in the original JUnit-based test cases.
- Cucumber also generates its own report, which can be viewed by opening
build/reports/cucumber/index.htmlin the browser. - Being a behavior-driven testing framework, the feature files allow us not only to define individual conditions, but also to declare entire scenario outlines, which make the defining of multiple assertions of similar data easier. Let's create another feature file named
restful.featurein thesrc/test/resources/com/example/bookpubdirectory at the root of our project with the following content:
- We will also create a corresponding
RestfulStepdefs.javafile in thesrc/test/java/com/example/bookpubdirectory at the root of our project with the following content:
- Execute the tests by running
./gradlew clean testand the tests should continue to get passed.
如果您在查看所有这些代码并在没有完全了解到底发生了什么的情况下继续进行操作后感到有点迷茫,那么您将在这里找到我们所做的一切的详细分类。
让我们先快速了解一下步骤定义是什么。由于 Cucumber 框架使用 Gherkin 特征文档文件来描述要测试的业务规则,以英文的形式表示-like 语句语句,这些需要被翻译成可执行代码。这是步骤定义类的工作。定义的功能场景中的每个步骤都需要与将执行它的步骤定义类中的方法相匹配。这种匹配是通过在方法上方的步骤注释中声明一个正则表达式来完成的。正则表达式包含 Cucumber 使用的匹配组,以便提取方法参数并将它们传递给执行方法。
在 RepositoryStepdefs 中,我们可以在以下方法中看到这一点:
@Given 注解包含匹配 给定 packt-books 固定装置已加载 文本,从 repositories.feature 文件和 extracts 模式中的 packt-books 文本,然后作为 fixtureName< /code> 方法的参数。 @When 和 @Then 注释的工作原理完全相同。因此,实际上,Cucumber 框架所做的是将特征文件中的类英语措辞规则与执行方法的匹配模式进行匹配,并提取部分规则作为匹配方法的参数。
Note
有关 Gherkin 以及如何使用它的更多信息,请访问 https:// cukes.info/docs/reference#gherkin。
解释了基本的 Cucumber 概述后,让我们将注意力转移到测试如何与 Spring Boot 集成和配置上。
这一切都从驱动程序类开始,在我们的例子中是 RunCukeTests。这个类本身不包含任何测试,但它有两个重要的注解将事物拼接在一起,@RunWith(Cucumber.class) 和 @CucumberOptions
:
@CucumberOptions:这为 Cucumber 提供了额外的配置:
plugin={"pretty", "html:build/reports/cucumber"}: This tells Cucumber to generate its reports in HTML format in thebuild/reports/cucumberdirectory.glue = {"cucumber.api.spring", "classpath:com.example.bookpub"}: This is a very important setting, as it tells Cucumber which packages to load and from where to load them during the execution of the tests. Thecucumber.api.springpackage needs to be present in order to take advantage of thecucumber-springintegration library, and thecom.example.bookpubpackage is the location of our Step Definition implementation classes.monochrome = true: This tells Cucumber not to print the output with the ANSI color as we integrate with JUnit, as it will not look correct in the saved console output files.
现在让我们看看 RepositoryStepdefs 类。它从类级别的以下注释开始:
@WebAppConfigurationinstructs Spring that this class needsWebApplicationContextto be initialized, and it will be used for testing purposes during the execution@ContextConfiguration(classes = BookPubApplication.classandloader = SpringBootContextLoader.class)instruct Spring to use theBookPubApplicationclass as a configuration for the Spring application context, as well as to use theSpringBootContextLoaderclass from Spring Boot in order to bootstrap the testing harness
由于 cucumber-spring 集成不知道 Spring Boot 而只知道 Spring,我们不能使用 @SpringBootTest 元-注解。我们不得不求助于仅使用 Spring 的注解来将事物拼接在一起。值得庆幸的是,我们不必经历很多麻烦,只需通过传递所需的配置类和加载器来声明 SpringBootTest 外观的确切注释。
一旦适当的注释到位,Spring 和 Spring Boot 将接管并为我们提供与步骤定义类的依赖项相同的自动装配 bean 的便利。
Cucumber 测试的一个有趣特征是每次执行 Scenario 时都会实例化 Step Definition 类的新实例。即使方法命名空间是全局的——这意味着我们可以使用在不同的步骤定义类中声明的方法——它们在其中定义的状态上运行并且不直接共享。但是,可以在不同的步骤定义实例中@Autowire另一个步骤定义的实例,并依赖公共方法或字段来访问和改变数据。
随着每个场景创建一个新实例,定义类是有状态的,并且依赖于内部变量来保持从断言到断言的转换之间的状态。例如,在 @When 注释方法中,一个特定的状态被设置,而在 @Then 注释方法中,一个集合对该状态的断言进行评估。在我们的 RepositoryStepdefs 类示例中,我们将在其 loadedBook 类变量的状态literal">searching_for_book_by_isbn(...) 方法,该方法稍后用于断言,以验证 book_title_will_be(...)
方法之后。因此,如果我们在特征文件中混合来自不同定义类的规则,内部状态将无法在多个类之间访问。
当 integrating 与 Spring 时,可以使用 injection 模拟对象——正如我们在前面的示例中的 MockPublisherRepositoryTests 中看到的那样——并且可以共享 @Given 注释方法用于为给定测试设置模拟的特定行为。然后我们可以使用相同的依赖实例并将其注入另一个定义类,该定义类可用于评估 @Then 带注释的断言方法。
另一种方法是我们在 second 定义类中看到的那种,RestfulStepdefs,我们在其中注入了 BookRepository。然而,在 restful.feature 中,我们将使用 Given packt-books fixture is loaded 行为声明,该行为声明会转化为调用来自 RepositoryStepdefs 类的 data_fixture_is_loaded 方法,它共享注入的 BookRepository< 的相同实例/code> 对象,将 packt-books.sql 数据插入其中。
如果我们需要从 RepositoryStepdefs 实例中访问 loadedBook 字段的值literal">RestfulStepdefs 类,我们可以在 RestfulStepdefs 中声明 @Autowired RepositoryStepdefs 字段并制作 loadedBook 字段 public 而不是 private 以使其可供外界访问。
Cucumber 和 Spring 集成的另一个巧妙特性是在特性文件中使用 @txn 注释。这告诉 Spring 在事务包装器中执行测试,在测试执行之间重置数据库,并保证每个测试的数据库状态都是干净的。
由于所有步骤定义类和测试行为定义特性文件之间的全局方法命名空间,我们可以利用 Spring 注入的力量来重用测试模型并为所有测试提供通用的设置逻辑。这使得测试的行为类似于我们的应用程序在真实生产环境中的运行方式。
另一个非常受欢迎的测试 framework 是 Spock,它是由 Peter Niederwieser 用 Groovy 编写的。作为一个基于 Groovy 的框架,它非常适合为大多数基于 JVM 的语言创建测试套件,尤其是 Java 和 Groovy 本身。 Groovy 的动态语言特性使其非常适合在不需要 Groovy 语言的情况下编写优雅、高效和富有表现力的规范用于翻译。它是在 Gherkin 库的帮助下在 Cucumber 中完成的。基于 JUnit,并通过 JUnit 的 @RunWith 工具与它集成,就像 Cucumber 所做的那样,它是对传统单元测试的简单增强,并且适用于所有现有工具,它们具有内置支持或与 JUnit 集成。
在这个秘籍中,我们将从上一秘籍停止的地方开始,并通过几个基于 Spock 的测试来增强我们的测试集合。在这些测试中,我们将看到如何使用 Spring 依赖注入和测试工具来设置 MockMVC。 Spock 测试规范将使用这些来验证我们的数据存储库服务将按预期返回数据的事实。
- In order to add the Spock tests to our application, we will need to make a few changes to our
build.gradlefile first. As Spock tests are written in Groovy, the first thing to do is add agroovyplugin to ourbuild.gradlefile, as follows:
- We will also need to add the necessary Spock framework dependencies to the
build.gradledependencies block:
- As the tests will be in Groovy, we will need to create a new source directory for the files. Let's create the
src/test/groovy/com/example/bookpubdirectory in the root of our project. - Now we are ready to write our first test. Create a
SpockBookRepositorySpecification.groovyfile in thesrc/test/groovy/com/example/bookpubdirectory at the root of our project with the following content:
- Execute the tests by running
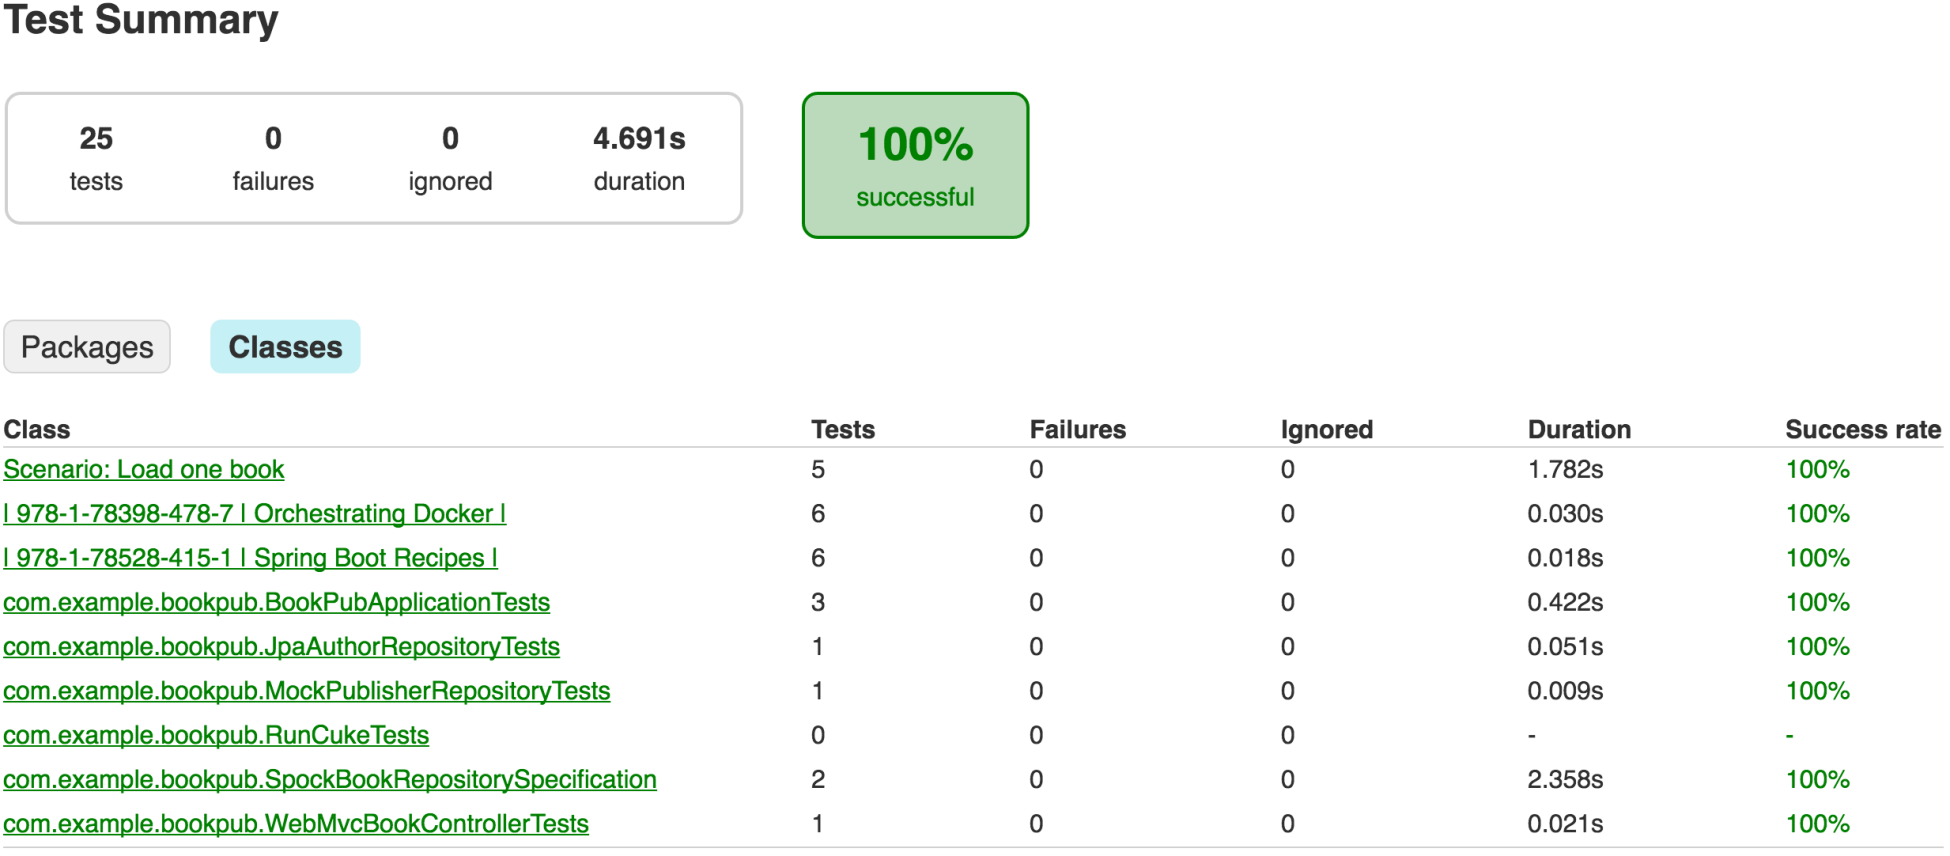
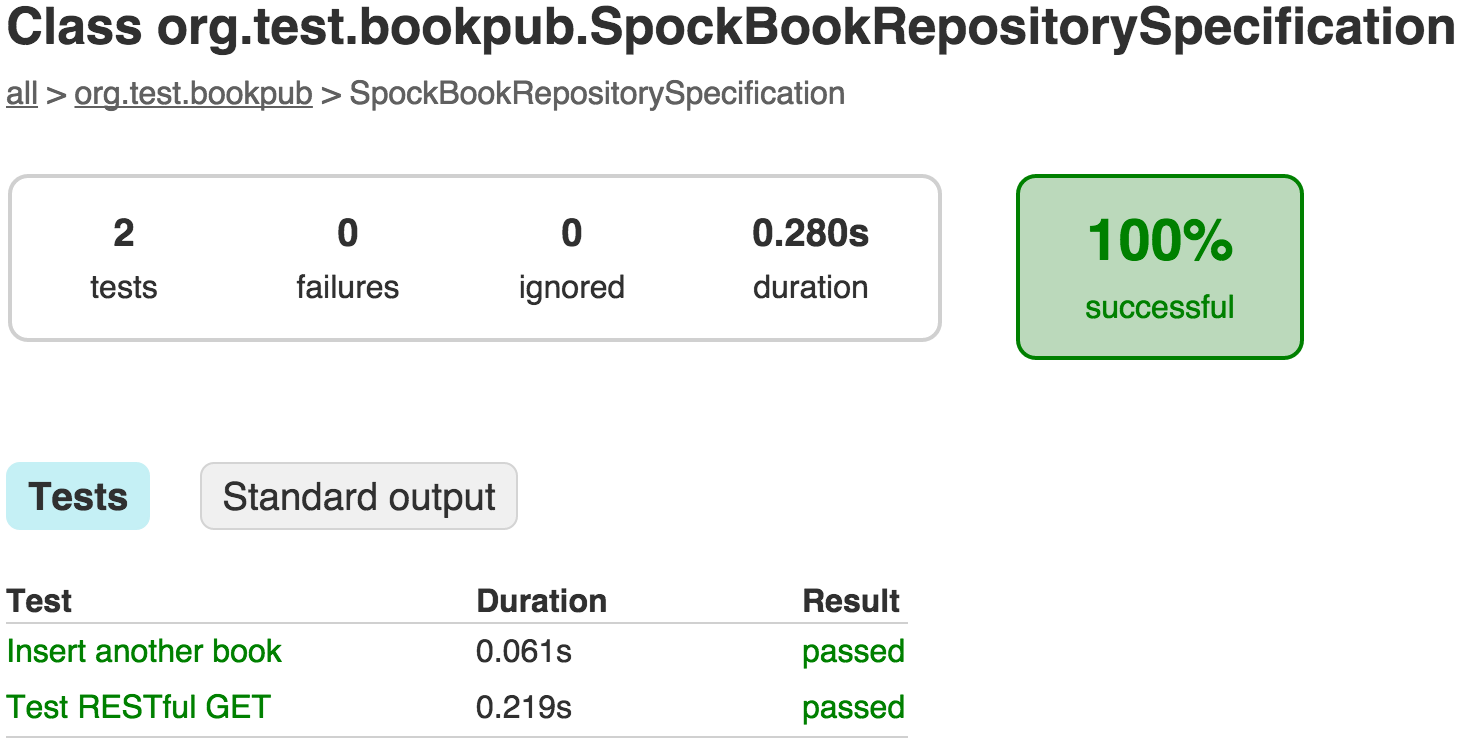
./gradlew clean testand the tests should get passed. - As Spock integrates with JUnit, we can see the execution report of the Spock tests together with the rest of our test suite. If we open
build/reports/tests/index.htmlin the browser and click theClassesbutton, we will see our specification in the table, as shown in the following screenshot:
- Selecting the
com.example.bookpub.SpockBookRespositorySpecificationlink will take us to the detailed report page, which is as follows:
- Next, we will take our tests a bit further and explore the mocking functionality of the database repositories. Let's use
PublisherRepositoryas our candidate to mock, and wire it into theBookControllerclass to provide agetBooksByPublisherfunctionality. Let's add the following content to theBookControllerclass in thesrc/main/java/com/example/bookpub/controllersdirectory at the root of our project:
- Let's add the following to the
Publisherclass in thesrc/main/java/com/example/bookpub/entitydirectory at the root of our project:
- Lastly, let's add a getter and setter for the books to the
Publisherentity class as well:
- Execute the tests by running
./gradlew clean testand the tests should continue to get passed.
正如您从这个示例中看到的那样,编写 tests 可以像被测试的生产代码本身一样复杂和复杂。让我们检查一下为了将 Spock 测试 集成到我们的 Spring Boot 应用程序中而采取的步骤。
我们做的第一件事是添加一个 Groovy 插件以使我们的构建对 Groovy 友好,我们还添加了 spock-core 和 所需的 Spock 库依赖项class="literal">spock-spring,这两者都是使 Spock 与 Spring 的依赖注入和上下文一起工作所必需的。
下一步是创建 SpockBookRepositorySpecification Spock 规范,它扩展了 Spock 的规范抽象基类。扩展 Specification 类非常重要,因为这是 JUnit 知道我们的类是需要执行的测试类的方式。如果我们查看 Specification 源代码,我们将看到 @RunWith(Sputnik.class) 注释,就像我们在黄瓜食谱中使用过。除了 JUnit 引导之外,Specification 类还为我们提供了许多有用的方法和模拟支持。
Note
有关 Spock 提供的详细功能的更多信息,您可以参考位于 http://spockframework.github.io/spock/docs/current/index.html。
还值得一提的是,我们对 SpockBookRepositorySpecification 类使用了与基于 Spring Boot 的测试相同的注解,如下面的代码所示:
除了 @SpringBootTest 之外,我们必须添加 @AutoConfigureMockMvc 的原因是添加功能以允许我们使用 @Autowire MockMvc 实例,而不必自己创建一个。常规 @SpringBootTest 不会自动创建和配置 MockMvc 对象的实例,因此我们可以手动创建它,如我们在 BookPubApplicationTests 中做了,或者添加了 @AutoConfigureMockMvc 注释,这是在 中使用的@WebMvcTest,让 Spring 为我们处理。好消息是我们总是可以使用与 Spring Boot 相同的注释组合,并直接注释我们的类,这正是我们所做的。
与 Cucumber 不同的是,Spock 将测试的所有方面组合在一个 Specification 类中,将其划分为多个块,如下所示:
setup: This block is used to configure the specific test with variables, populating data, building mocks, and so on.expect: This block is one of the stimulus blocks, as Spock defines it, designed to contain simple expressions asserting a state or condition. Besides evaluating the conditions, we can only define variables in this block, and nothing else is allowed.when: This block is another stimulus type block, which always goes together withthen. It can contain any arbitrary code and is designed to define the behavior that we are trying to test.then: This block is a response type block. It is similar toexpectand can only contain conditions, exception checking, variable definition, and object interactions, such as how many times a particular method has been called and so forth.
Note
有关交互测试的更多信息,请访问 Spock 的网站 http://spockframework .github.io/spock/docs/current/interaction_based_testing.html。
cleanup: This block is used to clean the state of the environment and potentially undo whatever changes were done as part of the individual test execution. In our recipe, this is where we will reset ourPublisherRepositorymock object.
Spock 还为我们提供了基于实例的 setup() 和 cleanup() 方法,可用于定义规范中所有 测试 通用的设置和清理行为。
如果我们查看我们的 setup() 方法,我们可以在这里使用测试数据配置数据库填充。一个有趣且重要的细微差别是 setup() 方法在每个测试方法之前执行,而不是每个类执行一次。在执行诸如填充数据库之类的操作以避免在没有正确回滚的情况下多次重新插入相同的数据时,记住这一点很重要。
为了帮助我们解决这个问题,测试方法的 @Transactional 注释。就像 Cucumber 特性文件中的 @txn 标签,这个注解指示 Spock 执行被注解的方法及其对应的 setup() 和 cleanup() 执行具有事务范围,在特定的 test 方法完成。我们依靠这种行为为每个测试获取干净的数据库状态,因此我们不会在每次执行 setup() 方法期间插入重复数据我们的 测试 运行。
大多数人可能想知道为什么我们必须将 @JsonBackReference 注释添加到我们的 Publisher 实体类中。答案与 Jackson JSON 解析器以及它如何处理循环依赖有关。在我们的模型中,我们有一本书属于出版商,每个出版商都有多本书。当我们使用 Books 模拟创建我们的 Publisher 类并将出版商实例分配给一本书时——后来被放入出版商的图书收藏——我们创建了一个循环引用。在执行 BookController.getBooksByPublisher(...) 方法期间,Jackson 渲染器会在尝试编写时抛出 StackOverflowError对象模型为 JSON。通过将这个注解添加到 Publisher,我们告诉 Jackson 对象是如何相互引用的,所以 Jackson 现在不再尝试写出完整的对象树,而是正确处理它,从而避免了循环引用循环的情况。
最后要记住的是 Spring Boot 如何处理和处理使用 @RepositoryRestResource 注释的存储库接口。与 BookRepository 接口不同,我们使用普通的 @Repository 注释进行了注释,后来显式声明为我们的 < code class="literal">BookController 类,我们没有创建显式控制器来处理我们的其他存储库接口的 RESTful 请求,例如 PublisherRepository 和其他。这些接口被 Spring Boot 扫描并自动与映射端点一起包装,这些端点捕获请求并将调用委托给支持的 SimpleJpaRepository 代理。由于这种设置,我们只能对这些作为 bean 依赖项显式注入的对象使用模拟对象替换方法,例如我们的 BookRepository 示例。好消息是,在这些情况下,我们不明确期望 bean 被连接并且只使用一些注释来构造 Spring Boot 的接口来发挥它的魔力,我们可以依靠 Spring Boot 来正确地完成这项工作。我们知道它已经测试了它背后的所有功能,因此我们不必测试它们。要测试实际的存储库和实体功能,我们可以使用 @DataJpaTest 注释来执行特定的 JPA 切片测试。