vlambda博客
学习文章列表

读书笔记《building-restful-web-services-with-spring-5-second-edition》春休中的CRUD作业

Chapter 4. CRUD Operations in Spring REST

在本章中,我们将完成基本的创建读取更新删除CRUD) Spring 5 Reactive REST 中的 API。在本章之后,您将能够在 Spring 5 中使用 Reactor 支持进行简单的 CRUD 操作。

在本章中,我们将介绍以下方法:

  • Mapping CRUD operations to HTTP methods
  • Creating a user
  • Updating a user
  • Deleting a user
  • Reading (selecting) a user

CRUD operations in Spring REST 


在本章中,我们将介绍 Spring 5 中的 User management(支持 Reactive)。我们将在用户管理中实现 CRUD 操作。

HTTP methods

基于 HTTP 1.1 规范,以下 是方法定义:

  • GET: This method gets the information mentioned in the URI. The GET method can be used for single or multiple items.
  • POST: This method creates the item mentioned in the URI. Generally, the POST method will be used for item creation and more secured options. As the parameters are hidden in POST, it will be secure compared to the GET method.
  • DELETE: This methods deletes the item in the requested URI.
  • PUT: This method updates the item in the requested URI. According to the HTTP specifications, the server can create the item if the item is not available. However, this will be decided by the developer who designed the application.
  • Advanced HTTP methods: Though we may not use advanced methods all the time, it will be good to know these methods, as they might be useful:
    • HEAD: This method gets meta information about the resource, not the resource itself, as a response. It will be used for caching purposes.
    • TRACE: This method is mostly used for debugging purposes where the contents of an HTTP request will be sent back to the requester.
    • CONNECT: This is used to open a tunnel and can be used for proxy purposes.
    • OPTIONS: This method is used to describe communication options for the target resource.

以下是我们的 CRUD 操作的 HTTP 方法建议:

操作

HTTP 方法

创造

POST

GET

更新

PUT

删除

删除

在本章的其余部分,我们将展示如何构建 CRUD 操作。

Reactive server initialization

在进入端点之前,我们将探索我们的文件结构,包括初始化程序、处理程序和存储库。

初始化我们的端口8081Server类如下:

public class Server { 
  public static final String HOST = "localhost";
  public static final int PORT = 8081;
  public static void main(String[] args) throws InterruptedException, IOException{
    Server server = new Server(); 
    server.startReactorServer(); 
    System.out.println("Press ENTER to exit.");
    System.in.read();
  }
  public void startReactorServer() throws InterruptedException {
    RouterFunction<ServerResponse> route = routingFunction();
    HttpHandler httpHandler = toHttpHandler(route);
    ReactorHttpHandlerAdapter adapter = new ReactorHttpHandlerAdapter(httpHandler);
    HttpServer server = HttpServer.create(HOST, PORT);
    server.newHandler(adapter).block();
  }
  public RouterFunction<ServerResponse> routingFunction() {
    // our Endpoints will be coming here
  }
} 

在前面的方法中,我们创建了一个 main 类。在 main 方法中,我们将初始化服务器并使用以下代码启动服务器:

Server server = new Server(); 
server.startReactorServer(); 

上述方法将启动 Reactor 服务器。 Reactor服务器实现如下:

RouterFunction<ServerResponse> route = routingFunction();
HttpHandler httpHandler = toHttpHandler(route);
ReactorHttpHandlerAdapter adapter = new ReactorHttpHandlerAdapter(httpHandler);
HttpServer server = HttpServer.create(HOST, PORT);
server.newHandler(adapter).block();

让我们稍后再看一下这段代码,因为这个概念是基于 Reactive 的。让我们假设这段代码运行良好,我们将继续关注端点。

以下是为我们的 CRUD 操作映射所有 REST 端点的方法:

public RouterFunction<ServerResponse> routingFunction() {
    // our Endpoints will be coming here
}

您可能会在 UserRepositoryUserHandler 上遇到错误。让我们现在填写这些:

package com.packtpub.reactive;
public interface UserRepository {
    // repository functions will be coming here
}

在前面的代码中,我们刚刚在我们现有的包com.packtpub.reactive中添加了 UserRepository接口。稍后,我们将针对我们的业务需求引入抽象方法。

现在,我们可以添加一个 UserHandler 类,并添加必要的东西:

package com.packtpub.reactive;
// import statements
public class UserHandler {    
    private final UserRepository userRepository;  
    public UserHandler(UserRepository userRepository){
        this.userRepository = userRepository;
    }
}

在前面的代码中,UserHandler 在其构造函数中初始化了 UserRepository 实例。如果有人获得 UserHandler 的实例,他们必须将 UserRepository 类型传递给 UserHandler 构造函数。通过这样做,UserRepository 将始终被转发到 UserHandler 以满足业务需求。

Sample values in the repository

为了使用存储库,我们必须创建一个具体的类并填写一些值来测试 GET 操作。在以下方法中,我们可以做到这一点:

package com.packtpub.reactive;
// import statements
public class UserRepositorySample implements UserRepository {    
  // initiate Users
  private final Map<Integer, User> users = new HashMap<>();
  // fill dummy values for testing
  public UserRepositorySample() {
    this.users.put(100, new User(100, "David"));
    this.users.put(101, new User(101, "John"));
    this.users.put(102, new User(102, "Kevin"));
  }
} 

在前面的类中,我们只是实现了 UserRepository 并填写了一些示例值。

为了简化我们的代码,我们只使用了基于应用程序的数据存储,这意味着一旦应用程序重新启动,我们的数据就会重新初始化。在这种情况下,我们不能在我们的应用程序中存储任何新数据。但是,这将帮助我们专注于我们的主要主题,例如与持久性无关的 Reactive 和 Spring 5。

我们可以在 routing 方法中使用这个示例存储库:

public RouterFunction<ServerResponse> routingFunction() {
    UserRepository repository = new UserRepositorySample();
    UserHandler handler = new UserHandler(repository);
}

前面的行将在我们的存储库中插入虚拟值。这足以测试 GET 操作。

getAllUsers – mapping

routingFunction 中,我们将为 our 第一个端点="literal">getAllUsers。首先,我们将 keep 处理程序中的 null 值以避免代码中的错误:

    return nest (
        path("/user"),
        nest(
          accept(MediaType.ALL),
          route(GET("/"), null)
        )    
    );

前面的 nest 方法将用于路由到正确的函数,也将用于对其他路由器进行分组。在前面的方法中,我们在路径中使用 /user 并使用 GET("/") 方法作为路由器。此外,我们使用 MediaType.ALL 来接受所有媒体范围以简化代码。

getAllUsers – implementation in the handler and repository

在这里,我们将在 our 存储库中定义和实现 getAllUsers 方法。另外,我们会通过UserHandlermain类中的getAllUsers方法>。

我们将在 UserRepository 类中为 getAllUsers 方法添加一个抽象方法:

Flux<User> getAllUsers();

与任何其他接口和具体类实现一样,我们必须在接口中添加抽象方法,在我们的例子中, UserRespository。前面的代码只是在 UserRepository类中添加了 getAllUsers

UserRepositorySampleUserRepository的具体类)中,我们将实现抽象方法getAllUsers< /代码>:

// this method will return all users
@Override
public Flux<User> getAllUsers() {
    return Flux.fromIterable(this.users.values());
}

在前面的代码中,我们添加了 getAllUsers 方法并实现了业务逻辑。由于我们已经在UserRepositorySample构造函数中定义了用户,我们只需要返回用户。  Flux 类有一个名为 fromIterable 的方法,用于从我们的 UserRepositorySample

Note

fromIterable 方法将返回一个 Flux,它发出包含在我们的 Java Collection 接口中的项目。由于 Collection 实现了可迭代接口,在我们的例子中,fromIterable 将是返回 Flux 的完美方法。

UserHandler.java 文件中,我们将添加代码以获取 Reactive 中的所有用户。下面的代码将引导我们完成 必要的细节:

public Mono<ServerResponse> getAllUsers(ServerRequest request){
  Flux<User> users = this.userRepository.getAllUsers();
  return ServerResponse.ok().contentType(APPLICATION_JSON).body(users, User.class); 
}

在前面的代码中,我们将在 Flux 中从存储库中获取所有用户,并将它们发送到 JSON 类型的响应中。服务器响应内容类型使用 APPLICATION_JSON 进行更新。 

现在是时候在我们的路由方法中添加我们的第一个方法getAllUsers了。在这里,我们将只使用一种路由方法来映射所有 REST API。 

最后,我们的路由函数在 Server.java中如下所示:

public class Server {    
    // existing code is hidden
    public RouterFunction<ServerResponse> routingFunction() {
        UserRepository repository = new UserRepositorySample();
        UserHandler handler = new UserHandler(repository);
        return nest (
            path("/user"),
            nest(
              accept(MediaType.ALL),
              route(GET("/"), handler::getAllUsers)
        ) 
    );
}

在前面的代码中,我们创建了一个 UserRepository 并将其转发给我们的 UserHandlerUserHandler 会自动调用 UserSampleRepository 中的 getAllUsers 方法。通过调用 UserHandler 的 getAllUsers 方法,我们将从我们之前实现的示例存储库类中获取所有用户。

在这里,我们使用 nest 方法并提供参数,例如 API 路径 GET("/") 和媒体类型。  nest方法接受RoutingFunction作为第二个参数,我们可以使用更多的nest< /code> 方法在我们的基本 nest 方法中。通过使用内部嵌套的方法,我们实现了业务需求:我们的基本REST API从"/user"开始,基本的get users API路由通过 "/"

因此,基本 API 路径 /user 将自动调用  getAllUsers 方法,因为它在前面的代码中实现。

Testing the endpoint – getAllUsers

由于我们已经完成了第一个 API 实现,我们现在可以通过在浏览器中调用以下 URI 来测试

http://localhost:8081/user

您应该得到以下结果:

[
  {
    userid: 100,
    username: "David"
  },
  {
    userid: 101,
    username: "John"
  },
  {
    userid: 102,
    username: "Kevin"
  }
]

您还可以在任何 REST 客户端(如 Postman/SoapUI 或任何其他 REST 客户端)中检查 API。

getUser – implementation in the handler and repository

在这里,我们将定义实现中的getUser方法我们的 存储库。另外,我们会通过UserHandlermain类中的getUser方法>。

我们将在 UserRepository 类中为 getUser 方法添加一个抽象方法:

Mono<User> getUser(Integer id);

在这里,我们将添加 getUser 方法的代码。您可以看到我们使用 Mono 返回类型进行单资源访问。

在 UserRepositorySample类 ( UserRepository的具体类)中,我们将实现抽象方法 getUser:

@Override
public Mono<User> getUser(Integer id){
    return Mono.justOrEmpty(this.users.get(id)); 
}

在前面的代码中,我们通过 id 检索了特定的用户。此外,我们已经提到,如果用户不可用,则应要求该方法返回一个空的 Mono。

UserHandler 方法中,我们将讨论如何处理请求并应用我们的业务逻辑来获取响应:

public Mono<ServerResponse> getUser(ServerRequest request){
    int userId = Integer.valueOf(request.pathVariable("id"));
    Mono<ServerResponse> notFound = ServerResponse.notFound().build();
    Mono<User> userMono = this.userRepository.getUser(userId);
    return userMono
        .flatMap(user -> ServerResponse.ok().contentType(APPLICATION_JSON).body(fromObject(user)))
        .switchIfEmpty(notFound); 
}

在前面的代码中,我们刚刚将字符串 id 转换为整数,以便将其提供给我们的 Repository 方法(<代码类="literal">getUser)。一旦我们从 Repository 收到结果,我们只是将其映射到 Mono JSON 内容类型。此外,如果没有可用的项目,我们使用 switchIfEmpty 发送正确的响应。如果搜索项不可用,它将简单地返回空的 Mono 对象作为响应。

最后,在我们的路由路径中添加getUser,在 Server.java中:

public RouterFunction<ServerResponse> routingFunction() {
    UserRepository repository = new UserRepositorySample();
    UserHandler handler = new UserHandler(repository);    
    return nest (
      path("/user"),
      nest(
        accept(MediaType.ALL),
        route(GET("/"), handler::getAllUsers)
      )
      .andRoute(GET("/{id}"), handler::getUser)      
    );
}

在前面的代码中,我们刚刚在现有路由中添加了一个新条目, .andRoute(GET("/{id}"), handler::getUser)小路。通过这样做,我们添加了 getUser 方法和相应的 REST API 部分来访问单个用户。重新启动服务器后,我们应该能够使用 REST API。

Testing the endpoint – getUser

由于我们已经完成了第一个 API 实现,我们可以现在通过在浏览器中使用 < code class="literal">GET 方法:

http://localhost:8081/user/100

您应该得到以下结果:

{
    userid: 100,
    username: "David"
}

createUser – implementation in the handler and repository

在这里,我们将定义实现中的createUser方法我们的 存储库。另外,我们会通过UserHandlermain类中的createUser方法>。

我们将在 UserRepository 类中为 createUser 方法添加一个抽象方法:

Mono<Void> saveUser(Mono<User> userMono);

在这里,我们将讨论如何使用示例存储库方法来保存用户。

在 UserRepositorySample ( UserRepository的具体类)中,我们将实现抽象方法 createUser:

@Override
public Mono<Void> saveUser(Mono<User> userMono) {
    return userMono.doOnNext(user -> { 
      users.put(user.getUserid(), user);
      System.out.format("Saved %s with id %d%n", user, user.getUserid());
    }).thenEmpty(Mono.empty());
}

在前面的代码中,我们使用 doOnNext 将用户保存在存储库中。此外,在失败的情况下,该方法将返回空的 Mono

由于我们在存储库中添加了 createUser 方法,因此我们将在此跟进我们的处理程序:

public Mono<ServerResponse> createUser(ServerRequest request) {
    Mono<User> user = request.bodyToMono(User.class);
    return ServerResponse.ok().build(this.userRepository.saveUser(user));
}

UserHandler 类中,我们创建了 createUser 方法来通过处理程序添加用户。在该方法中,我们通过bodyToMono方法将请求提取到Mono中。 user 创建后,会被转发到 UserRepository 保存方法。 

最后,我们将在Server.java中我们现有的路由函数中添加REST API路径来保存 用户

public RouterFunction<ServerResponse> routingFunction() {
    UserRepository repository = new UserRepositorySample();
    UserHandler handler = new UserHandler(repository);
    return nest (
      path("/user"),
      nest(
        accept(MediaType.ALL),
        route(GET("/"), handler::getAllUsers)
      )
      .andRoute(GET("/{id}"), handler::getUser)
      .andRoute(POST("/").and(contentType(APPLICATION_JSON)), handler::createUser) 
    );
}

Testing the endpoint – createUser

由于我们已经完成了第一个 API 实现,我们可以现在通过在浏览器中调用以下 URI 来测试它:

http://localhost:8081/user

由于我们不能在浏览器中使用 POST 方法,我们将在一个名为 Postman 的 REST API 客户端中对其进行测试: 

读书笔记《building-restful-web-services-with-spring-5-second-edition》春休中的CRUD作业

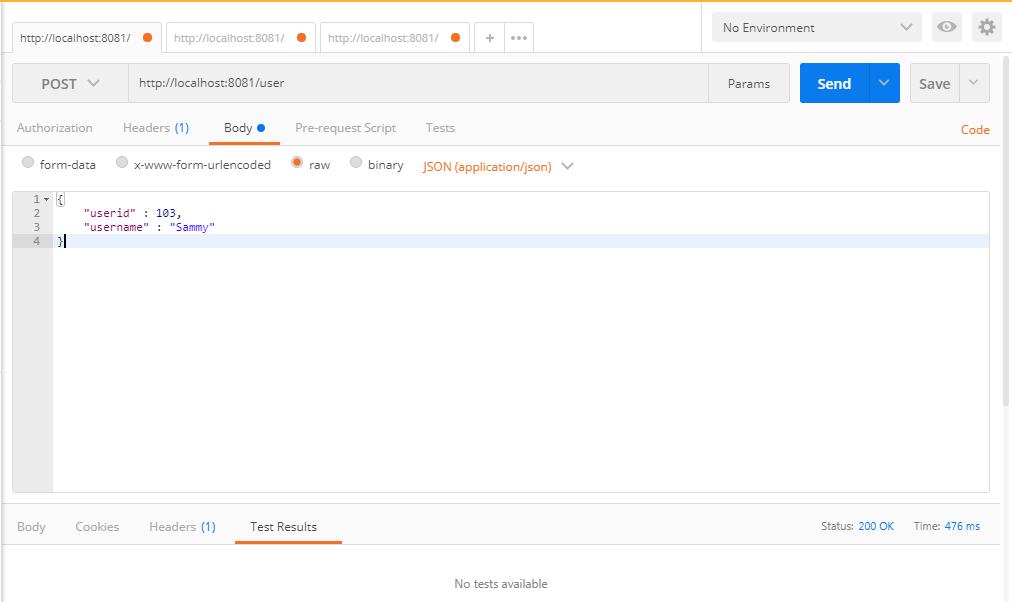
添加新用户后,您可以通过调用结果" class="indexterm"> getAllUsers URI (http://localhost:8081/user) .

Note

Postman 是一个 REST 客户端,可用于构建、测试和共享 REST API 调用。当我们无需编写测试代码即可测试 REST API 时,此类工具将非常有用。SoapUI 是另一个 REST 客户端,可用作邮递员的替代品。 

updateUser – implementation in the handler and repository

在这里,我们将定义实现中的updateUser方法我们的 存储库。另外,我们会通过UserHandler调用主类中的updateUser方法。

我们将在 UserRepository 类中为 updateUser 方法添加一个抽象方法:

Mono<Void> updateUser(Mono<User> userMono);

在 UserRepositorySample 类中,我们将添加更新代码的逻辑。这里,我们将使用 userid 作为key,使用 User object作为值来存储我们的地图:

@;Override
public Mono<Void> updateUser(Mono<User> userMono) {
    return userMono.doOnNext(user -> { 
      users.put(user.getUserid(), user);
      System.out.format("Saved %s with id %d%n", user, user.getUserid());
    }).thenEmpty(Mono.empty());
}

在前面的代码中,我们通过添加指定的用户(来自请求)来更新用户。一旦用户被添加到列表中,该方法将返回 Mono ;否则,它将返回 Mono.empty 对象。 

由于我们在存储库中添加了 updateUser 方法,因此我们将在此处跟进我们的处理程序:

public Mono<ServerResponse> updateUser(ServerRequest request) {
    Mono<User> user = request.bodyToMono(User.class);
    return ServerResponse.ok().build(this.userRepository.saveUser(user));
}

在前面的代码中,我们通过调用 bodyToMono方法将用户请求转换为Mono bodyToMono 方法会将正文提取到一个 Mono 对象中,因此它可以用于保存选项。

正如我们对其他 API 路径所做的那样,我们在 Server.java 中添加 updateUser API:

public RouterFunction<ServerResponse> routingFunction() {
    UserRepository repository = new UserRepositorySample();
    UserHandler handler = new UserHandler(repository);
    return nest (
      path("/user"),
      nest(
        accept(MediaType.ALL),
        route(GET("/"), handler::getAllUsers)
      )
      .andRoute(GET("/{id}"), handler::getUser)
      .andRoute(POST("/").and(contentType(APPLICATION_JSON)), handler::createUser)
      .andRoute(PUT("/").and(contentType(APPLICATION_JSON)), handler::updateUser) 
    );
}

Testing the endpoint – updateUser

由于我们已经完成了第一个 API 实现,我们现在可以通过 调用 URI http://localhost:8081/user 在 Postman 或 SoapUI 中,使用 PUT 方法:


读书笔记《building-restful-web-services-with-spring-5-second-edition》春休中的CRUD作业

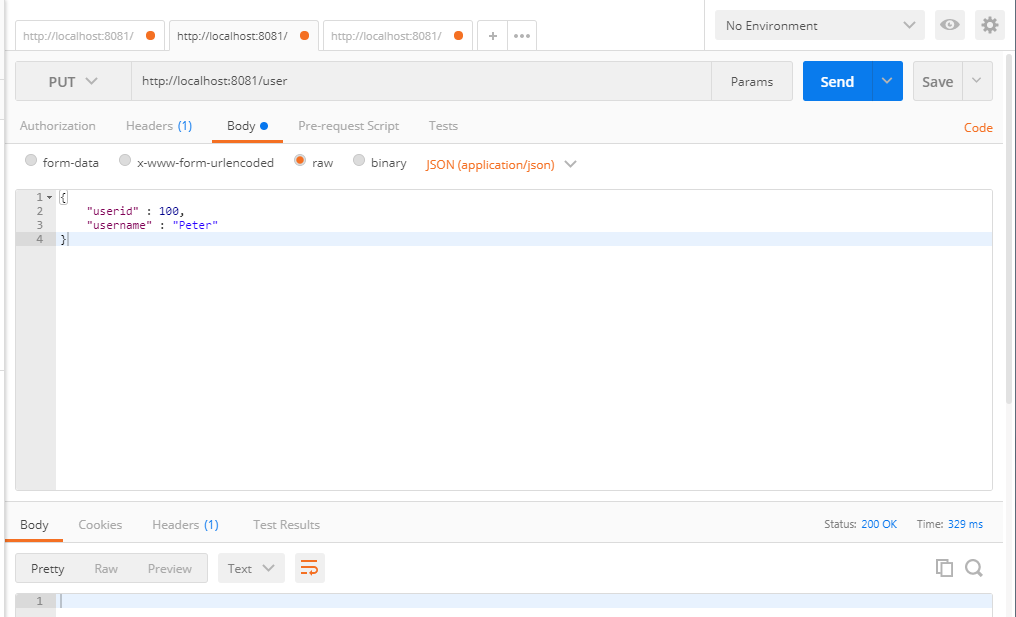
更新新用户后,您可以通过调用 getAllUsers URI (http://localhost:8081/user)。

deleteUser – implementation in the handler and repository

这里,我们将定义实现中的deleteUser方法我们的 存储库。另外,我们会通过UserHandlermain类中的deleteUser方法>。

像往常一样,我们将在 UserRepository 类中为 deleteUser 方法添加一个抽象方法:

Mono<Void> deleteUser(Integer id);

在 UserRepositorySample.java 文件中,我们将添加 deleteUser 方法从列表:

@Override
public Mono<Void> deleteUser(Integer id) {
    users.remove(id); 
    System.out.println("user : "+users);   
    return Mono.empty();
}

在前面的方法中,我们只是简单地从用户中移除元素并返回一个空的 Mono 对象。

由于我们在存储库中添加了 deleteUser 方法,因此我们将跟进我们的处理程序:

public Mono<ServerResponse> deleteUser(ServerRequest request) { 
    int userId = Integer.valueOf(request.pathVariable("id"));
    return ServerResponse.ok().build(this.userRepository.deleteUser(userId));
}

最后,我们将在 Server.java中我们现有的路由函数中添加REST API路径来保存 用户  :

public RouterFunction<ServerResponse> routingFunction() {
    UserRepository repository = new UserRepositorySample();
    UserHandler handler = new UserHandler(repository);
    return nest (
      path("/user"),
      nest(
        accept(MediaType.ALL),
        route(GET("/"), handler::getAllUsers)
      )
      .andRoute(GET("/{id}"), handler::getUser)
      .andRoute(POST("/").and(contentType(APPLICATION_JSON)), handler::createUser)
      .andRoute(PUT("/").and(contentType(APPLICATION_JSON)), handler::updateUser)
      .andRoute(DELETE("/{id}"), handler::deleteUser)
    );
}

Testing the endpoint – deleteUser

由于我们已经完成了第一个 API 实现,我们可以现在通过调用 URI http://localhost:8081/user/100我们的 客户端(Postman 或 SoapUI)中使用  ;DELETE 方法:

读书笔记《building-restful-web-services-with-spring-5-second-edition》春休中的CRUD作业

删除新用户后,可以调用 getAllUsers URI (http://localhost:8081/user)。

Summary


在本章中,我们学习了如何使用响应式支持(Flux 和 Mono)以及如何将我们的 API 与响应式组件集成。在 Reactor 服务器的帮助下,我们学习了基于 Reactive 的 REST API 的基本 CRUD 操作。此外,我们还介绍了如何为 CRUD 操作添加路由选项,并讨论了一些关于 CRUD 操作中的 Flux 和 Mono 实现。

在接下来的章节中,我们将关注 Spring 5 REST(没有 Reactor 支持),因为 Spring Reactive 库/API 仍处于不稳定模式,并且在主流应用程序中没有得到太多使用。尽管 Spring 团队正式发布了对 Reactive 的支持,但大多数业务需求并未明确实现和记录。考虑到这种情况,在接下来的章节中,我们将讨论没有 Reactive 相关主题的 Spring 5。