读书笔记《building-microservices-with-spring》用Spring Boot构建微服务
开发微服务不再那么乏味——这要归功于强大的 Spring Boot 框架。 Spring Boot 是一个用 Java 开发生产就绪微服务的框架。
本章将从前几章中解释的微服务理论转向通过查看代码示例的动手实践。在这里,我们将介绍 Spring Boot 框架,并解释 Spring Boot 如何帮助构建符合上一章讨论的原则和特性的 RESTful 微服务。最后,将回顾 Spring Boot 为使微服务生产做好准备所提供的一些特性。
在本章结束时,您将了解以下内容:
- Setting up the latest Spring development environment
- Developing RESTful services using Spring Framework 5 and Spring Boot
- Building reactive microservices using Spring WebFlux and Spring Messaging
- Securing microservices using Spring Security and OAuth2
- Implementing cross-origin microservices
- Documenting Spring Boot microservices using Swagger
- Spring Boot Actuator for building production-ready microservices
为了具体化微服务的概念,一对 微服务将 被构建。为此,假设以下components 已安装:
- JDK 1.8 (http://www.oracle.com/technetwork/java/javase/downloads/jdk8-downloads-2133151.html)
- Spring Tool Suite 3.8.2 (STS) (https://spring.io/tools/sts/all)
- Maven 3.3.1 (https://maven.apache.org/download.cgi)
或者,其他 IDE,例如 IntelliJ IDEA/NetBeans/Eclipse 可以 使用。同样,Gradle 等替代构建工具可以成为 使用过。 假设正确设置了Maven存储库、类路径和其他路径变量for<一个 id="id325929372" class="indexterm"> 运行 STS 和 Maven 项目。
本章基于以下版本的 Spring 库:
- Spring Framework 5.0.0.RC1
- Spring Boot 2.0.0. M1
Spring Boot 是一个utility 框架from Spring 团队快速轻松地引导基于 Spring 的应用程序和微服务。该框架使用一种自以为是的方法而不是配置进行决策,从而减少了编写大量样板代码和配置所需的工作量。使用 80-20 原则,开发人员应该能够启动具有许多默认值的各种 Spring 应用程序。 Spring Boot 进一步为开发人员提供了通过覆盖自动配置的值来定制应用程序的机会。
Spring Boot 不仅提高了 开发速度,还提供了一组生产就绪的操作功能,例如健康检查和指标 集合。由于 Spring Boot 屏蔽了很多配置参数,抽象了很多底层实现,在一定程度上将出错的几率降到最低。 Spring Boot 根据类路径中可用的库识别应用程序的性质,并运行打包在这些库中的自动配置类。
通常,许多开发人员错误地将 Spring Boot 视为代码生成器,但实际上并非如此。 Spring Boot 仅自动配置构建文件,例如 Maven 的 pom 文件。它还根据某些自以为是的默认设置设置属性,例如数据源属性。
考虑文件 pom.xml 中的以下依赖项:
例如,在前面的案例中,Spring Boot 理解项目设置为使用 Spring Data JPA 和 HSQL 数据库。它会自动配置驱动程序类和其他连接参数。
Spring Boot 的一大成果是它几乎消除了对传统 XML 配置的需求。 Spring Boot 还通过将所有必需的运行时依赖项打包到一个胖可执行 jar 中来支持微服务开发。
这些是不同基于Spring Boot的应用程序开发 可以启动:
- By using Spring Boot CLI as a command-line tool
- By using IDEs like Spring Tool Suite (STS), which provide Spring Boot, supported out of the box
- By using the Spring Initializr project at http://start.spring.io
- By using SDKMAN! (The Software Development Kit Manager) from http://sdkman.io
前三个选项将< /a> 在本章中进行探索,开发各种示例服务。
开发和演示 Spring Boot 功能的最简单 方法是使用命令行工具 Spring Boot CLI。
以下是设置 up 并运行 Spring Boot CLI 的步骤:
- Install the Spring Boot command-line tool by downloading the
spring-boot-cli-2.0.0.BUILD-M1-bin.zipfile from the following location URL:https://repo.spring.io/milestone/org/springframework/boot/spring-boot-cli/2.0.0.M1/
- Unzip the file into a directory of choice. Open a terminal window, and change the terminal prompt to the
binfolder.
- Verify the installation with the following command. If successful, the Spring CLI version will be printed on the console as shown:
- As the next step, a quick REST service will be developed in groovy, which is supported out of the box in Spring Boot. To do so, copy and paste the following code using any editor of choice, and save it as
myfirstapp.groovyinto any folder:
- In order to run this groovy application, go to the folder where
myfirstapp.groovyis saved, and execute the following command. The last few lines of the server startup log will be as shown in the following command snippet:
- Open a browser window, and point the URL to
http://localhost:8080; the browser will display the following message:
没有创建战争文件,也没有运行 Tomcat 服务器。 Spring Boot 自动选择了 Tomcat 作为 Web 服务器,并将其嵌入到应用程序中。这是一个非常基本的、最小的微服务。前面代码中使用的 @RestController 将在下一个示例中详细检查。
在本节中,我们将演示如何使用 STS 开发基于 Java 的 REST/JSON Spring Boot 服务。
Note
该示例的完整源代码可作为本书代码文件中的 chapter3.Bootrest 项目在以下 Git 存储库下获得:https://github.com/rajeshrv/Spring5Microservice
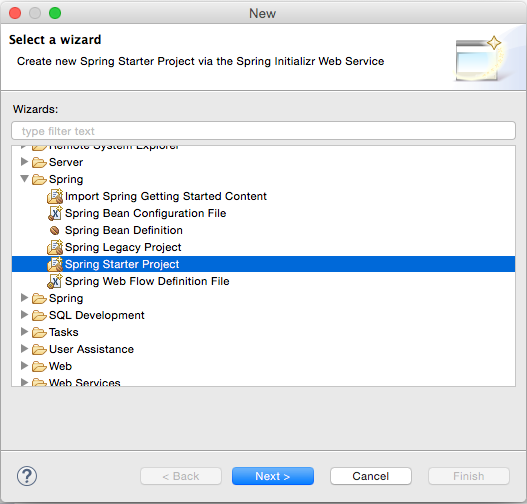
- The
Spring Starter Projectis a basic template wizard, which provides a selection of a number of other starter libraries. - Type the project name as
chapter3.bootrest, or any other name of your choice. It is important to choose the packaging as Jar. In traditional web applications, a war file is created, and then deployed into a servlet container, whereas, Spring Boot packages all the dependencies into a self-contained, autonomous jar with an embedded HTTP listener.
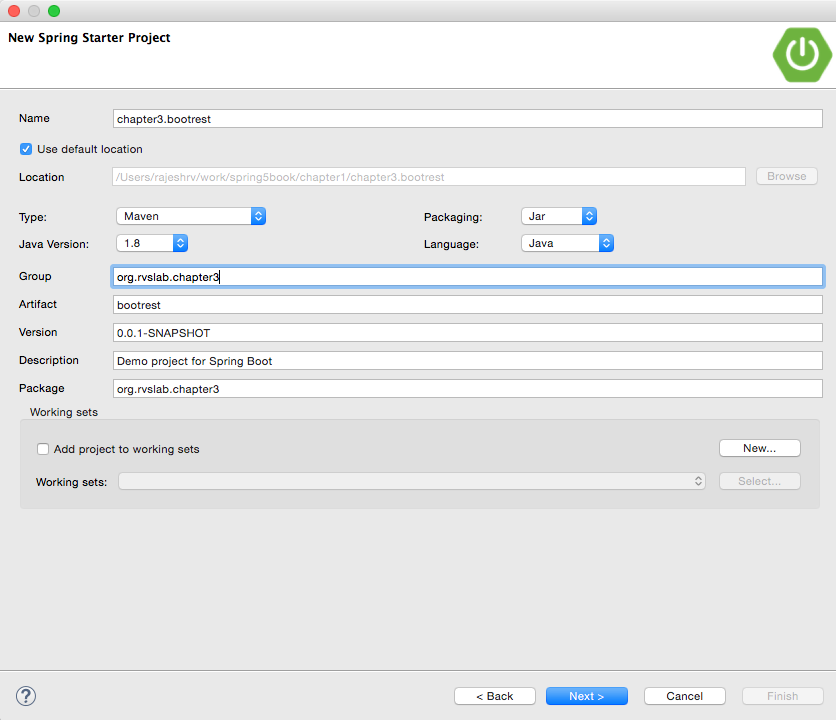
- Once completed, click on
Next.
- The wizard will show the library options. In this case, since we are developing REST services, select
WebunderW. This is an interesting step, which tells Spring Boot that a Spring MVC web application is being developed so that spring boot can include the necessary libraries, including Tomcat, as the HTTP listener and other configurations as required:eb
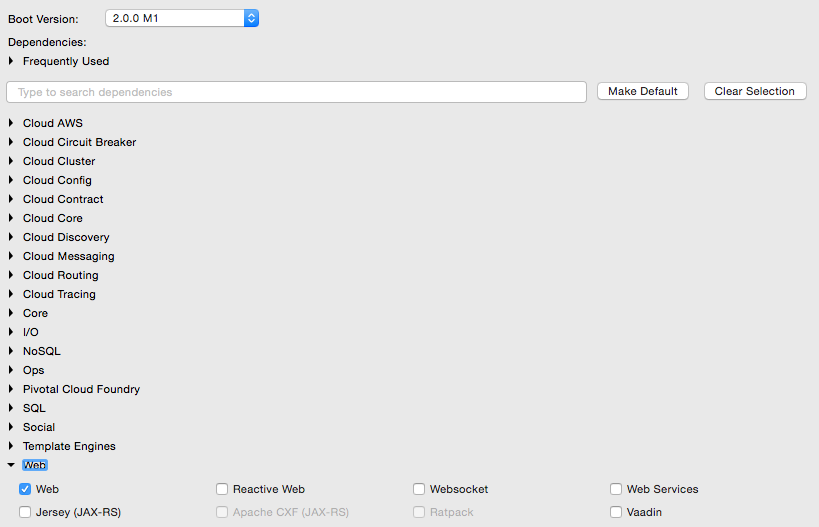
- Click on
Finish.
- Let us examine the
pomfile. The parent element is one of the interesting aspects inpom.xml:
Spring-boot-starter-parent 是 bill-of-materials (BOM),Maven 依赖管理使用的模式。 BOM 是一种特殊的 pom,用于管理项目所需的不同库版本。使用 spring-boot-starter-parent pom 的优点是开发人员无需担心找到合适的、兼容的 versions 的不同库,例如 Spring、Jersey、Junit、Logback、Hibernate、Jackson 等。
starter pom 包含 Maven 构建所需的 Boot 依赖项、合理的资源过滤和合理的插件配置列表。
Note
请参阅以下链接以查看 starter parent(版本 2.0.0)中提供的不同依赖项。如果需要,可以覆盖所有这些依赖项:https://github.com/spring-projects/spring-boot/blob/a9503abb94b203a717527b81a94dc9d3cb4b1afa/spring-boot-dependencies/pom.xml
starter pom 本身不会将 jar 依赖项添加到项目中。相反,它只添加库版本。随后,当将依赖项添加到 pom.xml 时,它们会引用此 pom.xml 中的库版本。一些属性如下图所示:
查看我们的 pom.xml 的依赖部分,可以看到这是一个干净整洁的 pom 文件,只有两个依赖项:
由于选择了 Web,spring-boot-starter-web 添加了 Spring 所需的所有依赖项MVC 项目。它还包括对 Tomcat 作为嵌入式 HTTP 侦听器的依赖项。这提供了一种有效的方法来获取作为单个包所需的所有依赖项。可以用其他库替换单个依赖项,例如用 Jetty 替换 Tomcat。
与 web 类似,Spring Boot 也来 增加了一些spring-boot-starter -* 库,如 amqp、aop、batch、data-jpa、thymeleaf 等。
在文件 pom.xml 中要检查的最后一件事是 Java 8 属性,如下所示:
默认情况下,父 pom 添加 Java 6。建议 Spring 5 将 Java 版本覆盖为 8。
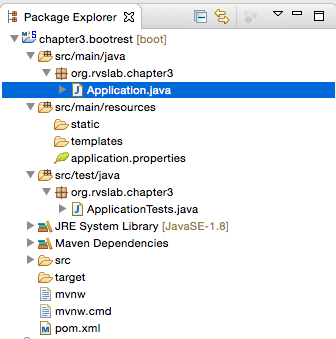
- Let us now examine
Application.java. Spring Boot, by default, generated a classorg.rvslab.chapter3.Application.javaundersrc/main/javafor bootstrapping:
根据 Java 约定,应用程序中只有一个 main 方法,它将在启动时调用。 main 方法通过调用 SpringApplication 上的 run 方法来引导 Spring Boot 应用程序。 Application.class 作为参数传递,告诉 Spring Boot 这是主要组件。
更重要的是,魔术是由 @SpringBootApplication 注解完成的。 @SpringBootApplication 是一个顶级注解,封装了其他三个注解,如下代码片段所示:
@Configuration 注释暗示包含的类声明了一个或多个 @Bean 定义。 @Configuration 使用 @Component 进行元注释,因此它们是组件扫描的候选对象。
@EnableAutoConfiguration 告诉 Spring Boot 根据类路径中可用的依赖项自动配置 Spring 应用程序。
- Let us examine
application.properties--a defaultapplication.propertiesfile is placed undersrc/main/resources. It is an important file for configuring any required properties for the Spring Boot application. At the moment, this file is kept empty, and will be revisited with some test cases later in this chapter.
- Let us examine
ApplicationTests.javaundersrc/test/java. This is a placeholder for writing test cases against the Spring Boot application.
- As the next step, add a REST endpoint. Let us edit
Application.javaundersrc/main/java, and add a RESTful service implementation. The RESTful service is exactly the same as what was done in the previous project. Append the following code at the end of theApplication.javafile:
- To run, go to
Run As|Spring Boot App. Tomcat will be started on the8080port:

遗留服务和这个服务之间的主要区别在于 Spring Boot 服务是自包含的。为了更清楚地说明这一点,请在 STS 之外运行 Spring Boot 应用程序。
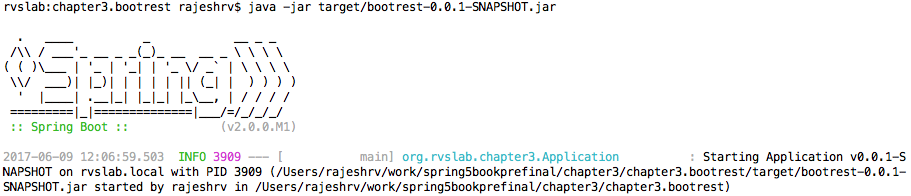
打开终端窗口,进入项目文件夹,运行 Maven,如下所示:
上述命令将在项目的目标文件夹下生成一个 fat jar。从命令行运行应用程序显示以下内容:
可以看到,bootrest-0.0.1-SNAPSHOT.jar 是自包含的,可以作为独立应用程序运行。此时,jar 的大小只有 14 MB。尽管应用程序不仅仅是一个hello world,但刚刚开发的spring boot服务实际上遵循了微服务的原则。
有 多种 方法来测试 REST/JSON Spring Boot 微服务。最简单的方法是使用 Web 浏览器或指向 URL 的 curl 命令,如下所示:
有许多工具可用于测试 RESTful 服务,例如 Postman、Advanced Rest Client、SOAP UI、Paw 等。
在此示例中,对于 testing 服务,将使用 Spring Boot 生成的默认测试类。向 ApplicatonTests.java 添加一个新的测试用例会导致:
请注意,@SpringBootTest 是一个用于测试 Spring Boot 应用程序的简单注解,它在测试执行期间启用 Spring Boot 功能。 webEnvironment=WebEnvironment.RANDOM_PORT 属性指示 Spring Boot 应用程序绑定到随机端口。当运行许多 Spring Boot 服务作为回归测试的一部分时,这将很方便。另请注意,TestRestTemplate 用于调用 RESTful 服务。 TestRestTemplate 是一个实用类,它抽象了 HTTP 客户端的底层细节,也自动发现 Spring Boot 使用的实际端口。
要对此进行测试,请打开一个终端窗口,转到项目文件夹,然后运行 mvn install。
在下一个示例中,Spring Initializr 将被使用< /a> 创建一个 Spring Boot 项目。 Spring Initializr 是 STS 项目向导的直接替代品,提供 用于配置和生成 Spring Boot 的 Web UI项目。 Spring Initializr 的优点之一是它可以通过网站生成项目,然后可以将其导入任何 IDE。
在这个例子中,HyperMedia As The Engine Of Application State<的概念 /strong> (HATEOAS) 用于基于 REST 的服务和 超文本应用程序语言 (HAL) 浏览器将 进行检查。
HATEOAS 可用于构建会话式微服务,这些微服务在 UI 与其后端服务之间表现出很强的亲和力。
HATEOAS 是一种 REST 服务模式,其中导航链接作为有效负载元数据的一部分提供。客户端应用程序确定状态,并遵循作为状态一部分提供的转换 URL。这种方法在客户端根据用户导航模式下载附加数据的响应式移动和 Web 应用程序中特别有用。
HAL 浏览器是一个方便的用于 hal+json 数据的 API 浏览器。 HAL 是一种基于 JSON 的格式,它建立了表示资源之间超链接的约定。 HAL 帮助 API 更易于探索和发现。
Note
此示例的完整源代码可作为本书代码文件中的 chapter3.boothateoas 项目在以下 Git 存储库下获得:https://github.com/rajeshrv/Spring5Microservice
以下是使用 Spring Initilizr 开发 HATEOAS 示例的具体步骤:
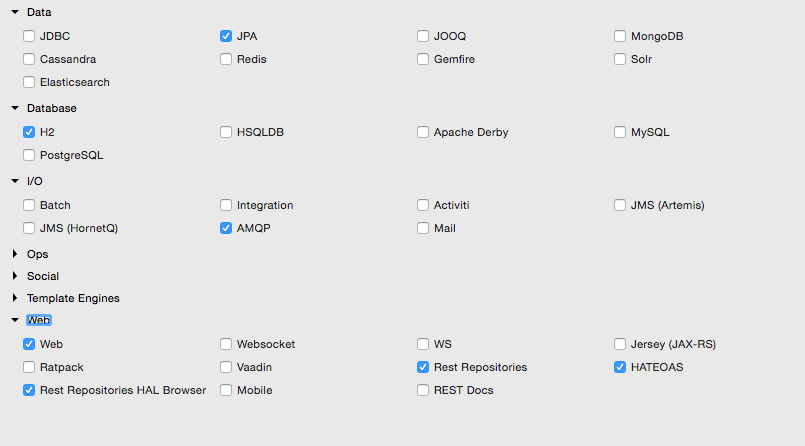
- In order to use Spring Initilizr, go to https://start.spring.io:
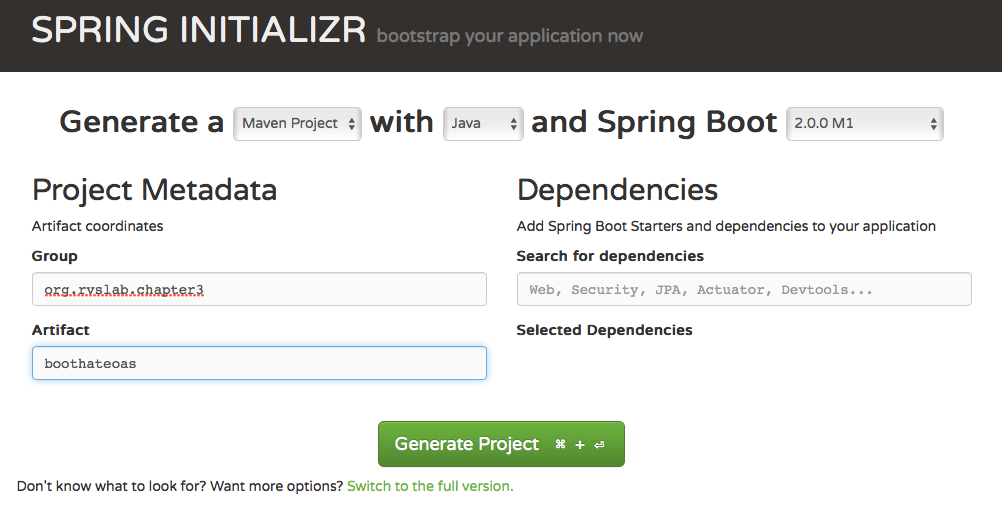
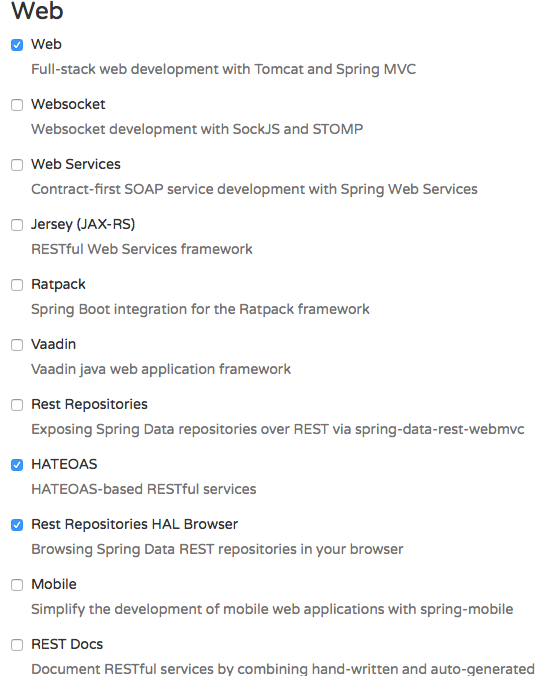
- Fill the details such as
Maven Project, Spring Boot version,Group, andArtifact, as shown in the preceding screenshot, and click onSwitch to the fullversion below theGenerate Projectsbutton. SelectWeb,HATEOAS, andRest Repositories HAL Browser. Make sure the Java version is 8, and the package type is selected as Jar, as shown in the following screenshot:
- Once selected, hit the
Generate Projectbutton. This will generate a Maven project, and download the project as a zip file into the download directory of the browser. - Unzip the file, and save it to a directory of your choice.
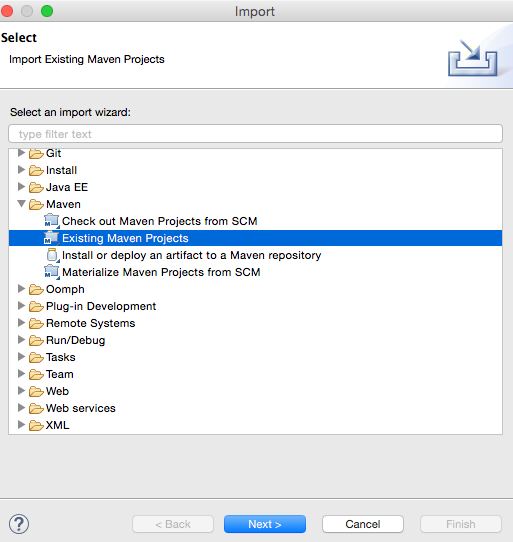
- Navigate to
Maven|Existing Maven Projects, then click onNext. - Click on browse next to the root directory, and select the unzipped folder. Click on
Finish. This will load the generated Maven project inSTS Project Explorer.
- Edit
BoothateoasApplication.javato add a new REST endpoint as follows:
- Note that this is the same
GreetingControllerclass as in the previous example. But a method named greeting was added this time. In this new method, an additional optional request parameter is defined and defaulted to HATEOAS. The following code adds a link to the resulting JSON--in this case, it adds the link to the same API. - The following code adds a self-reference web link to the Greet object:
"href": "http://localhost:8080/greeting?name=HATEOAS":
为此,我们需要从 ResourceSupport 扩展 Greet 类,如下面的代码所示。其余代码保持不变:
Addis a method onResourceSupport. ThelinkToandmethodOnare static methods ofControllerLinkBuilder, a utility class for creating links on controller classes. ThemethodOnmethod does a dummy method invocation, andlinkTocreates a link to the controller class. In this case, we usewithSelfRelto point it to self.- This will essentially produce a link,
/greeting?name=HATEOAS, by default. A client can read the link, and initiate another call. - Run as Spring Boot App. Once the server startup is completed, point the browser to
http://localhost:8080.
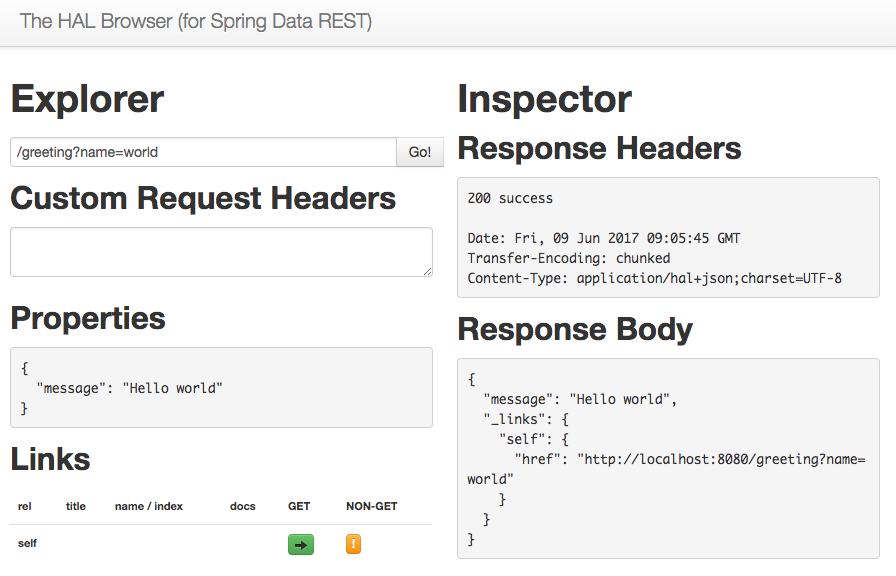
如上图所示,Response Body 的结果带有一个链接,href,这指向相同的服务。这是因为我们将引用指向了自身。此外,请查看 Links 部分。反对自我的小绿框是可导航的链接。
在这个简单的示例中它没有多大意义,但是这在具有许多相关实体的大型应用程序中可能很方便。使用提供的链接,客户可以轻松地在这些实体之间来回导航。
反应式微服务 强调了在生态系统中异步集成微服务的需求。尽管外部服务调用主要从响应式编程中受益,但响应式 principles 在任何软件开发中都很有用,因为它可以改善资源效率和可扩展性的特点。因此,使用响应式编程原则构建微服务非常重要。
我们可以通过两种方式实现反应式微服务。第一种方法是使用 Spring Framework 5 中的 Spring WebFlux。这种方法使用响应式 Web 服务器进行微服务。 second 方法是使用 RabbitMQ 等消息服务器进行微服务之间的异步交互。在本章中,我们将探讨这里提到的两个选项。
Java 中的反应式编程基于 Reactive Streams 规范。反应式流规范定义了异步流处理的语义或 flow 事件between 非阻塞样式的不同组件。
与标准观察者模式不同,Reactive Streams 允许 维护顺序、完成通知和完整错误时的通知背压支持。借助背压支持,接收者可以设置条款,例如它想要从发布者那里获得多少数据。此外,只有当数据准备好被处理时,接收器才能开始接收数据。 Reactive Streams 对于处理不同组件的不同线程池,或者在集成慢速和快速组件的情况下特别有用。
Note
反应式流规范现在作为 Java 9 java.util.concurrent.Flow 的一部分被采用。它的语义类似于 Java 8 中的 CompletableFuture ,带有用于收集结果的 lambda 表达式。
Spring Framework 5 在其核心集成了响应式编程原则作为 WebFlux。 Spring 5 WebFlux 基于 Reactive Streams 规范。在底层,Spring 的 Web Reactive Framework 使用 Reactor 项目 (https://projectreactor.io)实现反应式编程。 Reactor 是 Reactive Streams 规范的实现。借助 Spring Framework,开发人员还可以选择使用 RxJava 代替 Reactor。
在本节中,我们将了解如何使用 Spring 5 WebFlux 库构建反应式 Spring Boot 微服务。这些库帮助开发人员创建具有完全背压支持的异步、非阻塞 HTTP 服务器,而无需编写回调方法。请注意 在所有情况下它都不是一刀切的解决方案,如果不使用属性,这可能会适得其反服务质量。此外,开发人员需要确保下游组件支持完整的反应式编程。
为了获得反应式编程的全部功能,应该从客户端、端点和存储库端到端地使用反应式结构。这意味着,如果慢速客户端访问响应式服务器,则存储库中的数据读取操作会减慢以匹配客户端的慢速。
Note
在编写本书时,Spring Data Kay M1 支持 Mongo DB、Apache Cassandra 和 Redis 的响应式驱动程序。反应式 CRUD 存储库 ReactiveCrudRepository 是实现反应式存储库的便捷接口。
Spring WebFlux 支持两种用于实现 Spring Boot 应用程序的选项。第一种方法是基于 @Controller 的注解和 Spring Boot 通常使用的其他注解。第二种方法是函数式编程 Java 8 lambda 样式编码。
让我们使用 WebFlux 使用注释风格的反应式编程构建一个示例。
Note
此示例的完整源代码可作为本书代码文件中的 chapter3.webflux 项目在以下 Git 存储库下获得:https://github.com/rajeshrv/Spring5Microservice
按照以下步骤构建反应式 Spring Boot 应用程序:
- Go to https://start.spring.io, and generate a new Spring Boot project.
- Select
Reactive Webunder theWebsection:
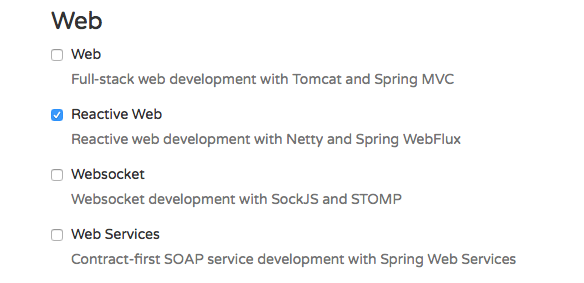
- Add the
GreetingControllerandGreetclasses fromchapter3.bootrestto theApplication.javaclass. - Run this project, and test with a browser by pointing to
http://localhost:8080. You will see the same response. - Let us add some Reactive APIs to enable reactive programming to the Boot application. Let us modify
RestController. Let us add a construct,Mono, as follows:
在这种情况下,响应正文使用 Mono,这意味着 Greet 对象只有在 Mono 完成后才会被序列化异步非阻塞模式。由于我们使用了 Mono,因此此方法仅创建一个确定的项目。
在这种情况下,Mono 用于声明一个逻辑,该逻辑将在对象被反序列化后立即执行。您可以将 Mono 视为具有一组回调方法的零个或一个对象的占位符(延迟)。
在 Mono 作为控制器方法的参数的情况下,该方法甚至可以在序列化结束之前执行。控制器中的代码将决定我们要对 Mono 对象做什么。或者,我们可以使用 Flux。 这些 结构将在下一节中详细解释。
现在让我们更改客户端。 Spring 5 reactive 引入了 WebClient 和 WebTestClient 作为 RestTemplate 的替代品。 WebClient 在底层完全支持响应式。
客户端代码如下:
WebTestClient 是用于测试 WebFlux 服务器的专用构建类。 WebClient, 另一个类似于 RestTemplate 从非测试客户端调用 WebFlux 时更方便。前面的测试代码首先使用服务器 URL 创建一个 WebTestClient。然后它在 / URL 上执行一个 get 方法,并根据现有结果验证它。
- Run the test from the command prompt using
mvn install. You will not notice any difference in functionality, but the execution model has changed under the hood.
让我们了解 Reactive Streams 规范。 Reactive Streams只有四个接口,解释如下:
Publisher 持有数据的 source,然后将数据元素发布为根据订阅者的请求。 Subscriber 然后可以在 Publisher 上附加订阅。注意 subscribe 方法只是一个注册方法,不会返回任何结果:
Subscriber 订阅 Publisher 以使用 streams 个数据。它定义了一组回调方法,这些方法将在这些事件上调用。完成是一切都完成并成功的时候。请注意,所有这些都是回调注册,并且方法本身不会响应任何数据:
Subscription 仅由一个 Publisher 和一个 Subscriber 共享调解这对之间的数据交换。当订阅者调用 request 时,发生。 cancel 基本上用于停止订阅,如下例所示:
Processor 代表一个处理阶段——它既是 Subscriber 又是 Publisher
和 必须 遵守双方的合同。 A of 可以通过连接 Publisher 和 链接 "literal">订阅者:
Reactor 对 Publisher 有两种实现——Flux 和 <强>单声道。 Flux 可以发出 0...N 个事件,而 Mono 用于单个事件 (0...1)。当 many< /a> 数据元素或值列表作为流传输。
在理想情况下,所有 microservice 交互都是预期 异步发生使用 发布订阅语义。 Spring Boot 提供了一种轻松的机制来配置 消息传递解决方案:

在下一个示例中,我们将创建一个带有发送者和接收者的 Spring Boot 应用程序,两者都通过外部队列连接。
Note
该示例的完整源代码可作为本书代码文件中的 chapter3.bootmessaging 项目在以下 Git 存储库下获得:https://github.com/rajeshrv/Spring5Microservice
让我们按照这些步骤来创建 一个字符串 boot 反应式 microservice 使用 RabbitMQ:
- Create a new project using STS to demonstrate this capability. In this example, instead of selecting
Web, selectAMQPunderI/O:
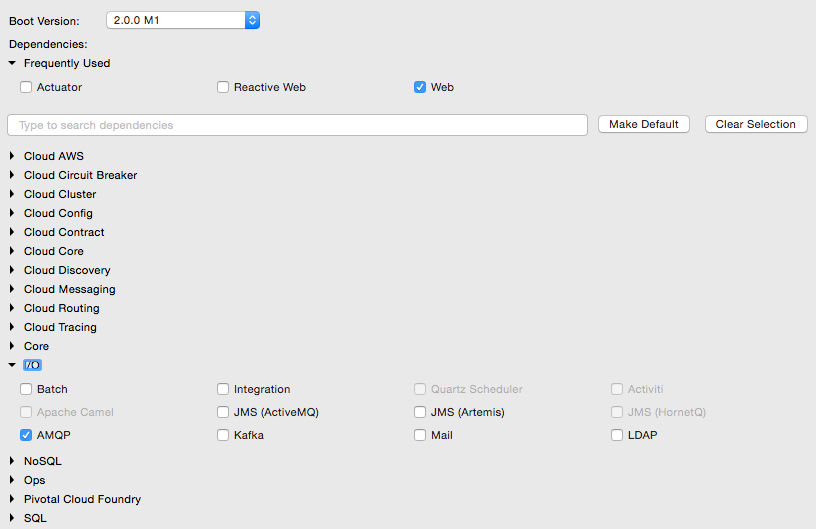
- RabbitMQ will also be needed for this example. Download and install the latest version of RabbitMQ from https://www.rabbitmq.com/download.html. RabbitMQ 3.5.6 is used in this book.
- Follow the installation steps documented on the site. Once ready, start the RabbitMQ server like this:
- Make the configuration changes to the
application.propertiesfile to reflect the RabbitMQ configuration. The following configuration uses the default port, username, and password of RabbitMQ:
- Add a message sender component and a queue named
TestQof the typeorg.springframework.amqp.core.QueuetoApplication.javaundersrc/main/java. TheRabbitMessagingTemplatetemplate is a convenient way to send messages, and abstracts all the messaging semantics. Spring Boot provides all boilerplate configurations for sending messages:
- For receiving a message, all that is needed is a
@RabbitListenerannotation. Spring Boot auto-configures all required boilerplate configurations:
- The last piece of this exercise is to wire the sender to our main application, and implement the
CommandLineRunnerinterface's run method to initiate the message sending. When the application is initialized, it invokes the run method of theCommandLineRunner:
- Run the application as a Spring Boot application, and verify the output. The following message will be printed on the console:
保护微服务很重要。当有许多微服务相互通信时,这将更加重要。每项服务都需要得到保护,但与此同时,安全性不应成为一种开销。在本节中,我们将学习一些保护微服务的基本措施。
Note
本示例的完整源代码可作为本书代码文件中的 chapter3.security 项目在以下 Git 存储库下获得:https://github.com/rajeshrv/Spring5Microservice
执行以下步骤来构建此示例:
- Create a new Spring Starter project, and select
WebandSecurity(under core) - Name the project as
chapter3.security - Copy rest endpoint from
chapter3.bootrest
将基本身份验证添加到 Spring Boot pretty 很简单。 pom.xml 文件将具有以下依赖项。这将包括必要的 Spring 安全库文件:
默认情况下,这将假定此项目需要基本安全性。运行应用程序,并使用浏览器对其进行测试。浏览器将询问登录用户名和密码。
默认的 basic 身份验证假定 .默认密码将在启动时打印在控制台上:
或者,可以在 application.properties 中添加用户名和密码,如下所示:
在本节中,我们将看到 OAuth2 的 basic Spring Boot 配置。当客户端应用程序需要访问受保护的资源时,客户端会向授权服务器发送 request。授权服务器验证请求,并提供访问令牌。将为每个客户端到服务器的请求验证此访问令牌。来回发送的请求和响应取决于授权类型。
Note
在此链接中阅读有关 OAuth 和授权类型的更多信息:http://oauth.net
在以下示例中将使用资源所有者密码凭证授予方法:
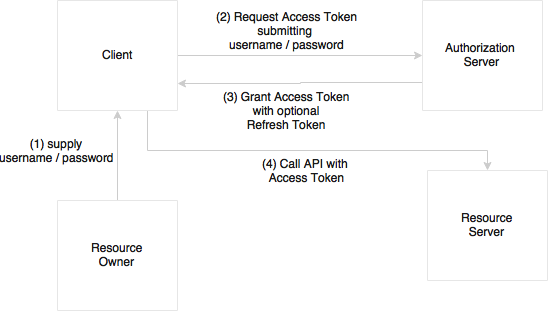
在这种情况下,如上图所示,资源所有者向客户端提供用户名和密码。然后,客户端通过提供凭据向授权服务器发送令牌请求。授权服务器对客户端进行授权,并返回访问令牌。在每个后续请求中,服务器都会验证客户端令牌。
要在我们的示例中实现 OAuth2,请执行以下步骤:
- As the first step, update
pom.xmlwith oauth2 dependency as follows:
- Next, add two new annotations--
@EnableAuthorizationServer--and@EnableResourceServertoApplication.java. The@EnableAuthorizationServerannotation creates an authorization server with an in-memory repository to store client tokens and to provide clients with a username, password, client ID, and secret.@EnableResourceServeris used to access the tokens. This enables a spring security filter that authenticates via an incoming OAuth2 token.
- Add another test case to test OAuth2 as follows:
如上代码所示,通过传递封装在资源详情对象中的资源详情,创建了一个特殊的REST模板OAuth2RestTemplate。这个 rest 模板处理下面的 OAuth2 进程。访问令牌 URI 是令牌访问的端点。
- Rerun the application using maven install. The first two test cases will fail, and the new one will succeed. This is because the server accepts only OAuth2-enabled requests.
这些是快速 配置提供< /a> 由 Spring Boot 开箱即用,但不足以成为生产级。我们可能需要自定义 ResourceServerConfigurer 和 AuthorizationServerConfigurer 以使它们准备好生产。无论如何,方法保持不变。
当从一个来源运行的客户端 Web 应用程序从另一个来源请求数据时,浏览器通常会受到限制。启用跨origin访问一般是termed as CORS(跨源资源共享 )。
这在处理微服务时尤其重要,例如当微服务在不同的域上运行,并且浏览器尝试从一个又一个浏览器访问这些微服务时:
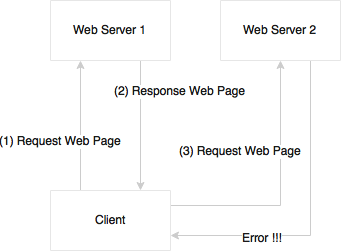
前面的示例展示了如何启用跨源请求。使用微服务,由于每个服务都有自己的来源运行,它很容易陷入客户端 Web 应用程序的问题,该应用程序使用来自多个来源的数据。例如,浏览器客户端从客户微服务访问客户,以及来自订单微服务的订单历史的场景在微服务世界中非常常见。
Spring Boot 提供了一种简单的声明式方法来启用跨源请求。
默认情况下,所有来源和标题都被接受。我们可以通过提供对特定来源的访问权限来进一步自定义跨来源注释,如下所示。 @CrossOrigin 注释使方法或类能够接受跨源请求:
可以通过使用 WebMvcConfigurer bean 并自定义 addCorsMappings (CorsRegistry 注册表来启用全局 CORS ) 方法。
前面的部分探讨了开发微服务所需的大部分 Spring Boot 功能。在本节中,我们将探讨 Spring Boot 的一些生产就绪操作方面。
Spring Boot 执行器提供了一种出色的开箱即用机制,用于监控和管理生产中的 Spring Boot 微服务。
Note
该示例的完整源代码可作为本书代码文件中的 chapter3.bootactuator 项目在以下 Git 存储库下获得:https://github.com/rajeshrv/Spring5Microservice
创建另一个 Spring starter 项目,并将其命名为 chapter3.bootactuator.application;这次,选择 Web、HAL 浏览器、hateoas、和 Actuator 依赖项。与 chapter3.bootrest 类似,使用 greet 方法添加一个 GreeterController 端点。将 management.security.enabled=false添加到 application.properties 文件以授予对所有端点的访问权限。
执行以下操作以执行应用程序:
- Start the application as Spring Boot App.
- Point the browser to
localhost:8080/application. This will open the HAL browser. Review theLinkssection.
Links 部分下提供了许多链接。这些由 Spring Boot 执行器自动公开:
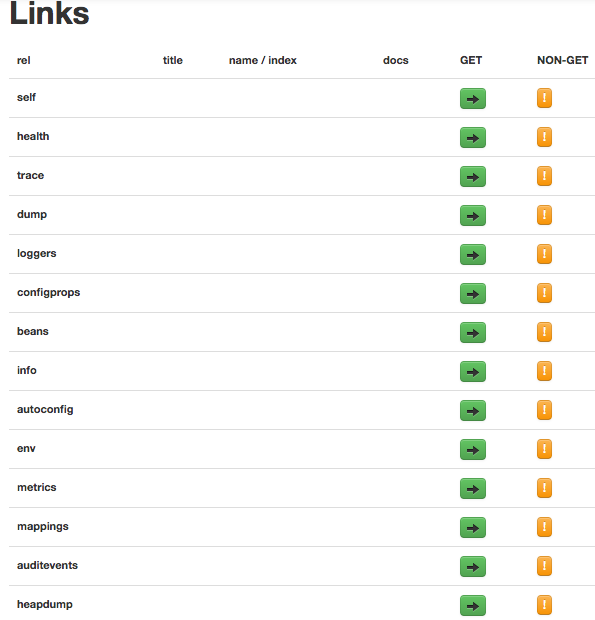
下面列出了一些重要的链接:
dump: Performs a thread dump and displays the resultmappings: Displays a list of all the http request mappingsinfo: Displays information about the applicationhealth: Displays the health condition of the applicationautoconfig: Displays the auto configuration reportmetrics: Shows different metrics collected from the application
在浏览器中,可以使用 /application/
访问各个端点。例如,要访问 /health 端点,请将浏览器指向 localhost:8080/application/health。

Spring Boot 提供远程访问< /a> 到使用 ssh 的引导应用程序。以下命令从终端窗口连接到 Spring Boot 应用程序。可以通过在 application.properties 文件中添加 shell.auth.simple.user.password 属性来自定义密码。更新后的 application.properties 将如下所示:
使用终端窗口使用以下代码连接到远程启动应用程序:
当与前面的命令连接时,可以访问类似的执行器信息。以下是通过 CLI 访问的指标信息的示例:
help: lists all the options availabledashboard: dashboard is one interesting feature, which shows a lot of system-level information
向 Spring Boot 应用程序添加一个新的 custom 模块并不是那么复杂。为了演示此功能,假设服务在一分钟内获得more 两个事务,则将设置服务器状态作为停止服务。
为了自定义这个,我们必须实现 HealthIndicator 接口,并重写 health 方法。以下代码是完成这项工作的快速而肮脏的实现:
前面的代码是一个简单的Plain Old Java Object(POJO ) 类,它维护事务计数窗口。 isWeak 方法检查是否特定窗口中的事务已达到临界点。 isExpired 检查当前窗口是否过期。 increment 方法只是增加计数器的值。
下一步,实现我们的自定义健康指标类 TPSHealth。这是通过扩展 HealthIndicator 来完成的,如下所示:
health 方法检查计数器是否isWeak。如果它很弱,它会将实例标记为停止服务。
最后,我们将 TPSHealth 自动装配到 GreetingController 类中,然后调用 health.updateTx() 在 greet 方法中,如下所示:
转到 HAL 浏览器中的 /application/health 端点,查看服务器的状态。
现在打开另一个浏览器,指向 http://localhost:8080,然后启动该服务两次或三次。回到/application/health端点,refresh查看状态。它会已更改为停止服务。
在此示例中,由于除了收集健康状态之外没有采取任何操作,因此即使状态为停止服务,新的服务调用仍将通过。但在现实世界中,程序应该读取 /application/health 端点,并阻止进一步的请求到达该实例。
API 文档的传统方法是编写服务规范文档或使用静态服务注册表。使用大量微服务,很难使 API 的文档保持同步。
可以通过多种方式记录微服务。本节将探讨如何使用流行的 Swagger 框架记录 微服务。在以下示例中,我们将使用 Springfox 库来生成 REST API 文档。 Springfox 是一套Java Spring 友好的库。
新建一个Spring Starter项目,在库选择窗口中选择Web。将项目命名为 chapter3.swagger.
Note
此示例的完整源代码可作为本书代码文件中的 chapter3.swagger 项目在以下 Git 存储库下获得:https://github.com/rajeshrv/Spring5Microservice
由于 Springfox 库不是 Spring 套件的一部分,因此编辑 pom.xml 文件,并添加 springfox-swagger 库依赖项。将以下依赖项添加到项目中:
创建一个与之前创建的服务类似的 REST 服务,但还要添加 @EnableSwagger2 注释,如下所示:
这就是 basic swagger 文档所需的全部内容。启动应用程序,并将浏览器指向 http://localhost:8080/swagger-ui.html。这将打开 swagger API 文档页面,如下图所示:
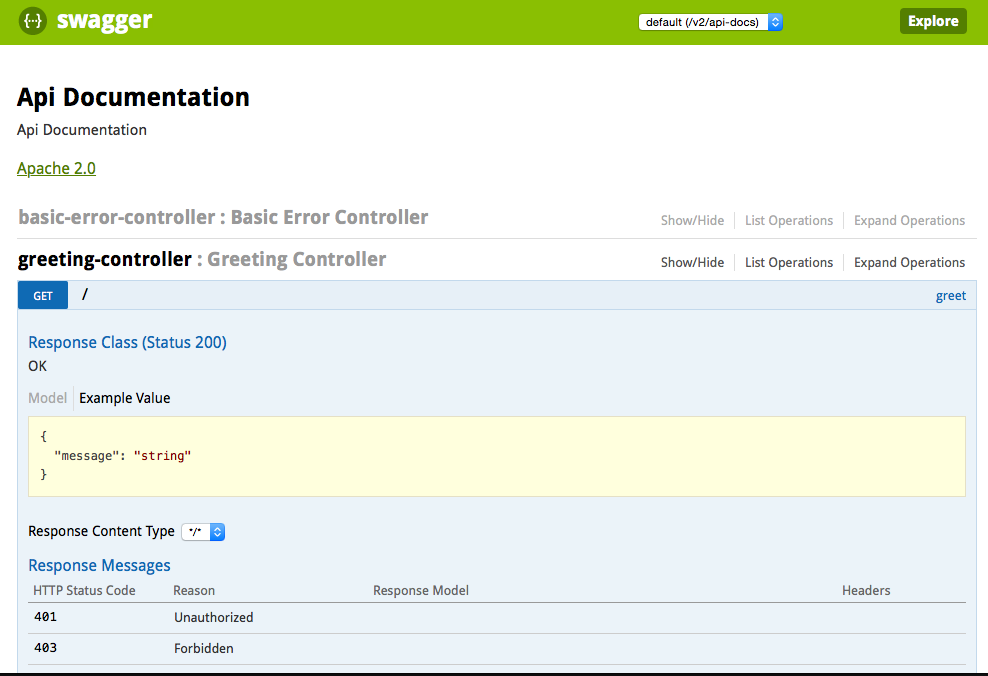
如上图所示,Swagger 列出了 GreetingController 类的可能操作。点击 GET 操作。这扩展了 GET 行,它提供了一个尝试操作的选项。
到目前为止,我们看到的examples不只是一个简单的你好世界。将我们的学习成果放在一起,本节演示了端到端的客户档案微服务实施。客户档案微服务将演示不同微服务之间的交互。它还将演示具有业务逻辑和原始数据存储的微服务。
在这个例子中,两个微服务——Customer Profile Service和Customer Notification Service< /span>-- 将被开发:

如 preceding 图所示,customer 配置文件微服务公开了创建、读取、更新和删除客户的方法,以及用于注册客户的注册服务。注册过程应用一定的业务逻辑,保存客户资料,并向客户通知微服务发送消息。客户通知微服务接受注册服务发送的消息,并使用 SMTP 服务器向客户发送电子邮件消息。异步消息传递用于将客户资料与客户通知服务集成。
客户微服务类域模型如下图所示:

图中的 CustomerController 是 REST 端点,它调用组件类 CustomerComponent。组件类/bean 处理所有业务逻辑。 CustomerRepository 是为处理客户实体的持久性而定义的 Spring 数据 JPA 存储库。
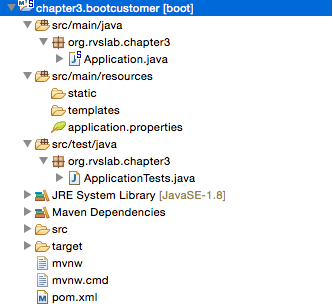
- Create a new Spring Boot project, and call it
chapter3.bootcustomerthe same way as earlier. Select the checkbox of the following options in the starter module selection screen:
这将使用 JPA、Rest Repository 创建一个 Web 项目,和 H2 作为数据库。 H2 是一个小型的内存嵌入式数据库,具有易于演示的数据库功能。在现实世界中,建议使用合适的企业级数据库。此示例使用 JPA 来定义持久性实体,并使用 REST 存储库来公开基于 REST 的存储库服务。
- Start building the application by adding an entity class named
Customer. For simplicity, there are only three fields added to the customer entity which are auto-generated--Idfield,name, andemail:
- Add a
Repositoryclass for handling persistence handling of customer. TheCustomerRepositoryextends the standardJpaRepository. That means, all the CRUD methods and default finder methods are automatically implemented by the Spring Data JPA:
在前面的示例中,我们在 Repository 类中添加了一个新方法 findByName,该方法实质上是根据以下内容搜索客户客户名称,如果有匹配的名称,则返回 Customer 对象。
@RepositoryRestResource 允许通过 RESTful 服务访问存储库。这也默认启用 HATEOAS 和 HAL。由于 CRUD 方法不需要额外的业务逻辑,我们将保持原样,没有控制器或组件类。使用 HATEOAS 可以帮助我们轻松地浏览 CustomerRepository 方法。
- Update
Application.javaby addingCommandLineRunnerto initialize the repository with some customer records, as follows:
CommandLineRunner,定义为一个bean,表示当它包含在一个SpringApplication中时它应该运行。这将在启动时将六个示例客户记录插入数据库。
- At this point, run the application as Spring Boot App. Open the HAL browser by pointing the browser URL to
http://localhost:8080.
- In the
Explorer, point tohttp://localhost:8080/customersand click onGo. This will list all customers in theResponse Bodysection of the HAL browser. - In the
Explorersection, enter the following URL, and click onGo. This will automatically execute paging and sorting on the repository, and return the result--http://localhost:8080/customers?size=2&page=1&sort=name
由于页面大小设置为 2,并且请求了第一页,因此它将以排序顺序返回两条记录。
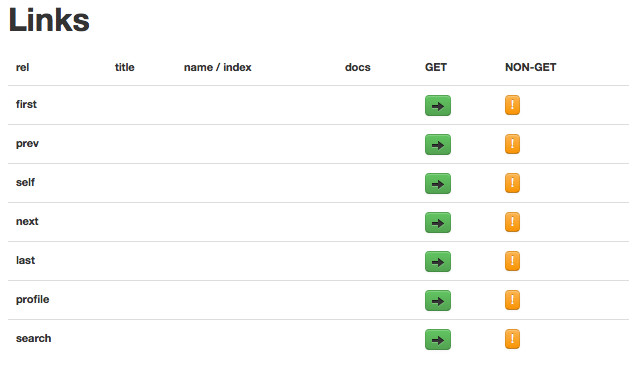
- Review the
Linkssection. As shown in the following diagram, it will facilitate navigating first, next, previous, and last. These are done using the HATEOAS links automatically generated by the repository browser:
- Also, one can explore the details of a customer by selecting the appropriate link,
http://localhost:8080/customers/2.
CustomerRegistrar 组件被添加用于处理业务逻辑。在这种情况下,只向组件添加了最少的业务逻辑。在这个组件类中,在注册客户时,我们只会检查客户名称是否已经存在于数据库中。如果不存在,则应插入新记录,否则应返回错误消息:
- Restart the Boot application, and test using the HAL browser using the following URL:
http://localhost:8080. - Point the Explorer field to
http://localhost:8080/customers. Review the results in theLinkssection:
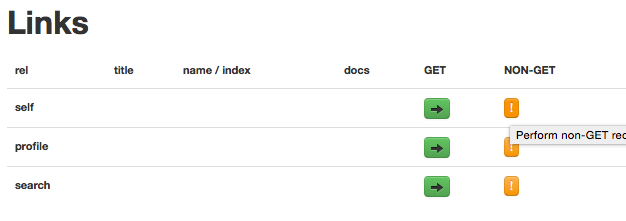
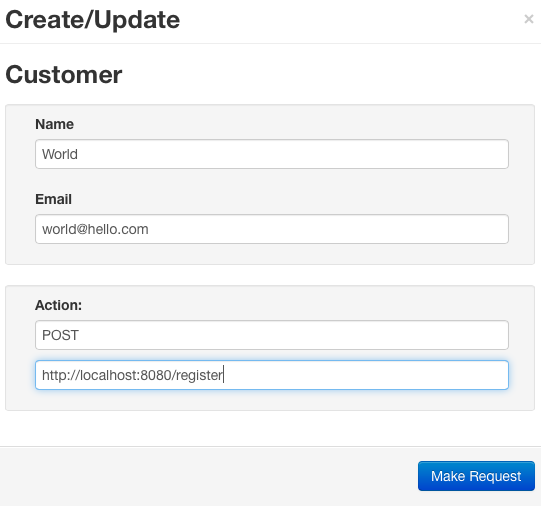
- Click on
NON-GETagainst self. This will open a form for creating a new customer. - Fill the form and change the action as shown in the preceding screenshot. Click on the
Make Requestbutton. This will call the register service and register the customer. Try giving a duplicate name to test the negative case as follows:
让我们通过集成通知客户的客户通知服务来完成示例中的最后一部分。注册成功后,通过异步调用客户通知微服务,应该给客户发送一封邮件。
执行以下步骤来构建客户通知微服务:
- First update
CustomerRegistrarfor calling the second service. This is done through messaging. In this case, we inject aSendercomponent for sending a notification to the customer by passing the customer's e-mail address to the sender:
发送方组件将基于 RabbitMQ 和 AMQP。在此示例中,RabbitMessagingTemplate 被用于上一个消息传递示例中所探讨的内容:
- We will also update the
Application.propertyfile to include RabbitMQ-related properties:
- We are ready to send the message. For consuming the message and sending emails, we will create a notification service. For this, let us create another Spring Boot service,
chapter3.bootcustomernotification. Make sure that the AMQP and Mail starter libraries are selected when creating the Spring Boot service. Both AMQP and Mail are under I/O.
chapter3.bootcustomernotifcation 项目的包结构如下图所示:
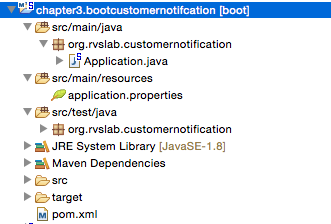
- Add a
Receiverclass. TheReceiverclass waits for a message on the customer. This will receive a message sent by the Customer Profile service. On the arrival of a message, it sends an email:
- Add another component for sending an email to the customer. We use
JavaMailSenderto send the email:
在幕后,Spring Boot 自动配置了 JavaMailSender 所需的所有 parameters .
执行以下步骤来测试应用程序:
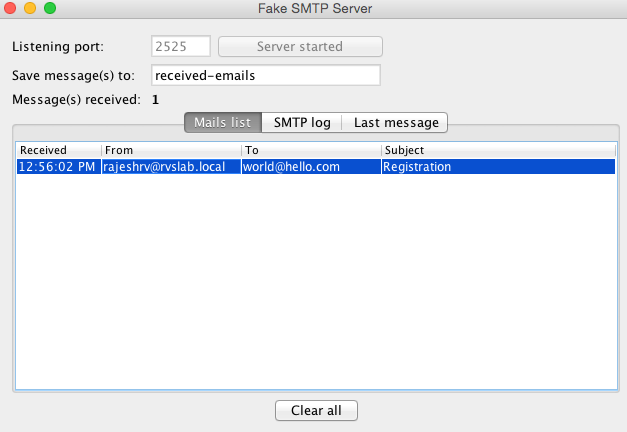
- To test SMTP, a test setup for SMTP is required to ensure that the mails are going out. In this example, Fake SMTP will be used.
- Download the Fake SMTP server from http://nilhcem.github.io/FakeSMTP.
- Once you have downloaded
fakeSMTP-2.0.jar, run the SMTP server by executing the following command:
- This will open a GUI for monitoring email messages. Click on the
Start Serverbutton next to the listening port text box. - Update
Application.propertieswith the following configuration parameters to connect to RabbitMQ as well as to the mail server:
- We are ready to test our microservices end to end. Start both Spring Boot Apps. Open the browser, and repeat the customer creation steps through the HAL browser. In this case, immediately after submitting the request, we will be able to see the e-mail in the SMTP GUI.