读书笔记《developing-java-applications-with-spring-and-spring-boot-ebook》断路器和安全
在上一章中,我们配置了将在我们的基础设施中运行的微服务,并且我们创建了一个 Eureka 服务器来作为我们解决方案的服务发现。此外,我们创建了一个配置服务器应用程序,它将作为我们微服务的配置。
在本章中,我们将创建微服务来与我们之前的基础设施进行交互。我们将了解如何为我们的业务微服务应用服务发现功能,并了解断路器模式如何帮助我们为应用程序带来弹性。
在本章中,我们将了解微服务如何通过 Spring WebFlux 客户端支持的 HTTP 异步调用与其他服务进行通信。
在本章结束时,我们将学会如何:
- Connect microservices with service discovery
- Pull the configuration from the configuration server
- Understand how
Hystrixbrings resilience to microservices - Show the Edge API strategy
- Present the Spring Boot Admin
我们将根据业务需求创建我们的第一个 微服务。我们将创建一个 planes 微服务,它将维护有关公司飞机的数据,例如特征、模型和其他一些属性。
planes 微服务将用于为我们的第二个微服务 flights 微服务提供平面特征。它需要获取一些飞机信息才能创建航班,例如座位数。
planes 微服务是一个很好的起点 因为不需要创建与业务相关的依赖项。
我们的 planes 微服务很快就会派上用场。是时候创造它了。我们走吧。
正如我们在 previous 章节中所做的那样,我们将为此使用 Spring Initializr。应选择以下依赖项,如以下屏幕截图所示:
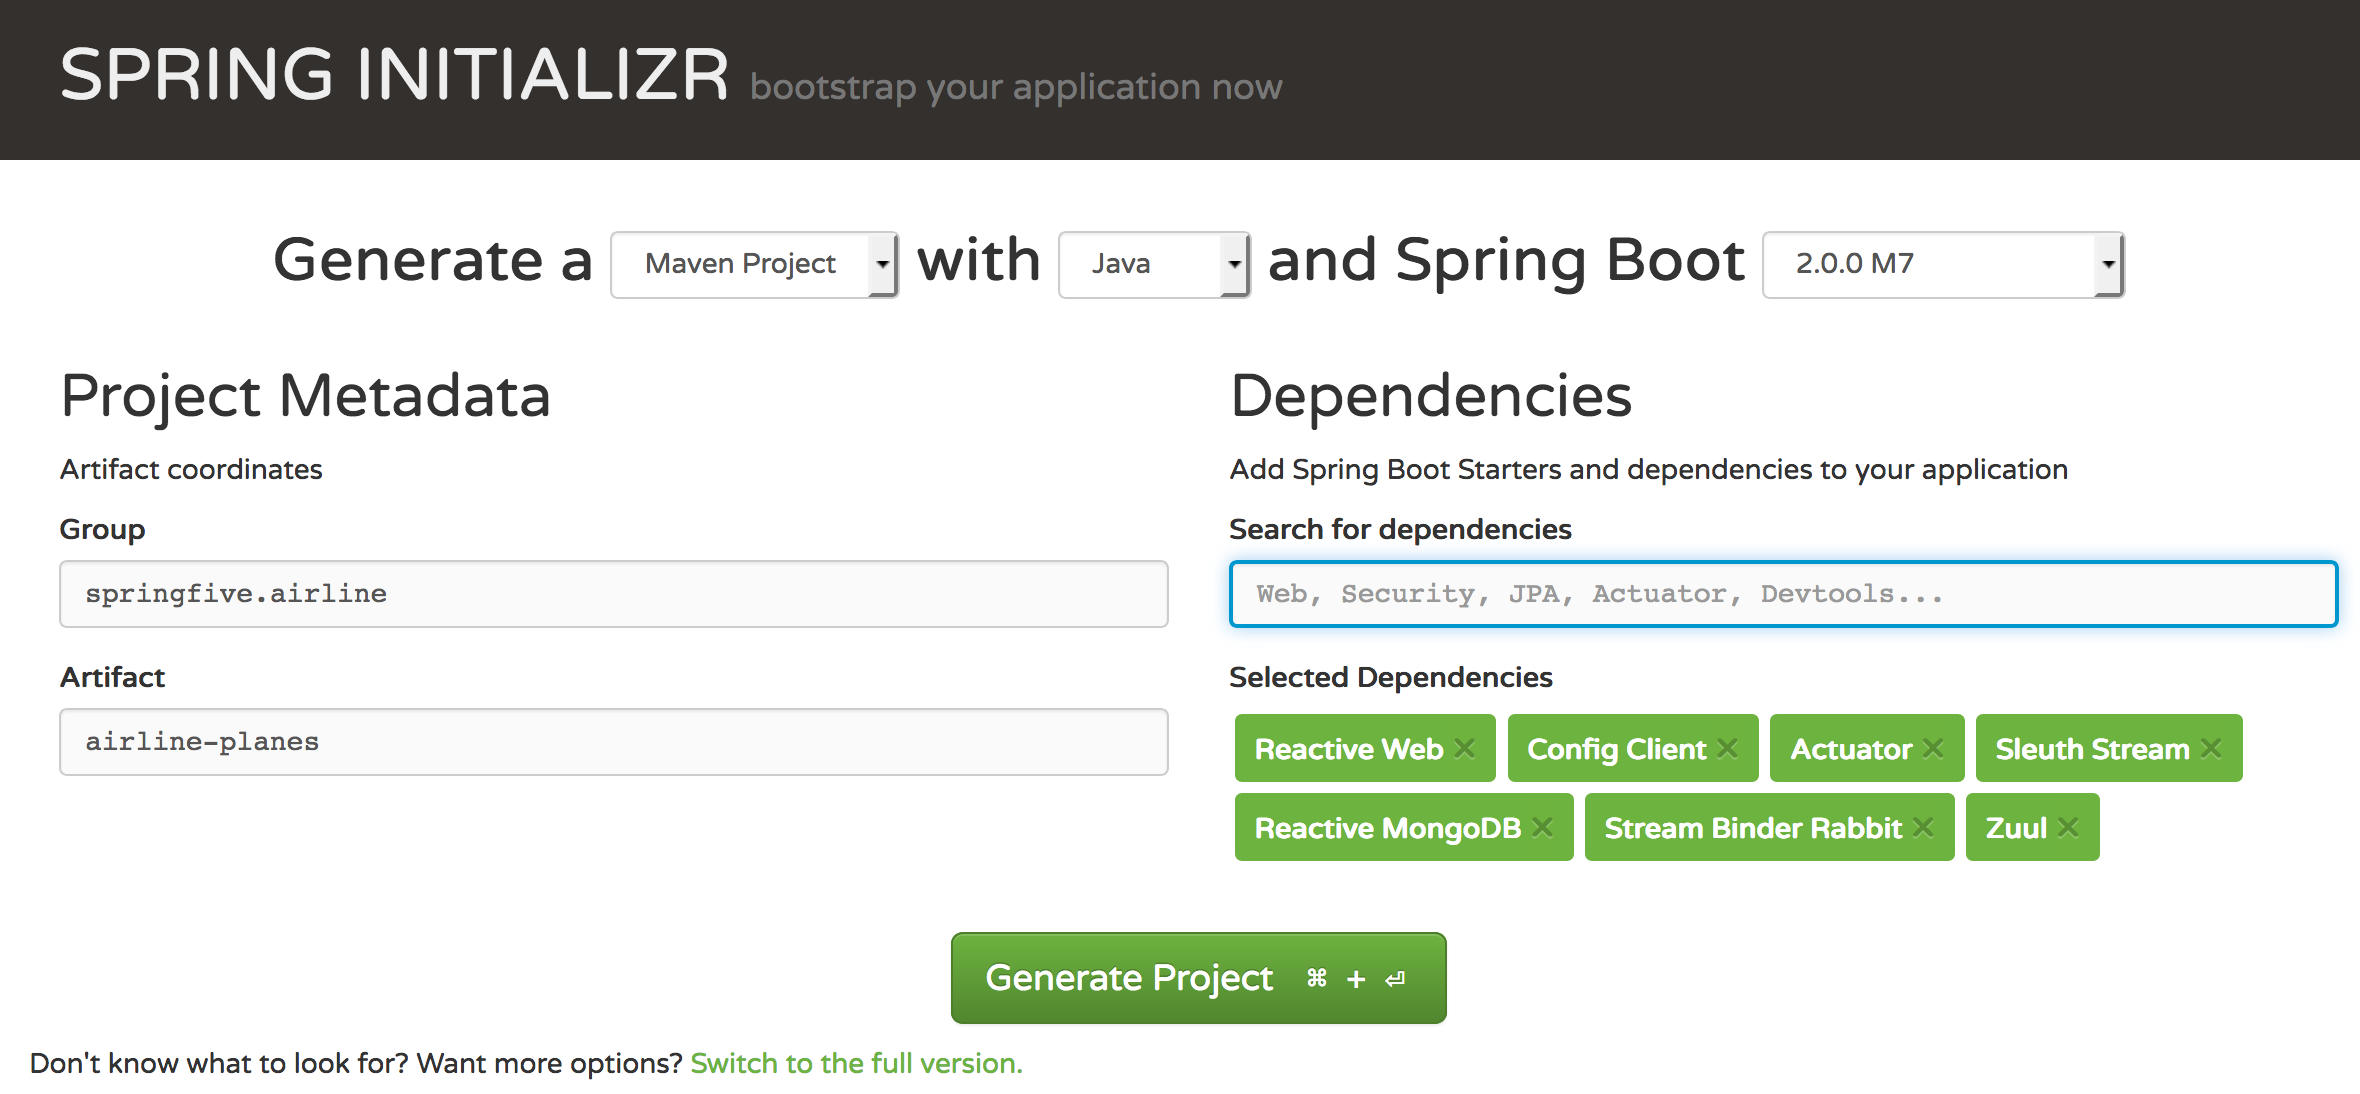
有一些必要的依赖关系。 Stream Binder Rabbit 和 Sleuth Stream 依赖项是必要的,以使我们能够发送数据跨度,并启用跨 RabbitMQ 消息代理的应用程序跟踪。我们将使用 MongoDB 作为这个特定应用程序的数据库,因此我们需要 Reactive MongoDB。 Config Client 对于解决方案中存在的所有微服务都是必需的。我们不会在类路径上进行任何应用程序配置。 Actuator 提供生产就绪的指标和有关正在运行的应用程序的信息;它是微服务架构风格的基本特征。此外, Zuul 对于让我们将应用程序与 Edge API 连接起来至关重要。我们将在本章的课程中了解更多有关它的信息。
我们现在可以按 Generate Project按钮下载项目。在 IDE 上打开项目。
planes 微服务将使用 Spring Boot 2 框架创建,因为我们有兴趣为我们的平面服务实现反应式基础。
此外,我们还需要包含一个依赖项,可以使用 pom.xml 中的以下代码段来完成:
spring-cloud-starter-netflix-eureka-client 启用服务发现,由我们应用程序中的 Eureka 服务器提供支持。
我们将在应用程序上添加一些功能。对于这个特定的 应用程序,我们将使用Spring Reactive WebFlux 创建CRUD 功能。
Plane 类代表我们微服务中的平面模型,类应该是这样的:
有趣的是 @Document 注释。它使我们能够配置的名称 我们域的 MongoDB 集合。 @Builder 注释使用带注释的方法创建 Builder 模式的实现。 Project Lombok 库提供 this 功能(https://projectlombok.org)。此外,该项目还有一些令人兴奋的功能,例如 @Data,它 创建了getters/setters、equals 和 hashCode 自动为带注释的类实现。
我们可以看到,这个类中有一些 domain 模型。这些模型在这里不需要解释,完整的源代码可以在GitHub项目中找到 https://github.com/PacktPublishing/Spring-5.0-By-Example/tree/master/Chapter08/airline-planes。
我们的 Plane 类需要一个 repository 来将数据持久化到数据库中。我们将使用 Spring Reactive MongoDB 实现为 MongoDB 提供的响应式存储库。我们将使用 ReactiveCrudRepository 因为它使我们的存储库具有反应性。我们的存储库应该是这样的:
除了新的响应式接口外,实现与之前的 Spring Data 版本相同。现在,我们可以在下一节中创建我们的服务层。
我们的 PlaneService 将 responsible 在code class="literal">PlaneRepository 和 PlaneResource;后一个我们将在下一节中创建。实现应该是这样的:
这个类没有什么特别的,PlaneService会调用PlaneRepository来持久化数据库中的平面。正如我们所见,我们已经广泛使用了 lambda。 Java 8 是运行 Spring Boot 2 应用程序的要求。
看看 Builder 模式如何使我们能够编写干净的代码。阅读这段代码要容易得多;我们使用 Lombok 提供的 chaining 方法来实现。
我们将使用 Spring WebFlux 来公开我们的 REST 端点,然后我们需要在我们的方法中返回 Mono 或 Flux。 REST 实现 应该是这样的:
看看 plane 方法。当 planeService.plane(id) 返回空的 Mono 时,REST 端点将返回 notFound,如下实现: <代码类="literal">ResponseEntity.notFound().build()。它使代码非常容易理解。
在 newPlane 方法中,我们将返回带有最近创建的新实体 ID 的 location HTTP 标头。
在我们运行平面微服务之前,我们将创建 plane 微服务的main 类。 负责 启动应用程序。为此,我们需要包含几个 Spring Annotations。类实现可以是这样的:
Spring Annotations 将与 Zuul 代理连接。此外,我们需要将应用程序与 Eureka 服务器连接并自动配置应用程序。这些行为可以使用 @EnableZuulProxy、@EnableEurekaClient 和 @SpringBootApplication。
现在,我们将创建一个 bootstrap.yaml 文件来指示 Spring Framework 搜索上一章创建的 Config Server 上的配置文件。该文件应该是这样的:
我们已经配置了 Config Server 地址;这是小菜一碟。
现在,我们需要在 GitHub 存储库中添加 application.yaml 文件,因为 Config Server 会尝试在存储库中查找该文件。
该文件可以在 GitHub 上找到 https://github.com/PacktPublishing/Spring-5.0-By-Example/blob/master/config-files/flights.yaml。
我们可以在 IDE 上或通过命令行运行应用程序;它是由你决定。在尝试运行之前检查配置服务器、Eureka、MongoDB 和 RabbitMQ 是否已启动并运行。
Note
我们可以使用位于 GitHub 上的 Docker compose 文件(https://github.com/PacktPublishing/Spring-5.0-By-Example/blob/master/Chapter07/docker/docker-compose-infra-full.yaml
)。 它包含准备使用的 RabbitMQ、Config Server、Eureka、MongoDB、MySQL、Redis 和 Zipkin 容器。如果您正在使用它,请使用以下命令运行它:docker-compose -f docker-compose-infra-full.yaml up -d。
让我们检查一下输出。我们可以通过不同的 方式检查它:在控制台上和在Eureka 服务器上。我们开始做吧。
检查控制台。让我们试着找到关于 DiscoveryClient 的一行。 planes 微服务正在尝试连接到 Eureka 服务器:

这里有一些关于日志文件的重要信息。第一行指示哪个应用程序正在尝试向 Eureka 服务器注册。接下来的四行是关于侦探的。 Sleuth 框架正在注册 RabbitMQ 队列和通道。
我们需要找到以下行:
此外,我们可以检查 Eureka 服务器,我们可以在其中看到 PLANES 应用程序,如下所示:

太棒了,我们的平面微服务可以运行了。
Note
我们可以使用 Postman 来尝试我们的微服务。这个应用程序使我们能够使用直观的 IDE 调用我们的 API 来与我们的微服务进行交互。该应用程序允许我们将一些 HTTP 调用分组到集合中。平面集合可以在 GitHub 上的 https://github.com/PacktPublishing/Spring-5.0-By-Example/blob/master/postman/planes.postman_collection。
我们已经完成了我们的第一个微服务。在下一节中,我们将创建我们的 flights 微服务,它将使用飞机的数据。
我们飞机的微服务已经启动并运行。这将是important,因为航班的微服务需要获取飞机的数据来创建航班的实体。
我们将介绍 Netflix Ribbon,它将充当我们应用程序的客户端负载均衡器,我们将使用服务发现来从服务注册表中查找服务的地址。
我们在previous 章节中多次执行此任务。我们可以在 GitHub 上下载项目源代码 https://github.com/PacktPublishing/Spring-5.0-By-Example/tree/master/Chapter08/airline-flights。在下一节中,我们将深入研究 Ribbon 以及它如何在分布式系统上为我们提供帮助。
Ribbon 是由 Netflix 公司创建和维护的开源项目。该项目在 Apache 2.0 下获得许可,可用于商业目的。
功能区为IPC<提供客户端软件负载平衡 /strong>(进程间通信)。该项目以异步方式支持大多数流行的协议,例如 TCP、UDP 和 HTTP。
还有更多有趣的功能,例如服务发现集成,它支持在云等动态和弹性环境中进行集成。为此,我们将查看我们的 Eureka 服务器。这两个项目都由 Netflix 团队维护。它非常适合我们的用例。
另一个有趣的特性是容错。 Ribbon 客户端可以在配置的列表中找到实时服务器并发送请求。此外,宕机的服务器不会收到任何请求。
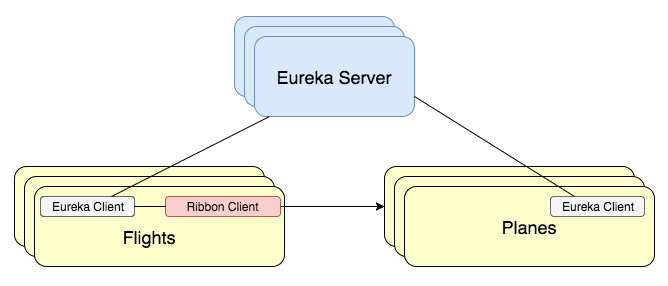
正如我们所见,Ribbon Client 可以与 Eureka 通信,然后将请求重定向到所需的微服务。在我们的例子中,flights 微服务将使用 Ribbon 客户端并从 Eureka 获取服务注册表并将调用重定向到实时 planes< /code> 微服务实例。这听起来像是一个了不起的解决方案。
现在,我们将了解服务 discovery 以及它如何在复杂和动态的环境中工作。服务发现的基本思想是维护服务存储库并为调用者提供服务地址。
它需要一些复杂的任务来实现这个目标。有两个主要的行为需要理解:
- The first one is the register. As we know, the service discovery needs to store the services information, such as the address and name, and then during the service bootstrap, it needs to send the information to the service registry.
- In the the second operation, the service discovery clients need to query the service registry, asking for the desired service name, for instance. Then the service registry will send the service information to the client.
现在我们了解了基础知识,如下图所示:
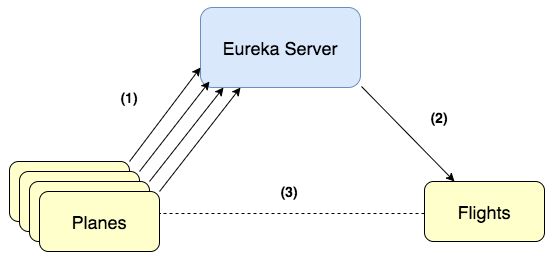
如上图所示:
- The first part is the service registration.
- At the second stage, the service client will get the service address from the Eureka server.
- Then the client can call based on the service information.
让我们在代码中进行。
现在我们将编写一些代码来与我们的service 发现和负载平衡基础设施进行交互。现在我们知道它是如何工作的,它将帮助我们理解源代码。
我们将创建一个 DiscoveryService 类,该类将从请求的 service 名称。类代码应该是这样的:
可以看到,我们注入了两个对象:LoadBalanceClient,它充当客户端负载均衡器,即Netflix Ribbon;和 DiscoveryClient,它将从请求的服务中找到实例。
我们使用 lambda Flux.defer() 来组织流程,然后我们将从 Eureka 服务器中查找服务实例。为此,我们使用 this.dClient.getInstances(service)。在我们从负载均衡中查找服务 URI 后,它将返回一个服务名称列表。这将使用 this.lbClient.choose(service). 然后我们将返回服务实例的Flux地址。
是时候看看客户端代码如何使用 DiscoveryService 对象了。客户端代码可以是这样的:
此代码可以在项目的PlaneService 类中找到。记住 serviceAddressFor() 方法返回一个 Flux 的服务地址。我们将使用 next() 方法获得第一个。然后我们可以将服务地址转换为有效地址以到达平面微服务。
现在,我们将测试 service 连接。我们需要完成以下任务:
- Run the Config Server, Eureka, the
planesmicroservice, and theflightsmicroservice - Create a
planeentity on theplanesmicroservice - Create a
flightentity on theflightsmicroservice
检查前面列出的所有服务是否已启动并正在运行。然后我们将使用以下 JSON 创建一个 plane 实体:
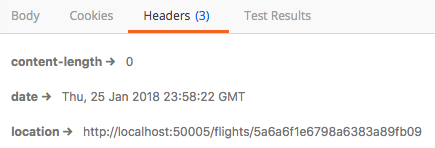
我们需要使用 HTTP http://localhost:50001/planes 调用 planes 微服务文字">POST 方法。我们可以在 Postman 的Planes Collection 中找到创建平面的请求。当我们调用创建平面 API 后,我们将获得一个新的平面 ID。它可以在 HTTP 响应标头中找到,如 Postman 上的 following 图像所示:
Note
Postman 是一个帮助开发者测试 API 的工具。 Postman 提供了一个友好的 GUI ( Graphic User Interface )来制作要求。此外,该工具支持环境,有助于测试不同的环境,例如开发、测试和生产。

查看 location HTTP 响应标头。 HTTP 状态码也很重要。我们将使用刚刚创建的飞机 ID 5a6a6c636798a63817bed8b4 创建一个新航班。
Note
我们可以在 W3 Org (https://www.w3.org/Protocols/rfc2616/rfc2616-sec10.html)。 记住这一点,因为遵循正确的状态代码非常重要。当我们创建 REST API 时,这被认为是最佳实践。
Flight Collection 可以在 GitHub 上找到 https://github.com/PacktPublishing/Spring-5.0-By-Example/blob/master/postman/flights.postman_collection。 有一个 Create Flight 请求我们要执行,但在此之前,我们需要更改我们之前创建的飞机 ID。看看下面的截图:
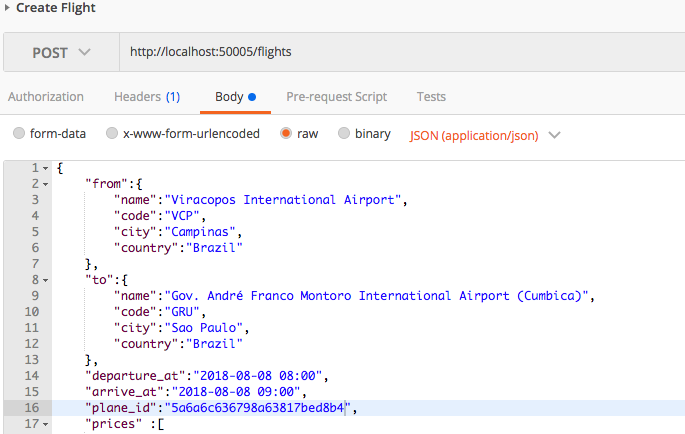
飞机 ID 已更改为我们之前创建的飞机的 ID。现在我们可以执行请求了。 flights 微服务与 planes 微服务具有相同的行为。它将返回带有新航班 ID 的位置响应。就我而言,生成的新 ID 如下图所示:
现在,我们可以通过 ID 找到航班。该请求可在 Flight Collection; 名称为 Flight by Id 中找到。我们可以执行这个请求,结果应该是这样的:
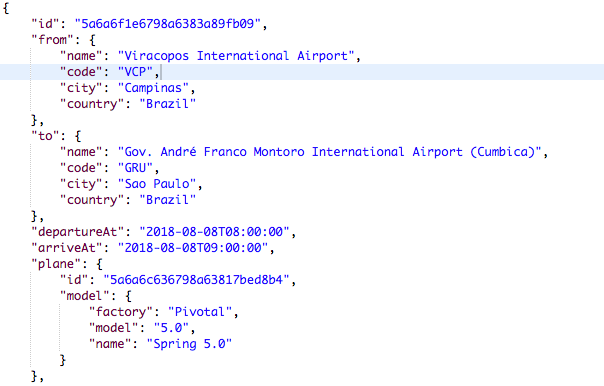
查看 plane JSON 节点。我们在 flight 微服务中没有任何关于飞机的数据。此信息来自 planes 微服务。我们使用了服务发现和客户端负载平衡。做得好!
我们来看看IDE提供的调试。我们要查看飞机服务地址:
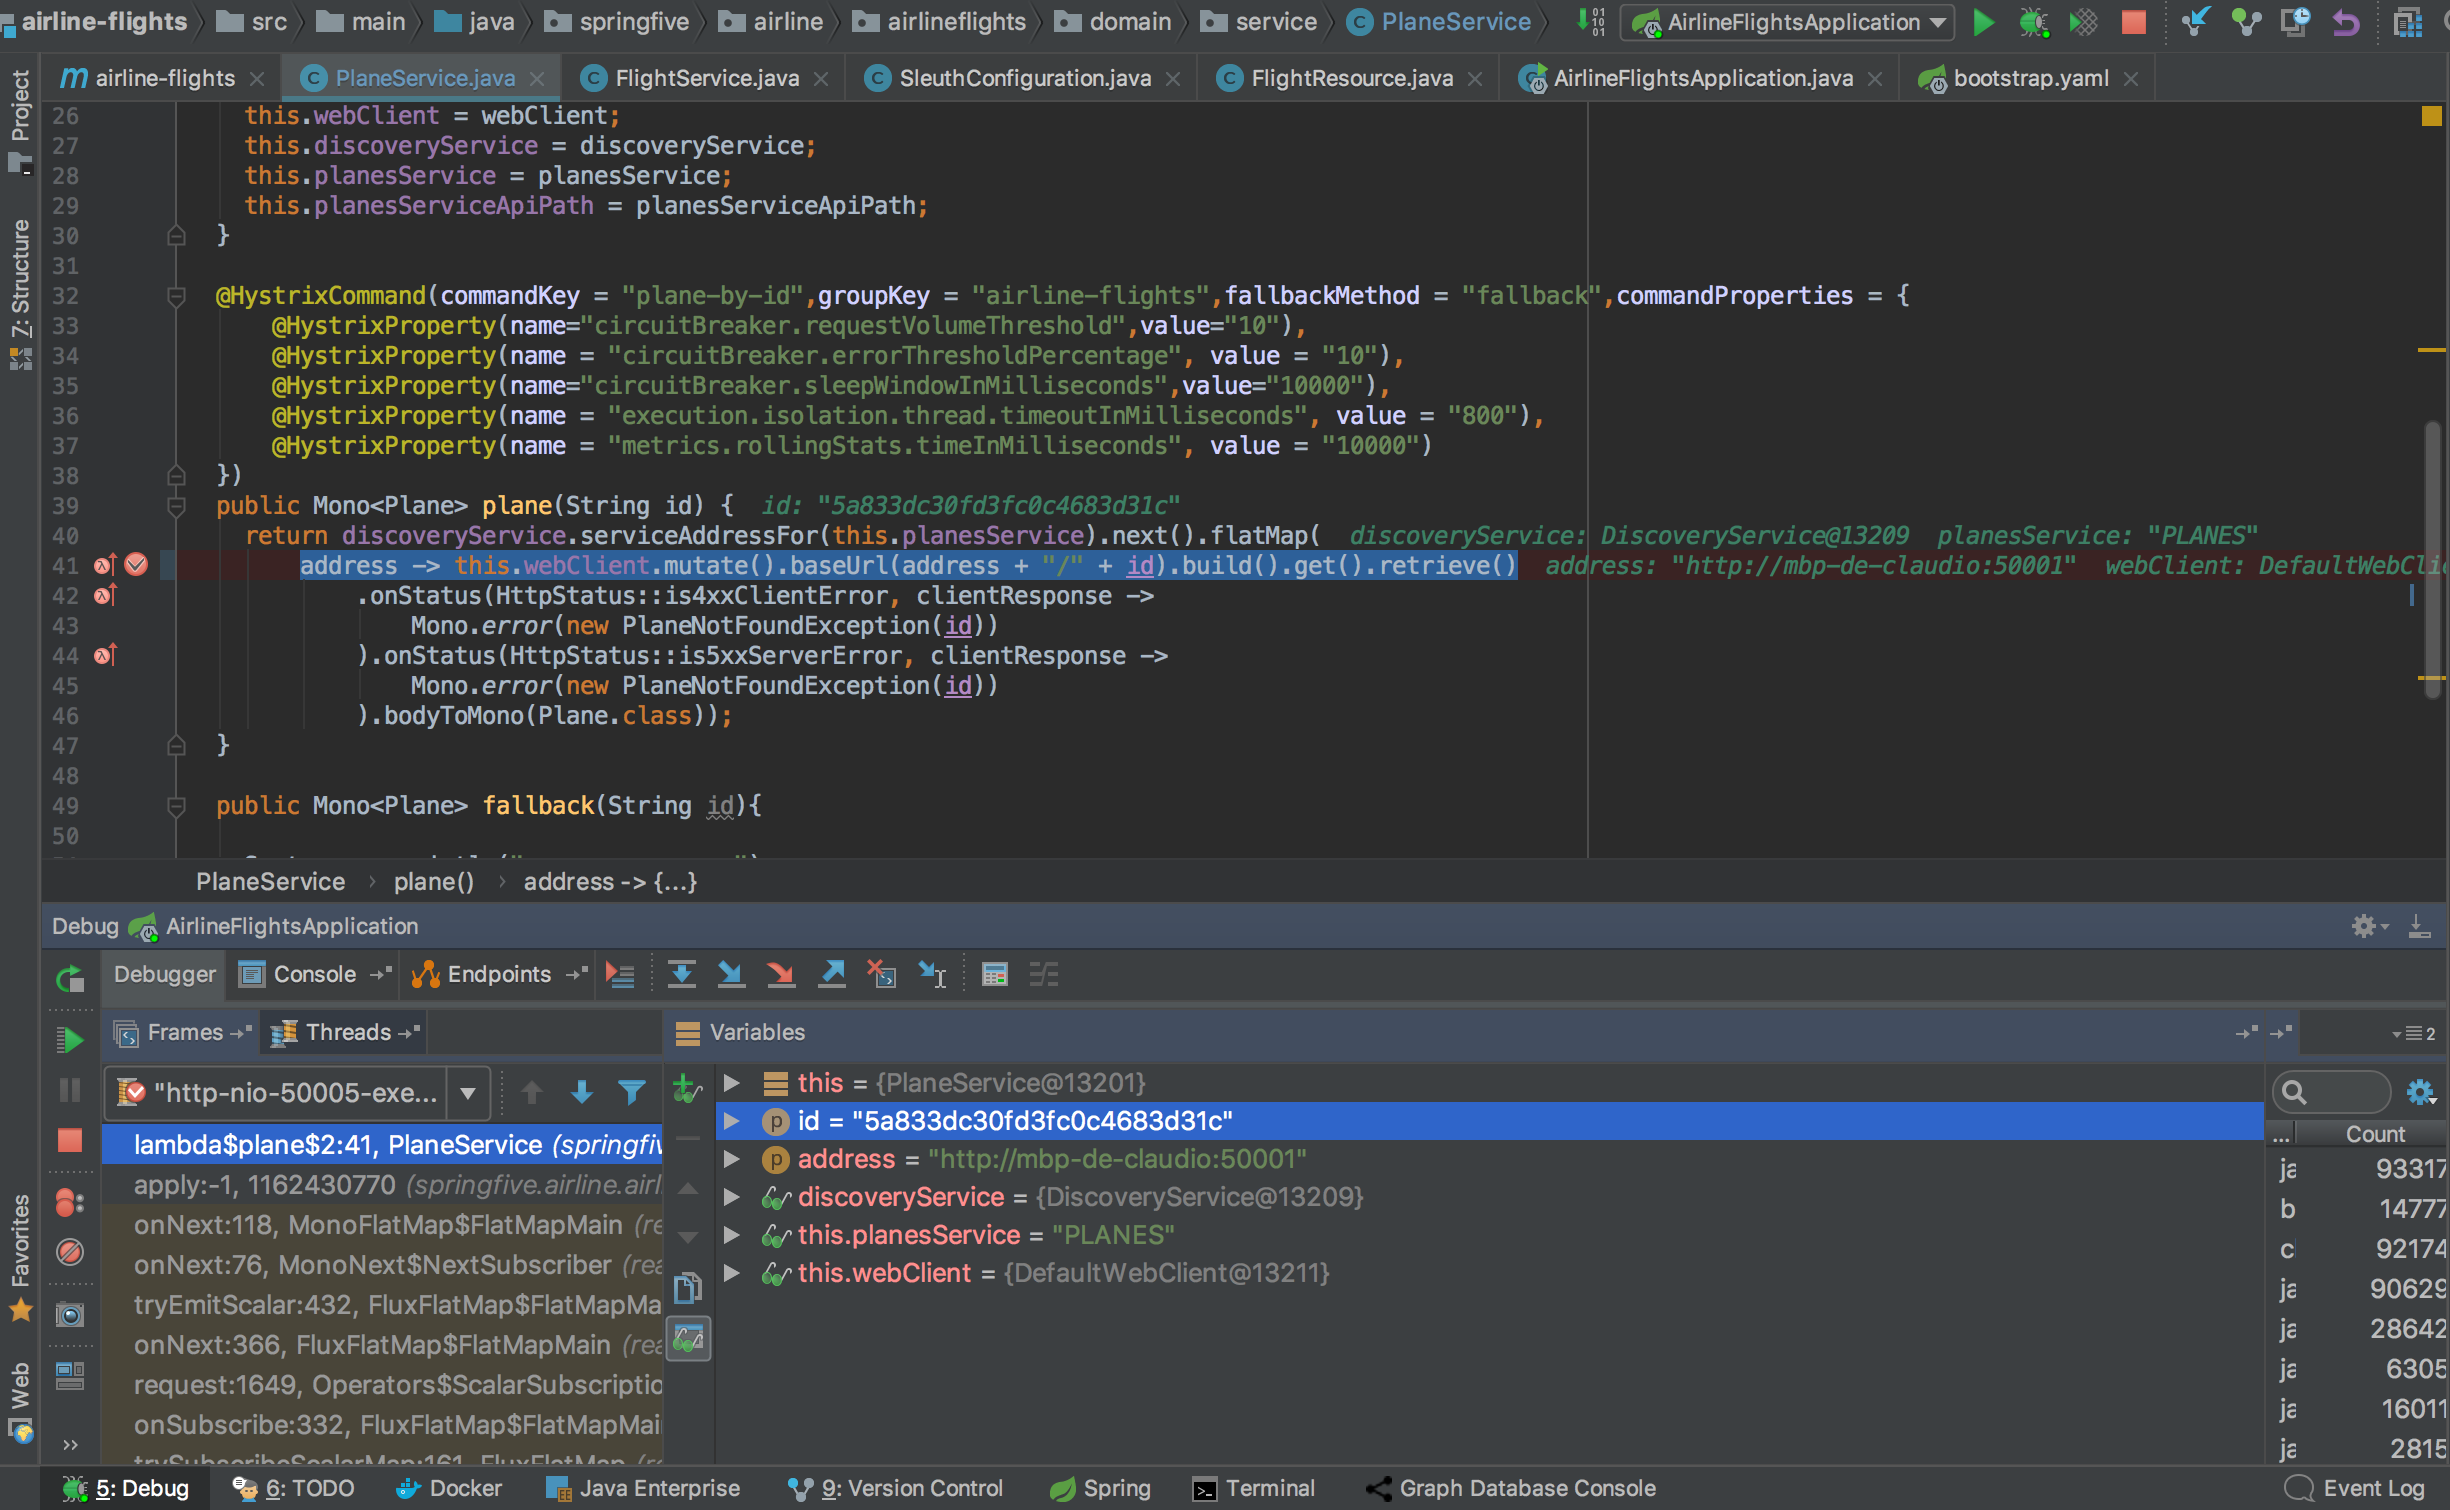
在 Variables 面板上,我们可以看到 address 变量。价值来自服务发现和客户端负载平衡。它是 服务 IP 或 域名称。 现在我们可以调用请求的服务来转换 URL。
太棒了,我们的基础设施运行良好,现在我们能够使用基础设施找到服务,但有一些重要的事情需要注意。我们将在下一节中发现它。
有时基础设施可能会出现故障,尤其是网络。它可能会导致微服务架构中的一些问题,因为通常服务之间存在许多连接。这意味着在运行时,微服务依赖于其他微服务。通常,这些连接是通过 HTTP 协议使用 REST API 完成的。
它可能导致称为级联故障的行为;也就是说,当微服务 system 的一部分失败时,由于依赖关系,它可以触发其他微服务失败。让我们来说明一下:
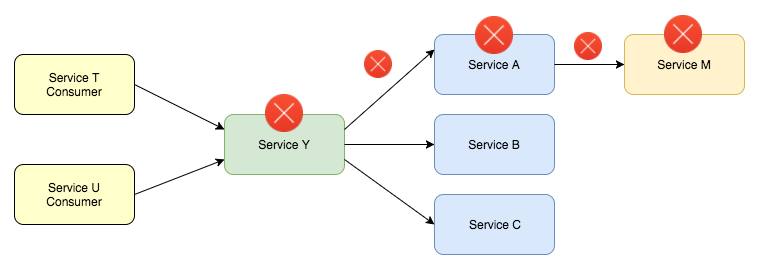
如果 Service Y 失败,Service A 和 Service M 也可能会失败。
当这种情况发生时,我们有一个模式可以帮助我们:断路器。
Hystrix 是一个帮助开发人员管理服务之间交互的库。该项目是开源的,由社区维护,位于 Netflix GitHub 下。
断路器模式是一种有助于控制 system 集成的模式。这个想法很简单:我们将远程调用包装在一个函数或对象中,我们将监视这些调用以跟踪失败。如果呼叫达到限制,电路将打开。其行为类似于电气断路器的行为,其思想是相同的——保护某物以避免破坏电气系统:
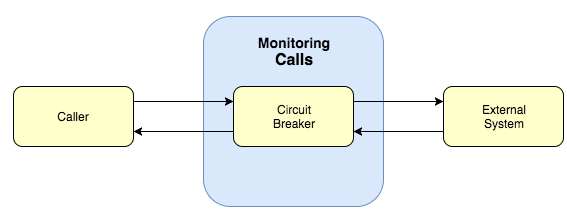
Hystrix 实现了断路器模式并具有一些有趣的行为,例如回退选项。 Hystrix 为我们的应用程序提供弹性。我们能够提供回退,停止级联故障,并提供操作控制。
该库提供高级配置,可以通过注解配置 "id325894901" class="indexterm"> 如果我们使用 Spring Cloud Hystrix。
Note
断路器模式由 Martin Fowler 描述。您可以在 Martin Fowler 的页面上找到有关它的更多信息 https://martinfowler。 com/bliki/CircuitBreaker.html
正如我们所料,Spring Boot 与 Netflix Hystrix 集成。 集成可以使用几个注解并通过使用 Hystrix 属性配置注解来完成。我们将保护 planes 我们在 flight 服务中编码的微服务交互。我们现在有一个方法来尝试获取飞机的数据。
我们来看看那个方法:
此命令有一些配置。第一个配置是 commandKey。 这里的基本思想是为命令创建一个名称。这对面板控制很有用。第二个, groupKey,是用于对命令进行分组的命令。它还有助于在仪表板上将命令数据分组在一起。有滚动窗口的概念。这个想法是在一段时间内对请求进行分组;它用于启用指标和统计信息。
circuitBreaker.requestVolumeThreshold 配置滚动窗口中将在电路上跳闸的请求数。例如,如果我们有一个滚动窗口配置为打开 10 秒,如果我们在 10 秒的间隙中有 9 个请求,电路将不会打开,因为我们有 在我们的命令中将其配置为 10。另一种配置是 circuitBreaker.sleepWindowInMilliseconds,其基本思想是在电路跳闸后给予一定的时间来拒绝请求,然后再次尝试以允许尝试。
最后一个是 execution.isolation.thread.timeoutInMilliseconds。 该属性配置命令的超时时间。这意味着如果达到配置的时间,断路器系统将执行回退逻辑并将命令标记为超时。
Note
Hystrix 库是高度可定制的,并且有很多属性可供使用。完整的文档可以在 https://github.com/Netflix/找到Hystrix/wiki/configuration。 我们可以将这些属性用于不同的用例。
Spring Boot Admin 项目是在生产环境中帮助 开发人员的工具。该工具在有条理的仪表板中显示 Spring Boot 应用程序指标,它使查看应用程序指标和更多信息变得非常容易。
该工具使用来自 Spring Boot Actuator 的数据作为信息源。该项目是开源的,有很多贡献者,也是社区中的一个活跃项目。
设置应用程序是小菜一碟。我们将需要 一个新的 Spring Boot 应用程序,并将这个新应用程序与我们的服务发现实现连接起来。让我们现在就做。
我们可以在 GitHub 上找到代码 https://github.com/PacktPublishing/Spring-5.0-By-Example/tree/master/Chapter08/admin。如果您想创建一个新应用程序,请继续;该过程类似于我们在前几章中所做的。
该项目是一个 Spring Boot 常规应用程序,具有两个新的依赖项:
这些依赖关系是关于 admin-server 和 admin-server-ui。该项目还不支持 Spring Boot 2,但这不是问题,因为我们不需要响应式的东西;它是一个监控工具。
我们已经配置了我们的强制依赖项。我们将需要一个服务发现,因为我们的基础设施中有一个。我们需要它来提供服务发现功能,并最小化我们的 Spring Boot Admin 应用程序的配置。让我们添加 Eureka 客户端依赖项:
太棒了,我们的依赖项配置正确。然后我们可以创建我们的主类。主类应该是这样的:
这里的主要区别在于 @EnableAdminServer 将为我们配置 Spring Boot Admin 应用程序并设置服务器。正如我们所料,我们将使用 Config Server 应用程序来存储我们的 application.yaml。为了实现这一点,我们需要创建我们的 bootstrap.yaml,它应该是这样的:
完全没有区别, bootstrap.yaml 被配置为从Config Server中查找配置文件。
是时候创建我们的 application.yaml 文件了,我们需要在其中添加一些配置来设置新的健康检查 URL,因为 Spring Boot 2 上的执行器已移动,前缀为执行器。我们新的健康检查 URL 应该是 /actuator/health。
我们的配置文件应该是这样的:
我们已经配置了 Eureka 服务器地址并设置了健康检查 URL。
现在我们可以运行我们的主类 AdminApplication。 我们可以使用Java命令行或IDE;完全没有区别。
运行!
我们应该在日志文件中看到以下行:

太棒了,我们的应用程序已经可以使用了。现在我们可以进入主页面了。进入http://localhost:50015/#/(主页面),我们可以看到如下页面:
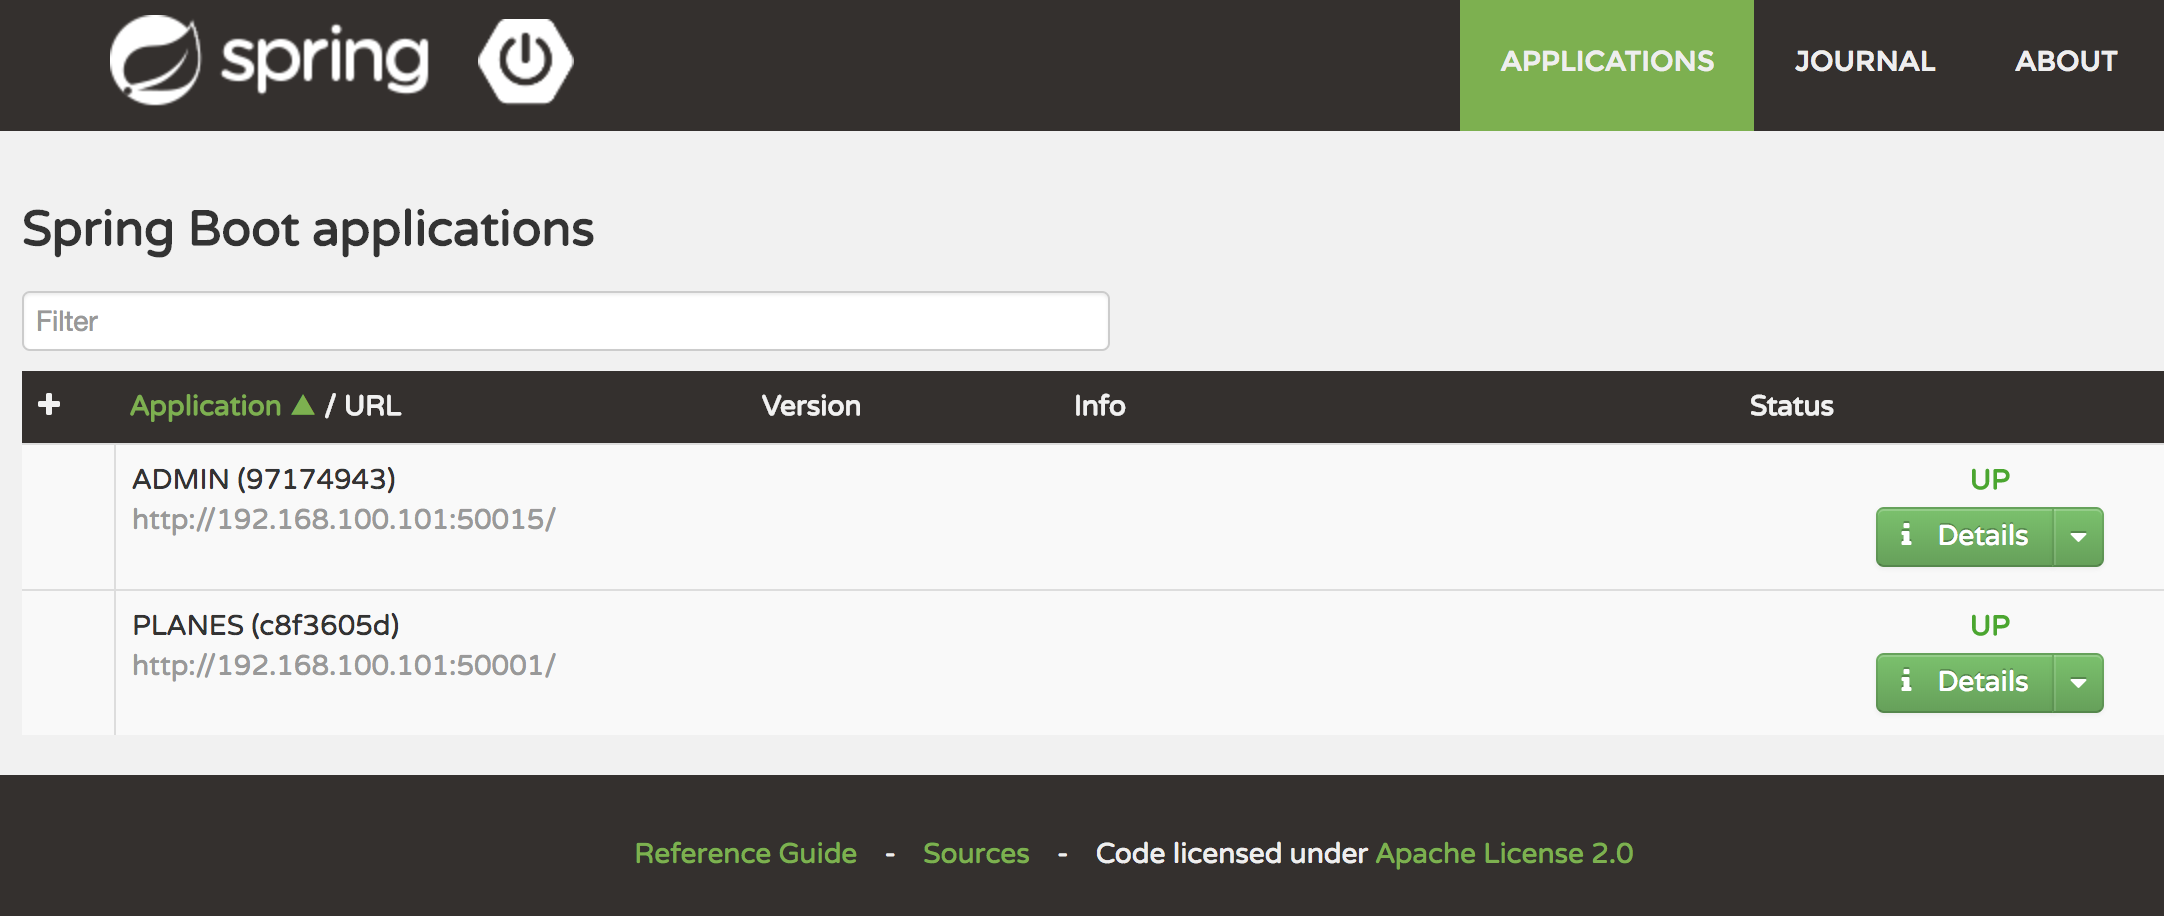
看看我们的微服务中的任何中断或奇怪行为是如何更容易看到的。请记住,微服务架构中的关键点是监控。为了有一个良好的环境,这是非常必要的。
Spring Cloud Gateway 是我们采用微服务架构的自然选择,但现在 Spring Cloud Gateway 并没有开启支持用于服务发现功能,例如 Eureka 服务器。这意味着我们必须逐个路由配置它。这听起来不太好。
我们将 Zuul 代理作为微服务环境的网关,但请记住,当项目支持服务发现时,Spring Cloud Gateway 是最佳选择。
让我们创建 Zuul 代理项目。
EDGE 服务是一种提供 动态路由、监控、弹性和安全性的服务。这里的基本思想是为我们的微服务创建一个反向代理。
该服务将充当我们微服务的代理,并将作为中央访问点公开。 Spring Cloud Zuul 与 Eureka 服务器集成。它将增加我们的弹性,因为我们将使用 Eureka 服务器提供的服务发现功能。
下图展示了我们将如何在我们的架构中使用 Edge Service:
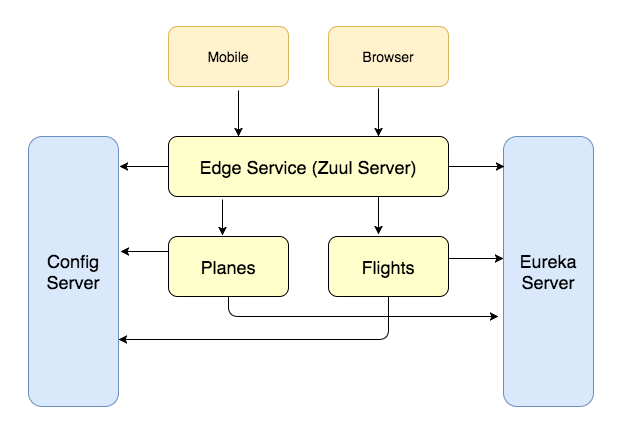
正如我们所见,Zuul Server 将连接到服务发现服务器,以获取可用服务的列表。之后,Zuul 服务将重定向到请求的服务。
看图。没有与客户端交互,即 Mobile 和 Browser 和我们的微服务。
Spring Cloud Zuul 还支持 interesting 特性,例如:
- pre: This can be used to set some data in
RequestContext; it is executed before the request is routed - route: This handles the request routing
- post: This filters which one acts after the request is routed
- error: When some errors happen, we can use the error feature to handle the request
我们不会使用这些功能,但请记住它们可能非常有用。请记住,我们的 Zuul 服务器是我们通往互联网的门户。
我们将使用 Zuul 服务器作为我们应用程序的 API gateway。现在是时候创建我们的项目了。由于创建这个项目没有相关的区别,我们将看看具体的 Zuul 部分。
所需的依赖项是:
它将为我们配置 Zuul 服务器依赖项。
现在我们可以添加项目的主类。类应该是这样的:
这里的新东西是 @EnableZuulProxy。它将设置一个 Zuul 服务器端点并配置反向代理过滤器。然后我们将能够将请求转发到微服务应用程序。 Zuul 集成了 Eureka 服务器,所以我们不需要手动配置。自动配置将在发现客户端实现时找到服务。
我们可以通过命令行或 IDE 运行应用程序,这取决于您。
然后我们可以看到配置的路由。转到 http://localhost:8888/routes,我们将能够看到路由:
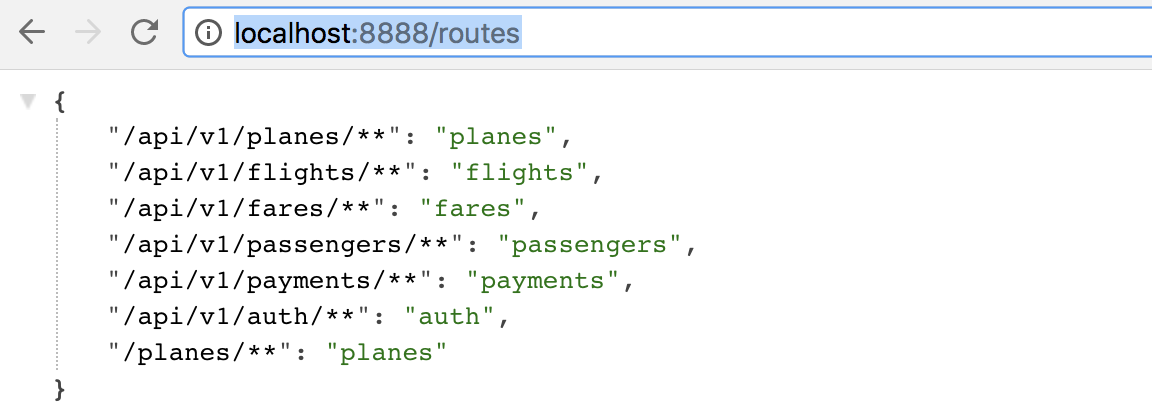
我们配置了一些路由。我们使用 application.yaml 文件来做到这一点。该文件应该是这样的:
让我们了解一下这个配置。我们创建了一个名为 planes 的节点。该节点配置一个path (即URI),并通过serviceId配置服务名,注册在Eureka服务器。
让我们做一个简单的测试。我们将:
- Configure the new URL path for the planes service
- Test the request using the Zuul server
打开位于 planes 微服务项目中的 PlaneResource 类。
RequestMapping 配置如下:
把它改成这样:
请记住,我们可以将 Zuul 服务器用作路由器,因此我们不再需要此信息。通过源代码上的 URI 路径,我们可以使用配置文件。
再次运行 planes 微服务。需要运行以下服务:
- Config Server
- Eureka server
- Planes microservice
- API Edge
然后我们可以使用 Zuul 代理调用 planes 微服务。让我们使用 cURL 来实现:
让我们稍微了解。端口8888指向Zuul Server,我们已经在application.yaml。当路径为 /api/v1/planes/**时,Zuul Server会重定向到 planes 微服务。基本流程是:
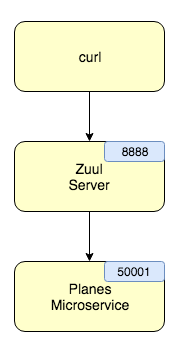
请求到达 Zuul Server,然后是 Zuul Server 会将其重定向到请求的微服务。结果应该是这样的;就我而言,我在数据库中有一些飞机:

太棒了,我们的 API 网关已全面运行。我们将它用于同一个端口中的所有服务,并且只有 URI 将被更改为指向所需的 serviceId。
在本章中,我们了解了一些重要的微服务模式,以及它们如何帮助我们交付容错、弹性和容易出错的应用程序。
我们已经练习了如何使用 Spring Framework 提供的服务发现特性以及它在应用程序运行时是如何工作的,并且我们做了一些调试任务来帮助我们理解它是如何工作的。
由 Netflix 托管的 Hystrix 项目可以提高我们应用程序的弹性和容错能力。在处理远程调用时,在本节中,我们创建了一些 Hystrix 命令,并了解了 Hystrix 是如何成为断路器模式的有用实现的。
在本章的最后,我们能够了解微服务的缺点以及如何解决分布式环境中的常见问题。
现在我们知道了如何使用 Spring Framework 解决微服务架构风格的常见问题。
在下一章中,我们将完成我们的 Airline Ticket System,使用配置的工具来监控微服务的健康状况,并看看它如何帮助开发人员在微服务在生产阶段运行时的运行时间。
到时候那里见。