vlambda博客
学习文章列表

读书笔记《functional-kotlin》用协程程序进行异步编程

Chapter 7. Asynchronous Programming with Coroutines

当今的软件开发环境使异步处理成为最重要的主题之一。处理器和内核数量的不断增加以及外部服务的大量消耗(近年来随着微服务架构的采用而增长)是我们应该关注并努力使用良好异步方法的一些因素.

Kotlin 的协程实现是构建异步应用程序的绝佳工具。

在本章中,我们将介绍以下主题:

  • Coroutines
  • Alternative approaches
  • Asynchronous processing
  • Channels and actors

Introduction to coroutines


让我们从一个没有协程的简单示例开始:

import kotlin.concurrent.thread

fun main(args: Array<String>) {
   thread {
      Thread.sleep(1000)
      println("World!")
   }
   print("Hello ")
   Thread.sleep(2000)
}

thread 函数 执行 不同线程中的代码块。在该块中,我们使用 Thread.sleep 模拟昂贵的 I/O 计算(例如通过 HTTP 从微服务访问数据)。 Thread.sleep 将阻塞当前线程作为参数传递的毫秒数。在这个例子中,我们不会等到计算完成才继续处理其他事情;我们打印另一条消息, "Hello",同时另一个计算正在执行。最后,我们等待两秒钟,直到计算完成。

这不是一个漂亮的代码,我们可以做得更好: 

fun main(args: Array<String>) {
   val computation = thread {
      Thread.sleep(1000)
      println("World!")
   }
   print("Hello ")
   computation.join()
}

在这个版本中,我们引用了我们的线程, computation;最后,我们等待 join() 方法完成。这比仅仅等待固定的时间要聪明,因为现实生活中的计算可能有不同的执行时间。

Understanding JVM threads

线程是 JVM(以及其他平台)上异步并发应用程序的构建 块。大多数情况下,JVM 线程由硬件线程(例如处理器内部的内核)支持。一个硬件线程可以支持多个软件线程(JVM 线程是一种软件线程),但在任何给定时间只执行一个软件线程。

操作系统(或 JVM)决定在每个硬件线程上执行哪个软件线程并在活动线程之间快速切换,从而看起来有多个软件线程同时执行,而实际上有许多活动线程由于存在硬件线程,因此正在执行软件线程。但是,在大多数情况下,认为所有软件线程都在同时执行是有用的。 

JVM 中的线程非常快速且响应迅速,但它们是有代价的。每个 Thread 在创建、处理(收集垃圾时)和上下文切换(当线程成为执行线程或停止)。由于此成本相对较高,JVM 应用程序不能拥有大量线程。

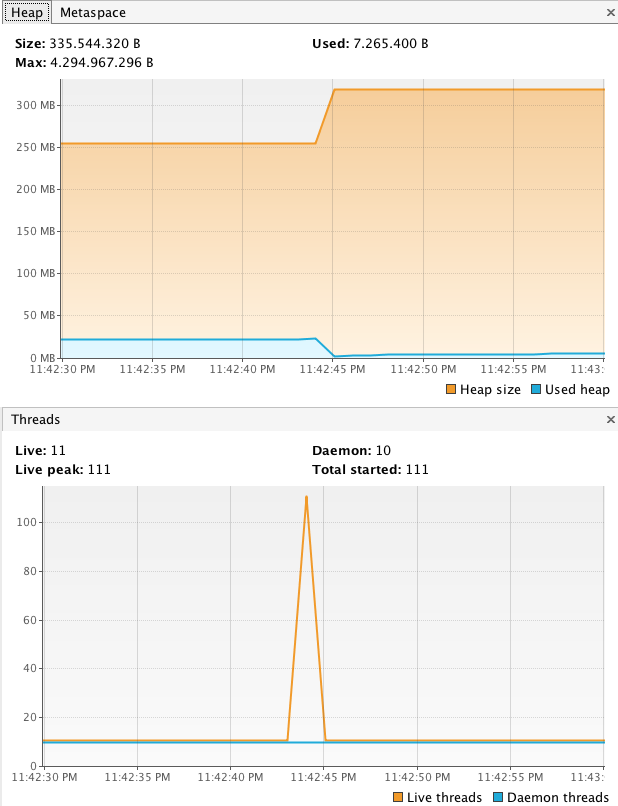
典型开发机器上的 JVM 应用程序可以轻松处理 100 个线程:

fun main(args: Array<String>) {
   val threads = List(100){
      thread {
         Thread.sleep(1000)
         print('.')
      }
   }
   threads.forEach(Thread::join)
}

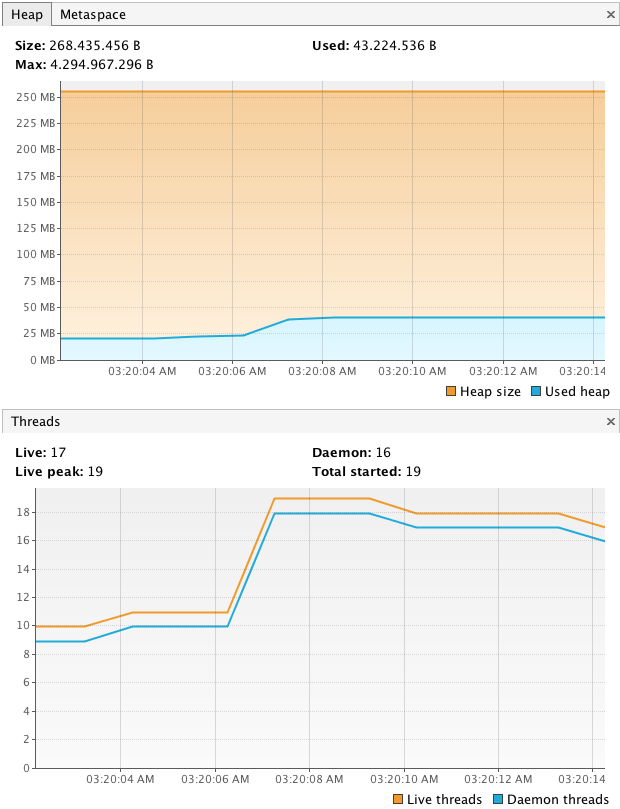
如果您使用任何外部 application 来监控 JVM 应用程序,例如 VisualVM 或 JConsole(以及其他),您会看到像这样的图形:

读书笔记《functional-kotlin》用协程程序进行异步编程

我们可以将线程数增加到 1,000,如 所示 在以下屏幕截图中:

读书笔记《functional-kotlin》用协程程序进行异步编程

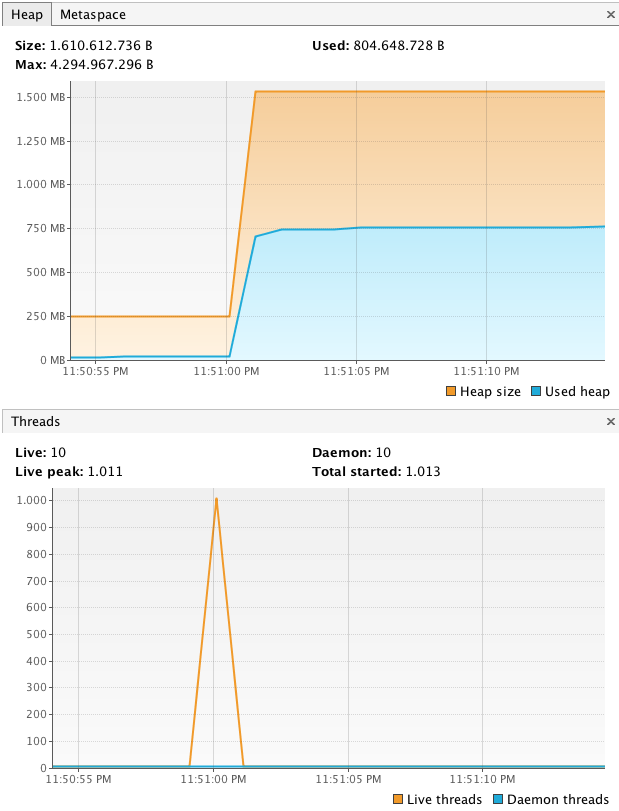
内存量正在快速增长,达到 1.5 GB 以上。

我们可以将线程数增加到 10,000 个吗?看看下面的截图:

读书笔记《functional-kotlin》用协程程序进行异步编程

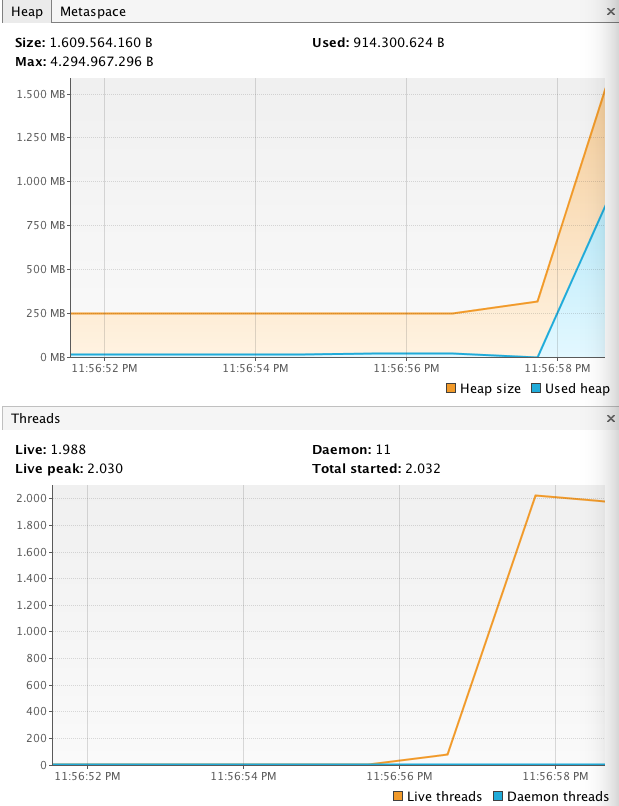
答案是直截了当的不;当应用程序因 OutOfMemoryError  而死时,创建了大约 2,020 个线程(此应用程序使用默认设置运行;这些设置可以在启动时更改)。

让我们尝试 1,900,这是对我们可以安全执行的 what 的公平估计:

读书笔记《functional-kotlin》用协程程序进行异步编程

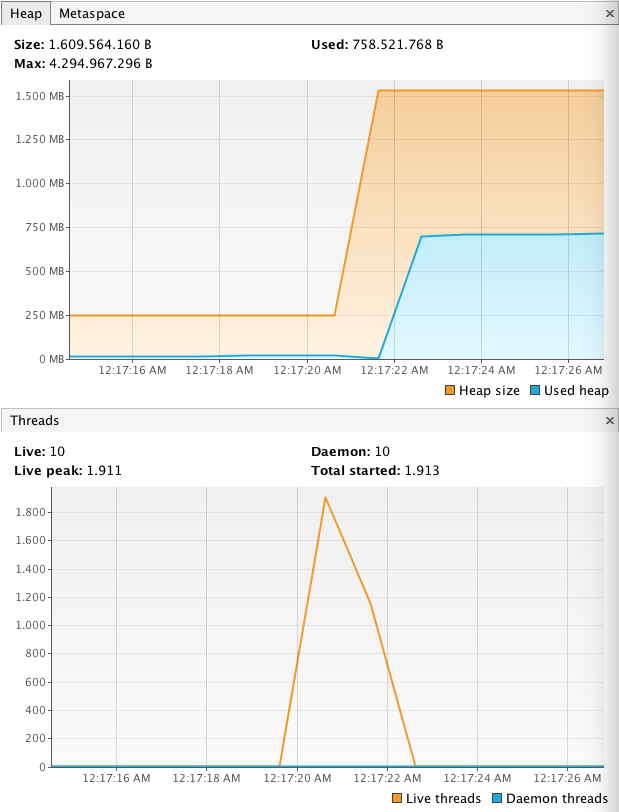
是的,我们可以运行 1,900 个并发线程。

在现代 JVM 应用程序中,创建和销毁线程被认为是一种不好的做法;相反,我们使用 Executor,一个让我们管理和重用线程的抽象,减少创建和处理的成本:

import java.util.concurrent.Executors
import java.util.concurrent.TimeUnit

fun main(args: Array<String>){
   val executor = Executors.newFixedThreadPool(1024)
   repeat(10000){
      executor.submit {
         Thread.sleep(1000)
         print('.')
      }
   }
   executor.shutdown() 
}

我们创建了一个 executor 值,它在内部有一个 thread 池多达 1,024 个线程。然后,我们提交 10,000 个任务;最后,我们关闭了 Executor。当我们关闭 Executor时,它无法接受新的任务并执行所有待处理的任务,如下:

读书笔记《functional-kotlin》用协程程序进行异步编程

有许多选项可以微调和使用, Executor,例如线程数和池类型或其实际实现。

Note

关于 JVM 线程的理论比本书所能涵盖的要多得多。如果您想阅读和了解有关线程和并发的更多信息,我们推荐经典书籍, Java Concurrency in Practice (2006),作者是 Dough Lea 、David Holmes、Joseph Bower、Joshua Block、Tim Peierls 和 Brian Goetz,来自 Addison-Wesley Professional。我们还推荐  Programming Concurrency on the JVM (2011),作者是 Pragmatic Bookshelf 的 Venkat Subramanian,以及 Java Concurrency LiveLessons (2015) 视频,来自 Addison-Wesley Professional 的 Douglas Schmidt。最后但同样重要的是, 我们推荐 Javier Fernández Gonzáles 的系列书籍和视频, Java Concurrency,由 Packt 出版。 

Hello, coroutine world!

现在,让我们用协程重写我们的 Hello World 应用程序。

但是,嘿!什么是协程?基本上,一个 coroutine 是一个非常轻量级的线程,它运行一段代码并且具有相似的生命周期,但可以完成返回值或异常。从技术上讲,coroutine 是可暂停计算的一个实例,一种可以暂停的计算。协程不绑定到特定线程,可以在一个 Thread 中挂起并在另一个线程中恢复执行:

import kotlinx.coroutines.experimental.delay
import kotlinx.coroutines.experimental.launch
import kotlinx.coroutines.experimental.runBlocking

fun main(args: Array<String>) = runBlocking {
    launch {
        delay(1000)
        println("World")
    }
    print("Hello ")
    delay(2000)
}

这里有几件事要介绍:

  • runBlocking: This function creates a coroutine and blocks the current Thread until the coroutine finishes, returning its result value (Unit in this case).
  • launch: This function creates a new coroutine without blocking the current Thread and returns Job (ignored here).
  • delay: This function is a suspending (more on this later) function that delays the current coroutine without blocking the current thread.
  • suspend: A suspending function is a function that may suspend the execution of a coroutine, without blocking the current Thread; therefore a suspending function must be called inside a coroutine—it can't be invoked from normal code. The function must be marked with the suspend modifier. So, delay can be invoked inside runBlocking and launch, both functions (among others) take a suspending lambda as the last parameter—a suspending lambda is a lambda marked with the suspend modifier.

在继续之前,让我们总结一下我们现在所知道的以及其他一些概念:

概念

说明

协程

一个非常轻量级的线程,可以返回一个值并且可以挂起和恢复。

暂停功能

用 suspend 修饰符标记的函数。它可以挂起协程而不阻塞线程。挂起函数必须在协程内调用,例如 delay

暂停 lambda

一个用 suspend 修饰符标记的 lambda 函数。它可以挂起协程而不阻塞线程。

协程构建器

一个函数接受一个暂停的 lambda,创建一个协程并可能返回一个结果,例如 runBlocking

暂停点

调用挂起函数的点。

继续

一个暂停coroutine在暂停点的状态,它代表 它的其余部分在暂停点之后执行。

让我们回到正题。

正如我们之前所讨论的,计算可以有不同的执行时间。因此, delay 在我们的 Hello World 示例中并不理想:

fun main(args: Array<String>) = runBlocking {
   val job = launch {
      delay(1000)
      println("World")
   }
   print("Hello ")
   job.join()
}

与我们的线程示例一样,我们引用 launch 创建的作业,并在最后使用挂起函数 join 挂起它

到目前为止,一切都很好。但是协程真的很轻吗?我们可以拥有 10,000 个协程吗?

让我们通过执行以下代码片段来尝试一下:

fun main(args: Array<String>) = runBlocking {
      val jobs = List(10000) {
         launch {
            delay(1000)
            print('.')
         }
      }
      jobs.forEach { job -> job.join() }
   }
}

哦,确实!有用:

读书笔记《functional-kotlin》用协程程序进行异步编程

它们比 Executor 解决方案快几个数量级,内存更少,线程更少(只有七个线程),而且非常易于阅读。

让我们使用 100 万个协程:

读书笔记《functional-kotlin》用协程程序进行异步编程

少于 2,000 个线程需要超过 1.5 GB 的内存。 100 万个协程需要不到 700 MB 的内存——我的情况是这样。结论是协程非常非常轻。

Using coroutines in real life


微基准测试非常有趣,它们让我们了解 Kotlin 协程的强大功能,但它们并不代表真正的-案例场景。

让我们介绍一下我们的真实案例:

enum class Gender {
   MALE, FEMALE;

   companion object {
      fun valueOfIgnoreCase(name: String): Gender = valueOf(name.toUpperCase())
   }
}

typealias UserId = Int

data class User(val id: UserId, val firstName: String, val lastName: String, val gender: Gender)

data class Fact(val id: Int, val value: String, val user: User? = null)

interface UserService {
   fun getFact(id: UserId): Fact
}

我们的 UserService 接口只有一个方法——getFact 将返回关于我们用户的 Chuck Norris 风格的事实,由用户身份。

实现应该首先检查用户的本地数据库;如果用户在 the 数据库中不存在,它应该从 < strong>RandomUser API 服务,(https://randomuser.me/documentation ),然后保存以备将来使用。一旦服务有了用户,它应该再次在数据库中检查与该用户相关的事实;如果 事实在数据库中不存在,它应该从 < strong>Internet Chuck Norris 数据库 API 服务, (http ://www.icndb.com/api/),并将其存储在数据库中。一旦服务有事实,它就可以被退回。服务必须尝试在不使用缓存的情况下减少外部调用(数据库、API 服务)的数量。

现在,让我们介绍其他接口, HTTP 客户端——UserClientFactClient

interface UserClient {
   fun getUser(id: UserId): User
}

interface FactClient {
   fun getFact(user: User): Fact
}

我们的客户端将使用 http4k (https:// /www.http4k.org/) 用于 HTTP 通信,Kotson (https://github.com/SalomonBrys/Kotson) 用于 JSON 处理。两个 libraries 都是为 Kotlin 设计的,但任何其他库都应该可以正常工作:

import com.github.salomonbrys.kotson.*
import com.google.gson.GsonBuilder
import org.http4k.client.ApacheClient

abstract class WebClient {
   protected val apacheClient = ApacheClient()

   protected val gson = GsonBuilder()
         .registerTypeAdapter<User> {
            deserialize { des ->
               val json = des.json
               User(json["info"]["seed"].int,
                     json["results"][0]["name"]["first"].string.capitalize(),
                     json["results"][0]["name"]["last"].string.capitalize(),
                     Gender.valueOfIgnoreCase(json["results"][0]["gender"].string))

            }
         }
         .registerTypeAdapter<Fact> {
            deserialize { des ->
               val json = des.json
               Fact(json["value"]["id"].int,
                     json["value"]["joke"].string)
            }
         }.create()!!
}

两个客户端都将扩展一个公共父类,其中包含 http4k ApacheClient 和一个使用 Kotson DSL 配置的 Gson 值:

import org.http4k.core.Method
import org.http4k.core.Request

class Http4KUserClient : WebClient(), UserClient {
   override fun getUser(id: UserId): User {
      return gson.fromJson(apacheClient(Request(Method.GET, "https://randomuser.me/api")
            .query("seed", id.toString()))
            .bodyString())
   }
}

Http4KUserClient 很简单,两个库都easy 好用,我们将大量代码移至父类:

class Http4KFactClient : WebClient(), FactClient {
   override fun getFact(user: User): Fact {
      return gson.fromJson<Fact>(apacheClient(Request(Method.GET, "http://api.icndb.com/jokes/random")
            .query("firstName", user.firstName)
            .query("lastName", user.lastName))
            .bodyString())
            .copy(user = user)
   }
}

Http4KFactClient 使用 copy 方法在 Fact 实例中设置用户值.

这些类实现得非常好,但是为了测试我们算法的实际性能,我们将模拟这些接口:

class MockUserClient : UserClient {
   override fun getUser(id: UserId): User {
      println("MockUserClient.getUser")
      Thread.sleep(500)
      return User(id, "Foo", "Bar", Gender.FEMALE)
   }
}

class MockFactClient : FactClient {
   override fun getFact(user: User): Fact {
      println("MockFactClient.getFact")
      Thread.sleep(500)
      return Fact(Random().nextInt(), "FACT ${user.firstName}, ${user.lastName}", user)
   }
}

查看以下数据库存储库, UserRepositoryFactRepository

interface UserRepository {
   fun getUserById(id: UserId): User?
   fun insertUser(user: User)
}

interface FactRepository {
   fun getFactByUserId(id: UserId): Fact?
   fun insertFact(fact: Fact)
}

对于我们的存储库,我们将使用 Spring 5 的 JdbcTemplate 。Spring 5 支持 Kotlin,包括用于方便和惯用 Kotlin 使用的扩展函数(您可以使用 < code class="literal">JdbcTemplate 在任何应用程序中,它不需要是 Spring 的):

import org.springframework.dao.EmptyResultDataAccessException
import org.springframework.jdbc.core.JdbcTemplate

abstract class JdbcRepository(protected val template: JdbcTemplate) {
   protected fun <T> toNullable(block: () -> T): T? {
      return try {
         block()
      } catch (_: EmptyResultDataAccessException) {
         null
      }
   }
}

与客户端一样,两个存储库都将有一个父类——在这种情况下,有一个用于转换的函数, EmptyResultDataAccessException; (spring 表示不存在记录的方式)转换为可空的惯用 Kotlin。

两个实现都很简单,如下:

import org.springframework.jdbc.core.queryForObject

class JdbcUserRepository(template: JdbcTemplate) : JdbcRepository(template), UserRepository {
   override fun getUserById(id: UserId): User? {
      return toNullable {
         template.queryForObject("select * from USERS where id = ?", id) { resultSet, _ ->
            with(resultSet) {
               User(getInt("ID"),
                     getString("FIRST_NAME"),
                     getString("LAST_NAME"),
                     Gender.valueOfIgnoreCase(getString("GENDER")))
            }
         }
      }
   }

   override fun insertUser(user: User) {
      template.update("INSERT INTO USERS VALUES (?,?,?,?)",
            user.id,
            user.firstName,
            user.lastName,
            user.gender.name)
   }
}

class JdbcFactRepository(template: JdbcTemplate) : JdbcRepository(template), FactRepository {
   override fun getFactByUserId(id: Int): Fact? {
      return toNullable {
         template.queryForObject("select * from USERS as U inner join FACTS as F on U.ID = F.USER where U.ID = ?", id) { resultSet, _ ->
            with(resultSet) {
               Fact(getInt(5),
                     getString(6),
                     User(getInt(1),
                           getString(2),
                           getString(3),
                           Gender.valueOfIgnoreCase(getString(4))))
            }
         }
      }
   }

   override fun insertFact(fact: Fact) {
      template.update("INSERT INTO FACTS VALUES (?,?,?)", fact.id, fact.value, fact.user?.id)
   }
}

对于我们的数据库,我们使用的是 H2 内存数据库,但是任何数据库都可以工作(您可以让这个应用程序使用一些不同的持久性机制,例如 NoSQL 数据库或任何缓存):

fun initJdbcTemplate(): JdbcTemplate {
   return JdbcTemplate(JdbcDataSource()
         .apply {
            setUrl("jdbc:h2:mem:facts_app;DB_CLOSE_DELAY=-1;DB_CLOSE_ON_EXIT=false")
         })
         .apply {
            execute("CREATE TABLE USERS (ID INT AUTO_INCREMENT PRIMARY KEY, FIRST_NAME VARCHAR(64) NOT NULL, LAST_NAME VARCHAR(64) NOT NULL, GENDER VARCHAR(8) NOT NULL);")
            execute("CREATE TABLE FACTS (ID INT AUTO_INCREMENT PRIMARY KEY, VALUE_ TEXT NOT NULL, USER INT NOT NULL,  FOREIGN KEY (USER) REFERENCES USERS(ID) ON DELETE RESTRICT)")
         }
}

函数 initJdbcTemplate 使用 H2 DataSource 创建 JdbcTemplate,并且,一旦准备就绪,它就会在 apply 扩展函数中创建表。 apply 扩展 function 对配置属性和调用初始化代码很有用,返回相同的值:

public inline fun <T> T.apply(block: T.() -> Unit): T {
    block()
    return this
}

与客户端一样,为了测试,我们将使用模拟:

class MockUserRepository : UserRepository {
   private val users = hashMapOf<UserId, User>()

   override fun getUserById(id: UserId): User? {
      println("MockUserRepository.getUserById")
      Thread.sleep(200)
      return users[id]
   }

   override fun insertUser(user: User) {
      println("MockUserRepository.insertUser")
      Thread.sleep(200)
      users[user.id] = user
   }
}

class MockFactRepository : FactRepository {

   private val facts = hashMapOf<UserId, Fact>()

   override fun getFactByUserId(id: UserId): Fact? {
      println("MockFactRepository.getFactByUserId")
      Thread.sleep(200)
      return facts[id]
   }

   override fun insertFact(fact: Fact) {
      println("MockFactRepository.insertFact")
      Thread.sleep(200)
      facts[fact.user?.id ?: 0] = fact
   }

}

使用这些模拟,我们最坏的情况是大约 1,600 毫秒:

  • UserRepository.getUserById = 200ms ~
  • UserClient.getUser = 500ms ~
  • UserRepository = 200ms ~
  • FactClient.getFact = 500ms ~
  • FactRepository.insertRepository = 200ms ~

现在,我们将使用不同风格的异步实现 UserService,包括同步实现,我们的基线。

Synchronous implementation

同步 code 易于编写、可预测且易于测试,但在某些情况下,它不会占用系统资源以最佳方式: 

class SynchronousUserService(private val userClient: UserClient,
                      private val factClient: FactClient,
                      private val userRepository: UserRepository,
                      private val factRepository: FactRepository) : UserService {

   override fun getFact(id: UserId): Fact {
      val user = userRepository.getUserById(id)
      return if (user == null) {
         val userFromService = userClient.getUser(id)
         userRepository.insertUser(userFromService)
         getFact(userFromService)
      } else {
         factRepository.getFactByUserId(id) ?: getFact(user)
      }
   }

   private fun getFact(user: User): Fact {
      val fact = factClient.getFact(user)
      factRepository.insertFact(fact)
      return fact
   }
}

这里没有什么花哨的,只是你的普通的、旧的无聊代码:

fun main(args: Array<String>) {

   fun execute(userService: UserService, id: Int) {
         val (fact, time) = inTime {
            userService.getFact(id)
         }
         println("fact = $fact")
         println("time = $time ms.")
      }

   val userClient = MockUserClient()
   val factClient = MockFactClient()
   val userRepository = MockUserRepository()
   val factRepository = MockFactRepository()

   val userService = SynchronousUserService(userClient,
         factClient,
         userRepository,
         factRepository)

   execute(userService, 1)
   execute(userService, 2)
   execute(userService, 1)
   execute(userService, 2)
   execute(userService, 3)
   execute(userService, 4)
   execute(userService, 5)
   execute(userService, 10)
   execute(userService, 100)   

}

我们执行 UserService.getFact 方法 10 次来预热 JVM(JVM 优化使应用程序在一段时间后运行得更快)。不用说,执行时间是 1,600 毫秒,这并不奇怪。

Callbacks

一种流行的异步代码风格是在单独的线程中执行 code 并调用 上述线程完成执行时的回调函数。回调样式的一个缺点是我们的异步函数现在需要一个额外的参数。回调样式很容易在 Kotlin 中编写,因为它支持 lambdas。

对于我们的回调实现,我们需要为我们的客户端和存储库提供适配器:

import kotlin.concurrent.thread

class CallbackUserClient(private val client: UserClient) {
   fun getUser(id: Int, callback: (User) -> Unit) {
      thread {
         callback(client.getUser(id))
      }
   }
}

class CallbackFactClient(private val client: FactClient) {
   fun get(user: User, callback: (Fact) -> Unit) {
      thread {
         callback(client.getFact(user))
      }
   }
}

class CallbackUserRepository(private val userRepository: UserRepository) {
   fun getUserById(id: UserId, callback: (User?) -> Unit) {
      thread {
         callback(userRepository.getUserById(id))
      }
   }

   fun insertUser(user: User, callback: () -> Unit) {
      thread {
         userRepository.insertUser(user)
         callback()
      }

   }
}

class CallbackFactRepository(private val factRepository: FactRepository) {
   fun getFactByUserId(id: Int, callback: (Fact?) -> Unit) {
      thread {
         callback(factRepository.getFactByUserId(id))
      }
   }

   fun insertFact(fact: Fact, callback: () -> Unit) {
      thread {
         factRepository.insertFact(fact)
         callback()
      }
   }
}

这些适配器在单独的线程中执行我们的代码,并在完成后调用回调函数 lambda:

class CallbackUserService(private val userClient: CallbackUserClient,
                    private val factClient: CallbackFactClient,
                    private val userRepository: CallbackUserRepository,
                    private val factRepository: CallbackFactRepository) : UserService {

   override fun getFact(id: UserId): Fact {
      var aux: Fact? = null
      userRepository.getUserById(id) { user ->
         if (user == null) {
            userClient.getUser(id) { userFromClient ->
               userRepository.insertUser(userFromClient) {}
               factClient.get(userFromClient) { fact ->
                  factRepository.insertFact(fact) {}
                  aux = fact
               }

            }
         } else {
            factRepository.getFactByUserId(id) { fact ->
               if (fact == null) {
                  factClient.get(user) { factFromClient ->
                     factRepository.insertFact(factFromClient) {}
                     aux = factFromClient
                  }
               } else {
                  aux = fact
               }
            }
         }
      }
      while (aux == null) {
         Thread.sleep(2)
      }
      return aux!!
   }
}

回调风格往往非常晦涩难懂;当多个回调嵌套时,情况更糟(在社区中被亲切地称为回调地狱)。最后的 while block 和 Thread.sleep 看起来很hacky。它也非常快,执行时间为 1,200 毫秒,但创建了许多线程并消耗了与之匹配的内存。

为每个函数调用创建一个线程的回调实现将在生产场景中快速消耗应用程序的所有资源;因此,它应该基于一些 Executor 实现或类似的。

Java Futures

由于回调风格往往难以维持,因此近年来出现了其他风格。其中一种风格是期货。 future 是一个 计算将来可能会完成。当我们调用 Future.get 方法时,它会得到它的结果,但是我们也阻塞了线程:

import java.util.concurrent.ExecutorService
import java.util.concurrent.Executors

class FutureUserService(private val userClient: UserClient,
                  private val factClient: FactClient,
                  private val userRepository: UserRepository,
                  private val factRepository: FactRepository) : UserService {
   override fun getFact(id: UserId): Fact {

      val executor = Executors.newFixedThreadPool(2)

      val user = executor.submit<User?> { userRepository.getUserById(id) }.get()
      return if (user == null) {
         val userFromService = executor.submit<User> { userClient.getUser(id) }.get()
         executor.submit { userRepository.insertUser(userFromService) }
         getFact(userFromService, executor)
      } else {
         executor.submit<Fact> {
            factRepository.getFactByUserId(id) ?: getFact(user, executor)
         }.get()
      }.also {
         executor.shutdown()
      }
   }

   private fun getFact(user: User, executor: ExecutorService): Fact {
      val fact = executor.submit<Fact> { factClient.getFact(user) }.get()
      executor.submit { factRepository.insertFact(fact) }
      return fact
   }
}

futures 的实现与我们的同步实现非常相似,但是到处都是那些奇怪的 submitget 函数.我们还需要处理 Executor。总时间约为 1,200 毫秒,创建了许多线程,比回调示例中的要多。一种可能的选择是 Executor 每个实例或全局,但在这种情况下,我们还需要有一些方法来管理它的生命周期。

Promises with Kovenant 

编写异步代码的另一种选择是使用 Promise。 promise 类似于未来(在许多框架中,未来和承诺是同义词),因为它代表 计算 可能会在未来完成。我们有一个阻塞方法来获取它的结果,但我们也可以对它的结果做出反应,回调样式。 

Kovenant (http: //kovenant.komponents.nl/) 是 promises实现< Kotlin 的 id="id288611245" class="indexterm">:

import nl.komponents.kovenant.Promise
import nl.komponents.kovenant.task
import nl.komponents.kovenant.then

class PromiseUserService(private val userClient: UserClient,
                   private val factClient: FactClient,
                   private val userRepository: UserRepository,
                   private val factRepository: FactRepository) : UserService {

   override fun getFact(id: UserId): Fact {

      return (task {
         userRepository.getUserById(id)
      } then { user ->
         if (user == null) {
            task {
               userClient.getUser(id)
            } success  { userFromService ->
               userRepository.insertUser(userFromService)
            } then { userFromService ->
               getFact(userFromService).get()
            }
         } else {
            task { factRepository.getFactByUserId(id) ?: getFact(user).get() }
         }
      }).get().get()
   }

   private fun getFact(user: User): Promise<Fact, Exception> = task {
      factClient.getFact(user)
   } success  { fact ->
      factRepository.insertFact(fact)
   }
}

函数 task 创建 Promise<T, Exception>(我们之前在其他实现中没有涉及的内容) .我们可以通过以下几种方式与 Promise<T, Exception>进行交互:

  • get(): T: This blocks the current thread and returns the promise's result.
  • then(bind: (T) -> R): Promise<R, Exception>: This is similar to map on functional collections; it returns a new Promise value with a new type.
  • success(callback: (T) -> Unit): Promise<T, Exception>: This is callback on successful Promise execution. It's useful for side effects
  • fail(callback: (Exception) -> Unit): Promise<T, Exception>: This is callback on fail, like a catch block.
  • always(callback: () -> Unit): Promise<T, Exception>: This always executes, like a finally block.

这些代码乍一看很难掌握,但是一旦你习惯了 promise 成语,它就很容易阅读。另外,请注意,promise 是一个未来,因此您可以编写类似于我们未来示例的内容,但不会乱用 Executors。 Java 8 包含一种名为 CompletableFuture<T> 的新型未来,可以将其视为一个承诺。

第一次执行(Kovenant 初始化阶段)的执行时间约为 1,350 毫秒,然后稳定在 1,200 毫秒左右。在其默认配置中,Kovenant 使用尽可能多的线程,从而导致内存使用率很高,但可以对 Kovenant 进行微调以使用更少的线程。

Coroutines

现在,让我们用协程重写我们的 example

import kotlinx.coroutines.experimental.Deferred
import kotlinx.coroutines.experimental.async
import kotlinx.coroutines.experimental.launch
import kotlinx.coroutines.experimental.runBlocking

class CoroutineUserService(private val userClient: UserClient,
                     private val factClient: FactClient,
                     private val userRepository: UserRepository,
                     private val factRepository: FactRepository) : UserService {
   override fun getFact(id: UserId): Fact = runBlocking {
      val user = async { userRepository.getUserById(id) }.await()
      if (user == null) {
         val userFromService = async { userClient.getUser(id) }.await()
         launch { userRepository.insertUser(userFromService) }
         getFact(userFromService)
      } else {
         async { factRepository.getFactByUserId(id) ?: getFact(user) }.await()
      }
   }

   private suspend fun getFact(user: User):Fact {
      val fact: Deferred<Fact> = async { factClient.getFact(user) }
      launch { factRepository.insertFact(fact.await()) }
      return fact.await()
   }
}

我们的代码比我们的 Future 示例更直接,非常接近我们的同步代码。我们在上一节中介绍了 runBlockinglaunch,但这里介绍了一个新的协程构建器,异步

async 协程构建器获取一段代码并异步执行它,返回 Deferred Deferred 是一个 Future 带有一个 await 方法,它会阻塞协程直到完成但不是线程; Deferred 也继承自 Job 所以继承了它的所有方法,例如 join .

协程代码感觉很自然,但是当我们使用异步代码时它是明确的,但是由于资源成本低,我们可以在代码中使用尽可能多的协程;例如, CoroutineUserService 使用的线程和内存不到任何其他实现的一半。

现在我们有了所有的实现,我们可以比较 code 复杂性和 resource 消费:

代码复杂度

资源消耗

同步

代码复杂度非常低。

资源消耗非常低,性能缓慢。

回调

需要非常高的适配器;预计会出现重复;嵌套回调很难阅读;并且有各种黑客。

资源消耗很高。使用共享的 Executor 可以改善它,但它会增加更多的代码复杂性。

期货

代码复杂度中等。 Executorsget() 很吵,但仍然可读。

资源消耗很高,但可以使用不同的 Executor 实现和共享执行器进行微调,但这会增加代码复杂性。

承诺

代码复杂度中等,使用 promise 样式(then, success)。使用期货风格(get),它可以像协程一样流畅而不影响性能。

资源消耗非常高,性能一流,但可以在不更改代码的情况下进行微调。

协程

代码复杂度低;它与带有用于异步操作的显式块的同步样式大小相同。

资源消耗低,开箱即用的顶级性能。


总体而言,协程无疑是赢家,Kovenant 的承诺紧随其后。

Coroutine context

协程总是在上下文中运行。所有 coroutine 构建器都默认指定了上下文,并且该上下文可通过值 coroutineContext ,在协程体内:

import kotlinx.coroutines.experimental.*

fun main(args: Array<String>) = runBlocking {
   println("run blocking coroutineContext = $coroutineContext")
   println("coroutineContext[Job] = ${coroutineContext[Job]}")
   println(Thread.currentThread().name)
   println("-----")

   val jobs = listOf(
         launch {
            println("launch coroutineContext = $coroutineContext")
            println("coroutineContext[Job] = ${coroutineContext[Job]}")
            println(Thread.currentThread().name)
            println("-----")
         },
         async {
            println("async coroutineContext = $coroutineContext")
            println("coroutineContext[Job] = ${coroutineContext[Job]}")
            println(Thread.currentThread().name)
            println("-----")
         },
         launch(CommonPool) {
            println("common launch coroutineContext = $coroutineContext")
            println("coroutineContext[Job] = ${coroutineContext[Job]}")
            println(Thread.currentThread().name)
            println("-----")
         },
         launch(coroutineContext) {
            println("inherit launch coroutineContext = $coroutineContext")
            println("coroutineContext[Job] = ${coroutineContext[Job]}")
            println(Thread.currentThread().name)
            println("-----")
         }
   )

   jobs.forEach { job ->
      println("job = $job")
      job.join()
   }
}

每个协程上下文还包括 CoroutineDispatcher,它决定协程运行哪个线程。协程构建器,例如 asynclaunch,使用 DefaultDispatcher 调度器默认情况下(在当前协程版本 0.2.1 中,DefaultDispatcher 等于 CommonPool;但是,这种行为可以在未来)。

协程上下文也可以保存值;例如,您可以使用 coroutineContext[Job] 来恢复协程的作业。

协程上下文可用于控制其子级。我们的 100 万个协程示例可以重新设计以加入其所有子项:

fun main(args: Array<String>) = runBlocking {

   val job = launch {
      repeat(1_000_000) {
         launch(coroutineContext) {
            delay(1000)
            print('.')
         }
      }
   }

   job.join()
}

我们可以设置一个实际上来自外部 launch 协程上下文的共享协程上下文,而不是百万个协程中的每一个都有自己的上下文。当我们加入外部 launch 作业时,它也加入了它的所有协程子进程。

Channels


两个协程通信(或协程与外部世界,如 async)的一种方式是 through延迟<T>

import kotlinx.coroutines.experimental.delay
import kotlinx.coroutines.experimental.launch
import kotlinx.coroutines.experimental.runBlocking

fun main(args: Array<String>) = runBlocking {
    val result = CompletableDeferred<String>()

   val world = launch {
      delay(500)
      result.complete("World (from another coroutine)")
   }

   val hello =launch {
      println("Hello ${result.await()}")
   }

   hello.join()
   world.join()
}

延迟对于单个值来说很好,但有时我们想发送一个序列或一个流。在这种情况下,我们可以使用 Channel。 Channel 类似于 BlockingQueue,但使用挂起操作而不是阻塞操作,Channel 也可以是 close

import kotlinx.coroutines.experimental.channels.*

fun main(args: Array<String>) = runBlocking<Unit> {
   val channel = Channel<String>()

   val world = launch {
      delay(500)
      channel.send("World (from another coroutine using a channel)")
   }

   val hello = launch {
      println("Hello ${channel.receive()}")
   }

   hello.join()
   world.join()
}

让我们用通道编写我们的 100 万个协程示例,如下所示:

fun main(args: Array<String>) = runBlocking<Unit> {

   val channel = Channel<Char>()

   val jobs = List(1_000_000) {
      launch {
         delay(1000)
         channel.send('.')
      }
   }

   repeat(1_000_000) {
      print(channel.receive())
   }

   jobs.forEach { job -> job.join() }
}

当然,这不是频道的预期用例。通常,单个协程(或多个协程)向通道发送消息:

fun main(args: Array<String>) = runBlocking<Unit> {

   val channel = Channel<Char>()

   val sender = launch {
      repeat(1000) {
         delay(10)
         channel.send('.')
         delay(10)
         channel.send(',')
      }
      channel.close()
   }

   for (msg in channel) {
      print(msg)
   }

   sender.join()

}

channel 本身就是一个迭代器,所以它可以用在 for 块。

编写此代码的更简单方法是使用 produce 构建器,如下所示:

fun dotsAndCommas(size: Int) = produce {
   repeat(size) {
      delay(10)
      send('.')
      delay(10)
      send(',')
   }
}

fun main(args: Array<String>) = runBlocking<Unit> {
   val channel = dotsAndCommas(1000)

   for (msg in channel) {
      print(msg)
   }
}

produce 构建器返回 ReceiveChannel<T>,一个仅用于接收的通道类型。 Channel<T> 扩展了这两种类型, SendChannel<T>ReceiveChannel< T>

Channel pipelines

当我们有渠道时,我们可以有 related 模式,例如管道。 管道是连接消费者和生产者的一系列渠道,类似 到 Unix 管道或 企业集成模式 (EIP< /跨度>)。

让我们使用 EIP 编写我们自己的销售系统。我们先来看看模型:

data class Quote(val value: Double, val client: String, val item: String, val quantity: Int)

data class Bill(val value: Double, val client: String)

data class PickingOrder(val item: String, val quantity: Int)

现在,让我们看一下模式:

import kotlinx.coroutines.experimental.CoroutineContext

fun calculatePriceTransformer(coroutineContext: CoroutineContext, quoteChannel: ReceiveChannel<Quote>) = produce(coroutineContext) {
   for (quote in quoteChannel) {
      send(Bill(quote.value * quote.quantity, quote.client) to PickingOrder(quote.item, quote.quantity))
   }
}

calculatePriceTransformer 函数从通道接收报价并将其转换为 Pair<Bill, PickingOrder>

fun cheapBillFilter(coroutineContext: CoroutineContext, billChannel: ReceiveChannel<Pair<Bill, PickingOrder>>) = produce(coroutineContext) {
   billChannel.consumeEach { (bill, order) ->
      if (bill.value >= 100) {
         send(bill to order)
      } else {
         println("Discarded bill $bill")
      }
   }
}

cheapBillFilter 函数很好地过滤了 bill 值低于100:

suspend fun splitter(filteredChannel: ReceiveChannel<Pair<Bill, PickingOrder>>,
                accountingChannel: SendChannel<Bill>,
                warehouseChannel: SendChannel<PickingOrder>) = launch {
   filteredChannel.consumeEach { (bill, order) ->
      accountingChannel.send(bill)
      warehouseChannel.send(order)
   }
}

splitter 将 Pair<Bill, PickingOrder>拆分成各自的通道:

suspend fun accountingEndpoint(accountingChannel: ReceiveChannel<Bill>) = launch {
   accountingChannel.consumeEach { bill ->
      println("Processing bill = $bill")
   }
}

suspend fun warehouseEndpoint(warehouseChannel: ReceiveChannel<PickingOrder>) = launch {
   warehouseChannel.consumeEach { order ->
      println("Processing order = $order")
   }
}

accountingEndpointwarehouseEndpoint 都通过打印来处理它们各自的消息,但是,在现实生活中,我们可以存储这些 < span>messages 进入我们的数据库,使用 JMS< 向其他系统发送电子邮件或发送消息/strong>AMQPKafka

fun main(args: Array<String>) = runBlocking {

   val quoteChannel = Channel<Quote>()
   val accountingChannel = Channel<Bill>()
   val warehouseChannel = Channel<PickingOrder>()

   val transformerChannel = calculatePriceTransformer(coroutineContext, quoteChannel)

   val filteredChannel = cheapBillFilter(coroutineContext, transformerChannel)

   splitter(filteredChannel, accountingChannel, warehouseChannel)

   warehouseEndpoint(warehouseChannel)

   accountingEndpoint(accountingChannel)

   launch(coroutineContext) {
      quoteChannel.send(Quote(20.0, "Foo", "Shoes", 1))
      quoteChannel.send(Quote(20.0, "Bar", "Shoes", 200))
      quoteChannel.send(Quote(2000.0, "Foo", "Motorbike", 1))
   }

   delay(1000)
   coroutineContext.cancelChildren()
}

main 方法组装我们的销售系统并对其进行测试。

许多其他通道消息模式可以使用协程通道实现,例如扇入、扇出和 actors。我们将在下一节中介绍 actors

Managing mutable state


当我们处理 asynchronous 代码时,主要关注点(也是噩梦燃料)是如何处理可变状态。我们在 第 3 章 不变性 - 这很重要。但有时不可能使用函数式不可变样式。协程为这个问题提供了一些替代方案。

在以下示例中,我们将使用多个协程来更新计数器:

import kotlin.system.measureTimeMillis

suspend fun repeatInParallel(times: Int, block: suspend () -> Unit) {
   val job = launch {
      repeat(times) {
         launch(coroutineContext) {
            block()
         }
      }
   }
   job.join()
}

fun main(args: Array<String>) = runBlocking {
   var counter = 0

   val time = measureTimeMillis {
      repeatInParallel(1_000_000) {
         counter++
      }
   }
   println("counter = $counter")
   println("time = $time")
}

对于较小的数字, counter 是正确的,但是一旦我们开始增加大小,我们就会看到古怪的数字。

现在我们可以看看协程为我们提供的替代方案。

Switching contexts

我们的第一个选项是使用不同的 context 进行更新操作:

import kotlinx.coroutines.experimental.*

fun main(args: Array<String>) = runBlocking {
   var counter = 0

   val counterContext = newSingleThreadContext("CounterContext")

   val time = measureTimeMillis {
      repeatInParallel(1_000_000) {
         withContext(counterContext) {
            counter++
         }
      }
   }
   println("counter = $counter")
   println("time = $time")
}

 withContext 函数 在特定的协程上下文中执行一个块——在这种情况下,是一个单线程的。切换上下文是一种强大的技术,可以让我们以细粒度的方式操作代码的运行方式。

Thread safe structures

从 Java 5 起,我们可以访问 到一些原子线程安全结构,这些结构在协程中仍然有用:

import java.util.concurrent.atomic.AtomicInteger

fun main(args: Array<String>) = runBlocking {
   val counter = AtomicInteger(0)

   val time = measureTimeMillis {
      repeatInParallel(1_000_000) {
         counter.incrementAndGet()
      }
   }
   println("counter = ${counter.get()}")
   println("time = $time")
}

AtomicInteger 为我们提供了许多线程安全的原子操作。还有更多的线程安全结构,例如其他原子原语和并发集合。

Mutexes

Mutex(互斥)对象允许 access 到多个协程共享相同的资源但不同时:

import kotilnx.coroutines.experimental.sync.Mutex
import kotlinx.coroutines.experimental.sync.withLock

fun main(args: Array<String>) = runBlocking {
   val mutex = Mutex()
   var counter = 0

   val time = measureTimeMillis {
      repeatInParallel(1_000_000) {
         mutex.withLock {
            counter++
         }
      }
   }
   println("counter = $counter")
   println("time = $time")
}

Mutex 对象的工作方式类似于同步控制结构,但它不是阻塞线程,而是阻塞协程。

Actors

actor 是一种对象,它交互 与其他actor和通过消息的外部世界。 actor 对象可以有一个私有的内部可变状态,可以通过消息在外部进行修改和访问,但不能直接访问。 Actors 由于其一致的编程模型近年来越来越受欢迎,并已在数百万用户应用程序中成功测试,例如 WhatsApp使用 Erlang 构建,这种语言让演员成为众人瞩目的焦点:

import kotlinx.coroutines.experimental.channels.actor

sealed class CounterMsg
object IncCounter : CounterMsg()
class GetCounter(val response: CompletableDeferred<Int>) : CounterMsg()

fun counterActor(start:Int) = actor<CounterMsg> {
   var counter = start
   for (msg in channel) {
      when (msg) {
         is IncCounter -> counter++
         is GetCounter -> msg.response.complete(counter)
      }
   }
}

要编写一个actor,首先,我们需要定义我们要发送哪些消息。在这里,我们创建了两条消息, IncCounterGetCounterGetCounter 有一个 CompletableDeferred<Int> 值可以让我们知道 演员

我们可以使用 actor 构建器来创建  actor。在我们的 actor 协程中,我们可以访问 channel 属性,  ReceiveChannel<CounterMsg> ;,接收消息并对它们做出反应。 counterActor(Int) 函数将返回  SendChannel<CounterMsg>;因此,我们可以调用的函数只有 send(CounterMsg)close()

fun main(args: Array<String>) = runBlocking {
   val counterActor = counterActor(0)

   val time = measureTimeMillis {
      repeatInParallel(1_000_000) {
         counterActor.send(IncCounter)
      }
   }

   val counter = CompletableDeferred<Int>()
   counterActor.send(GetCounter(counter))
   println("counter = ${counter.await()}")
   println("time = $time")
}

Actor 一开始可能很难掌握,但是一旦你明白,actor 模型可以直接用于创建复杂而强大的系统。

Note

在本书的示例代码中,您可以找到使用 actors 实现我们的 UserService 示例。您可以在 https://github.com/MarioAriasC/FunctionalKotlin/blob/master/Chapter07/src/main/kotlin/com/packtpub/functionalkotlin/chapter07/facts.kt#L377

Summary


协程显示出改变我们对异步代码和执行的看法的巨大潜力。在本章中,我们介绍了如何编写协程以及如何使用协程上下文和通道。我们还全面了解了如何处理异步共享可变状态。

在下一章中,我们将学习函数式集合及其操作。