vlambda博客
学习文章列表

读书笔记《building-microservices-with-spring》使用依赖项注入模式连接Bean

Chapter 3. Wiring Beans using the Dependency Injection Pattern

在上一章中,您了解了 四人组GOF ) 设计模式及其示例和用例。现在,我们将更详细地介绍在 Spring 应用程序中注入 bean 和依赖项的配置,您将在其中看到在 Spring 应用程序中配置的各种方式。这包括使用 XML、注释、Java 和 Mix 进行配置。

每个人都喜欢电影,对吧?好吧,如果不是电影,戏剧、戏剧或戏剧怎么样?有没有想过如果不同的团队成员不互相交谈会发生什么?我所说的团队不仅是指演员,还包括布景团队、化妆人员、视听人员、音响系统人员等等。不用说,每个成员都对最终产品做出了重要贡献,这些团队之间需要大量的协调。

一部轰动一时的电影是数百人为共同目标而共同努力的产物。同样,优秀的软件是一个应用程序,其中多个对象协同工作以实现某些业务目标。作为一个团队,每个对象都必须相互了解,并相互沟通以完成工作。

在银行系统中,汇款服务必须知道帐户服务,帐户服务必须知道帐户存储库,等等。所有这些组件协同工作,使银行系统能够运行。在第 1 章Framework 5.0 和设计模式入门中,您看到了使用传统方法创建的相同银行示例,即使用构造和直接对象启动来创建对象。这种传统方式导致代码复杂,难以重用和单元测试,并且彼此高度耦合。

但是在 Spring 中,对象有责任完成它们的工作,而无需查找和创建其工作所需的其他依赖对象。 Spring 容器负责查找或创建其他依赖对象,并与它们的依赖项协作。在前面银行系统的例子中,转账服务依赖于账户服务,但它并不一定要创建账户服务,所以依赖是由容器创建的,并交给应用程序中的依赖对象.

在本章中,我们将参考 依赖注入 (DI) 模式,以及它是如何工作的。在本章结束时,您将了解基于 Spring 的应用程序的对象如何在它们之间创建关联,以及 Spring 如何连接这些对象以完成工作。您还将学习在 Spring 中连接 bean 的许多方法。

本章将涵盖以下主题:

  • The dependency injection pattern
  • Types of dependency injection patterns
  • Resolving dependency using the Abstract Factory pattern
  • Lookup-method injection pattern
  • Configuring beans using the Factory pattern
  • Configuring dependencies
  • Common best practices for configuring dependencies in an application

The dependency injection pattern


在任何企业应用程序中, 工作对象之间的协调对于实现业务目标非常重要。应用程序中对象之间的关系表示对象的依赖关系,因此每个对象都会通过协调应用程序中的依赖对象来完成工作。对象之间所需的这种依赖关系往往很复杂,并且在应用程序中具有紧密耦合的编程。 Spring 通过使用依赖注入模式为应用程序的紧耦合代码提供了一种解决方案。依赖注入是一种设计模式,它促进了应用程序中的松散耦合类。这意味着系统中的类依赖于他人的行为,而不依赖于类对象的实例化。依赖注入模式还促进了对接口的编程,而不是对实现的编程。对象依赖关系应该在接口上,而不是在具体类上,因为松散耦合的结构为您提供了更高的可重用性、可维护性和可测试性。

Solving problems using the dependencies injection pattern

在任何企业应用程序中,要处理的一个常见问题是如何配置和连接不同的元素以实现业务目标——例如,如何将 Web 层的控制器与不同成员编写的服务和存储库接口绑定在一起在不知道 Web 层的控制器的情况下,团队的成员。因此,有许多框架通过使用轻量级容器来组装来自不同层的组件来为这个问题提供解决方案。此类框架的示例是 PicoContainer 和 Spring Framework。

PicoContainer 和 Spring 的容器使用了多种设计模式来解决不同层的不同组件的组装问题。在这里,我将讨论其中一种设计模式——依赖注入模式。依赖注入为我们提供了一个解耦和松耦合的系统。它确保了依赖对象的构造。在下面的示例中,我们将演示依赖注入模式如何解决与 各种分层组件之间的协作相关的常见问题.

Without dependency injection

在下面的Java示例中,首先我们看看两个类之间的依赖关系是什么?看看下面的类图:

读书笔记《building-microservices-with-spring》使用依赖项注入模式连接Bean

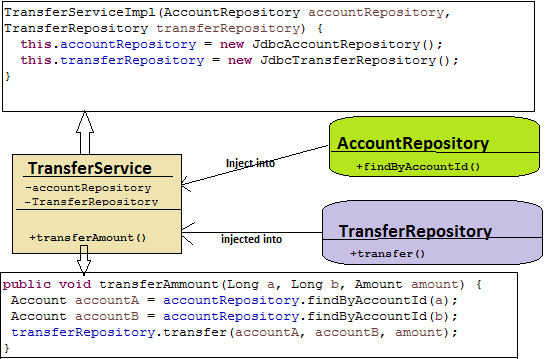
TransferService 与 AccountRepository 和 TransferRepository 具有依赖关系,用于 transferAmount() 方法和存储库类的直接实例化。

如上图所示,TransferService 类包含两个成员变量,AccountRepository TransferRepository。 这些由 TransferService 构造函数。 TransferService 控制使用哪个存储库实现。它还控制着它们的构造。在这种情况下,TransferService 据说对以下示例具有硬编码依赖:

以下是 TransferServiceImpl.java 文件:

    public class TransferServiceImpl implements TransferService { 
      AccountRepository accountRepository; 
      TransferRepository transferRepository; 
      public TransferServiceImpl(AccountRepository accountRepository, 
      TransferRepository transferRepository) { 
        super(); 
        // Specify a specific implementation in the constructor 
        instead of using dependency injection
        this.accountRepository = new JdbcAccountRepository(); 
        this.transferRepository = new JdbcTransferRepository(); 
      } 
      // Method within this service that uses the accountRepository and 
      transferRepository
      @Override 
      public void transferAmmount(Long a, Long b, Amount amount) { 
        Account accountA = accountRepository.findByAccountId(a); 
        Account accountB = accountRepository.findByAccountId(b); 
        transferRepository.transfer(accountA, accountB, amount); 
      } 
    }   

在前面的例子中,TransferServiceImpl类有两个类的依赖关系,即AccountRepository TransferRepositoryTransferServiceImpl 类有两个依赖类的成员变量,并通过其构造函数使用 JdbcAccountRepository 等存储库的 JDBC 实现来初始化它们code> 和 JdbcTransferRepositoryTransferServiceImpl 类与存储库的 JDBC 实现紧密耦合;如果 JDBC 实现更改为 JPA 实现,您还必须更改 TransferServiceImpl 类。

根据SOLID(Single Responsibility Principle, Open Closed Principle, Liskov's Substitution Principle, Interface Segregation Principle, Dependency Inversion Principle)原则,一个类在应用程序中应该具有单一职责,但在前面的例子中,TransferServiceImpl 类还负责构造 JdbcAccountRepositoryJdbcTransferRepository 类的对象。我们不能在类中使用对象的方向实例化。

在我们第一次尝试避免 TransferServiceImpl 类中的直接实例化逻辑时,我们可以使用 Factory 类来创建 Factory 的实例代码类="literal">TransferServiceImpl。按照这个思路,TransferServiceImpl最小化了对AccountRepositoryTransferRepository的依赖—— - 之前我们有一个紧密耦合的存储库实现,但现在它只引用接口,如下图所示:

读书笔记《building-microservices-with-spring》使用依赖项注入模式连接Bean

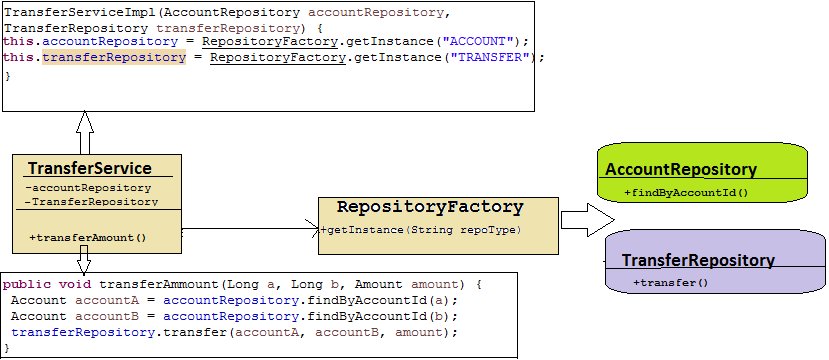
TransferService 与 AccountRepository 和 TransferRepository 具有依赖关系,用于 transferAmount() 方法与存储库类的工厂。

但是 TransferServiceImpl 类再次与 RepositoryFactory 类的实现紧密耦合。此外,此过程不适合我们有更多依赖项的情况,这会增加 Factory 类或 Factory< 的复杂性/代码>类。存储库类也可以有其他依赖项。

以下代码使用 Factory 类获取 AccountRepositoryTransferRepository 类:

以下是 TransferServiceImpl.java 文件:

    package com.packt.patterninspring.chapter4.bankapp.service;
    public class TransferServiceImpl implements TransferService { 
      AccountRepository accountRepository; 
      TransferRepository transferRepository; 
      public TransferServiceImpl(AccountRepository accountRepository,
      TransferRepository transferRepository) { 
        this.accountRepository = RepositoryFactory.getInstance(); 
        this.transferRepository = RepositoryFactory.getInstance(); 
      }
@Override
    public void transferAmount(Long a, Long b, Amount amount) { 
      Account accountA = accountRepository.findByAccountId(a); 
      Account accountB = accountRepository.findByAccountId(b); 
      transferRepository.transfer(accountA, accountB, amount); 
    } 
   } 

在前面的代码示例中,我们已经最小化了紧耦合,并从 TransferServiceImpl 类中移除了方向对象的实例化,但这并不是最优的解决方案。

With dependency injection pattern

Factory的思想避免了direct实例化一个类的对象,而且我们还必须创建另一个模块来负责接线类之间的依赖关系。此模块称为 依赖注入器,它基于 控制反转 (IoC) 模式。根据IoC框架,Container负责对象实例化,解决类之间的依赖关系< /span> 在应用程序中。对于在其范围内定义的对象,该模块有自己的构造和销毁生命周期。

在下图中,我们使用了依赖注入模式来解析 TransferServiceImpl 类的依赖:

读书笔记《building-microservices-with-spring》使用依赖项注入模式连接Bean

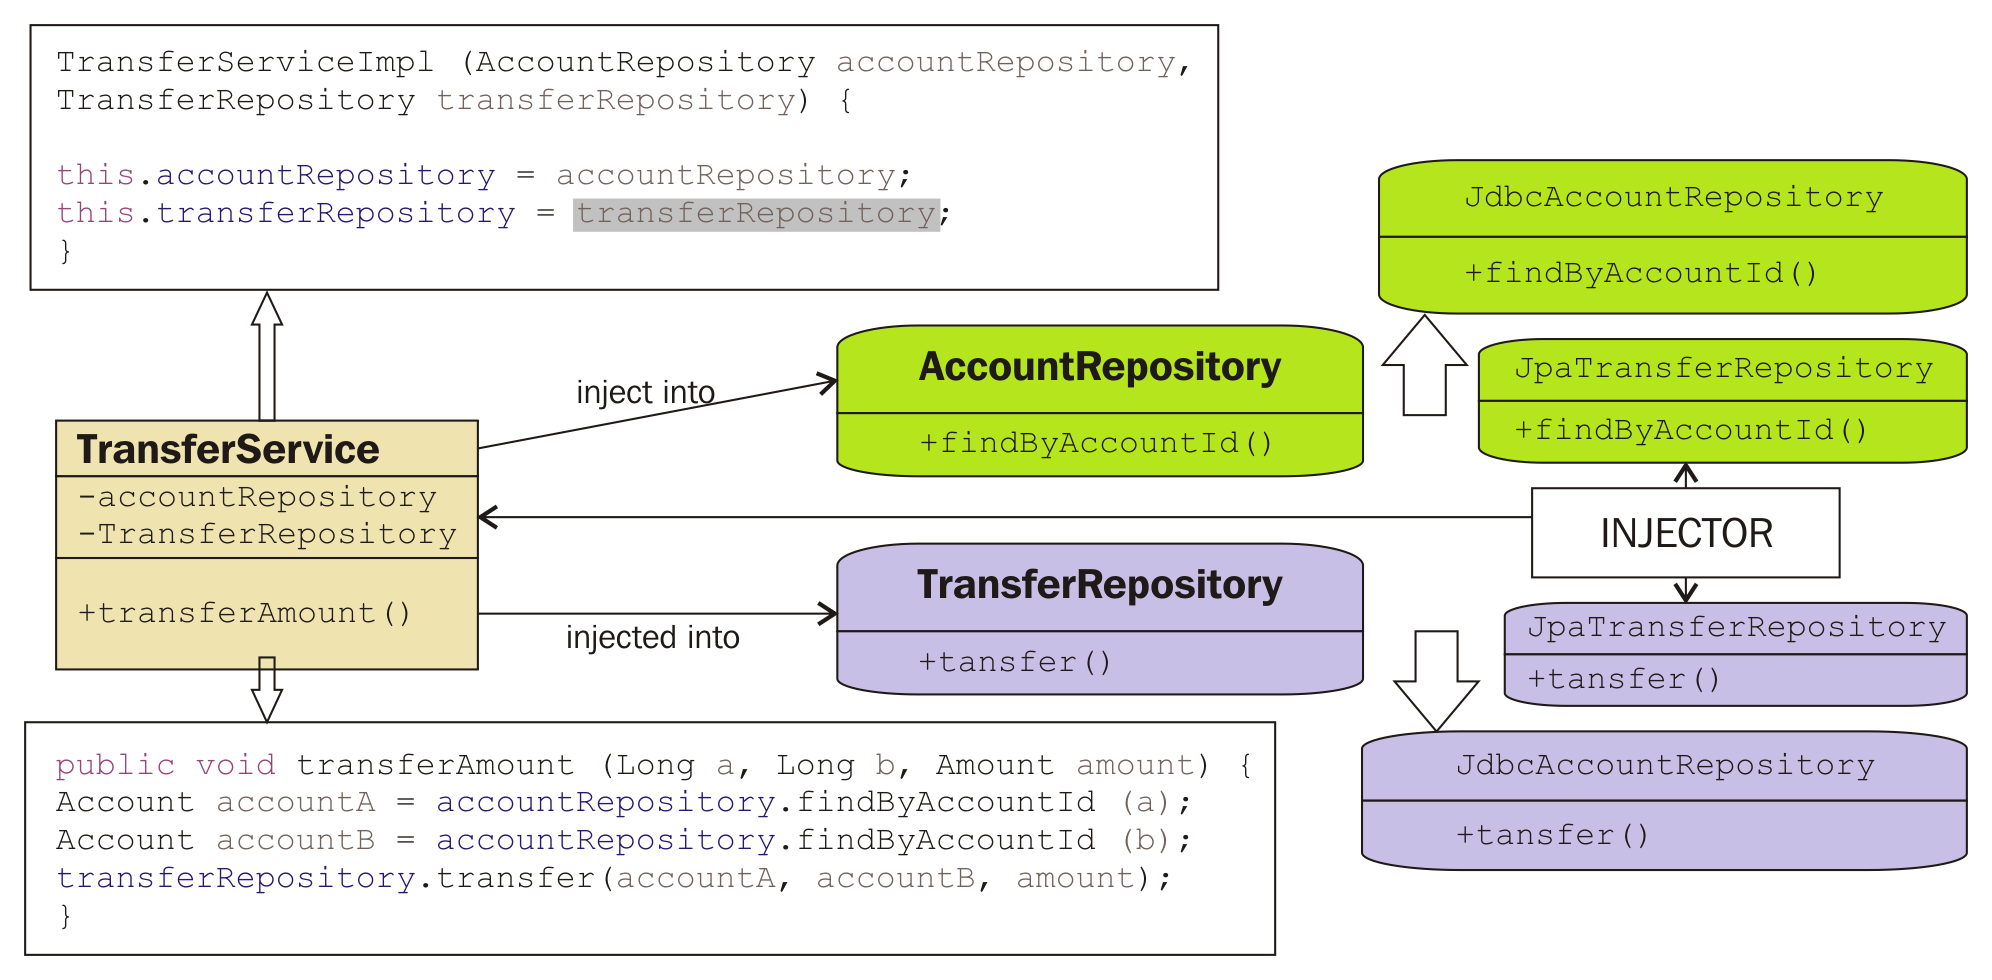
使用依赖注入设计模式来解决 TransferService 的依赖关系。

在以下示例中,我们使用了一个接口来解析依赖项:

以下是 TransferServiceImpl.java 文件:

    package com.packt.patterninspring.chapter4.bankapp.service; 
    public class TransferServiceImpl implements TransferService { 
      AccountRepository accountRepository; 
      TransferRepository transferRepository; 
      public TransferServiceImpl(AccountRepository accountRepository, 
      TransferRepository transferRepository) { 
        this.accountRepository = accountRepository; 
        this.transferRepository = transferRepository; 
     } 
     @Override 
     public void transferAmmount(Long a, Long b, Amount amount) { 
       Account accountA = accountRepository.findByAccountId(a); 
       Account accountB = accountRepository.findByAccountId(b); 
       transferRepository.transfer(accountA, accountB, amount); 
     } 
    } 

TransferServiceImpl 类中,我们传递了 AccountRepositoryTransferRepository 接口的引用给构造函数。现在 TransferServiceImpl 类与实现存储库类松散耦合(使用任何风格,存储库接口的 JDBC 或 JPA 实现),框架负责将依赖关系与涉及依赖类。松散耦合为我们提供了更高的可重用性、可维护性和可测试性。

Spring 框架实现了依赖注入模式来解决 Spring 应用程序中类之间的依赖关系。 Spring DI 基于 IoC 概念,即 Spring Framework 有一个容器,它在其中创建、管理和销毁对象;它被称为 Spring IoC 容器。 Spring 容器中的对象称为 Spring beans。在 Spring 应用程序中连接 bean 的方法有很多。让我们看一下配置 Spring 容器的三种最常见的方法。

在下一节中,我们将了解依赖注入模式的类型;您可以使用其中任何一个来配置依赖项。

Types of dependency injection patterns


以下是可以注入应用程序的 dependency 注入类型:

  • Constructor-based dependency injection
  • Setter-based dependency injection

Constructor-based dependency injection pattern

依赖注入是一种解决依赖类的dependencies的设计模式,依赖就是对象属性。必须使用构造函数注入或设置器注入的方式之一为依赖对象构造注入器。构造函数注入是在创建对象时实现这些对象属性以实例化对象的方法之一。一个对象有一个公共构造函数,它将依赖类作为构造函数参数来注入依赖项。您可以在依赖类中声明多个构造函数。之前,只有 PicoContainer Framework 使用基于构造函数的依赖注入来解决依赖关系。目前,Spring 框架还支持构造函数注入来解决依赖关系。

构造函数注入模式的优点

如果您在 Spring 应用程序中使用构造函数 injection,以下是优点:

  • Constructor-based dependency injection is more suitable for mandatory dependencies, and it makes a strong dependency contract
  • Constructor-based dependency injection provides a more compact code structure than others
  • It supports testing by using the dependencies passed as constructor arguments to the dependent class
  • It favors the use of immutable objects, and does not break the information hiding principle

构造函数注入模式的缺点

以下是这种基于构造函数的注入模式的唯一缺点

  • It may cause circular dependency. (Circular dependency means that the dependent and the dependency class are also dependents on each other, for example, class A depends on Class B and Class B depends on Class A)

基于构造函数的依赖注入示例模式

让我们看看以下基于构造函数的 dependency 注入示例。在下面的代码中,我们有一个 TransferServiceImpl 类,它的构造函数有两个参数:

    public class TransferServiceImpl implements TransferService { 
      AccountRepository accountRepository; 
      TransferRepository transferRepository; 
      public TransferServiceImpl(AccountRepository accountRepository,    
      TransferRepository transferRepository) { 
        this.accountRepository = accountRepository; 
        this.transferRepository = transferRepository; 
      } 
      // ... 
    }

存储库也将由 Spring 容器管理,因此,容器将向其中注入用于数据库配置的 datasource 对象,如下所示:

以下是 JdbcAccountRepository.java 文件:

    public class JdbcAccountRepository implements AccountRepository{ 
      JdbcTemplate jdbcTemplate; 
      public JdbcAccountRepository(DataSource dataSource) { 
        this.jdbcTemplate = new JdbcTemplate(dataSource); 
      } 
      // ... 
    }

以下是 JdbcTransferRepository.java 文件:

    public class JdbcTransferRepository implements TransferRepository{ 
      JdbcTemplate jdbcTemplate; 
      public JdbcTransferRepository(DataSource dataSource) { 
        this.jdbcTemplate = new JdbcTemplate(dataSource); 
      } 
       // ... 
    }

您可以在前面的代码中看到存储库的 JDBC 实现为 AccountRepositoryTransferRepository。这些类也有一个参数构造函数来注入与 DataSource 类的依赖关系。

让我们看看在企业应用程序中实现依赖注入的另一种方式,即setter注入。

Setter-based dependency injection

容器的注入器有另一种方式来连接依赖对象的dependency。在 setter 注入中,实现这些 dependencies 的方法之一是在依赖类中提供 setter 方法。 Object 有一个公共的 setter 方法,它将依赖的类作为方法参数来注入依赖项。对于基于 setter 的依赖注入,依赖类的构造函数不是必需的。如果更改依赖类的依赖项,则无需更改。 Spring Framework 和 PicoContainer Framework 支持 setter 注入来解决依赖关系。

setter 注入的优点

如果在 Spring 应用程序中使用 setter 注入模式,以下是优点:

  • Setter injection is more readable than the constructor injection
  • Setter injection solves the circular dependency problem in the application
  • Setter injection allows costly resources or services to be created as late as possible, and only when required
  • Setter injection does not require the constructor to be changed, but dependencies are passed through public properties that are exposed

setter 注入的缺点

以下是 setter 注入模式的缺点:

  • Security is lesser in the setter injection pattern, because it can be overridden
  • A setter-based dependency injection does not provide a code structure as compact as the constructor injection
  • Be careful whenever you use setter injection, because it is not a required dependency

基于 setter 的依赖注入示例

让我们看看以下基于 setter 的 dependency 注入示例。以下 TransferServiceImpl 类具有带有一个存储库类型参数的 setter 方法:

以下是 TransferServiceImpl.java 文件:

    public class TransferServiceImpl implements TransferService { 
      AccountRepository accountRepository; 
      TransferRepository transferRepository; 
    
      public void setAccountRepository(AccountRepository 
      accountRepository) { 
        this.accountRepository = accountRepository; 
      } 
      public void setTransferRepository(TransferRepository  
      transferRepository) { 
        this.transferRepository = transferRepository; 
      } 
      // ... 
    } 

同样,让我们​​为存储库的实现定义一个设置器,如下所示:

以下是 JdbcAccountRepository.java 文件:

    public class JdbcAccountRepository implements AccountRepository{ 
      JdbcTemplate jdbcTemplate; 
      public setDataSource(DataSource dataSource) { 
        this.jdbcTemplate = new JdbcTemplate(dataSource); 
    } 
     // ... 
   } 

以下是 JdbcTransferRepository.java 文件:

    public class JdbcTransferRepository implements TransferRepository{ 
      JdbcTemplate jdbcTemplate; 
      public setDataSource(DataSource dataSource) { 
        this.jdbcTemplate = new JdbcTemplate(dataSource); 
   } 
    // ... 
  } 

您可以在前面的代码中看到存储库的 JDBC 实现为 AccountRepositoryTransferRepository。这些类有一个带有一个参数的 setter 方法来注入 dependencyDataSource 类。

构造函数与 setter 注入和最佳实践

Spring 框架支持两种类型的 dependency 注入模式。构造器和设置器注入模式都组装系统中的元素。 setter 和构造函数注入之间的选择取决于您的应用程序需求和手头的问题。让我们看看下表,它列出了构造函数和 setter 注入之间的一些区别,以及一些最佳实践来选择哪一个适合您的应用程序。

构造函数注入

Setter 注入

具有构造函数的类接受参数;它有时非常紧凑,并且清楚地理解它创建的内容。

这里构造了对象,但不清楚它的属性是否被初始化。

当依赖是强制性的时,这是一个更好的选择。

这适用于依赖项不是强制性的情况。

它允许您隐藏不可变的对象属性,因为它没有这些对象属性的设置器。为了确保对象的不可变特性,请使用构造函数注入模式而不是 setter 注入。

它不能确保对象的不可变性质。

它在您的应用程序中创建循环依赖。

它解决了应用程序中的循环依赖问题。在这种情况下,setter 注入是比构造函数更好的选择。

它不适用于应用程序中的标量值依赖。

如果您有简单的参数(例如字符串和整数)作为依赖项,则最好使用 setter 注入,因为每个 setter 名称都指示该值应该做什么。


在下一节中,您将学习如何配置注入器以查找 bean 并将它们连接在一起,以及注入器如何管理 bean。在这里,我将使用 Spring 配置作为依赖注入模式。

Configuring the dependency injection pattern with Spring


在本节中,我将解释在应用程序中配置依赖项所需的流程。主流注入器是 Google Guice、Spring 和 Weld。在本章中,我使用的是 Spring 框架,因此,我们将在这里看到 Spring 配置。下图是 Spring 工作原理的高级视图:
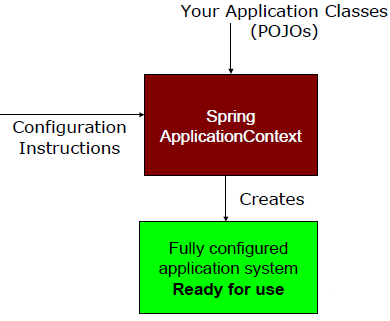
读书笔记《building-microservices-with-spring》使用依赖项注入模式连接Bean

Spring 如何使用依赖注入模式工作

在上图中,Configuration Instruction 是您的应用程序的元配置。这里,我们在Your Application Classes (POJOs)中定义依赖,并初始化Spring 容器通过结合 POJO 和 配置说明 来解决依赖,最后,你就拥有了一个完整的配置和可执行的系统或应用程序。

正如您在上图中所见,Spring 容器在您的应用程序中创建 bean,并通过 DI 模式为这些对象之间的关系组装它们。 Spring 容器根据我们提供给框架的配置创建 bean,因此,您有责任告诉 Spring 要创建哪些 bean,以及如何将它们连接在一起。

Spring 在配置 Spring bean 的依赖方面非常灵活。以下是配置应用程序元数据的三种方法:

  1. Dependency injection pattern with Java-based configuration—it is an explicit configuration in Java.
  2. Dependency injection pattern with Annotation-based configuration—it is an implicit bean discovery, and automatic wiring.
  3. Dependency injection pattern with XML-based configuration—it is an explicit configuration in XML.

Spring 在 Spring 中提供了三种连接 bean 的选择。您必须选择其中一个选项,但没有一个选项是任何应用程序的最佳匹配。这取决于您的应用程序,您还可以将这些选择混合并匹配到一个应用程序中。现在让我们详细讨论基于 Java 的配置的依赖注入模式。

Dependency injection pattern with Java-based configuration


从 Spring 3.0 开始,它提供了一个基于 Java 的 Spring 配置来连接 Spring 豆类。查看以下 Java 配置类 (AppConfig.java) 来定义 Spring bean 及其依赖项。基于 Java 的依赖注入配置是更好的选择,因为它更强大且类型安全。

Creating a Java configuration class - AppConfig.java

让我们创建一个 AppConfig.java 配置类 for 我们的示例:

    package com.packt.patterninspring.chapter4.bankapp.config; 
    import org.springframework.context.annotation.Configuration; 
    @Configuration 
    public class AppConfig { 
         //.. 
    } 

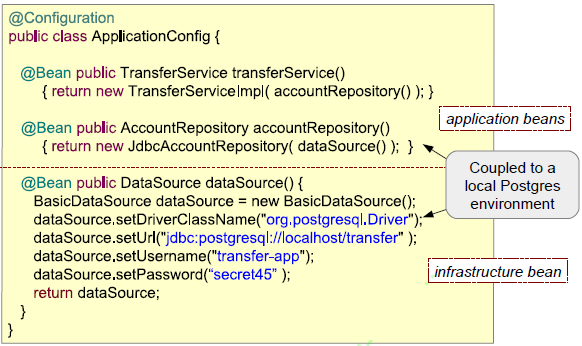
前面的AppConfig类被@Configuration注解,表示它是应用的配置类,包含bean 定义的详细信息。此文件将由 Spring 应用程序上下文加载,以为您的应用程序创建 bean。

现在让我们看看如何声明 TransferServiceAccountRepositoryTransferRepository bean在 AppConfig 中。

Declaring Spring beans into configuration class

要在基于 Java 的配置中声明 bean,您必须编写一个方法 for 在配置中创建所需的类型对象类,并使用 @Bean 注释该方法。让我们看看在 AppConfig 类中为声明 bean 所做的以下更改:

    package com.packt.patterninspring.chapter4.bankapp.config; 
    import org.springframework.context.annotation.Bean; 
    import org.springframework.context.annotation.Configuration; 
    @Configuration 
    public class AppConfig { 
      @Bean 
      public TransferService transferService(){ 
        return new TransferServiceImpl(); 
      } 
     @Bean 
     public AccountRepository accountRepository() { 
       return new JdbcAccountRepository(); 
     } 
     @Bean 
     public TransferRepository transferRepository() { 
       return new JdbcTransferRepository(); 
     } 
   } 

在前面的配置文件中,我声明了三个方法来为TransferServiceAccountRepositoryTransferRepository。这些方法使用 @Bean 批注进行批注,表明它们负责实例化、配置和初始化要由 Spring IoC 容器管理的新对象。容器中的每个 bean 都有一个唯一的 bean ID;默认情况下,bean 的 ID 与 @Bean 注释的方法名称相同。在上述情况下,bean 将被命名为 transferServiceaccountRepositorytransferRepository< /代码>。您还可以使用 @Bean 注释的 name 属性覆盖该默认行为,如下所示:

    @Bean(name="service") 
    public TransferService transferService(){ 
     return new TransferServiceImpl(); 
    } 

现在 "service" 是那个 bean TransferService 的 bean 名称。

让我们看看如何为 TransferServiceAccountRepositoryTransferRepository AppConfig 中的 bean。

Injecting Spring beans

在前面的代码中,我声明了 bean TransferServiceAccountRepositoryTransferRepository;这些 bean 没有依赖关系。但是,实际上,TransferService bean dependsAccountRepositoryTransferRepository。让我们看看在 AppConfig 类中为声明 bean 所做的以下更改:

    package com.packt.patterninspring.chapter4.bankapp.config; 
    import org.springframework.context.annotation.Bean; 
    import org.springframework.context.annotation.Configuration; 
    @Configuration 
    public class AppConfig { 
      @Bean 
      public TransferService transferService(){ 
        return new TransferServiceImpl(accountRepository(), 
        transferRepository()); 
     } 
     @Bean 
     public AccountRepository accountRepository() { 
       return new JdbcAccountRepository(); 
     } 
     @Bean 
     public TransferRepository transferRepository() { 
       return new JdbcTransferRepository(); 
     } 
    } 

在前面的示例中,在基于 Java 的配置中连接 bean 的最简单方法是引用被引用 bean 的方法。 transferService() 方法通过调用参数构造函数来构造 TransferServiceImpl 类的实例,该构造函数采用 AccountRepositoryTransferRepository。在这里,似乎 TransferServiceImpl 类的构造函数正在调用 accountRepository() transferRepository() 方法分别创建 AccountRepositoryTransferRepository 的实例,但这并不是实际调用 create实例。 Spring 容器创建 AccountRepositoryTransferRepository 的实例,因为 accountRepository()transferRepository() 方法使用 @Bean 注释进行注释。 Spring 将拦截另一个 bean 方法对 bean 方法的任何调用,以确保返回该方法的 Spring bean 的默认单例范围,而不是允许再次调用它。

Best approach to configure the dependency injection pattern with Java

在前面的配置示例中,我声明了 transferService() bean 方法以使用其参数构造 TransferServiceImpl 类的实例构造函数。 bean 方法,accountRepository()transferRepository(),作为构造函数的参数传递。但是在企业应用程序中,很多配置文件依赖于应用程序架构的各个层。假设服务层和基础设施层有自己的配置文件。这意味着 accountRepository()transferRepository() 方法可能在不同的配置文件中,而 transferService() bean 方法可能在另一个配置文件中。将 bean 方法传递给构造函数对于使用 Java 配置依赖注入模式不是一个好的做法。让我们看看另一种配置依赖注入的最佳方法:

    package com.packt.patterninspring.chapter4.bankapp.config; 
    import org.springframework.context.annotation.Bean; 
    import org.springframework.context.annotation.Configuration; 
    @Configuration 
    public class AppConfig { 
      @Bean 
      public TransferService transferService(AccountRepository 
      accountRepository, TransferRepository transferRepository){ 
        return new TransferServiceImpl(accountRepository, 
        transferRepository); 
     } 
     @Bean 
     public AccountRepository accountRepository() { 
       return new JdbcAccountRepository(); 
     } 
     @Bean 
     public TransferRepository transferRepository() { 
       return new JdbcTransferRepository(); 
     } 
    } 

在前面的代码中,transferService() 方法请求 AccountRepositoryTransferRepository 作为参数。当 Spring 调用 transferService() 来创建 TransferService bean 时,它会自动装配 AccountRepositoryTransferRepository 到配置方法中。使用这种方法,transferService() 方法仍然可以注入 AccountRepositoryTransferRepository 进入 TransferServiceImpl 的构造函数,而不显式引用 accountRepository()transferRepository() @Bean 方法。

现在让我们看一下基于 XML 配置的依赖注入模式。

Dependency injection pattern with XML-based configuration


Spring 提供依赖 injection 与基于 XML 的 configuration 从一开始。它是配置 Spring 应用程序的主要方式。在我看来,每个开发人员都应该了解如何在 Spring 应用程序中使用 XML。在本节中,我将参考基于 XML 的配置来解释与上一节基于 Java 的配置中讨论的相同的示例。


Creating an XML configuration file

在基于 Java 的配置部分,我们创建了 AppConfig@Configuration 注释注释的类。同样,对于基于 XML 的配置,我们现在将创建一个以 元素为根的 applicationContext.xml 文件。以下最简单的示例显示了基于 XML 的配置元数据的基本结构:

以下是 applicationContext.xml 文件:

    <?xml version="1.0" encoding="UTF-8"?> 
    <beans xmlns="http://www.springframework.org/schema/beans" xmlns:xsi="http://www.w3.org/2001/XMLSchema-instance" xsi:schemaLocation="http://www.springframework.org/schema/beans http://www.springframework.org/schema/beans/spring-beans.xsd"> 
    
     <!-- Configuration for bean definitions go here --> 
    
    </beans> 

前面的 XML 文件是应用程序的配置文件,其中包含有关 bean 定义的详细信息。此文件也由 ApplicationContext 的 XML 风格的实现加载,以便为您的应用程序创建 bean。让我们看看如何在前面的 XML 文件。

Declaring Spring beans in an XML file

与 Java 一样,我们 通过使用Spring-beans 模式作为 <bean> 元素。 <bean> 元素是 JavaConfig 的 @Bean 注释的 XML 类似物。我们将以下配置添加到基于 XML 的配置文件中:

    <bean id="transferService" class="com.packt.patterninspring.chapter4. bankapp.service.TransferServiceImpl"/> 
    <bean id="accountRepository" class="com.packt.patterninspring.chapter4. bankapp.repository.jdbc.JdbcAccountRepository"/> 
    <bean id="transferService" class="com.packt.patterninspring.chapter4. bankapp.repository.jdbc.JdbcTransferRepository"/> 

在前面的代码中,我创建了一个非常简单的 bean 定义。在此配置中,<bean> 元素有一个 id 属性来标识单个 bean 定义。 class 属性表示为创建此 bean 的完全限定类名。 id 属性的值是指协作对象。因此,让我们看看如何配置协作 bean 以解决应用程序中的依赖关系。

Injecting Spring beans

Spring 提供了这两种方法来define DI 模式以在应用程序中将依赖项与依赖 bean 一起注入:

  • Using constructor injection
  • Using setter injection
Using constructor injection

对于带有 construction 注入的 DI 模式,Spring 为您提供了两个基本选项,即 < ;constructor-arg> 元素和 c-namespace 在 Spring 3.0 中引入。 c-namespace 在应用程序中的冗长程度较低,这是它们之间的唯一区别——您可以选择任何一个。让我们使用构造注入来注入协作bean,如下所示:

    <bean id="transferService" class="com.packt.patterninspring.chapter4. bankapp.service.TransferServiceImpl"> 
     <constructor-arg ref="accountRepository"/> 
     <constructor-arg ref="transferRepository"/> 
    </bean> 
    <bean id="accountRepository" class="com.packt.patterninspring.chapter4. bankapp.repository.jdbc.JdbcAccountRepository"/> 
    <bean id="transferRepository" class="com.packt.patterninspring.chapter4. bankapp.repository.jdbc.JdbcTransferRepository"/> 

上述配置中,TransferService<bean>元素有两个<constructor -arg>. 这告诉它将对 ID 为 accountRepositorytransferRepository 的 bean 的引用传递给TransferServiceImpl 的构造函数。

从 Spring 3.0 开始,c-namespace 类似地具有在 XML 中表达构造函数参数的更简洁的方式。为了使用这个命名空间,我们必须在 XML 文件中添加它的模式,如下所示:

    <?xml version="1.0" encoding="UTF-8"?> 
    <beans xmlns="http://www.springframework.org/schema/beans" xmlns:xsi="http://www.w3.org/2001/XMLSchema-instance" xmlns:c="http://www.springframework.org/schema/c" xsi:schemaLocation="http://www.springframework.org/schema/beans http://www.springframework.org/schema/beans/spring-beans.xsd"> 
    
    <bean id="transferService" class="com.packt.patterninspring.chapter4. bankapp.service.TransferServiceImpl" c:accountRepository-ref="accountRepository" c:transferRepository- ref="transferRepository"/> 
    <bean id="accountRepository" class="com.packt.patterninspring.chapter4. bankapp.repository.jdbc.JdbcAccountRepository"/> 
    <bean id="transferRepository" class="com.packt.patterninspring.chapter4. bankapp.repository.jdbc.JdbcTransferRepository"/> 
    
     <!-- more bean definitions go here --> 
    
    </beans> 

让我们看看如何使用 setter 注入来设置这些依赖项。

Using setter injection

使用注入,Spring 还提供了你有两个基本选项作为<property> 元素和 p-namespace 在 Spring 3.0 中引入。 p-namespace 还减少了应用程序中代码的冗长,这是它们之间的唯一区别,您可以选择任何一个。让我们使用 setter 注入来注入协作 bean,如下所示:

    <bean id="transferService" class="com.packt.patterninspring.chapter4. bankapp.service.TransferServiceImpl"> 
     <property name="accountRepository" ref="accountRepository"/> 
     <property name="transferRepository" ref="transferRepository"/> 
    </bean> 
    <bean id="accountRepository" class="com.packt.patterninspring.chapter4. bankapp.repository.jdbc.JdbcAccountRepository"/> 
    <bean id="transferRepository" class="com.packt.patterninspring.chapter4. bankapp.repository.jdbc.JdbcTransferRepository"/> 

上述配置中,TransferService<bean>元素有两个<property> ; 元素,告诉它将对 ID 为 accountRepositorytransferRepository 的 bean 的引用传递给 setter 方法TransferServiceImpl,如下:

    package com.packt.patterninspring.chapter4.bankapp.service; 
 
    import com.packt.patterninspring.chapter4.bankapp.model.Account; 
    import com.packt.patterninspring.chapter4.bankapp.model.Amount; 
    import com.packt.patterninspring.chapter4.bankapp.
     repository.AccountRepository; 
    import com.packt.patterninspring.chapter4.bankapp.
     repository.TransferRepository; 
 
    public class TransferServiceImpl implements TransferService { 
      AccountRepository accountRepository; 
      TransferRepository transferRepository; 
    
      public void setAccountRepository(AccountRepository   
      accountRepository) { 
        this.accountRepository = accountRepository; 
      } 
      public void setTransferRepository(TransferRepository 
      transferRepository) { 
         this.transferRepository = transferRepository; 
      } 
      @Override 
      public void transferAmmount(Long a, Long b, Amount amount) { 
        Account accountA = accountRepository.findByAccountId(a); 
        Account accountB = accountRepository.findByAccountId(b); 
        transferRepository.transfer(accountA, accountB, amount); 
      } 
    } 

在前面的文件中,如果你使用这个 Spring bean 没有 setter 方法,属性 accountRepositorytransferRepository 将被初始化为 null 而没有注入依赖。

从 Spring 3.0 开始,p-namespace 也有类似的在 XML 中表达属性的更简洁的方式。为了使用这个命名空间,我们必须在 XML 文件中添加它的模式,如下所示:

    <?xml version="1.0" encoding="UTF-8"?> 
    <beans xmlns="http://www.springframework.org/schema/beans" xmlns:xsi="http://www.w3.org/2001/XMLSchema-instance" xmlns:p="http://www.springframework.org/schema/p" xsi:schemaLocation="http://www.springframework.org/schema/beans http://www.springframework.org/schema/beans/spring-beans.xsd"> 
    
    <bean id="transferService" class="com.packt.patterninspring.chapter4.bankapp. service.TransferServiceImpl" p:accountRepository-ref="accountRepository" p:transferRepository- ref="transferRepository"/> 
    <bean id="accountRepository" class="com.packt.patterninspring.chapter4. bankapp.repository.jdbc.JdbcAccountRepository"/> 
    <bean id="transferRepository" class="com.packt.patterninspring.chapter4. bankapp.repository.jdbc.JdbcTransferRepository"/> 
    
    <!-- more bean definitions go here --> 
    
    </beans> 

现在让我们看一下基于注解配置的依赖注入模式。

Dependency injection pattern with Annotation-based configuration


如前两节所述,我们定义了具有基于Java和XML的配置的DI模式,以及这两个选项明确定义依赖关系。它通过使用 AppConfig Java 文件中的 @Bean 注释方法或 <bean> 元素标记。通过这些方法,您还可以为应用程序外部的那些类创建bean,即存在于应用程序中的类第三方库。现在让我们讨论另一种创建 Spring bean 的方法,并通过 Stereotype 注释使用隐式配置来定义它们之间的依赖关系。

What are Stereotype annotations?

Spring Framework 为您提供了一些 特殊注释。这些注解用于在应用程序上下文中自动创建 Spring bean。主要的原型注解是@Component。通过使用这个注解,Spring 提供了更多的 Stereotype 元注解如 @Service,用于创建 Spring Service 层的 bean,@Repository,用于为 DAO 层的存储库创建 Spring bean,以及 @Controller,用于在控制器层创建Spring bean。如下图所示:

读书笔记《building-microservices-with-spring》使用依赖项注入模式连接Bean

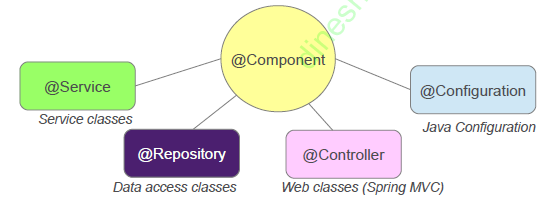
通过使用这些注解,Spring 通过以下两种方式创建 automatic 连接:

  • Component scanning: In this, Spring automatically searches the beans to be created in the Spring IoC container
  • Autowiring: In this, Spring automatically searches the bean dependencies in the Spring IoC container

隐式地,DI 模式配置减少了应用程序的详细程度,并最大限度地减少了显式配置。让我们在前面讨论的相同示例中演示组件扫描和自动装配。在这里,Spring 将为 TransferServiceTransferRepositoryAccountRepository 创建 bean通过发现它们,并根据定义的依赖关系自动将它们相互注入。

Creating auto searchable beans using Stereotype annotations

让我们看看下面的 TransferService 接口。它的实现@Component注释。请参考以下代码:

    package com.packt.patterninspring.chapter4.bankapp.service; 
    public interface TransferService { 
      void transferAmmount(Long a, Long b, Amount amount); 
    } 

前面的接口对于这种配置方法并不重要——我只是将它用于应用程序中的松散耦合。我们来看看它的实现,如下:

    package com.packt.patterninspring.chapter1.bankapp.service; 
    import org.springframework.stereotype.Component; 
    @Component 
    public class TransferServiceImpl implements TransferService { 
      @Override 
      public void transferAmmount(Long a, Long b, Amount amount) { 
         //business code here 
      } 
   } 

您可以在前面的代码中看到 TransferServiceImpl 使用 @Component 注解进行注解。该注解用于将这个类标识为一个组件类,也就是说,它有资格扫描和创建这个类的一个bean。现在无需使用 XML 或 Java 配置将此类显式配置为 bean——Spring 现在负责创建 TransferServiceImpl 类的 bean,因为它是用 @Component 注释。

如前所述,Spring 为我们提供了 @Component 注解的元注解为 @Service, @Repository@Controller。这些注释基于应用程序不同层的特定职责。这里,TransferService是服务层类; 作为 Spring 配置的最佳实践,我们必须用特定的注解来注解这个类,@Service ,而不是使用通用注解 @Component 来创建此类的 bean。以下是使用 @Service 注释注释的同一类的代码:

    package com.packt.patterninspring.chapter1.bankapp.service; 
    import org.springframework.stereotype.Service; 
    @Service 
    public class TransferServiceImpl implements TransferService { 
      @Override 
      public void transferAmmount(Long a, Long b, Amount amount) { 
         //business code here 
      } 
    } 

让我们看看应用程序中的其他类——这些是 AccountRepositoryimplementation 类——以及 TransferRepository 接口是在应用程序的 DAO 层工作的存储库。 作为最佳实践这些类应该用@Repository 注释而不是使用 @Component 注释,如下所示。

JdbcAccountRepository.java 实现了 AccountRepository 接口:

    package com.packt.patterninspring.chapter4.bankapp.repository.jdbc; 
    import org.springframework.stereotype.Repository; 
    import com.packt.patterninspring.chapter4.bankapp.model.Account; 
    import com.packt.patterninspring.chapter4.bankapp.model.Amount; 
    import com.packt.patterninspring.chapter4.bankapp.repository.
      AccountRepository; 
    @Repository 
    public class JdbcAccountRepository implements AccountRepository { 
      @Override 
      public Account findByAccountId(Long accountId) { 
        return new Account(accountId, "Arnav Rajput", new   
        Amount(3000.0)); 
      } 
    } 

JdbcTransferRepository.java 实现了 TransferRepository 接口:

    package com.packt.patterninspring.chapter4.bankapp.repository.jdbc; 
    import org.springframework.stereotype.Repository; 
    import com.packt.patterninspring.chapter4.bankapp.model.Account; 
    import com.packt.patterninspring.chapter4.bankapp.model.Amount; 
    import com.packt.patterninspring.chapter4.bankapp.
      repository.TransferRepository; 
    @Repository 
    public class JdbcTransferRepository implements TransferRepository { 
      @Override 
      public void transfer(Account accountA, Account accountB, Amount 
      amount) { 
        System.out.println("Transfering amount from account A to B via 
        JDBC implementation"); 
      } 
    } 

在 Spring 中,您必须在应用程序中启用组件扫描,因为默认情况下未启用它。您必须创建一个配置 Java 文件,并使用 @Configuration@ComponentScan 对其进行注释。此类用于搜索带有 @Component 注释的类,并从中创建 bean。

让我们看看 Spring 如何扫描带有任何原型注解的类。

Searching beans using component scanning

在 Spring 应用程序中使用组件扫描搜索 bean 需要以下最低 配置

    package com.packt.patterninspring.chapter4.bankapp.config; 
 
    import org.springframework.context.annotation.ComponentScan; 
    import org.springframework.context.annotation.Configuration; 
 
    @Configuration 
    @ComponentScan 
    public class AppConfig { 
    
    } 

AppConfig 类定义了一个 Spring 连接配置类,与上一节中基于 Java 的 Spring 配置相同。这里需要注意一件事 - AppConfig 文件还有一个 @ComponentScan,因为之前它只有 < code class="literal">@Configuration 注释。配置文件 AppConfig 使用 @ComponentScan 进行注释,以便在 Spring 中启用组件扫描。 @ComponentScan 注解会扫描那些在与配置类相同的包中默认使用 @Component 注解的类。由于 AppConfig 类在 com.packt.patterninspring.chapter4.bankapp.config 包中,Spring 将只扫描这个包及其子包。但是我们的组件应用程序类在 com.packt.patterninspring.chapter1.bankapp.servicecom.packt.patterninspring.chapter4.bankapp。 repository.jdbc 包,这些不是 com.packt.patterninspring.chapter4.bankapp.config 的子包。在这种情况下,Spring 允许通过设置组件扫描的基本包来覆盖 @ComponentScan 注释的默认包扫描。让我们指定一个不同的基础包。只需要在@ComponentScanvalue属性中指定包,如下图:

    @Configuration 
    @ComponentScan("com.packt.patterninspring.chapter4.bankapp") 
    public class AppConfig { 
    
    } 

或者您可以使用 basePackages 属性定义基本包,如下所示:

    @Configuration 
    @ComponentScan(basePackages="com.packt.patterninspring.
    chapter4.bankapp") 
    public class AppConfig { 
    
    } 

@ComponentScan注解中,basePackages属性可以接受一个字符串数组,也就是说我们可以定义多个基础包来扫描应用程序中的组件类。在之前的配置文件中,Spring会扫描com.packt.patterninspring.chapter4.bankapp包的所有类,以及这个包下的所有子包。 作为最佳实践,始终定义组件类所在的特定基础包。例如,在以下代码中,我为服务和存储库组件定义了基础包:

    package com.packt.patterninspring.chapter4.bankapp.config; 
    import org.springframework.context.annotation.ComponentScan; 
    import org.springframework.context.annotation.Configuration; 
    @Configuration 
    @ComponentScan(basePackages=       
    {"com.packt.patterninspring.chapter4.
    bankapp.repository.jdbc","com.packt.patterninspring.
    chapter4.bankapp.service"}) 
    public class AppConfig { 
    
    } 

现在 Spring 只扫描 com.packt.patterninspring.chapter4.bankapp.repository.jdbccom.packt.patterninspring.chapter4.bankapp.service 包 及其子包(如果存在)。而不是像前面的例子那样进行大范围扫描。

Spring 允许您通过类或接口如下:

    package com.packt.patterninspring.chapter4.bankapp.config; 
    import org.springframework.context.annotation.ComponentScan; 
    import org.springframework.context.annotation.Configuration; 
    import com.packt.patterninspring.chapter4.bankapp.
     repository.AccountRepository; 
    import com.packt.patterninspring.chapter4.
     bankapp.service.TransferService; 
    @Configuration 
    @ComponentScan(basePackageClasses=   
    {TransferService.class,AccountRepository.class}) 
    public class AppConfig { 
 
    } 

正如您在前面的代码中看到的,basePackages 属性已被替换为 basePackageClasses。现在 Spring 将识别那些包中的组件类,其中 basePackageClasses 将用作组件扫描的基本包。

它应该找到 TransferServiceImplJdbcAccountRepositoryJdbcTransferRepository 类,并自动在 Spring 容器中为这些类创建 bean。明确地说,不需要为这些类定义 bean 方法来创建 Spring bean。让我们通过 XML 配置打开组件扫描,然后您可以使用 Spring 的上下文命名空间中的 <context:component-scan> 元素。这是启用组件扫描的最小 XML 配置:

    <?xml version="1.0" encoding="UTF-8"?> 
    <beans xmlns="http://www.springframework.org/schema/beans" xmlns:xsi="http://www.w3.org/2001/XMLSchema-instance" xmlns:context="http://www.springframework.org/schema/context" xsi:schemaLocation="http://www.springframework.org/schema/beans http://www.springframework.org/schema/beans/spring-beans.xsd http://www.springframework.org/schema/context http://www.springframework.org/schema/context/spring-context.xsd"> 
    <context:component-scan base- package="com.packt.patterninspring.chapter4.bankapp" /> 
    </beans> 

在前面的 XML 文件中,<context:component-scan> 元素与 Java 中的 @ComponentScan 注释相同-基于配置的组件扫描。

Annotating beans for autowiring

Spring 提供对自动 bean 连接的支持。这意味着 Spring 通过在应用程序上下文中查找其他协作 bean 来自动解决依赖 bean 所需的依赖关系。 Bean Autowiring 是另一种 DI 模式配置方式。它减少了应用程序的冗长,但 configuration 分布在整个应用程序中。 Spring 的 @Autowired 注释用于自动 bean 连接。这个 @Autowired 注释表明应该为此 bean 执行自动装配。

在我们的示例中,我们有 TransferService,它具有 AccountRepositoryTransferRepository 的依赖项.它的构造函数用 @Autowired 注释,表明当 Spring 创建 TransferService bean 时,它应该使用其带注释的构造函数实例化该 bean ,并传入另外两个 bean,AccountRepositoryTransferRepository,它们是 TransferService 的依赖项 豆。让我们看看下面的代码:

    package com.packt.patterninspring.chapter4.bankapp.service; 
    import org.springframework.beans.factory.annotation.Autowired; 
    import org.springframework.stereotype.Service; 
    import com.packt.patterninspring.chapter4.bankapp.model.Account; 
    import com.packt.patterninspring.chapter4.bankapp.model.Amount; 
    import com.packt.patterninspring.chapter4.bankapp.
     repository.AccountRepository; 
    importcom.packt.patterninspring.chapter4.
     bankapp.repository.TransferRepository; 
    @Service 
    public class TransferServiceImpl implements TransferService { 
      AccountRepository accountRepository; 
      TransferRepository transferRepository; 
    @Autowired 
    public TransferServiceImpl(AccountRepository accountRepository, 
    TransferRepository transferRepository) { 
      super(); 
      this.accountRepository = accountRepository; 
      this.transferRepository = transferRepository; 
    } 
    @Override 
    public void transferAmmount(Long a, Long b, Amount amount) { 
      Account accountA = accountRepository.findByAccountId(a); 
      Account accountB = accountRepository.findByAccountId(b); 
      transferRepository.transfer(accountA, accountB, amount); 
    } 
   } 

Note

注意——从 Spring 4.3 开始,如果您在该类中仅定义一个带有参数的构造,则不再需要 @Autowired 注释。如果类有多个参数构造函数,那么您必须在其中任何一个上使用 @Autowired 注释。

@Autowired 注解不限于构造;可以配合setter方法使用,也可以直接在字段中使用,即直接一个autowired类属性。让我们看看下面这行设置器和字段注入的代码。

Using @Autowired with setter method

在这里,您可以使用 @Autowired 注释 setter 方法的 setAccountRepositorysetTransferRepository注解。此注解可以与 any 方法一起使用。没有特别的理由仅将它与 setter 方法一起使用。请参考以下代码:

    public class TransferServiceImpl implements TransferService { 
      //... 
      @Autowired 
      public void setAccountRepository(AccountRepository  
      accountRepository) { 
        this.accountRepository = accountRepository; 
      } 
      @Autowired 
      public void setTransferRepository(TransferRepository 
      transferRepository) { 
        this.transferRepository = transferRepository; 
      } 
      //... 
    } 
Using @Autowired with the fields

在这里,您可以注释这些类实现业务目标所需的 class 属性。让我们看看下面的代码:

    public class TransferServiceImpl implements TransferService { 
      @Autowired 
      AccountRepository accountRepository; 
      @Autowired 
      TransferRepository transferRepository; 
      //... 
    } 

在前面的代码中,@Autowired 注解通过 type 解析依赖,然后通过 name 如果属性名称与 Spring 容器中的 bean 名称相同。默认情况下,@Autowired 依赖项是必需的依赖项——如果依赖项未解析,它会引发异常,无论我们是否将它与构造函数一起使用或使用 setter 方法。您可以使用此注释的 required 属性覆盖 @Autowired 注释的必需行为。您可以使用布尔值 false 设置此属性,如下所示:

    @Autowired(required = false) 
    public void setAccountRepository(AccountRepository
    accountRepository) { 
      this.accountRepository = accountRepository; 
    }  

在前面的代码中,我们将 required 属性设置为布尔值 false。在这种情况下,Spring 将尝试执行自动装配,但如果没有匹配的 bean,它将使 bean 不连线。但作为代码的最佳实践,您应该避免将其值设置为 false,直到绝对必要为止。

The Autowiring DI pattern and disambiguation

@Autowiring 注释减少了代码中的 verbosity,但它可能会创建当容器中存在两个相同类型的 bean 时会出现一些问题。让我们看看在这种情况下会发生什么,用下面的例子:

    @Service 
    public class TransferServiceImpl implements TransferService { 
    @Autowired 
    public TransferServiceImpl(AccountRepository accountRepository) { 
    ... } 
    } 

前面的代码片段显示 TransferServiceImpl 类具有与 AccountRepository 类型的 bean 的依赖关系,但 Spring 容器包含两个相同类型的bean,即以下:

    @Repository 
    public class JdbcAccountRepository implements AccountRepository 
    {..} 
   @Repository 
   public class JpaAccountRepository implements AccountRepository {..} 

从上面的代码可以看出,AccountRepository接口的实现有两种——一种是JdbcAccountRepository,一种是JpaAccountRepository。在这种情况下,Spring 容器会在应用程序启动时抛出以下异常:

    At startup: NoSuchBeanDefinitionException, no unique bean of type 
    [AccountRepository] is defined: expected single bean but found 2... 

Resolving disambiguation in Autowiring DI pattern

Spring 提供了另外一个注解,@Qualifier,以克服自动装配 DI 中的歧义问题。让我们看看下面的 snippet 带有 @Qualifier 注释的代码:

    @Service 
    public class TransferServiceImpl implements TransferService { 
    @Autowired 
    public TransferServiceImpl( @Qualifier("jdbcAccountRepository")
    AccountRepository accountRepository) { ... } 

现在,我使用 @Qualifier 注释按名称而不是按类型连接依赖项。因此,Spring 将在名为 "jdbcAccountRepository" 的 bean 依赖项中搜索 TransferServiceImpl 类。我给豆子的名字如下:

    @Repository("jdbcAccountRepository") 
    public class JdbcAccountRepository implements AccountRepository 
    {..} 
    @Repository("jpaAccountRepository") 
    public class JpaAccountRepository implements AccountRepository {..} 

@Qualifier,也可用于方法注入和字段注入组件名称,除非有相同接口的两个实现,否则不应显示实现细节。

现在让我们讨论一些为您的 Spring 应用程序选择 DI 模式配置的最佳实践。

使用抽象工厂模式解决依赖关系

如果要为 bean 添加 if...else 条件配置,您可以这样做,如果您使用 Java 配置,还可以添加一些自定义逻辑。但在 XML 配置的 case 中,无法添加 if。 ..then...else 条件。 Spring 通过使用抽象工厂模式为 XML 配置中的条件提供了解决方案。使用工厂创建所需的 bean,并使用工厂内部逻辑中所需的任何复杂 Java 代码。

Implementing the Abstract Factory Pattern in Spring (FactoryBean interface)

Spring 框架提供了 FactoryBean 接口作为抽象工厂模式的实现。 FactoryBean 是一种将有趣的 object 构造逻辑封装在类中的模式. FactoryBean 接口提供了一种自定义 Spring IoC 容器的实例化逻辑的方法。您可以为本身是工厂的对象实现此接口。自动检测实现 FactoryBean 的 Bean。

该接口的定义如下:

    public interface FactoryBean<T> { 
     T getObject() throws Exception; 
     Class<T> getObjectType(); 
     boolean isSingleton(); 
   } 

根据前面对该接口的定义,使用 FactoryBean 的依赖注入会导致 getObject() 被透明地调用。 isSingleton() 方法为单例返回 true,否则返回 false . getObjectType() 方法返回 getObject() 方法返回的对象的对象类型。

Implementation of FactoryBean interface in Spring

FactoryBean 在 Spring 中被广泛使用 如下:

  • EmbeddedDatabaseFactoryBean
  • JndiObjectFactoryBean
  • LocalContainerEntityManagerFactoryBean
  • DateTimeFormatterFactoryBean
  • ProxyFactoryBean
  • TransactionProxyFactoryBean
  • MethodInvokingFactoryBean
Sample implementation of FactoryBean interface

假设您有一个 TransferService 定义如下:

    package com.packt.patterninspring.chapter4.bankapp.service; 
    import com.packt.patterninspring.chapter4.
     bankapp.repository.IAccountRepository; 
    public class TransferService { 
      IAccountRepository accountRepository; 
      public TransferService(IAccountRepository accountRepository){ 
        this.accountRepository = accountRepository; 
      } 
      public void transfer(String accountA, String accountB, Double 
      amount){ 
        System.out.println("Amount has been tranferred"); 
      } 
    } 

你有一个 FactoryBean ,它的定义是这样的:

    package com.packt.patterninspring.chapter4.bankapp.repository; 
    import org.springframework.beans.factory.FactoryBean; 
    public class AccountRepositoryFactoryBean implements 
    FactoryBean<IAccountRepository> { 
      @Override 
      public IAccountRepository getObject() throws Exception { 
        return new AccountRepository(); 
      } 
      @Override 
      public Class<?> getObjectType() { 
        return IAccountRepository.class; 
      } 
      @Override 
      public boolean isSingleton() { 
        return false; 
      } 
    }  

您可以像这样使用假设的 AccountRepositoryFactoryBean 连接一个 AccountRepository 实例:

    <?xml version="1.0" encoding="UTF-8"?> 
    <beans xmlns="http://www.springframework.org/schema/beans" xmlns:xsi="http://www.w3.org/2001/XMLSchema-instance" xmlns:c="http://www.springframework.org/schema/c" xsi:schemaLocation="http://www.springframework.org/schema/beans http://www.springframework.org/schema/beans/spring-beans.xsd"> 
    
    <bean id="transferService" class="com.packt.patterninspring. chapter4.bankapp.service.TransferService"> 
     <constructor-arg ref="accountRepository"/> 
    </bean> 
    <bean id="accountRepository" class="com.packt.patterninspring.chapter4. bankapp.repository.AccountRepositoryFactoryBean"/> 
    </beans> 

在前面的示例中,TransferService 类依赖于 AccountRepository bean,但在 XML 文件中,我们定义了 AccountRepositoryFactoryBean 作为 accountRepository bean。 AccountRepositoryFactoryBean 类实现了 Spring 的 FactoryBean 接口。 FactoryBeangetObject 方法的结果将被传递,而不是实际的 FactoryBean< /code> 本身。 Spring 注入 FactoryBeangetObjectType() 方法返回的对象,以及 FactoryBeangetObjectType();这个 bean 的范围由 FactoryBeanisSingleton() 方法决定。

以下是 Java Configuration 中 FactoryBean 接口的相同配置:

    package com.packt.patterninspring.chapter4.bankapp.config; 
    import org.springframework.context.annotation.Bean; 
    import org.springframework.context.annotation.Configuration; 
    import com.packt.patterninspring.chapter4.bankapp.
     repository.AccountRepositoryFactoryBean; 
    import com.packt.patterninspring.chapter4.
     bankapp.service.TransferService; 
    @Configuration 
    public class AppConfig { 
      public TransferService transferService() throws Exception{ 
        return new TransferService(accountRepository().getObject()); 
      } 
    @Bean 
    public AccountRepositoryFactoryBean accountRepository(){ 
      return new AccountRepositoryFactoryBean(); 
    } 
    } 

与 Spring 容器中的其他普通 bean 一样,Spring FactoryBean 也具有任何其他 Spring bean 的所有其他特性,包括 Spring 容器中所有 bean 的生命周期钩子和服务请享用。

Best practices for configuring the DI pattern


以下是配置 DI 模式的最佳实践

  • Configuration files should be separated categorically. Application beans should be separate from infrastructure beans. Currently, it's a bit difficult to follow.
读书笔记《building-microservices-with-spring》使用依赖项注入模式连接Bean
  • Always specify the component name; never rely on generated names by the container.
  • It is a best practice to give a name along with a description of what the pattern does, where to apply it, and the problems it addresses.
  • The best practices for component scanning are as follows:
    • The components are scanned at startup, and it scans the JAR dependencies as well.
    • Bad practice: It scans all the packages of com and org. It increases the startup time of the application. Avoid such type of component scanning:
                @ComponenttScan (( {{ "org", "com" }} ))
    • Optimized: It scans only the specific packages as defined by us.
                 @ComponentScan ( {  
                  "com.packt.patterninspring.chapter4.
                  bankapp.repository", 
                 "com.packt.patterninspring.chapter4.bankapp.service"} 
                  ) 
  • Best practices in choosing implicit configuration:
    • Choose annotation-based configurations for frequently changing beans
    • It allows for very rapid development
    • It is a single place to edit the configuration
  • Best practices in choosing explicit via Java configuration:
    • It is centralized in one place
    • Strong type checking enforced by the compiler
    • Can be used for all classes
  • Spring XML Best Practices: XML has been around for a long time, there are many shortcuts and useful techniques available in XML configuration as well, they are listed follow:
    • factory-method and factory-bean attributes
    • Bean Definition Inheritance
    • Inner Beans
    • p and c namespaces
    • Using collections as Spring beans

Summary


阅读本章后,您现在应该对 DI 设计模式以及应用这些模式的最佳实践有了一个很好的了解。 Spring 处理管道部分,因此,您可以通过使用依赖注入模式专注于解决域问题。 DI 模式将对象从解决其依赖关系的负担中解放出来。你的对象得到了它工作所需的一切。 DI 模式简化了您的代码,提高了代码的可重用性和可测试性。它促进了对接口的编程,并隐藏了依赖项的实现细节。 DI 模式允许集中控制对象的生命周期。您可以通过两种方式配置 DI——显式配置和隐式配置。显式配置可以通过基于 XML 或 Java 的配置进行配置;它提供集中配置。但是隐式配置是基于注解的。 Spring 为基于注解的配置提供了原型注解。这种配置减少了应用程序中代码的冗长,但它分散在应用程序文件中。