读书笔记《developing-java-applications-with-spring-and-spring-boot-ebook》带有Spring Boot的WebSockets
地狱啊@springboot 摇滚! (在获得 2016 年 JAX 创新奖之后)
– Andrew Rubalcaba @Han_Cholo
在上一章中,我们学习了如何将应用程序拆分为由限界上下文驱动的微服务。然而,我们仍然使用 Spring Cloud 以有效的方式将事物连接在一起。
在构建社交媒体平台方面,标准已经制定得非常高。我们都希望对我们查看的任何内容进行动态更新。如果有人对我们也在查看的主题发表评论,我们希望立即收到更新提醒。通过 WebSockets 的力量可以实现这种流畅的变化。
在本章中,我们将介绍以下主题:
- Publishing saved comments to a chat service
- Broadcasting saved comments to web subscribers
- Configuring a WebSocket broker
- Consuming messages from the web asynchronously
- Introducing user chatting with channel-wide and user-specific messages
我们将使用 WebFlux 中的 Spring 的响应式 WebSocket API,同时在我们的模板中使用一些 JavaScript。
在上一章中,我们通过 Spring Cloud Stream 将 images 服务连接到 comments 服务。这让我们可以通过网络将新的comments 传输到专门用于存储 它们在 MongoDB 数据存储中。
以下屏幕截图显示我们输入新评论:
继续这个用例到它自然的结论,我们希望在存储一条消息之后,我们想与大家分享它,对吧?为此,让我们使用 comment 微服务的 CommentService。
在上一章中,comments 服务将传入的 Flux<Comment> 流转换为 Flux<Void>,虚空流。从本质上讲,这具有在此时丢弃流的效果。在本章中,我们希望接收传入的评论流并转发它们。
这是通过改变 Comment.save() 操作来实现的,如下所示:
除了以下更改外,之前的代码几乎与我们之前的代码相同:
- The last step of the map operation now returns
commentinstead ofMono.empty() - The method now has a return type of
Flux<Comment>
通过这个调整,来自 save() 的返回结果通过 Source.OUTPUT 通道传输。
我们存储在配置服务器上的 comments.yml 属性文件需要升级如下:
前面的代码与上一章基本相同,但有以下内容:
spring.cloud.stream.bindings.inputand its properties are the same as beforespring.cloud.stream.bindings.output.destinationpoints to a different exchange to avoid colliding with the one feeding messages into this servicespring.cloud.stream.bindings.output.groupprovides a logical grouping to ensure proper handling if we ever scale up to more than one instance ofcommentsservicespring.cloud.stream.bindings.output.content-typeis markedapplication/json, indicating we don't expect the consumer to use the same domain class, but will probably deserialize into their own POJO instead
通过所有这些更改,我们的 comments 微服务已准备好将保存的评论传输给能够广播给用户的其他人。将它们 back 发送到 images 服务可能很诱人。但是,让我们继续保持狭窄范围的概念,并将此流量发送到不同的、以聊天为中心的微服务。我们甚至可以将其称为 chat 服务!
如果我们访问 http://start.spring.io,选择 Gradle、Spring Boot 2.0、Eureka 发现、配置客户端、 Stream Rabbit、Lombok 和 Reactive Web ,我们将准备好一个不错的小服务来聊天:
spring-boot-starter-webflux: This comes with a Reactive Streams capable WebSocket APIlombok: This is the library that gets us out of the business of coding getters, setters, and other boilerplate Java codespring-cloud-starter-stream-rabbit: This is the Spring Cloud Stream library that uses RabbitMQ as the underlying technologyspring-cloud-stream-reactive: This layers on Reactive Streams supportspring-cloud-starter-eureka: This makes the microservice capable of registering itself with our Eureka Server and of consuming other Eureka-based servicesspring-cloud-starter-config: This lets the microservice get its configuration details from the Config Server
查看构建文件的 rest 没有什么价值,因为它与我们的其他微服务相同。
有了这些依赖关系,唯一的 事物 需要制作这个又一个微服务™ 是为了塑造我们的 Spring Boot public static void main 像这样:
最后一段代码可以很简单地描述:
@SpringCloudAppplicationis a@SpringBootApplicationcombined with a Eureka Discovery, and with circuit breaker enabled
我们很接近。在本书的早期,我们会将所需的设置放在 application.yml(或 application.properties)中,但由于我们有采用 Spring Cloud Config Server,我们需要创建以下 bootstrap.yml 文件:
这个 bootstrap.yml 文件现在将我们的应用程序标识为 Eureka 的 chat 微服务,并将导致它向 Config Server 请求chat.yml 在启动时。
为了支持这一点,我们需要将以下内容添加到我们的 配置服务器的 Git 仓库:
哇!这是很多设置。让我们把它们分开:
server.portshows this service will listen on port8200. (Why not?)spring.cloud.stream.bindings.inputcontains the exact same settings we saw earlier in the commentsspring.cloud.stream.bindings.outputsettings. This ensures that the two are talking to each other.- We also have
spring.cloud.stream.bindings.newComments,.clientToBroker, and.brokerToClient. This part is a little complex, so let's discuss what happens.
重要的是要理解消息流。到目前为止,我们已经看到从网站发送到 comments 服务的消息,存储到 MongoDB 数据库中,然后转发到我们的 chat
服务。
此时,我们正在尝试 将这些消息转入WebSockets。但是,这是什么意思? WebSocket 是网页和服务器之间的一个非常轻量级的双向通道。 WebSockets 本身并没有对通过这个细管道传输的内容做出太多规定,但可以肯定的是——每个网页在连接到服务器时都有一个单独的 <强>会话。
Spring WebFlux 提供了一个 API,让我们可以 hook 进入这个面向 WebSocket 的会话,无论是发送还是接收。但是没有 WebSocket 会话会立即链接到另一个 WebSocket 会话。如果我们使用 Spring Framework 4 的 WebSocket API,我们将利用其最复杂的消息传递 API。此 API 诞生于 Spring Integration,与 Spring Cloud Streams 中的概念相同。 Spring MVC 带有一个内置的代理来帮助桥接不同会话之间的消息。本质上,源自一个 WebSocket 会话的消息必须传输到代理,然后它可以转发到任何可能的 other WebSocket 会话感兴趣的。
使用 Spring WebFlux,我们没有这样的消息传递 API,没有这样的代理,也没有更高级别的构造,例如基于用户的消息传递。但这没什么大不了的!我们可以自己设计它——使用我们已经熟悉的 Spring Cloud Stream 工具。
通过本章的其余部分,我们将把这些消息流链接在一起,这将是最优雅的。
使用通过 Spring 发送的 messages Cloud Stream,chat应用需要自己的CommentService:
上述代码可以描述如下:
@Servicemarks this as a Spring bean, picked up automatically when the chat microservice starts@EnableBinding(Sink.class)shows this to be a receiver for Spring Cloud Stream messages- Our service implements
WebSocketHandler, a WebFlux interface that comes with ahandle(WebSocketSession)method (which we'll use shortly) - An Slf4j
Loggeris used to print out traffic passing through
该服务需要消费从 Spring Cloud Stream 发送的消息。但是,这些消息的目的地是不是另一个Spring 云流目的地。相反,我们希望将它们通过管道传输到 WebSocket 会话中。
为此,我们需要从基于 RabbitMQ 的 Flux
down code>,并将它们转发到连接到 WebSocket 会话的 Flux。这就是我们需要另一个 FluxSink 对象的地方:
最后一段代码可以很容易地描述如下:
- We need a Jackson
ObjectMapper, and will get it from Spring's container through constructor injection. - To create a
FluxSinkthat lets us put comments one by one onto aFlux, we useFlux.create(), and let it initialize our sink,webSocketCommentSink. - When it comes to backpressure policy, it's wired to ignore backpressure signals for simplicity's sake. There may be other scenarios where we would select differently.
publish()andautoConnect()kick ourFluxinto action so that it's ready to start transmitting once hooked into the WebSocket session.
我们的想法是将事件直接放到 webSocketCommentSink 上,然后将相应的 flux 连接到 WebSocket API。把它想象成 webSocketCommentSink 作为我们可以附加评论的对象,而 flux 是消费者在另一端拉出它们(消费者订阅后)。
配置了 webSocketCommentSink 后,我们现在可以将其 hook 到 Spring Cloud流Sink,如下:
- The
broadcast()method is marked as a@StreamListenerforSink.INPUT. Messages get deserialized asCommentobjects thanks to theapplication/jsonsetting. - The code checks if our
webSocketCommentSinkis null, indicating whether or not it's been created. - A log message is printed.
- The
Commentis dropped into ourwebSocketSink, which means that it will become available to our correspondingfluxautomatically.
有了这项服务,当有新评论到达时,我们可以期望在 chat 服务的日志中看到以下内容:
最后一步是通过 WebSocket 会话推送此 Flux 注释。还记得我们类顶部的 WebSocketHandler 接口吗?让我们实现它:
这个WebSocketHandler可以这样描述:
- We are handed a
WebSocketSessionwhich has a very simple API - The
Comment-basedFluxis piped into the WebSocket via itssend()method - This
Fluxitself is transformed from a series ofCommentobjects into a series of JSON objects courtesy of Jackson, and then, finally, into a series ofWebSocketMessageobjects
需要指出的是,在 Spring Framework 4 中,大部分这些都是由 Spring 的 WebSocket API 及其消息传递 API 的内部工作处理的。无需将 Java POJO 序列化和反序列化为 JSON 表示。这是由 Spring 的转换器服务开箱即用地提供的。
在 Spring Framework 5 中,在 WebFlux 模块中,WebSocket API 非常简单。将其视为来来往往的消息流。因此,将 Comment 对象链转换为 JSON 编码文本消息的职责至关重要。正如我们刚刚看到的,使用 Reactor 的功能范式,这并不麻烦。
我们已经编写了 CommentService 来实现 Spring 的 WebSocketHandler 接口,也就是说,它是 准备好 通过 WebSocket 传输流量。 next 步骤是挂钩 this 服务进入机器。
我们可以从创建一个 Spring 配置类开始:
这个 Spring 配置类专门用于配置 WebSocket 支持,并使用 @Configuration 注解进行标记,表明它是 Spring bean 定义的来源。
有了这些,我们现在来到注册 WebSocket 功能的核心部分:
前面的一小段代码可以分解如下:
@Beanindicates this entire method is used to construct a Spring bean.- It's a
HandlerMappingbean, Spring's interface for linking routes with handler methods. - The name of the method,
webSocketMapping, indicates this method is about wiring routes for WebSocket message handling. - It asks for a copy of the
CommentServicebean we defined earlier. Since Spring Boot activates component scanning, an instance of that service will be created automatically, thanks to the@Serviceannotation we put on it earlier. - We create a Java
Map, designed for mapping string-based routes ontoWebSocketHandlerobjects, and dub it aurlMap. - We load the map with
/topic/comments.new, and link it with ourCommentService, a class that implements theWebSocketHandlerinterface. - There's the sticky issue of microservices, whereby, our
chatservice runs on a different port from the frontendimageservice. Any modern web browser will deny a web page calling a different port from the original port it was served. To satisfy security restrictions (for now), we must implement a custom Cross-origin Resource Sharing or CORS policy. In this case, we add an Allowed Origin ofhttp://localhost:8080, the address where the frontendimageservice resides. - With both the
urlMapand thecorsConfigurationpolicy, we constructSimpleUrlHandlerMapping. It also needs an order level of10to get viewed ahead of certain other route handlers provided automatically by Spring Boot.
本质上,这个 bean 负责将 WebSocket routes 映射到处理程序,无论是针对客户端到服务器还是服务器- 到客户端的消息传递。到目前为止,我们设计的消息路由是一个 WebSocket 消息,它在创建新评论时在服务器上发起,并推送到所有客户端,以便他们可以收到新评论的提醒。
在 Spring Framework 4 中,有一个基于注解的机制,可以让我们直接在处理程序本身上配置这些路由。但是对于 Spring Framework 5 (WebFlux),我们必须手动配置。考虑到我们在多个微服务之间拆分事物的方式,CORS 对处理也很重要。
下面列出了同一配置类中的另一个关键组件:
前面这个看起来有点无聊的 Spring bean 对 WebSocket 消息传递的基础设施至关重要。它将 Spring 的 DispatcherHandler 连接到 WebSocketHandler,允许将 URI 映射到处理程序方法。
在服务器上配置好所有内容后,就该在客户端中wire 了。因为 JavaScript 有一个 WebSocket API,我们没有使用诸如 Simple(或 Streaming ) 面向文本的消息协议 (STOMP< /span>),我们不需要 任何额外的库。
所以我们可以扩充我们的 Thymeleaf 模板,index.html。需要指出的是,我们的模板在 images 微服务中,而不是我们刚刚创建的 chat 微服务中。在 HTML 的底部添加以下代码块:
前面的代码块可以解释如下:
- The HTML
<script>tag combined withth:inline="javascript"allows Thymeleaf to process it. - To avoid HTML parsing in various browsers as well as our IDE, the entire code is wrapped with
CDATAtags. - To ensure our JavaScript code doesn't litter the global namespace, we have enclosed it in an immediately-invoked function expression (IIFE)
(function() { /* code */ })();. The code inside this block cannot be reached from anywhere outside, and this is a Good Thing™. There is no chance we'll run into anyone else's variables without deliberate action.
重复这一点——我们在 images 微服务中编写任何用于通过 WebSocket 发送和接收消息的 JavaScript。那是因为它是我们 Thymeleaf 模板的来源。要实际发送和接收 WebSocket 消息,它会 connect 到 chat< /strong> 微服务。
最后的代码可以描述如下:
- We start by creating a WebSocket connection at
ws://localhost:8200/topic/comments.new. - With a JavaScript
WebSocketobject assigned to oursocketvariable, we then assign event handlers toonopenandonmessage. - The
onopenhandler is processed when a connection is first opened on the server. In this case, it merely logs that we have connected. - The
onmessagehandler is processed everytime a message is issued from the server. In this case, we log the event'sdata, parse it (assuming it's JSON), construct an HTML LI, and append it to the page's already existing UL based on the comment'simageId.
现在我们准备好在创建评论时从服务器接收异步消息,并在站点上动态显示它们。但是,还有其他需要注意的地方。
还记得在上一章中,我们有一个供用户填写评论的 HTML 表单吗?上一章的控制器响应这样的POST:
redirect:/ 是一个 Spring Web 信号,用于通过 HTTP 重定向在 / 处重新呈现页面。由于我们正在转向基于异步 WebSocket 消息动态更新页面,这不再是最好的方法。
有哪些问题?几个可以列举如下:
- If the comment hasn't been saved (yet), the redirect would re-render the page with no change at all.
- The redirect may cause an update in the midst of handling the new comment's WebSocket message. Based on the race conditions, the comment may not yet be saved, causing it to not appear, and the refresh may miss the asynchronous message, causing the entire comment to not be displayed unless the page is manually refreshed.
- Setting up a WebSocket handler with every new comment isn't efficient.
无论哪种方式,这都不能很好地利用资源,并且可能会引入时间问题。相反,最好将其转换为 AJAX 调用。
为此,我们需要像这样更改 HTML:
我们移除 HTML 表单并用按钮替换它,而不是带有文本输入和 Submit 输入的表单:
- The
<input>contains anidattribute unique to its corresponding image - The
<button>has a similaridattribute
<button> 也有 class="comment",我们将使用<一个 id="id326231925" class="indexterm"> 来查找,并用事件处理程序装饰它以处理点击,如下所示:
最后一段 JavaScript,包含在我们整洁的小 (function(){})() 中,具有以下内容:
document.querySelectorAll('button.comment')uses a native JavaScript query selector to find all the HTML buttons that have the classcomment.- Iterating over each button, an event listener is added, responding to the
clickevents. - When a click is received, it fetches the corresponding comment input.
- Then it fashions an
XMLHttpRequestobject, opening aPOSToperation set for asynchronous communications. - With Thymeleaf's JavaScript support, it will plug in the URL for
@{'/comments'}upon rendering.
- Then it constructs a
FormData, and loads the same fields as the previous chapter as if we had filled out an HTML form on the page. - It transmits the form data over the wire. Since we don't depend on the results, they are ignored.
- Finally, it clears out the comment input's entry box.
为了支持我们 现在 进行 AJAX 调用而不期望重定向这一事实,我们需要对服务器端。
一方面,我们需要将 image 微服务的 CommentController 从基于视图更改为 REST 控制器。在本书的前面部分,它看起来像这样:
@Controller 将其标记为预期返回 HTTP 重定向的 Spring WebFlux 控制器。
要调整 AJAX 调用的内容,请将其更新为如下所示:
通过将 @Controller 替换为 @RestController,我们将此类标记为 Spring WebFlux 控制器,并将结果直接写入 HTTP 响应身体。
有了这些,我们现在可以重写 addComment ,如下所示:
我们改变了什么?以下:
- The return type has switched from
Mono<String>toMono<ResponseEntity<?>>.ResponseEntity<?>is a Spring Web container that holds HTTP response headers, body, and status code. - The logic for forwarding messages to the
commentsservice over aFluxSinkto Spring Cloud Stream is the same as the previous chapter. - The last line of both the
ifand theelseclauses uses the static builder methods ofResponseEntityto generate anHTTP 204 (No Content)response. It indicates success, but no response body is included. Considering the client isn't interested in any content, that's good enough!
让我们检查一下我们的手艺。如果我们 start 启动所有内容(记得先启动配置服务器),然后打开两个单独的浏览器选项卡,我们可以看看效果。
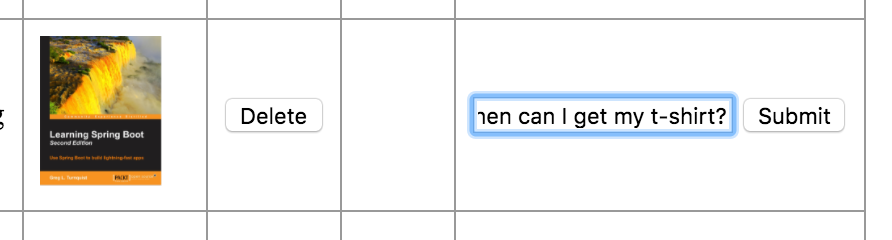
在以下屏幕截图中,一位用户输入了一条新评论(封面不错!):
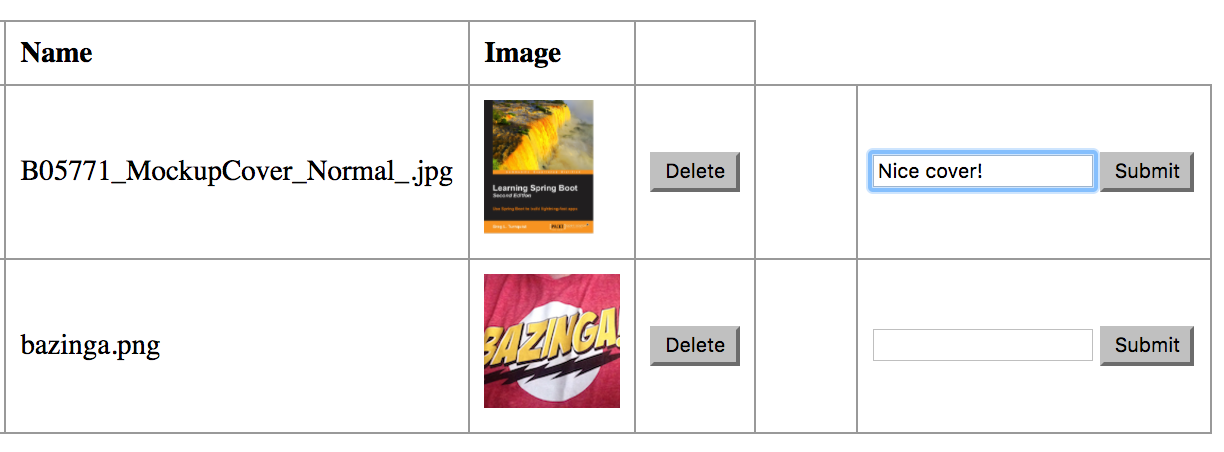
另一个拥有自己浏览器的用户正在查看相同的图像。当第一个用户点击 Submit 时,消息会自动出现在第二个用户的窗口中,如下所示:
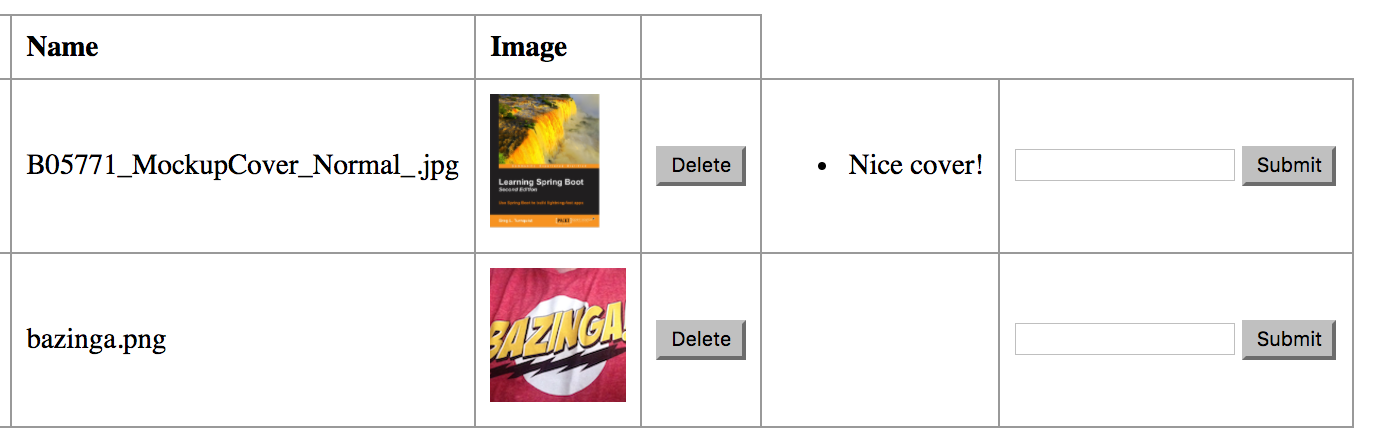
无需重新加载页面,也无需刷新数据并从 comments 服务中提取数据。
我们还可以在第二个用户的浏览器控制台中看到消息活动:

哪个社交媒体平台不提供手段供用户相互交流?在本节中,我们将增强我们的应用程序以允许用户之间的聊天。这是在客户端和服务器之间使用异步 WebSocket 消息传递的另一种方式。
首先,让我们在模板底部添加一个新的 HTML 元素,如下所示:
前面的 HTML 代码位于上传小部件的正下方,用于发送新图片。它包含:
- A simple greeting.
- An HTML
textareafor displaying messages,80columns wide and10rows tall. It is disabled to make it a read-only message output. - A text input for entering new messages.
- A button to submit new messages.
要从文本输入框中发布新消息,我们需要在 JavaScript 中添加另一段代码:
最后一段代码执行以下操作:
- It creates another WebSocket connection, this time to
ws://localhost:8200/app/chatMessage.new(which we'll code further down). - Registers a handler function to be invoked when the
onopenevent of the WebSocket is triggered. - Finds the
chatButton, and registers an event handler for theclickevents. - When clicked, fetches the
chatInputtext input. - Using the WebSocket variable, it sends the value of the
chatInputtext input. NOTE: This is pure text. No JSON encoding needed. - Clears out
chatInput, and switches focus back to it.
这会将原始字符串传输到服务器。这些消息是如何接收的将很快被定义,但是既然我们在这里,为什么不继续编写另一端的代码,即当这些消息从服务器传输到客户端时呢?
Note
您是否对看到 http://localhost:8200 感到紧张?到目前为止,它已经出现在几个地方(随着我们编写更多代码,它会再次出现)。这有点武断,也不适合扩大生产规模,对吧?我们可以将此值填充到 Config Server Git 存储库中,然后编写一些 JavaScript 将其排除,但这听起来有点复杂。而且它仍然不能解决缩放问题。事实上,第 18 章,保护您的应用程序中有一个更简单的解决方案使用 Spring Boot。所以我们现在将坚持使用硬编码的 URL。
要在聊天消息到达时显示它们,请添加以下内容:
前面的代码执行以下操作:
- Creates a third WebSocket connection to
ws://localhost:8200/topic/chatMessage.new - On the WebSocket's
onmessagehandler, registers a function handler to be invoked with every new message - When an event arrives, grabs hold of the
chatDisplay - Appends the message's
datato thechatDisplay, and adds a newline character
Note
对 /app/chatMessage.new 和 /topic/chatMessage.new 路径感到困惑?第一个用于从客户端向我们的服务器端应用程序发送消息,而后者用于从服务器向客户端发送消息。不要求它们以 /app 或 /topic 为前缀。这只是一个约定,用于帮助表示消息的传输位置。
我们刚刚定义了 send 用户消息到 server 以及从服务器 receive 消息的路由。下一步是在我们的服务器端代码中注册这些路由。我们通过像这样更新我们的 WebSocketConfig 类的 webSocketMapping 来做到这一点:
最后一段代码包含很多变化,让我们一一分解:
- Previously, this method only injected
CommentService. Now we also injectInboundChatServiceas well asOutboundChatService. These are two services we must define based on the need to broker WebSocket messages between sessions. (Don't panic! We'll get to that real soon). - We have two new routes added to the
urlMap--/app/chatMessage.newand/topic/chatMessage.new--which we just saw used in the web layer. - These same routes must also be added to our CORS policy.
Note
你对 CORS 政策有点紧张吗?当我们刚刚在前一章中展示了如何不需要管理代码中的硬编码端口时,您是否担心管理硬编码端口?担心在需要保护一切时这意味着什么?别担心,我们将在 第 18 章,使用 Spring Boot 保护您的应用程序。
通过对 chat 微服务的 WebSocketConfig 的调整,我们现在必须配置如何处理传入的 WebSocket 消息。重要的是要意识到,如果我们收到消息的 Flux,然后转身在同一个 WebSocketSession 上广播它们,那么唯一的接收消息的人将是发送消息的人——如果你愿意的话,一个回显服务器。
这就是为什么如果我们想广播这样的消息,我们需要一个代理。 所有客户端必须接收传入的消息,将其中继到代理,然后在另一端接收。
现在,我们在哪里可以找到经纪人?我们已经有一个了!我们一直在使用 Spring Cloud Stream 代表我们通过 RabbitMQ 传输消息。我们也可以对这些消息做同样的事情。
重要的是要记住 Spring Cloud Stream 在通道范式上运行。一切都是通过渠道发送和接收的。到目前为止,我们已经通过使用 Source、Sink 和 Processor
,三个与 output 和 input 配合使用的接口。要处理新的基于评论的消息、客户端到服务器的用户消息和服务器到客户端的用户消息,这两个通道是不够的。
所以,我们需要定义一组新的流。我们可以通过在 chat 微服务中创建自己的接口 ChatServiceStreams 来做到这一点,如下所示:
- Three channel names are defined at the top--
NEW_COMMENTS,CLIENT_TO_BROKER, andBROKER_TO_CLIENT. They each map onto a channel name ofnewComments,clientToBroker, andbrokerToClient. newComments()is defined as an input linked to theNEW_COMMENTSchannel via the@Inputannotation, and has a return type ofSubscribableChannel, meaning, it can be used to consume messages.clientToBroker()is defined as an output linked to theCLIENT_TO_BROKERchannel via the@Outputannotation, and has a return type ofMessageChannel, which means that it can be used to transmit messages.brokerToClient()is defined as an input linked to theBROKER_TO_CLIENTchannel via the@Inputannotation, and also has a return type ofSubscribableChannel, which means it, too, can be used to consume messages.
我们需要这个接口,这样我们就可以开始创建我们之前承诺要构建的 InboundChatService:
前面的服务代码,注册用于处理 /app/chatMessage.new 上的消息,可以描述如下:
@Servicemarks it as a Spring service that should launch automatically thanks to Spring Boot's component scanning.@EnableBinding(ChatServiceStreams.class)signals Spring Cloud Stream to connect this component to its broker-handling machinery.- It implements the
WebSocketHandlerinterface--when a client connects, thehandle(WebSocketSession)method will be invoked. - Instead of using the
@StreamListenerannotation as in the previous code, this class injects aChatServiceStreamsbean (same as the binding annotation) via constructor injection. - To handle a new
WebSocketSession, we grab it and invoke itsreceive()method. This hands us aFluxof potentially endlessWebSocketMessageobjects. These would be the incoming messages sent in by the client that just connected. NOTE: Every client that connects will invoke this method independently. - We map the
Flux<WebSocketMessage>object's stream of payload data into aFlux<String>viagetPayloadAsText(). - From there, we transform each raw message into a formatted message with the WebSocket's session ID prefixing each message.
- Satisfied with our formatting of the message, we
flatMapit onto ourbroadcast()message in order to broadcast it to RabbitMQ. - To hand control to the framework, we put a
then()on the tail of this Reactor flow so Spring can subscribe to thisFlux. - The
broadcastmethod, invoked as every message is pulled down, marshals and transmits the message by first building a Spring Cloud StreamsMessage<String>object. It is pushed out over theChatServiceStreams.clientToBroker()object'sMessageChannelvia thesend()API. To reactorize it, we wrap it withMono.fromRunnable.
哇!那是很多代码!这就是 函数式反应式编程(FRP)。在命令式构造和中间结果上花费的精力并不多。相反,每一步都链接到下一步,形成一个转换流,从一个输入(在本例中为 WebSocketSession)提取数据,并将其引导到 channel 用于代理(ChatServiceStreams.clientToBroker())。
还记得之前我们在配置服务器的 Git 存储库中创建 chat.yml 文件吗?这是关键片段:
它包含 spring.cloud.stream.bindings.clientToBroker 的条目,其中 clientToBroker 匹配 频道名称 我们在 ChatServiceStreams 中设置。它表示通过 clientToBroker 通道传输的消息将放在 RabbitMQ 的 learning-spring-boot-chat-user-messages 交换,并与标记为 app-chatMessages 的其他消息分组。
这样就可以向所有人广播任何基于用户的聊天消息。我们只需要让每个用户都倾听他们的声音!
为此,我们需要创建 other< /span> 我们之前承诺要构建的服务,OutboundChatService:
代码可以描述如下:
- Again, the
@Serviceannotation marks this as an automatically wired Spring service. - It has the same
EnableBinding(ChatServicesStreams.class)as the inbound service, indicating that this, too, will participate with Spring Cloud Streams. - The constructor call wires up another one of those
FluxSinkobjects, this time for aFluxor strings. @StreamListener(ChatServiceStreams.BROKER_TO_CLIENT)indicates that this service will be listening for incoming messages on thebrokerToClientchannel. When it receives one, it will forward it tochatMessageSink.- This class also implements
WebSocketHandler, and each client attaches via thehandle(WebSocketSession)method. It is there that we connect thefluxof incoming messages to theWebSocketSessionvia itssend()method. - Because
WebSocketSession.send()requiresFlux<WebSocketMessage>, we map theFlux<String>into it usingsession::textMessage. Nothing to serialize. - There is a custom log flag when the
Fluxfinished, and another for when the entireFluxis handled.
而已!
使用 InboundChatService 路由单个 messages 从客户端到服务器再到代理,我们是能够获取单个消息并将其广播给所有用户。然后,通过 OutboundChatService 为每个 WebSocket 会话提取消息副本 ,每个用户都可以接收副本。
别忘了,我们还在 Config Server 上为 OutboundChatService 添加了对 chat.yml 的绑定:
还记得我们为订阅 ws://localhost:8200/topic/chatMessage.new 而编写的一小段 JavaScript 吗?它将接收广播消息。
Note
Flux 和 FluxSink——如果你还没有理解,将异步操作与预先建立的 Flux 对象很容易被这种模式处理。我们现在已经看过好几次了。如果异步服务的双方都使用 Flux,则没有必要。但是,如果有东西直接钩住它们,这种机制很容易弥合差距。
InboundChatService 和 OutboundChatService 的名称有些随意。需要注意的重要一点是,一个负责将 WebSocket 消息从客户端通过服务器传输到代理。这些是传入。在跨越代理之后,我们在此阶段将它们描述为 outgoing。命名约定旨在帮助记住什么做什么。 Spring Boot 和 Spring Cloud Stream 都不在乎 这些类的名称。
通过这种增强,我们可以启动并查看它的外观。
在我们的新聊天框的以下屏幕截图中,有一个涉及两个用户的对话:
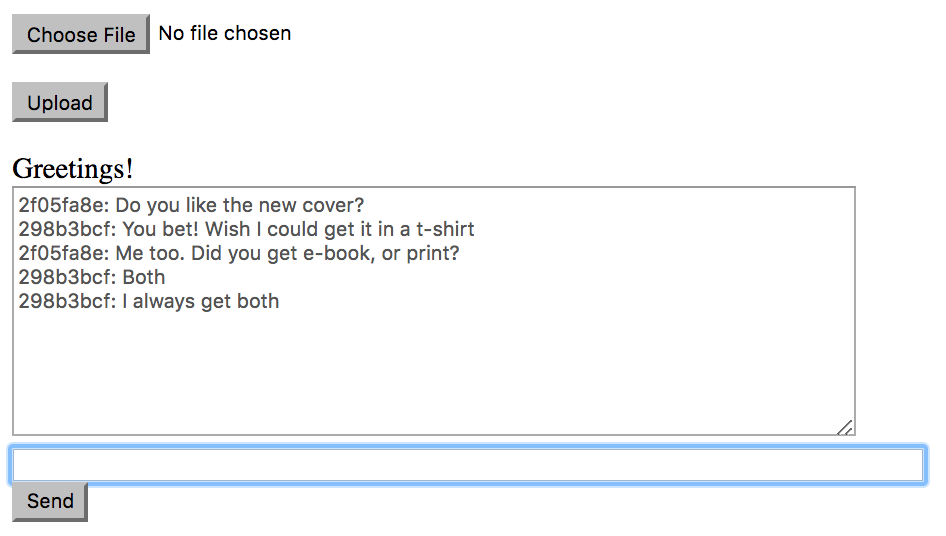
前缀值(2f05fa8e 和 298b3bcf)是纯 WebSocket 会话 ID。与人类用户联系有点棘手,嗯?然而,这种交流是各方所看到的。 (由于双方看到相同的交换,无需显示 both 浏览器选项卡。)
但是,如果我们窥视浏览器的 JavaScript 控制台,我们会得到一个新的见解。以下是用户以 2f05fa8e 作为会话 ID 的屏幕截图:
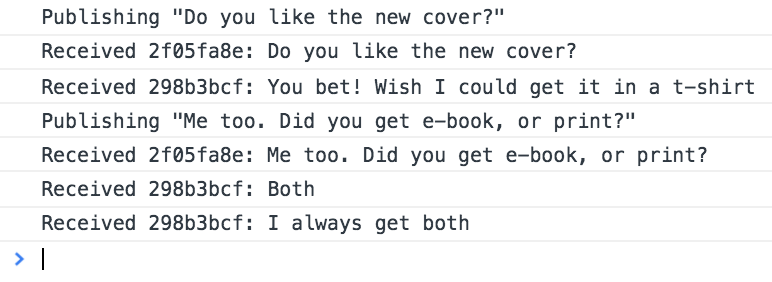
我们可以立即看到第一条消息(你喜欢新封面吗?)正在发布并立即收到。之后,另一个 user 发送一条单独的消息(你打赌!希望我能得到T 恤)。
如果我们检查其他用户的 JavaScript 控制台,我们可以看到对话的另一面:
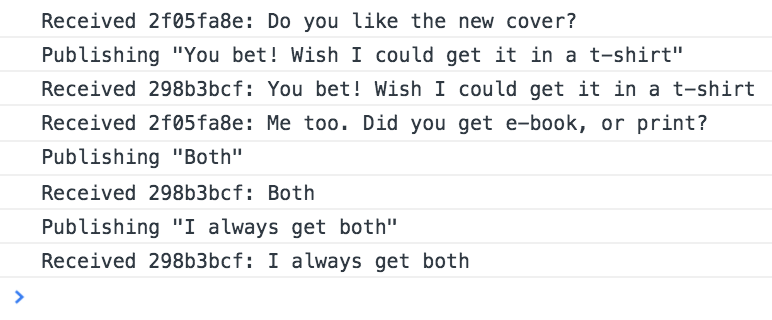
第一条消息来自第一个用户(你喜欢新封面吗?),然后是第二个用户的回复(你打赌!... )等等。
简单的。优雅的。异步。这就是 WebSockets 的用途。这里我们有一个简单的用法。
到目前为止,我们已经使用不同类型的广播消息制作了一个相对丰富的应用程序。
例如,当一个新的评论被写入时,它会被发送给每个客户。只有实际显示相关图像的客户端才会update 任何东西。但是消息还是发出来了。此外,当用户输入新的聊天消息时,它会发送给所有人。对于这些用例,此解决方案很好。 WebSockets 使这个过程非常高效。
但是,当我们只想向一个订阅者发送消息时,肯定会有这样的场景。我们将在本节中追求的一个完美示例是添加向“@”用户发送聊天消息的功能。我们只希望将这样的消息发送给该特定用户。什么会更好?如果我们能做到这一点而不破坏我们迄今为止所做的一切。
我们可以从 chat 微服务中的 ChatController 开始。我们应该能够查看传入的消息,并嗅出以 @ 开头的任何内容。如果我们找到它,那么我们应该能够提取用户名,并将消息发送给该用户和该用户单独。如果消息不是以 @ 开头,只需像以前一样将消息广播给所有人。
在本章中,我们还没有提到安全性。这将在 第 18 章,使用 Spring Boot 保护您的应用。现在,我们需要一些东西来代替它。
作为一种解决方法,我们可以引入concept,用户输入自己的用户名并使用基于HTTP用于创建 WebSocket 的请求。
为了给用户提供一个输入用户名的地方,我们可以把它放在 Thymeleaf 模板的顶部:
有一个 Connect 和一个 Disconnect 按钮来类似地登录/注销 WebSocket 会话。
现在我们可以连接它,以便单击 Connect 按钮,实际创建 WebSocket 连接:
这是单击 Connect 时发生的情况:
- The
connectbutton is hidden while thedisconnectbutton is shown - We get hold of the
usernameinput - The
chatBoxis switched from hidden to displayed
从这里开始,创建 WebSocket 的其余流程,包括额外的 当我们订阅 参数:/topic/chatMessage.new 时,userInput 输入提供的 user
传入聊天消息的上述订阅代码的工作原理如下:
- We again create a JavaScript
WebSocket, but it has an extra query argument,user, populated with theusernameInputvalue - The route we subscribe to is
/topic/chatMessage.new, the same one thatOutboundChatServicepublishes to - The
onmessagehandler is assigned a function that updates thechatDisplaytextarea with the new event'sdata
总结一下,我们添加以下事件监听器,以防点击 Disconnect:
- It hides the
Disconnectbutton and the chat box while showing theConnectbutton - It closes all the WebSockets
我们仍然缺少一个关键要素——将输入的 username 链接到用户的 WebSocket 会话。
由于我们构建的每一个 WebSocketHandler 服务都可能需要访问这些用户数据,我们应该构建一个 shim< /span> 调用 UserParsingHandshakeHandler 像这样滑入:
前面的代码可以描述如下:
- This abstract class implements
WebSocketHandler; it will be invoked when a newWebSocketSessionis created - It contains a mapping between session ID and username, called
userMap, initialized in the constructor - The implementation of
handle(WebSocketSession)takes theuserMapand puts a new entry keyed off the session's ID - The value stored under that session ID is extracted from the session's handshake, granting access to the original URI
- With some Java 8 stream magic, we can extract the query string from this URI, and find the user argument
findFirst()produces anOptional, so we can either map over the answer or fall back to an empty string (no user)- Having loaded the
userMap, we then invoke the concrete subclass through a custom abstract method,handleInternal(WebSocketMessage) - To facilitate looking up the current username,
getUser(String)is provided to look up user based on session ID
这段代码将处理用户详细信息,允许每个具体的 WebSocketHandler 做它的事情,同时还可以访问当前会话的用户名。
要使用这个新的握手处理程序,我们需要像 update InboundChatService这个:
- It now extends
UserParsingHandshakeHandlerinstead ofWebSocketHandler. - Instead of implementing
handle(WebSocketSession), we must now writehandleInternal(WebSocketSession). This is a classic pattern of using a parent abstract class to intercept and then delegate. broadcast()takes two arguments--messageanduser. Theuserfield is populated usinggetUser(session.getId()).broadcast()builds aMessagelike it did earlier in this chapter, but also adds a custom header containing the user of the creator of the message.
实现用户对用户消息的最后 步骤 是将过滤器应用于 OutboundChatService
。由于我们编写了 UserParsingHandshakeHandler,我们必须调整服务来处理这个问题:
对于初学者,我们需要更改这个类以扩展 UserParsingHandshakeHandler 而不是 WebSocketHandler。
无需更改配置我们的 FluxSink 的构造函数调用。但是,处理程序本身必须进行如下调整:
细节可以解释如下:
- Just like
InboundChatService, we must now implementhandleInternal(WebSocketSession). - It has the same
session.send(Flux)call, but thatFluxhas a couple of extra steps added, including a filter and an extra map. - The
filtercall validates each message, deciding whether or not this user should get it. (We'll write thatvalidate()method in a moment). - Assuming the message is valid for this user, it uses a local
transformmethod to tweak it. - The rest of the machinery used to convert this string message into a
WebSocketMessage<String>and pipe it over the WebSocket is the same as before.
在处理消息流时,过滤器中的分层并不是什么大问题。在下面的代码中查看如何:
最后一段代码可以描述如下:
validateaccepts aMessage<String>and the name of the current user (not the user that sent the message).- It first checks the payload, and if it starts with
@, it looks deeper. If the message does NOT start with@, it just lets it on through. - If the message starts with
@, it proceeds to extract the target user by parsing the text between@and the first space. It also extracts the original sender of the message using theUserheader. - If the current user is either the sender or the receiver, the message is allowed through. Otherwise, it is dropped.
像这样的过滤功能可以轻松地将各种选项分层。我们用它来定位用户特定的消息。但是想象一下,放置诸如安全检查、区域消息、基于时间的消息等等之类的东西!
总结一下,我们还需要编写一个 little 转换,以使用户到用户的体验一流:
前面这个不错的小转换可以描述如下:
transformaccepts aMessage<String>, and converts it into a plain old string message- It extracts the
Userheader to find who wrote the message - If the message starts with
@, then it assumes the message is targeted, and prefixes it with the author wrapped in parentheses - If the message does NOT start with
@, then it prefixes it with the author wrapped in parentheses plus(all), to make it clear that this is a broadcast message
随着这一变化的到位,我们编写了一个复杂的用户对用户聊天服务,运行在 RabbitMQ 之上,使用 Reactive Streams。
通过将用户名与 WebSocket ID 关联起来,让我们看看 如何 所有这些运行。重新启动一切,然后访问该站点。
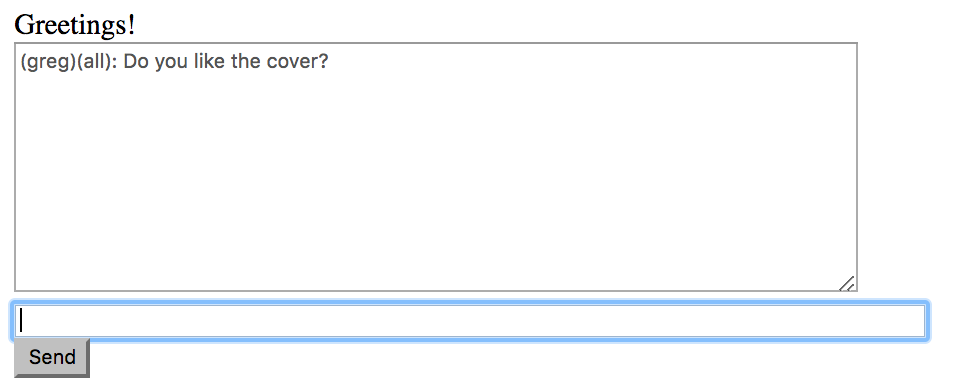
首先,我们登录,如此屏幕截图所示:

如上一个屏幕截图所示,用户以 greg 身份登录。之后,聊天框将显示在页面底部。如果我们假设 oliver 和 phil 也已经登录,我们可以看到消息交换如下:
格雷格问每个人都喜欢封面:
这个前面的信息大家都看到了。同样,没有理由显示所有三个用户的视图,因为在这个阶段它是相同的。
Oliver 给出了他的 $0.02:
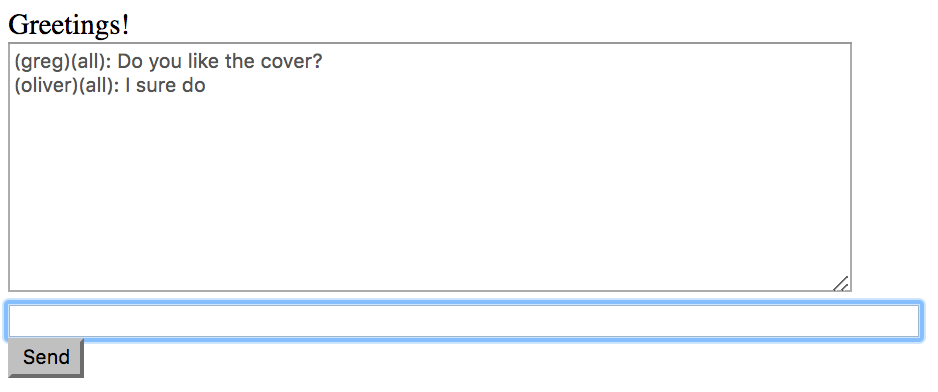
到目前为止,对话是完全开放的,如每条消息上的 (all) 标签所示。顺便说一句,与我们使用会话 ID 的早期版本相比,这种基于用户的交互是否更容易关注对话?
Phil 直接向 Greg 写了一个问题:
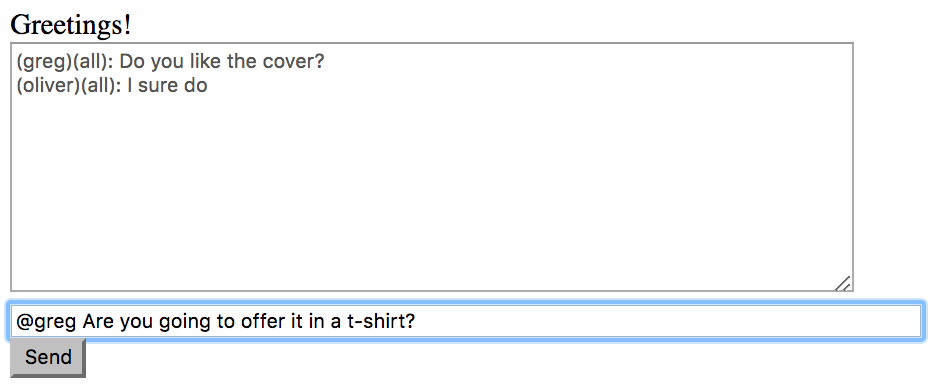
Phil 点击Send 后,Greg 的浏览器中出现以下内容:
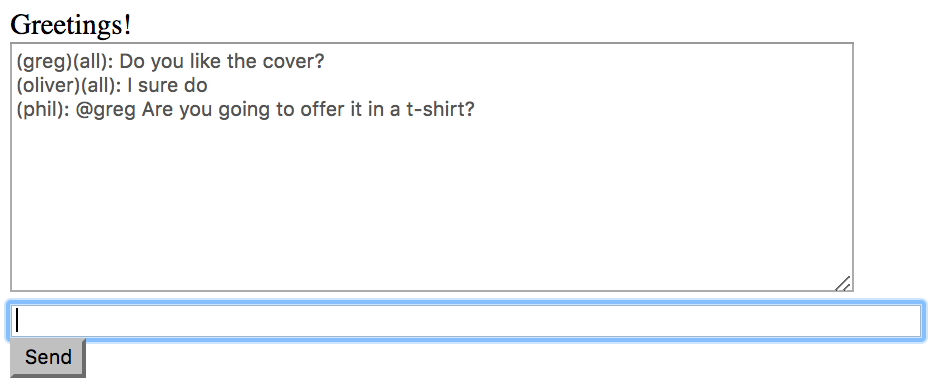
注意这条消息没有 (all)?我们知道 this 消息是直接的,通过查看 Oliver 的浏览器可以进一步验证:
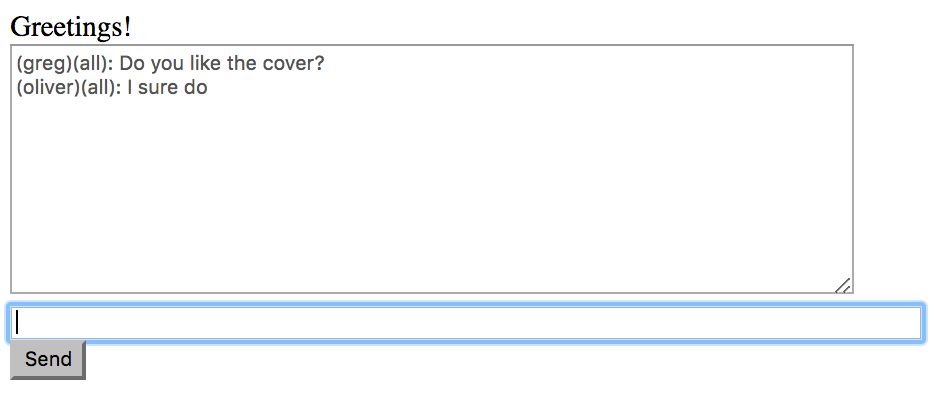
没有关于 T 恤可用性的后续问题的迹象。
如果我们查看 Greg 的 JavaScript 控制台,我们可以看到所有这些:
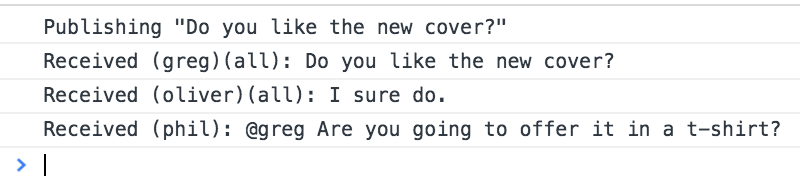
前面的交换显示以下内容:
- One message is sent from Greg's session to the server
- Two broadcast messages are received via the broker from Greg and Oliver
- One direct message is received from Phil
总之,很高兴看到通过使用 Spring Cloud Stream 在整个系统中链接 together 消息流,我们能够准确地将我们想要的消息传递给我们想要接收它们的人。我们能够利用强大的传输代理 RabbitMQ,而不会陷入混乱的细节。
我们利用标题之类的东西来标记我们的消息,并根据需要过滤东西以实现业务需求。而且我们没有把所有的时间都花在配置代理、servlet 容器或其他任何东西上。相反,我们在逻辑上定义了渠道以及从这些渠道发布/消费的内容。