vlambda博客
学习文章列表

读书笔记《hands-on-full-stack-development-with-spring-boot-2-0-and-react》通过Reaction使用REST API

Chapter 7. Consuming the REST API with React

本章解释了使用 React 建立网络。我们将学习 Promise,它使异步代码更简洁、更易读。对于网络,我们将使用 fetch 库。作为示例,我们使用 GitHub REST API 来演示如何使用 React 使用 RESTful Web 服务。

在本章中,我们将看到以下内容:

  • Using promises
  • How to use Fetch
  • How to make requests to the REST API
  • How to handle responses from the REST API
  • How to create a React app that consumes the REST API

Technical requirements


在本书中,我们使用的是 Windows 操作系统,但所有工具都适用于 Linux 和 macOS,因为必须安装 Node.js 和 create-react-app。  ;

Using promises

处理异步操作的传统方法是使用回调函数来判断操作的成功或失败。调用回调函数之一,具体取决于调用的结果。下面的例子展示了使用回调函数的想法:

function doAsyncCall(success, failure) {
    // Do some api call
    if (SUCCEED)
        success(resp);
    else
        failure(err);
}

success(response) {
    // Do something with response
}

failure(error) {
    // Handle error
}

doAsyncCall(success, failure);

Promise 是一个表示异步操作结果的对象。使用 Promise 可以简化异步调用时的代码。 Promise 是非阻塞的。

Promise 可以处于 一个 三种状态:

  • Pending: Initial state
  • Fulfilled: Successful operation
  • Rejected: Failed operation

使用 Promise,如果我们使用的 API 支持 Promise,我们就可以进行异步调用。在下一个示例中,异步调用完成,当返回响应时,执行 then 中的函数并将响应作为参数:

doAsyncCall()
.then(response => // Do something with the response);

您可以将 thens 链接在一起,这意味着您可以一个接一个地运行多个异步操作:

doAsyncCall()
.then(response => // Get some result from the response)
.then(result => // Do something with the result);

您还可以使用 catch() 为 Promise 添加错误处理:

doAsyncCall()
.then(response => // Get some result from the response)
.then(result => // Do something with result);
.catch(error => console.error(error))

有一种更现代的方式来处理异步调用,使用 async/await,它是在 ECMAScript 2017 中引入的。不像 Promise 那样被浏览器广泛支持。 async/await 实际上是基于 Promise 的。要使用 async/await,您必须定义一个 async 函数可以包含等待表达式。以下是使用 async/await 的异步调用示例。如您所见,您可以使用与同步代码类似的方式编写代码:

doAsyncCall = async () => {
    const response = await fetch('http://someapi.com');
    const result = await response.json();
    // Do something with the result
}

对于错误处理,您可以使用 try...catchasync/await,如下例所示:

doAsyncCall = async () => {
  try {
    const response = await fetch('http://someapi.com');
    const result = await response.json();
    // Do something with the result
  }
  catch(err) {
    console.error(err);
  } 
}

Using the Fetch API

使用 Fetch API,您可以发出 web 请求。 Fetch API 的思想类似于传统的 XMLHttpRequest,但 Fetch API 还支持 Promise,使其更易于使用。

Fetch API 提供了一个 fetch() 方法,该方法有一个强制参数,即您正在调用的资源的路径。在 Web 请求的情况下,它将是服务的 URL。对于返回 JSON 响应的简单 GET 方法调用,语法如下。 fetch() 方法返回一个包含响应的承诺。您可以使用 json() 方法从响应中解析 JSON 正文:

fetch('http://someapi.com')
.then(response => response.json())
.then(result => console.log(result));
.catch(error => console.error(error))

要使用其他 HTTP 方法,例如 POST,您可以在 fetch 方法的第二个参数中定义它。第二个参数是您可以定义多个请求设置的对象。以下源代码使用 POST 方法发出请求:

fetch('http://someapi.com', {method: 'POST'})
.then(response => response.json())
.then(result => console.log(result))
.catch(error => console.error(error));

您还可以在第二个参数中添加标题。以下 fetch 调用包含 'Content-Type' : 'application/json' 标头:

fetch('http://someapi.com', 
 {
  method: 'POST', 
  headers:{'Content-Type': 'application/json'}
 }
.then(response => response.json())
.then(result => console.log(result))
.catch(error => console.error(error));

如果您必须在请求正文中发送 JSON 编码的数据,则语法如下:

fetch('http://someapi.com', 
 {
  method: 'POST', 
  headers:{'Content-Type': 'application/json'},
  body: JSON.stringify(data)
 }
.then(response => response.json())
.then(result => console.log(result))
.catch(error => console.error(error));

您还可以使用其他库进行网络调用。一个非常流行的库是 axios (https:// /github.com/axios/axios),您可以使用 npm 将其安装到您的 React 应用程序中。 axios 有一些好处,例如 JSON 数据的自动转换。以下代码显示了使用 axios 的示例调用:

axios.get('http://someapi.com')
.then(response => console.log(response))
.catch(error => console.log(error));

axios 对不同的 HTTP 方法有自己的调用方法。例如,如果你想发出一个 DELETE请求, axios提供了 axios.delete 方法。

Practical examples

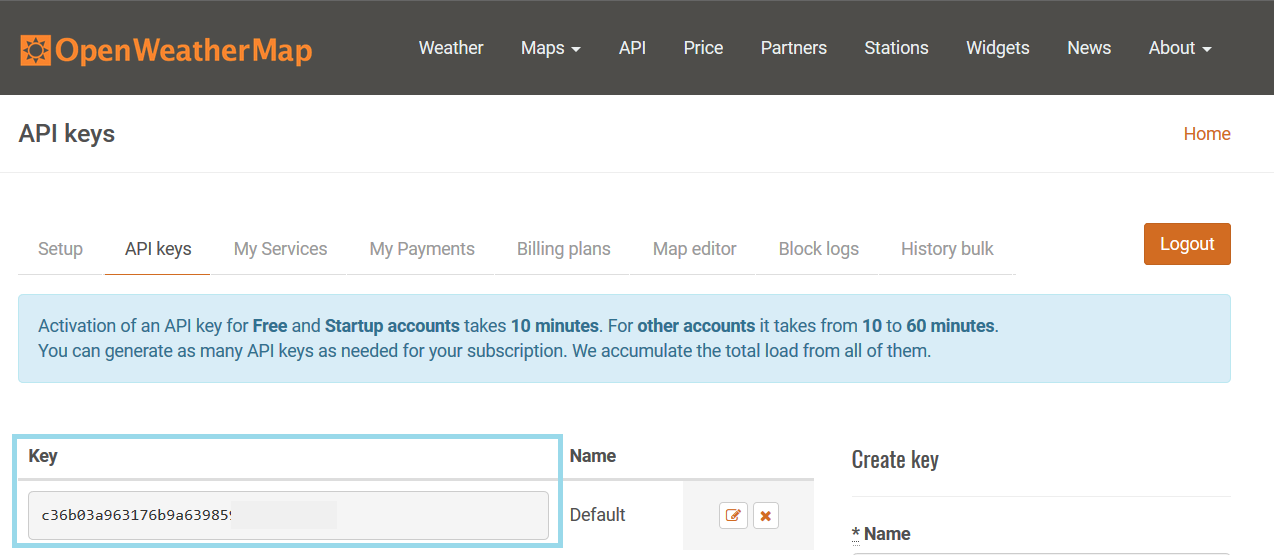
我们将通过两个示例使用 一些开放的 REST API。首先,我们将制作一个显示伦敦当前天气的 React 应用程序。 weather 是从 OpenWeatherMap ( https://openweathermap.org/)。您需要注册到 OpenWeatherMap 以获取 API 密钥。我们将使用免费帐户,因为这足以满足我们的需求。注册后,导航到您的帐户信息以找到 API 密钥选项卡。在那里,您将看到您的 React 天气应用程序所需的 API 密钥:

读书笔记《hands-on-full-stack-development-with-spring-boot-2-0-and-react》通过Reaction使用REST API

让我们用 create-react-app 创建一个新的 React 应用。打开您正在使用的 PowerShell 或其他终端,然后键入以下命令:

create-react-app weatherapp

移动到 weatherApp 文件夹:

cd weatherapp

使用以下命令启动您的应用程序:

npm start

使用 VS Code 打开您的项目文件夹,然后在编辑器视图中打开 App.js 文件。删除 <div className="App"></div> 分隔符内的所有代码。现在您的源代码应如下所示:

import React, { Component } from 'react';
import './App.css';

class App extends Component {
  render() {
    return (
      <div className="App">
      </div>
    );
  }
}

export default App;

Note

如果您已将 Reactjs 代码片段 安装到 VS Code,则可以通过键入 con 。典型的 React 方法有很多不同的快捷方式,例如 cdm for componentDidMount()

首先,我们添加必要的构造函数和状态。我们将在我们的应用程序中显示温度、描述和天气图标,因此,我们定义了 三个 状态值。我们还将添加一个布尔状态来指示获取加载的状态。以下是构造函数的源代码:

  constructor(props) {
    super(props);
    this.state = {temp: 0, desc: '', icon: '', loading: true}
  }

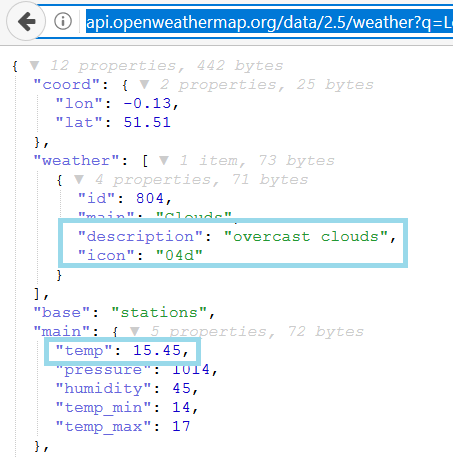
当您使用 REST API 时,您应该首先检查响应以便能够从 JSON 数据中获取值。在以下示例中,您可以看到返回伦敦当前天气的地址。将地址复制到浏览器,可以看到 JSON 响应数据:

api.openweathermap.org/data/2.5/weather?q=London&units=Metric&APIkey=YOUR_KEY

从响应中,您可以看到可以使用 main.temp 访问 tempdescriptioniconweather 数组中,只有一个元素,我们可以使用 weather[0].descriptionweather[0].icon 来访问它:

读书笔记《hands-on-full-stack-development-with-spring-boot-2-0-and-react》通过Reaction使用REST API

REST API 调用通过componentDidMount() 生命周期方法中的 fetch 完成。响应成功后,我们将天气数据保存到状态,并将 loading状态改为false。状态改变后,组件将被重新渲染。我们将在下一步中实现 render() 方法。以下是 componentDidMount()方法的源码:

  componentDidMount() {
    fetch('http://api.openweathermap.org/data/2.5/weather?
      q=London&units=Metric
      &APIkey=c36b03a963176b9a639859e6cf279299')
    .then(response => response.json()) 
    .then(responseData => {
      this.setState({ 
         temp: responseData.main.temp,
         desc: responseData.weather[0].description,
         icon: responseData.weather[0].icon, 
         loading: false 
       })
     })
     .catch(err => console.error(err)); 
  }

添加 componentDidMount() 方法后,请求在组件挂载时完成。我们可以使用 React Developer Tool 检查一切是否正确。在浏览器中打开您的应用并打开浏览器开发人员工具的 React 选项卡。现在您可以看到状态已使用响应中的值进行了更新。您还可以从 Network 选项卡检查请求状态是否为 200 OK:

读书笔记《hands-on-full-stack-development-with-spring-boot-2-0-and-react》通过Reaction使用REST API

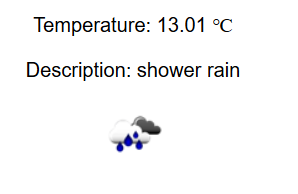
最后,我们实现render() 方法来show 天气值.我们正在使用条件渲染,否则会出现错误,因为我们在第一次渲染调用中没有图像代码并且图像上传不会成功。要显示天气图标,我们必须在图标代码和 .png 之前添加http://openweathermap.org/img/w/  在图标代码之后。然后,我们可以将连接的图像 URL 设置为  img 元素的 src 属性。温度和描述显示在段落元素中。  °C  HTML 实体显示摄氏度符号:

  render() {
    const imgSrc =    `http://openweathermap.org/img/w/${this.state.icon}.png`;

if (this.state.loading) {
      return <p>Loading</p>;
}
    else {
      return (
        <div className="App">
          <p>Temperature: {this.state.temp} °C</p>
          <p>Description: {this.state.desc}</p>
          <img src={imgSrc} alt="Weather icon" />
        </div>
      );
  }
  }

现在你的应用程序应该准备好了。当您在浏览器中打开它时,它应该如下图所示:

读书笔记《hands-on-full-stack-development-with-spring-boot-2-0-and-react》通过Reaction使用REST API

整个 App.js 文件的源代码如下:

import React, { Component } from 'react';
import './App.css';

class App extends Component {
  constructor(props) {
    super(props);
    this.state = {temp: 0, desc: '', icon: ''}
  }

  componentDidMount() {
    fetch('http://api.openweathermap.org/data/2.5/weather?
      q=London&units=Metric&APIkey=YOUR_KEY')
    .then(response => response.json()) 
    .then(responseData => {
      this.setState({ 
         temp: responseData.main.temp,
        desc: responseData.weather[0].description,
        icon: responseData.weather[0].icon 
       }); 
    });
  }

  render() {
    const imgSrc = 'http://openweathermap.org/img/w/' + 
    this.state.icon + '.png';

    return (
      <div className="App">
        <p>Temperature: {this.state.temp}</p>
        <p>Description: {this.state.desc}</p>
        <img src={imgSrc} />
      </div>
    );
  }
}

export default App;

在第二个示例中,我们将开始 使用 GitHub API 通过关键字获取存储库。使用与上一个示例相同的步骤,创建一个名为 restgithub 的新 React 应用程序。启动应用程序并使用 VS Code 打开项目文件夹。

App 中删除 <div className="App"></div> divider 中的额外代码。 js 文件,您的 App.js 代码应类似于以下示例代码:

import React, { Component } from 'react';
import './App.css';

class App extends Component {
  render() {
    return (
      <div className="App">
      </div>
    );
  }
}

export default App;

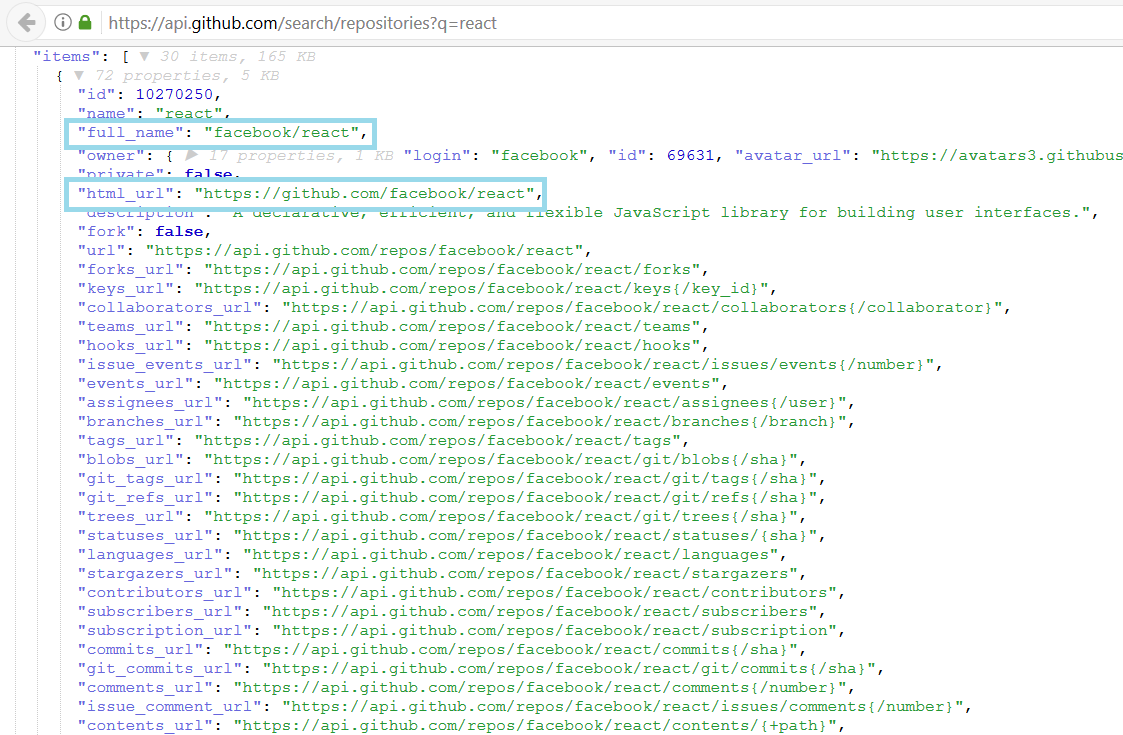
GitHub REST API 的 URL 如下:

https://api.github.com/search/repositories?q=KEYWORD

让我们通过在浏览器中输入 URL 并使用 react 关键字来检查 JSON 响应。从响应中,我们可以看到存储库作为名为 items 的 JSON 数组返回。从各个存储库中,我们将显示 full_name 和 html_url 值。我们将在表格中呈现数据,并使用 map函数将值转换为表格行,如上一章所示:

读书笔记《hands-on-full-stack-development-with-spring-boot-2-0-and-react》通过Reaction使用REST API

我们将使用来自用户输入的关键字进行 REST API 调用。因此,我们无法在 componentDidMount() 方法中调用 REST API,因为在那个阶段,我们没有可用的用户输入。实现这一点的一种方法是创建一个输入字段和按钮。用户在输入字段中键入关键字,按下按钮时完成 REST API 调用。我们需要两种状态,一种用于用户输入,另一种用于来自 JSON 响应的数据。以下是 构造函数的源码。数据状态的类型是一个数组,因为存储库在响应中作为 JSON 数组返回:

  constructor(props) {
    super(props);
    this.state = { keyword: '', data: [] };
  }

接下来,我们将输入字段和按钮实现到 render() 方法中。我们还必须在输入字段中添加一个更改侦听器,以便能够将输入值保存到状态,称为 keyword。该按钮有一个点击监听器,它调用函数 将使用给定的关键字进行 REST API 调用:

  fetchData = () => {
    // REST API call comes here
  }

  handleChange = (e) => {
    this.setState({keyword: e.target.value});
  }

  render() {
    return (
      <div className="App">
        <input type="text" onChange={this.handleChange} />
        <button onClick={this.fetchData} value={this.state.keyword} >Fetch</button>
      </div>
    );
  }

在 fetchData函数中,我们连接了 urlkeyword状态通过使用模板文字。然后我们将 items数组从响应中保存到状态,称为data。以下是fetchData函数的源码:

  fetchData = () => {
    const url = `https://api.github.com/search/repositories?
       q=${this.state.keyword}`;
    fetch(url)
    .then(response => response.json()) 
    .then(responseData => {
      this.setState({data : responseData.items }); 
    }); 
  } 

render方法中,我们首先使用 map函数对 数据< /code> 状态表行。  url repository 将是链接元素的 href

  render() {
    const tableRows = this.state.data.map((item, index) => 
      <tr key={index}><td>{item.full_name}</td>
      <td><a href={item.html_url}>{item.html_url}</a></td></tr>); 

    return (
      <div className="App">
        <input type="text" onChange={this.handleChange} />
        <button onClick={this.fetchData} value={this.state.keyword} >Fetch</button>
        <table><tbody>{tableRows}</tbody></table>
      </div>
    );

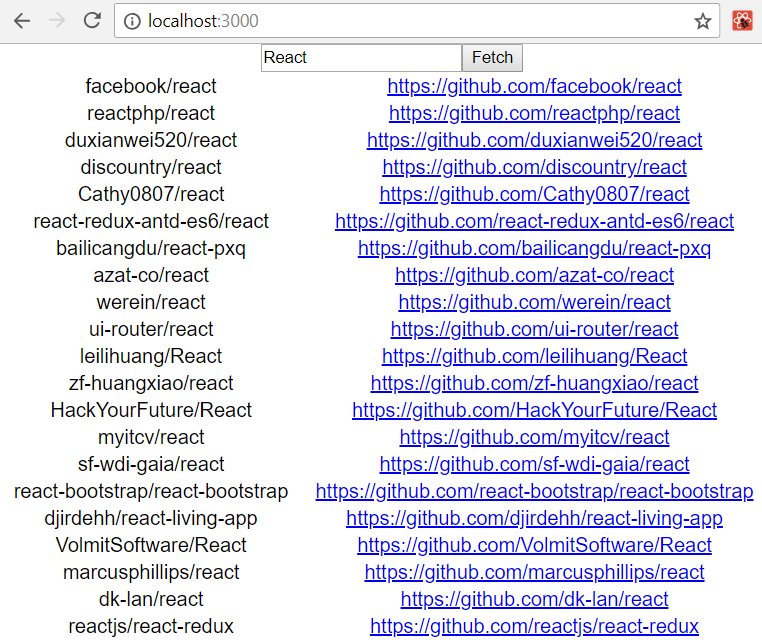
以下屏幕截图显示了在 REST API 调用中使用 React 关键字时的最终应用程序:

读书笔记《hands-on-full-stack-development-with-spring-boot-2-0-and-react》通过Reaction使用REST API

整个 App.js 文件的源代码如下所示:

import React, { Component } from 'react';
import './App.css';

class App extends Component {
  constructor(props) {
    super(props);
    this.state = { keyword: '', data: [] };
  }

  fetchData = () => {
    const url = `https://api.github.com/search/repositories?
      q=${this.state.keyword}`;
    fetch(url)
    .then(response => response.json()) 
    .then(responseData => {
      this.setState({data : responseData.items }); 
    }); 
  }

  handleChange = (e) => {
    this.setState({keyword: e.target.value});
  }

  render() {
    const tableRows = this.state.data.map((item, index) => 
      <tr key={index}><td>{item.full_name}</td>
      <td><a href={item.html_url}>{item.html_url}</a></td></tr>); 

    return (
      <div className="App">
        <input type="text" onChange={this.handleChange} />
        <button onClick={this.fetchData} value={this.state.keyword} >Fetch</button>
        <table><tbody>{tableRows}</tbody></table>
      </div>
    );
  }
}

Summary 


在本章中,我们专注于使用 React 建立网络。我们从使异步网络调用更容易实现的承诺开始。这是一种处理调用的更简洁的方式,并且比使用传统的回调函数要好得多。在本书中,我们将 Fetch API 用于网络,因此我们了解了使用 fetch 的基础知识。我们实现了两个调用开放 REST API 的实用 React 应用程序,并在浏览器中呈现响应数据。在下一章中,我们将介绍一些将在前端使用的有用的 React 组件。

Questions


  1. What is a promise?
  2. What is fetch?
  3. How should you call the REST API from the React app?
  4. How should you handle the response of the REST API call?