读书笔记《developing-java-applications-with-spring-and-spring-boot-ebook》使用Spring Boot进行反应式数据访问
到目前为止,@springboot 给我留下了深刻的印象,10 分钟即可启动并运行 REST 服务,现在添加 MongoDB。幕后没有黑魔法!
– Graham Rivers-Brown @grahamrb
在上一章中,我们开始使用 Spring WebFlux 将社交媒体平台的前端部分组合在一起。缺少的关键要素是数据存储。很少有应用程序不涉及数据库。事实上,数据存储可以说是我们在应用程序开发中遇到的最关键的组件之一。在本章中,我们将学习如何在响应式数据存储(MongoDB)中持久化信息,并学习如何与之交互。
在本章中,我们将执行以下操作:
- Getting underway with a reactive data store
- Wiring up Spring Data repositories with Spring Boot
- Creating a reactive repository
- Pulling data through a Mono/Flux and chain of operations
- Creating custom finders
- Querying by example
- Querying with MongoOperations
- Logging reactive operations
由于本书的目标是 cutting 边缘的 Spring Boot 2.0 及其对 Reactive Streams 的支持,所以我们必须选择一些东西比 JPA 更新。 JPA 规范不包括反应式编程。因此,它的 API 不是反应式的。但是,MongoDB 有响应式驱动程序,并且将是完美的。
要开始,我们需要安装最新版本的 MongoDB 3.4(用于响应式支持)。
如果您使用的是 macOS X,安装 MongoDB 就像这样简单:
安装 MongoDB 后,我们可以将其作为服务启动,如下所示:
Note
对于其他操作系统,请查看 https://www 的下载链接。 mongodb.com/download-center。有关安装 MongoDB 的更多详细信息,请访问 https://docs.mongodb。 com/manual/installation/。
假设我们已经安装并运行了 MongoDB,我们现在可以深入研究编写一些代码。
要编写任何 MongoDB 代码,我们需要将 Spring Data MongoDB 添加到我们的类路径中。我们可以通过使用以下内容更新我们的构建文件来做到这一点:
前面的新编译时依赖项引入了以下内容:
- Spring Data MongoDB
- MongoDB's core components + Reactive Stream drivers
Note
需要指出的是,spring-boot-starter-webflux和spring-boot-starter-data-mongodb-reactive 传递引入 Project Reactor。 Spring Boot 的 dependency-management 插件负责确保它们都拉入相同的版本。
有了类路径上的所有这些东西,Spring Boot 将忙于为我们配置东西。但首先,我们要解决的问题是什么?
那种查询一定有三十年了! SQL 的 ANSI 规范于 1986 年发布,其效果可以在无数种语言中看到。
那么,写这样的东西会更好吗:
最后一段代码是JPA(Java Persistence API) ,基于基于 开源Hibernate 项目(已成为JPA 的参考实现)。这是Java对编写纯SQL的改进吗?
也许下面的这个片段是一个增强?
最后一个代码片段是 jOOQ,并且 can 帮助完成代码,但似乎我们基本上在做我们几十年来一直在做的事情。
特别是,考虑到我们可以通过创建这个来做同样的事情:
前面的声明式接口做的事情完全相同,但没有用任何语言编写单个查询。
通过扩展 Spring Data 的 ReactiveCrudRepository,我们获得了一组开箱即用的 CRUD 操作(save、findById, findAll, 删除, deleteById< /code>、count、exists 等)。我们还可以完全通过方法签名添加自定义查找器(本例中为 findByFirstName)。
当 Spring Data 看到一个接口扩展了它的 Repository 标记接口(ReactiveCrudRepository 所做的),它会创建一个具体的实现。它扫描每个方法,并解析它们的方法签名。看到findBy,它就知道查看方法名的其余部分,并开始根据域类型(Employee)。因为它可以看到 Employee 有 firstName,所以它有足够的信息来进行查询。这也提示了参数中的预期标准(name)。最后,Spring Data 查看返回类型来决定要组装什么结果集——在本例中,是我们在上一章中开始探索的 Reactor Flux。组装后的整个查询(不是查询results) , 被缓存,因此多次使用查询没有开销。
简而言之,通过遵循一个非常简单的约定,根本不需要手写查询。虽然本书关注的是 MongoDB 及其对应的 Mongo 查询语言,但这个概念也适用于 SQL、JPA、Cassandra 查询语言或任何其他支持的 数据存储。
这种管理数据的机制是革命性的,使 Spring Data 成为最受欢迎的 Spring 组合项目之一,仅次于 Spring Framework 本身和 Spring Security(当然还有 Spring Boot)。
等一下,我们之前不是提到过使用 MongoDB 吗?
是的。这就是 Spring Data 的查询中立方法更好的原因。更改数据存储不需要完全丢弃所有内容并重新开始。之前声明的接口扩展了 Spring Data Commons,而不是 Spring Data MongoDB。唯一的数据存储详细信息在域对象本身中。
代替 Employee 是一些基于 JPA 的实体定义,我们可以使用基于 MongoDB 文档的实体定义,如下所示:
前面的 MongoDB POJO 可以这样描述:
- The
@DataLombok annotation takes care of getters, setters,toString,equals, andhashCodefunctions. @Documentis an optional annotation that lets us spell out the MongoDB collection that this domain object will be stored under ("employees").@Idis a Spring Data Commons annotation that flags which field is the key. (NOTE: When using Spring Data JPA, the required annotation isjavax.persistence.Id, whereas, all other Spring-Data-supported stores utilizeorg.springframework.data.annotation.Id).
Note
什么是 Spring Data Commons?它是所有 Spring Data 实现的父项目。它定义了每个解决方案实现的几个概念。例如,这里定义了解析查找器签名以组合查询请求的概念。但是将其转换为本机查询的位由数据存储解决方案本身提供。 Spring Data Commons 还提供了各种接口,允许我们减少代码与数据存储的耦合,例如 ReactiveCrudRepository 以及我们很快就会看到的其他接口。
start 将 Employee 对象写入 employees MongoDB 数据库的集合。
通常,连接 repository 不仅需要定义域对象和存储库,还需要激活 Spring Data。每个数据存储都带有 一个注释来激活它以支持存储库。在我们的例子中,这将是 @EnableReactiveMongoRepositories,因为我们使用的是 MongoDB 的响应式驱动程序。
但是,有了 Spring Boot,我们就不用动一根手指头了!
为什么?
因为以下代码来自 Spring Boot 本身,显示了如何启用 MongoDB 反应式存储库支持:
上述自动配置策略可以描述如下:
@Configuration: This indicates that this class is a source of bean definitions.@ConditionalOnClass: This lists ALL the classes that must be on the classpath for this to kick in--in this case, MongoDB's reactiveMongoClient(Reactive Streams version) andReactiveMongoRepository, which means that it only applies if Reactive MongoDB and Spring Data MongoDB 2.0 are on the classpath.@ConditionalOnMissingBean: This indicates that it only applies if there isn't already aReactiveMongoRepositoryFactoryBeanand aReactiveMongoRepositoryConfigurationExtensionbean.
@ConditionalOnProperty: This means that it requires that thespring.data.mongodb.reactive-repositoriesproperty must be set totruefor this to apply (which is the default setting if no such property is provided).@Import: This delegates all bean creation for reactive repositories toMongoReactiveRepositoriesAutoConfigureRegistrar.@AutoConfigureAfter: This ensures that this autoconfiguration policy is only applied afterMongoReactiveDataAutoConfigurationhas been applied. That way, we can count on certain infrastructure being configured.
当我们将 spring-boot-starter-data-mongodb-reactive 添加到类路径时,该策略开始生效,并创建了关键 bean 用于响应式与交互 一个 MongoDB 数据库。
留给读者作为一个练习来拉起 MongoReactiveRepositoriesAutoConfigureRegistrar,看看它是如何工作的。需要注意的是,该类底部的 nestled 如下:
前面提到的这个小类意味着我们不必启用响应式 MongoDB 存储库。当 Reactive MongoDB 和 Spring Data MongoDB 2.0+ 在类路径上时,Spring Boot 会自动为我们做这件事。
到目前为止,我们一直在使用我们的员工示例域涉足 Spring Data。我们需要将注意力转移回我们在上一章开始构建的社交媒体平台。
在我们可以处理 reactive 存储库之前,我们需要重新访问 Image 我们在上一章定义的领域对象。让我们对其进行调整,使其与 MongoDB 很好地配合使用:
前面的定义几乎与我们在前一章中看到的相同,但有以下区别:
- We use
@Documentto identify this is a MongoDB domain object, but we accept Spring Data MongoDB's decision about what to name the collection (it's the short name of the class, lowercase, that is,image) @Datacreates a constructor for all final fields by default, hence, we've marked bothidandnameasfinal- We have also marked both fields
privatefor proper encapsulation
有了这些,我们准备好声明我们的社交媒体平台的响应式存储库,如下所示:
反应式存储库的代码可以描述如下:
- Our interface extends
ReactiveCrudRepository, which, as stated before, comes with a prepackaged set of reactive operations includingsave,findById,exists,findAll,count,delete, anddeleteAll, all supporting Reactor types - It includes a custom finder named
findByNamethat matches onImage.namebased on parsing the name of the method (not the input argument)
从 ReactiveCrudRepository 继承的每个操作都接受直接参数或对 Reactor 友好的变体。这意味着,我们可以调用 save(Image) 或 saveAll(Publisher。由于 )
Mono 和 Flux 都实现了 Publisher,saveAll() 可用于存储任何一个。
ReactiveCrudRepository 的所有方法都返回基于 Mono 或 Flux关于情况。有的,比如delete,直接返回Mono
,意思是没有数据返回,但是我们需要操作的处理以发出响应式流的 subscribe 调用。 findById 返回一个 Mono,因为只能有一个。 findAll 返回一个 Flux<Image>。
在我们开始使用这个 reactive 存储库之前,我们需要预加载我们的 MongoDB 数据存储。对于此类操作,建议实际使用 blocking API。这是因为在启动应用程序时,当 Web 容器和我们的手写加载器都在启动时,存在一定的线程锁问题风险。由于 Spring Boot 还创建了一个 MongoOperations 对象,我们可以简单地抓住它,如下所示:
上述代码详细如下:
@Componentensures that this class will be picked up automatically by Spring Boot, and scanned for bean definitions.@Beanmarks theinitmethod as a bean definition requiring aMongoOperations. In turn, it returns a Spring BootCommandLineRunner, of which all are run after the application context is fully formed (though in no particular order).- When invoked, the command-line runner will use
MongoOperations, and request that all entries be deleted (dropCollection). Then it will insert three newImagerecords. Finally, it will fetch with (findAll) and iterate over them, printing each out.
加载示例数据后,让我们在下一节中将内容挂钩到我们的响应式 ImageService 中。
我们已经连接了一个 repository 以通过 Spring Data 与 MongoDB 交互。现在我们 可以开始将它挂接到我们的ImageService。
我们需要做的第一件事是将我们的存储库注入到服务中,如下所示:
在上一章中,我们加载了 Spring 的 ResourceLoader。在本章中,我们将 ImageRepository 添加到我们的构造函数中。
之前,我们查找现有上传文件的名称,并构造了 Image 对象的 Flux。这需要想出一个人为的 id 值。
现在我们有了一个真实的数据存储,我们可以简单地获取它们,并将它们返回给客户端,如下所示:
在这最后一段代码中,我们利用 imageRepository 用它的 findAll() 方法完成所有工作。记住——findAll 是在 ReactiveCrudRepository 中定义的。我们不必自己写。因为它已经给了我们一个Flux,所以没有必要做任何其他事情。
请记住,返回的图像的 Flux 是 lazy。这意味着只有客户端请求的 number 图像从数据库拉到内存并通过系统的其余部分在任何给定时间。本质上,客户端可以请求一个或尽可能多的请求,而数据库,感谢 reactive 驱动程序,将遵守.
让我们继续做一些更复杂的事情——存储图像的 Flux,如下所示:
上述代码可以描述如下:
- With a
Fluxof multipart files,flatMapeach one into two independent actions: saving the image and copying the file to the server. - Using
imageRepository, put together aMonothat stores the image in MongoDB, usingUUIDto create a unique key and the filename. - Using
FilePart, WebFlux's reactive multipart API, build anotherMonothat copies the file to the server. - To ensure both of these operations are completed, join them together using
Mono.when(). This means that each file won't be completed until the record is written to MongoDB and the file is copied to the server. - The entire flow is terminated with
then()so we can signal when all the files have been processed.
Note
曾经使用过承诺吗?它们在 JavaScript 世界中非常流行。 Project Reactor 的 Mono.when() 类似于 A+ Promise 规范的 promise.all() API,它等到所有子- 承诺在前进之前完成。 Project Reactor 可以被视为具有更多可用操作的类固醇的承诺。在这种情况下,通过使用 then() 将多个操作串在一起,您可以避免 回调地狱同时确保事情如何展开的流畅。
从根本上说,我们需要创建图像涉及两件事——将文件的内容复制到服务器,并将其记录写入MongoDB。这与我们通过使用 Mono.when() 组合两个单独的操作在代码中声明的内容相同。
imageRepository.save() 已经是一个反应式操作,所以我们可以直接将其捕获为 Mono。因为 MultipartFile 本质上与阻塞 servlet 范例相关联,所以 WebFlux 有一个新接口 FilePart,用于处理文件上传被动地。它的 transferTo() API 返回一个 Mono
让我们发出何时执行传输的信号。
这是交易吗?当然不是 ACID 风格的(Atomic、一致、孤立、Durable)传统上存在于关系数据存储中。这些类型的 transactions 长期以来一直无法很好地扩展。当更多客户端尝试更改相同的数据行时,传统事务阻塞的频率越来越高。阻塞本身与响应式编程不一致。
但是,从语义上讲,也许我们正在从事一项交易。毕竟,我们是说这两个动作都必须在给定的 FilePart< 之前从 Reactive Streams 的角度完成 /code> 被认为是在 Flux 的中间处理的。鉴于对 transactions 的假设由来已久,最好将这个术语抛在脑后,并将其称为 反应式承诺。
Note
虽然可以在 Mono.when 中内联 ,为了便于阅读,它们被作为单独的变量提取出来。您编写的流程越多,您就越倾向于在单个链接语句中简化事情。如果你觉得幸运,那就去吧!saveDatabaseImage 操作和 copyFile 操作()
就处理顺序而言,哪个在先?将文档保存在 MongoDB 中,还是将文件存储在服务器上?它实际上没有在 API 中指定。声明的只是这两个操作都必须完成才能继续,并且 Reactor 保证如果正在使用任何异步线程,框架将处理任何和所有协调。
这就是为什么 Mono.when() 是需要完成两个或多个任务时的完美结构,而 顺序却没有'没关系。第一次运行代码时,也许 MongoDB 能够先存储记录。很有可能下次执行此代码时,MongoDB 可能会由于响应另一个操作等外部因素而稍微延迟,因此允许先复制文件。之后的时间,其他因素可能会导致订单交换。但这个结构的关键是确保我们以最高效率使用资源,同时仍然获得一致的结果——两者都在继续之前完成。
Note
请注意我们如何使用 flatMap 将每个文件转换为既复制文件又保存 MongoDB 记录的承诺? flatMap 有点像 map 和 then,但使用的是类固醇。 map 的签名是 map(T → V) : V,而 flatMap
有 flatMap(T → Publisher
Mono 并产生包含的价值。如果您正在编写没有点击的反应流,请检查您的
map 或
then 调用之一是否需要替换为
flatMap。
如果我们想要某个顺序发生,最好的构造是 Mono.then()。我们可以将多个 then 调用链接在一起,确保在前进之前的每一步都达到一定的统一状态。
让我们通过调整 deleteImage 来结束本节,如下所示:
前面的代码可以解释如下:
- First we create a
Monoto delete the MongoDB image record. It usesimageRepositoryto firstfindByName, and then it uses a Java 8 method handle to invokeimageRepository.delete. - Next, we create a
MonousingMono.fromRunnableto delete the file usingFiles.deleteIfExists. This delays deletion untilMonois invoked. - To have both of these operations completed together, we join them with
Mono.when(). - Since we're not interested in the results, we append a
then(), which will be completed when the combinedMonois done.
我们重复与 createImage() 相同的编码模式,我们将操作收集到多个 Mono 定义中,并用 Mono.when()。这是 Promise 模式,在进行响应式编码时,我们会经常使用它。
Note
传统上,Runnable 对象以某种多线程方式启动,并且旨在在后台运行。在这种情况下,Reactor 可以通过使用它的调度程序来完全控制它的启动方式。 Reactor 还能够确保在 Runnable 对象为完成了它的工作。
归根结底,这就是 Project Reactor 中这些各种操作的整个 点。我们声明所需的状态,并将所有工作 scheduling 和线程管理卸载到框架。我们使用一个从头开始设计的工具包,以支持异步、非阻塞操作,以最大限度地利用资源。这为我们提供了一种一致的、有凝聚力的方式来定义预期结果,同时获得最大的效率。
借助 Spring Data 存储库,我们能够创建适合任何情况的查询。在本章前面,我们看到了 findByName,它只是根据域对象的 name 属性进行查询。
下表显示了我们可以使用 Spring Data MongoDB 编写的更全面的查找器集合。为了说明这些关键字的广度,它假定域模型比我们之前定义的 Image 类更大:
查找方法 |
说明 |
|
基于 |
|
基于 |
|
基于 |
|
根据 |
|
按 |
|
按 |
|
按 |
|
基于 |
|
根据 |
|
根据 |
|
基于 |
|
基于 |
|
根据 |
|
基于 |
|
基于在提供的集合中找到的 |
|
在提供的集合中找不到基于 |
|
基于 |
|
基于 |
|
基于输入的查询是正则表达式 |
|
基于输入的查询是正则表达式,应用了 MongoDB |
|
对于字符串输入,查询就像 |
|
对于字符串输入,查询类似 |
|
使用 |
|
使用 MongoDB 的 |
|
使用 MongoDB 的 |
|
使用 MongoDB 的 |
|
使用 MongoDB 的 |
|
使用 MongoDB 的 |
|
|
|
|
|
通过与输入具有相同布尔值的 |
所有这些上述关键字也可用于构造 deleteBy 方法。
虽然上表显示了 MongoDB 存储库查询支持的所有关键字,但下表显示了各种支持的返回类型:
Image(or Java primitive types)Iterable<Image>Iterator<Image>Collection<Image>List<Image>Optional<Image>(Java 8 or Guava)Option<Image>(Scala or Vavr)Stream<Image>Future<Image>CompletableFuture<Image>ListenableFuture<Image>@Async Future<Image>@Async CompletableFuture<Image>@Async ListenableFuture<Image>Slice<Image>Page<Image>GeoResult<Image>GeoResults<Image>GeoPage<Image>Mono<Image>Flux<Image>
简而言之,Spring Data 涵盖了几乎所有 container 类型,这意味着我们可以选择适合的解决方案我们的需求。由于本书的重点是响应式编程,我们将坚持使用 Mono 和 Flux,因为它们封装了异步 + 非阻塞 +懒惰,不影响客户,也不管数量。
到目前为止,我们已经使用属性导航构建了 几个 反应式查询。我们更新了 ImageService 以将我们的查询结果被动地转换为支持我们的社交媒体平台所需的操作。
但是在我们的数据 API 设计中可能不明显的是,我们的方法签名直接与属性相关联。这意味着如果域字段发生更改,我们将不得不更新查询,否则它们会中断。
我们可能会遇到其他问题,例如提供在我们的网页上放置过滤器的功能,以及让用户根据他们的需要获取图像子集。
如果我们有一个列出员工信息的系统会怎样。如果我们想象编写一个查找器,让用户输入firstName,< code class="literal">lastName 和年龄范围,它可能看起来像这样:
哎呀!太丑了(更糟糕的是,想象一下让所有字符串不区分大小写!)
所有这些都将我们引向另一种 Spring Data 解决方案——Query by Example。
简单地说,通过示例查询让我们使用提供的标准组装一个域对象,并将它们提交给查询。让我们看一个例子。假设我们像这样存储 Employee 记录:
前面的这个例子是一个非常简单的领域对象,可以解释如下:
- Lombok's
@Dataannotation provides getters, setters,equals,hashCode, andtoStringmethods - Spring Data MongoDB's
@Documentannotation indicates this POJO is a target for storage in MongoDB - Spring Data Commons'
@Idannotation indicates that theidfield is the identifier - The rest of the fields are simple strings
接下来,我们需要像之前所做的那样定义一个存储库,但我们还必须混合另一个接口,该接口为我们提供了 Query by Example 操作的标准补充。我们可以通过以下定义做到这一点:
最后一个存储库定义可以解释如下:
- It's an interface declaration, meaning, we don't write any implementation code
ReactiveCrudRepositoryprovides the standard CRUD operations with reactive options (MonoandFluxreturn types, and more)ReactiveQueryByExampleExecutoris a mix-in interface that introduces the Query by Example operations which we'll poke at shortly
再一次,只定义了一个域对象和一个 Spring Data 存储库,我们就拥有了查询 MongoDB 的所有工具!
首先,我们应该再次使用阻塞 MongoOperations 来预加载一些数据,如下所示:
前面的设置可以描述如下:
预加载数据后,让我们仔细看看用于定义存储库的 ReactiveQueryByExampleExecutor 接口(由 Spring Data Commons 提供)。深入研究,我们可以找到几个关键的查询签名,如下所示:
与 findByLastName 之类的查找器相比,上述这些方法的名称都没有任何属性。最大的区别是 Example 作为参数的使用。 Example 是 Spring Data Commons 提供的用于定义查询参数的容器。
这样的 Example 对象是什么样的?让我们现在建造一个!
Example 的构造描述如下:
- We create an
Employeeprobe namede - We set the probe's
firstNametoBilbo - Then we leverage the
Example.ofstatic helper to turn the probe into anExample
在我们实际使用 Example 进行查询之前,有必要了解 what 和 Example 对象是。简单地说,Example 由探针和匹配器组成。探针是 POJO 对象包含 我们希望用作标准的所有值。匹配器是一个 ExampleMatcher,它控制如何使用探针。我们将在以下各种用法中看到不同类型的匹配。
继续我们的 Example,我们现在可以从存储库中请求响应,如下所示:
我们不再需要将 firstName 放在查询的方法签名中。相反,它已成为通过 Example 输入提供给查询的参数。
默认情况下,示例仅查询非空字段。这是一种奇特的说法,即只考虑探针中填充的字段。此外,提供的值必须与存储的记录完全匹配。这是 Example 对象中使用的默认匹配器。
由于并不总是需要完全匹配,让我们看看我们如何调整事物,并提出不同的匹配标准,如以下代码所示:
前面的例子可以描述如下:
- We create another
Employeeprobe - We deliberately set the
lastNamevalue as lowercase - Then we create a custom
ExampleMatcherusingmatching() withIgnoreCasesays to ignore the case of the values being checkedwithMatcherlets us indicate that a given document'slastNamestarts with the probe's valuewithIncludeNullValueswill also match any entries that have nulled-out values- Finally, we create an
Exampleusing our probe, but with this custom matcher
通过这个高度定制的示例,我们可以查询符合这些条件的所有员工:
最后一段代码仅使用 findAll 查询,该查询使用相同的示例条件返回 Flux。
Note
还记得我们是如何简单地提到,Query by Example 可以适用于填写各种字段的网页上的表单吗?根据这些字段,用户可以决定要获取什么。注意到我们是如何使用 withIgnoreCase 的吗?默认情况下,该标志翻转为 true,但可以为其提供布尔值。这意味着我们可以在网页上放置一个复选框,允许用户决定是否在搜索中忽略大小写。
简单或复杂,Query by Example 提供了灵活的选项来查询结果。使用 Reactor 类型,我们可以得到我们需要的任何东西with 提供的两个查询:findOne 或 findAll。
到目前为止,我们已经深入研究了 repository 解决方案,使用按属性查询和按示例查询。我们可以使用另一个角度,MongoTemplate。
MongoTemplate 模仿 Spring Framework 的 JdbcTemplate,这是 Spring 实现的第一个数据访问机制。 JdbcTemplate 允许我们专注于编写查询,同时将连接管理和错误处理委托给框架。
MongoTemplate 为构建 MongoDB 操作带来了同样的力量。它非常强大,但有一个关键的权衡。使用 MongoTemplate 编写的所有代码都是 MongoDB 特定的。将解决方案移植到另一个数据存储非常困难。因此,不建议将其作为第一个解决方案,而是将其作为一种工具,用于需要高度调整的 MongoDB 语句的关键操作。
要执行响应式 MongoTemplate 操作,有一个对应的 ReactiveMongoTemplate 支持 Reactor 类型。与 ReactiveMongoTemplate 交互的推荐方式是通过其接口 ReactiveMongoOperations。
此外,Spring Boot 将自动 扫描类路径,如果它在类路径中发现 Spring Data MongoDB 2.0 以及 MongoDB 本身,它将创建一个 ReactiveMongoTemplate。我们可以简单地请求一个自动装配到我们的类中的副本,无论是通过构造函数注入还是字段注入,如下所示:
最后一个代码片段中的 @Autowired 表示该字段将在加载类时注入,我们将获得实现 ReactiveMongoOperations。
Note
对于测试用例,现场注入很好。但是对于实际运行的组件,Spring 团队建议使用构造函数注入,这将贯穿本书。有关构造函数注入的好处的更多详细信息,请阅读 Spring Data 负责人 Oliver Gierke 在 http://olivergierke.de/2013/11/why-field-injection-is-evil/。
使用 ReactiveMongoOperations 和 Query byExample,我们可以 看之前的查询改写如下:
我们可以撕开 MongoDB 查询中的这个最新问题,如下所示:
- The declaration of the probe and its example is the same as shown earlier
- To create a query for one entry, we use
findOnefromReactiveMongoOperations - For the first parameter, we create a new
Query, and use thebyExamplestatic helper to feed it the example - For the second parameter, we tell it to return an
Employee
因为这是 ReactiveMongoOperations,所以返回的值包含在 Mono 中。
可以进行类似的调整以获取具有自定义条件的多个条目,如下所示:
现在让我们看看前面的查询的详细信息:
- The example is the same as the previous
findAllquery - This time we use
find, which accepts the same parameters asfindOne, but returns aFlux
ReactiveMongoOperations 及其 Query 输入打开了一个强大操作的世界,如下所示:
除此之外,还支持更新文档、查找然后更新和更新插入,所有这些都通过流畅的 API 支持丰富的原生 MongoDB 运算符。
到目前为止,我们已经为 MongoDB 制作了一个 domain 对象,定义了一个响应式存储库,并更新了我们的 ImageService 来使用它。但是,如果我们开火,我们怎么能看到正在发生的事情呢?除了查看网页,我们还能在控制台日志中看到什么?
到目前为止,这似乎是我们得到的最多的:

我们看到一些关于 connecting 到 MongoDB 实例的日志消息,但仅此而已!没有太多可以调试的东西,嗯?永远不要害怕,Spring Boot 来救援。
Spring Boot 提供了广泛的日志记录支持。即兴发挥,我们可以创建一个 logback.xml 文件,并将其添加到 src/main/resources 中的配置中。 Spring Boot 将读取它,并覆盖其默认的日志记录策略。如果我们想彻底检查日志设置,那就太好了。
但很多时候,我们只想为特定的包调整一些日志级别。 Spring Boot 为我们提供了一种更细粒度的方式来改变 what 被记录的内容。
只需将其添加到 src/main/resources/application.properties:
这些调整可以描述如下:
logging.leveltells Spring Boot to adjust log levels with the name of the package tacked on followed by a level- The application code,
com.greglturnquist, is set toDEBUG - Spring Data,
org.springframework.data, is set toTRACE - Project Reactor,
reactor.coreandreactor.util, are set toTRACE
通过这些调整,如果我们 launch 我们的应用程序,这是我们得到的输出的一部分:
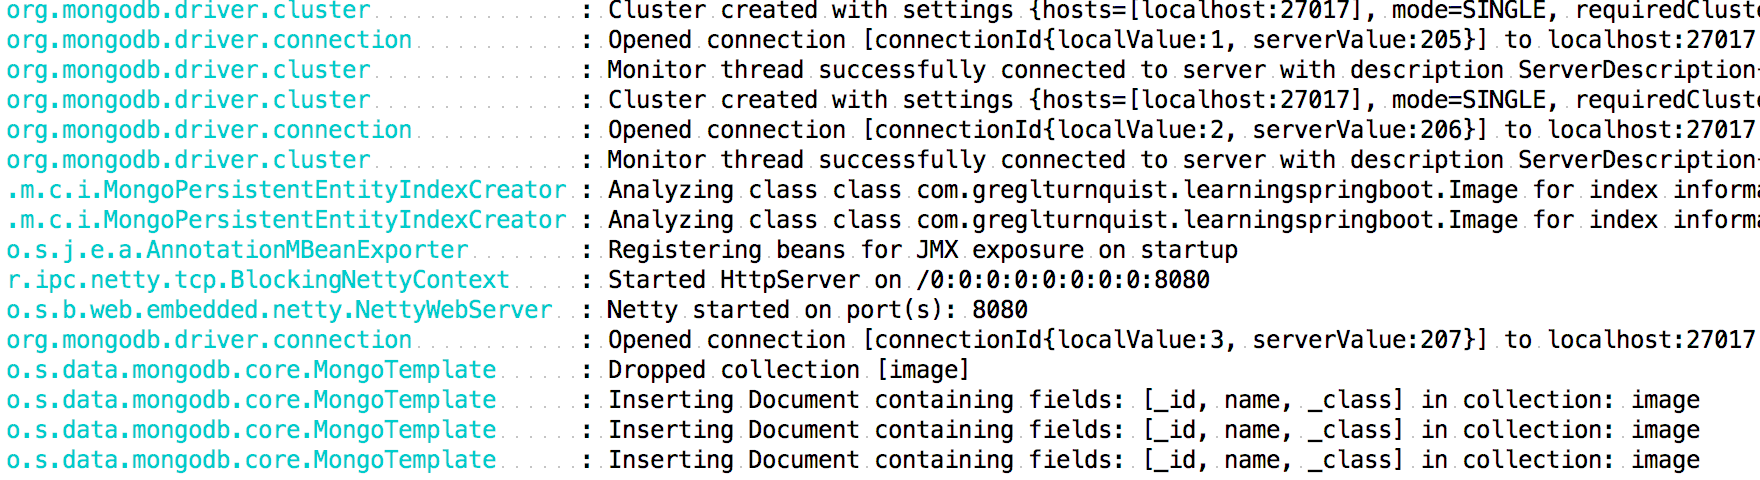
前面的输出显示了一些 MongoDB 活动,包括集群配置、连接和域分析。到最后,InitDatabase预加载我们的数据的效果在一定程度上可以看出,可以解释如下:
Dropped collection [image]: This indicates all the entries being deleted by ourdropCollectionInserting Document containing fields...: This indicates entries being saved using ourinsert
这绝对是一种改进,但缺少的是 Reactor 在处理所有这些方面所起的作用。当我们调高 Reactor 的日志级别时,没有任何输出。
如果我们查看ImageService,就会出现问题,我们可以在哪里添加更多的日志记录?在传统的命令式编程中,我们通常会在沿途的几个地方编写 log.debug("blah blah")。但是在这种反应式流程中,没有“停止”来放置它们。
Project Reactor 带有一个声明性的日志语句,我们可以在此过程中添加。下面是我们如何装饰 findAllImages:
前面的服务操作只有一个反应步骤,所以我们只能插入一个 log 语句。 ImageService.findOneImage 有同样的故事,所以不需要展示。
但是,createImage 有几个步骤,在这段代码中 seen :
最后的代码与我们之前的拥有 相同,只是每个反应器操作都带有一个log 语句。每一个都附加了一个唯一的标签,所以,我们可以告诉确切地发生了什么以及发生在哪里。
如果我们从 uploads 两个模拟多部分文件的单元测试中执行此代码(我们将在下一章,第 13 章,使用 Spring Boot 进行测试),我们可以在控制台输出中发现每个标签,如下所示:
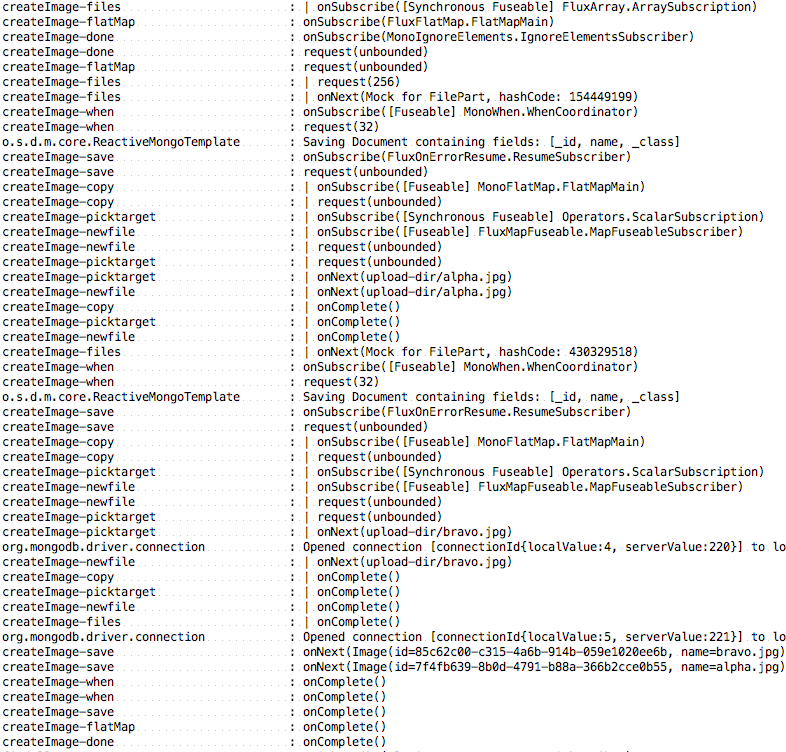
前面的输出显示了每个步骤,以及它们如何在反应流的订阅、请求、下一步和完成的舞蹈中一起发挥作用。最值得注意的是,外部操作(files、flatMap 和 done)订阅时显示在顶部。每个文件都会导致过滤操作发生,然后是保存和复制。在底部,同样的 outer 操作(同样是 files,< code class="literal">flatMap 和 done) 发出反应流 complete
。
要使用日志标记 deleteImage,让我们进行以下更改:
这与我们之前编写的 deleteImage 代码相同,只是我们在日志语句中随处可见,以准确指示正在发生的事情。
一切都设置好后,我们应该能够进行测试。对于初学者,我们可以通过运行 LearningSpringBootApplication 类的 public static void main() 方法来启动代码,或者我们可以运行从命令行使用 Gradle,如下所示:
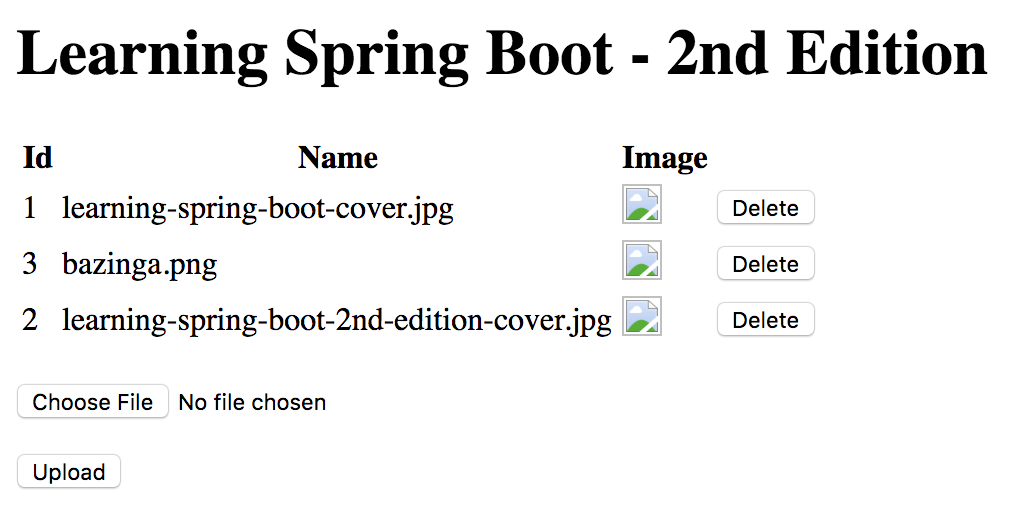
如果我们启动应用程序并导航到 http://localhost:8080,我们可以看到预加载的图像,如下图所示:
我们可以单击单个图像,然后查看一些 comparable 日志消息,如下所示:
这个非常简单的流程说明了 Reactive Streams 模式。我们订阅了一张图片。发送了一个请求——在这种情况下,是无限的(即使我们事先知道只有一个结果)。 onNext 是答案,它是一个基于文件的 URL(一个 Spring Resource)被返回。然后发出 complete。
Note
此日志记录仅限于 ImageService,这意味着我们看不到它转换为 HTTP 响应。如果您想进一步探索,请随意添加额外的 log 语句到 HomeController.oneRawImage。
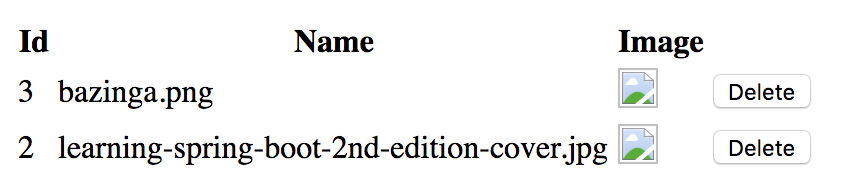
如果我们点击Delete按钮,会删除图片并刷新页面,如下:
完成删除后,如果我们查看 console 日志并关注发生了什么,我们会看到如下内容:
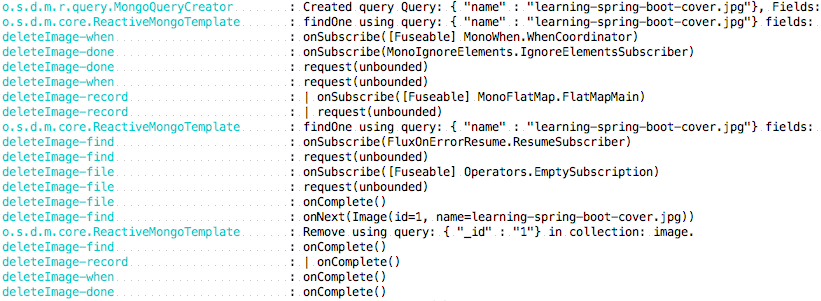
在最顶部,我们可以看到发出的 MongoDB 查询,通过 findOne using query 输出找到所需的图像。设置Mono.when,然后发出Remove using query删除记录。除了完整的信号外,文件的实际删除只记录了很少的细节。当我们看到 deleteImage-done 发出一个完整的问题时,整个事情就结束了。
Note
我们还没有开始用日志消息标记 HomeController,但在这个阶段我们不需要。如果您想探索该地区,请随意。使用这些日志语句,您可以真正了解 Reactor 是如何安排任务的,甚至可以发现操作顺序在不同时间发生波动的情况。关键是我们有一个真正的工具来调试反应流。
有了这个,我们成功地编写了一个响应式 ImageService ,它既可以将文件复制到服务器,又可以在 MongoDB 中写入记录;我们做到了,让 Spring Boot 自动配置所有 beans 使 Spring Data MongoDB 与 Spring WebFlux 和 MongoDB 无缝协作。