vlambda博客
学习文章列表

读书笔记《spring-security-3-x-cookbook》第 10 章使用 Spring Web 服务的 Spring Security

第 10 章使用 Spring Web 服务的 Spring Security

在本章中,我们将介绍:

  • 在 RESTful Web 服务上应用 Spring Security

  • 使用 cURL 工具的 Spring RESTful Web 服务的 Spring Security

  • 将 Spring Security 与 Apache CXF RESTful 服务集成

  • 将 Spring Security 与基于 Apache CXF SOAP 的 Web 服务集成

  • 将 Spring Security 与 Apache Camel 集成

介绍


SOAP简单对象访问协议)是基于 XML 的网络服务。它用于在 Web 服务之间传输请求和响应消息。

REST (Representational State Transfer) 是一种发送数据的方式通过 HTTP 协议作为 XML、文本或 JSON 文件。

在本节中,我们将 Spring Security 应用于 Web 服务。任何 Web 服务的正常流程是服务 WSDL 或 URL 将暴露给最终用户。在 Spring Security 的应用上,最终用户可以通过身份验证和授权使用服务。

在 RESTful Web 服务上应用 Spring Security


REST 已成为提供 Web 服务的另一种方式

可以使用 XML、文本或 JSON 格式跨应用程序共享数据。 REST Web 服务被视为轻量级 Web 服务。

让我们应用 Spring Security 来访问 REST Web 服务,这样只有授权用户才能访问 RESTful Web 服务。由于使用 URL 访问 RESTful Web 服务并使用 HTTP 协议,我们可以轻松应用 URL 级别的安全性。此示例演示基于表单的身份验证。但用户也可以使用 BASIC 和 Digest Authentication。

下面是注释与Spring一起用于生成RESTful Web服务:

  • @PathVariable

  • @RequestMapping

  • @RequestMethod

准备好

  • 使用 Spring Web 服务 API 创建 RESTful Web 服务

  • 添加 Spring Security 依赖项

  • 将 Spring 过滤器配置添加到 Web.xml 文件

  • 配置 application-security.xml 文件

  • 创建一个 AccessController 类来处理登录和注销操作

  • 在应用程序中配置 Spring Security 以对用户进行身份验证

怎么做...

以下是将 RESTful Web 服务与 Spring Security 集成的步骤:

  1. 让我们用 @PathVariable 创建一个 BookController 类,如以下代码片段所示:

    package org.springframework.rest;
    @Controller
    public class BookController {
      private static final Map<Integer, Books> books = new HashMap<Integer, Books>();
      static {
        try {
          books.put(1, new Books(1, "Someone Like You", "Penguin", "Durjoy Datta-Nikita Singh"));
          books.put(2, new Books(2, "The Secret Wish List", "Westland", " Preeti Shenoy"));
          books.put(3, new Books(3, "Love Stories That Touched My Heart ", "Metro Reads", " Preeti Shenoy"));
        } catch (Exception e) {
          e.printStackTrace();
        }
      }
      @RequestMapping(value = "/books/{book_id}", method = RequestMethod.GET)
      @ResponseBody
      public Books findCharacter(@PathVariable int book_id) {
        return books.get(book_id);
      }
    }
  2. 创建 书籍 POJO带有 @JsonAutoDetect 注解的类,如以下代码片段所示:

    @JsonAutoDetect
    public class Books {
        private int book_id;
        private String book_name;
        private String book_publication;
        private String book_author;
        public Books(int book_id, String book_name, String book_publication, String book_author) {
          this.book_id = book_id;
          this.book_name = book_name;
          this.book_publication = book_publication;
          this.book_author = book_author;
        }
        public String getBook_author() {
          return book_author;
        }
        public void setBook_author(String book_author) {
          this.book_author = book_author;
        }
        public int getBook_id() {
          return book_id;
        }
        public void setBook_id(int book_id) {
          this.book_id = book_id;
        }
        public String getBook_name() {
          return book_name;
        }
        public void setBook_name(String book_name) {
          this.book_name = book_name;
        }
        public String getBook_publication() {
          return book_publication;
        }
        public void setBook_publication(String book_publication) {
          this.book_publication = book_publication;
        }
    }
  3. 创建 一个 AccessController 类来处理 登录和注销操作:

    package org.springframework.booksservice;
    @Controller
    public class AccessController {
      @RequestMapping(value = "/", method = RequestMethod.GET)
      public String defaultPage(ModelMap map) {
        return "redirect:/login";
      }
      @RequestMapping(value = "/login", method = RequestMethod.GET)
      public String login(ModelMap model) {
        return "login";
      }
      @RequestMapping(value = "/accessdenied", method = RequestMethod.GET)
      public String loginerror(ModelMap model) {
        model.addAttribute("error", "true");
        return "denied";
      }
      @RequestMapping(value = "/logout", method = RequestMethod.GET)
      public String logout(ModelMap model) {
        return "logout";
      }
    }
  4. 配置Application-security.xml文件,如下代码片段所示:

      <http auto-config="false" use-expressions="true">
        <intercept-url pattern="/login" access="permitAll" />
        <intercept-url pattern="/logout" access="permitAll" />
        <intercept-url pattern="/accessdenied" access="permitAll" />
        <intercept-url pattern="/**" access="hasRole('ROLE_EDITOR')" />
        <form-login login-page="/login" default-target-url="/books" authentication-failure-url="/accessdenied" />
        <logout logout-success-url="/logout" />
      </http>
      <authentication-manager>
        <authentication-provider>
        <user-service>
          <user name="anjana" password="packt123" authorities="ROLE_EDITOR" />
        </user-service>
      </authentication-provider>
    </authentication-manager>

这个怎么运作...

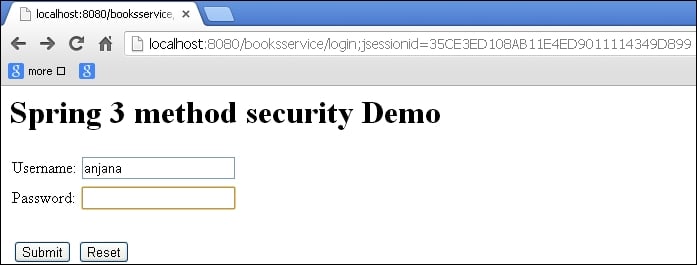
访问 URL:http://localhost:8080/booksservice/books/1。这是基于 REST 的 URL, 使用 Spring Security 限制访问。当用户调用基于 REST 的 Web 服务 URL 时,Spring Security 会将用户重定向到登录页面。成功验证后,用户将被重定向到授权的基于 REST 的 Web 服务页面。

以下是使用 Spring Security 的基于 REST 的应用程序的工作流程。您将被重定向到登录页面,如以下屏幕截图所示:

读书笔记《spring-security-3-x-cookbook》第 10 章使用 Spring Web 服务的 Spring Security

身份验证和授权后,您将能够访问RESTful Web服务,如以下屏幕截图所示:

读书笔记《spring-security-3-x-cookbook》第 10 章使用 Spring Web 服务的 Spring Security

也可以看看

  • 将 Spring Security 与 Apache CXF RESTful Web 服务集成 秘诀

  • 将 Spring Security 与基于 Apache CXF SOAP 的 Web 服务集成 秘诀

  • 将 Spring Security 与 Apache Camel 集成 秘诀

使用 cURL 工具的 Spring RESTful Web 服务的 Spring Security


在这个 示例中,我们明确使用了 Spring Security API 类和接口。我们将使用 curl 命令验证 RESTful Web 服务。使用 cURL 工具,您可以使用 URL 传输数据。它可用于测试身份验证。这是同一个图书服务示例,它具有一些明确的 Spring Security 相关 API 类,例如 AuthenticationEntryPointSimpleURLAuthenticationSuccessHandler。在这里,目标是演示它们在 Spring Security 中的内部用法。

准备好

  • 实现AuthenticationEntryPoint接口并在XML文件中配置

  • 扩展 SimpleUrlAuthenticationSuccessHandler 并在 XML 文件中配置

  • 配置 Application-security.xml 文件

  • 将安全相关过滤器添加到 Web.xml 文件

  • 下载适用于您的操作系统的 cURL 工具

怎么做...

以下是使用 AuthenticationEntryPoint 接口和 SimpleURLAuthenticationSuccessHandler 类应用 Spring Security 认证和授权机制的步骤:

  1. AuthenticationEntryPoint 类是一个认证入口类,它实现了 AuthenticationEntryPointImpl 类。

    public final class AuthenticationEntryPointImpl implements AuthenticationEntryPoint {
      @Override
      public void commence(final HttpServletRequest request, final HttpServletResponse response, final AuthenticationException authException) throws IOException {
        response.sendError(HttpServletResponse.SC_UNAUTHORIZED, "Unauthorized");
      }
    }
  2. 扩展SimpleURLAuthenticationSuccessHandler类,如如下代码片段:

      public class MySimpleUrlAuthenticationSuccessHandler extends SimpleUrlAuthenticationSuccessHandler {
        private RequestCache requestCache = new HttpSessionRequestCache();
        @Override
        public void onAuthenticationSuccess(final HttpServletRequest request, final HttpServletResponse response, final Authentication authentication) throws ServletException, IOException {
          final SavedRequest savedRequest = requestCache.getRequest(request, response);
          if (savedRequest == null) {
            clearAuthenticationAttributes(request);
            return;
          }
          final String targetUrlParameter = getTargetUrlParameter();
          if (isAlwaysUseDefaultTargetUrl() || (targetUrlParameter != null && StringUtils.hasText(request.getParameter(targetUrlParameter)))) {
            requestCache.removeRequest(request, response);
            clearAuthenticationAttributes(request);
            return;
          }
          clearAuthenticationAttributes(request);
        }
        public void setRequestCache(final RequestCache requestCache) {
          this.requestCache = requestCache;
        }
      }
  3. 配置 Application-security.xml 文件。

      <http entry-point-ref="authenticationEntryPoint">
        <intercept-url pattern="/**" access="ROLE_EDITOR"/>
        <form-login authentication-success-handler-ref="mySuccessHandler" />
        <logout />
      </http>
      <beans:bean id="mySuccessHandler"class="org.springframework.booksservice.MySimpleUrlAuthenticationSuccessHandler"/>
      <beans:bean id="authenticationEntryPoint"class="org.springframework.booksservice.AuthenticationEntryPointImpl"/>
      <authentication-manager>
        <authentication-provider>
          <user-service>
            <user name="anjana" password="packt123" authorities="ROLE_EDITOR" />
          </user-service>
        </authentication-provider>
      </authentication-manager>
      </beans:beans>

这个怎么运作...

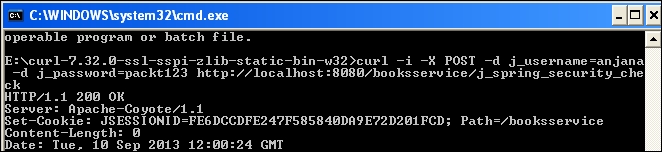
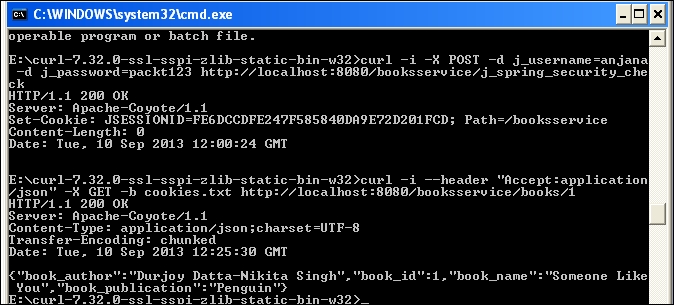
现在访问网址:http://localhost:8080/booksservice/books/1

会看到一个页面,上面说您无权查看这些页面。

让我们使用为我们提供 cookie 的 cURL 工具。 200 OK 消息暗示我们已通过身份验证。

Command: curl -i -X POST -d j_username=anjana -d j_password=packt123 http://localhost:8080/booksservice/j_spring_security_check
curl -i --header "Accept:application/json" -X GET -b cookies.txt http://localhost:8080/booksservice/books/1

cookie 存储在名为 mycookies.txt 的文件中。

读书笔记《spring-security-3-x-cookbook》第 10 章使用 Spring Web 服务的 Spring Security

也可以看看

  • 将 Spring Security 与 Apache CXF RESTful Web 服务集成 秘诀

  • 将 Spring Security 与基于 Apache CXF SOAP 的 Web 服务集成 秘诀

  • 将 Spring Security 与 Apache Camel 集成 秘诀

将 Spring Security 与 Apache CXF RESTful Web 服务集成


这部分让我们创建一个Apache CXF RESTful Web 服务。它是一个开源的 Web 服务框架。让我们在此演示中使用 BASIC 身份验证。

CXF 支持合约优先和合约最后的 Web 服务。它还支持 RESTful Web 服务。

让我们将 Spring Security 与 CXF 集成并授权 RESTful Web 服务。

准备好

  • cxf 依赖添加到 pom 文件中

  • 使用 CXF 设置 RESTful Web 服务

  • 配置 spring-security.xml 文件

怎么做...

以下是将 Spring Security 与 Apache CXF RESTful Web 服务集成的步骤:

  1. 配置 Book POJO班级。

    @XmlRootElement(name = "book")
    public class Book {
        private int book_id;
        private String book_name;
        private String book_publication;
        private String book_author;
        public Book(int book_id, String book_name, String book_publication, String book_author) {
          this.book_id = book_id;
          this.book_name = book_name;
          this.book_publication = book_publication;
          this.book_author = book_author;
        }
        public String getBook_author() {
          return book_author;
        }
        public void setBook_author(String book_author) {
          this.book_author = book_author;
        }
        public int getBook_id() {
          return book_id;
        }
        public void setBook_id(int book_id) {
          this.book_id = book_id;
        }
        public String getBook_name() {
          return book_name;
        }
        public void setBook_name(String book_name) {
          this.book_name = book_name;
        }
        public String getBook_publication() {
          return book_publication;
        }
        public void setBook_publication(String book_publication) {
          this.book_publication = book_publication;
        }
    }
  2. 配置 BookCollection POJO 班级。

      @XmlType(name = "BookCollection")
      @XmlRootElement
      public class BookCollection {
        private Collection books;
        public BookCollection() {
        }
        public BookCollection(Collection books) {
          this.books = books;
        }
        @XmlElement(name="books")
        @XmlElementWrapper(name="books")
        public Collection getUsers() {
          return books;
        }
      }
  3. 配置 BookService 接口。

    public interface BookService {
        BookCollection getBooks();
        Book getBook(Integer id);
        Response add(Book book);
    }
  4. 配置 BookServiceImpl 类。

      @Path ("/services/")
      public class BookServiceImpl implements BookService {
        private static final Map<Integer, Book> books = new HashMap<Integer, Book>();
        private static int index = 4;
        static {
          try {
            books.put(1, new Book(1, "Someone Like You", "Penguin", "Durjoy Datta-Nikita Singh"));
              books.put(2, new Book(2, "The Secret Wish List", "Westland", " Preeti Shenoy"));
              books.put(3, new Book(3, "Love Stories That Touched My Heart ", "Metro Reads", " Preeti Shenoy"));
            } catch (Exception e) {
              e.printStackTrace();
            }
        }
        @Override
        @POST
        @Path("/book")
        @Consumes("application/json")
        public Response add(Book book) {
          System.out.println("Adding :" + book.getBook_name());
          book.setBook_id(index++);
          return Response.status(Response.Status.OK).build();
        }
        @Override
        @GET
        @Path("/book/{book_id}")
        @Produces("application/json")
        public Book getBook(@PathParam("book_id") Integer book_id) {
          return books.get(book_id);
        }
        @Override
        @GET
        @Path("/books")
        @Produces("application/json")
        public BookCollection getBooks() {
          return new BookCollection(books.values());
        }
    }
  5. 配置 application-security.xml< /代码>文件:

      <sec:global-method-security pre-post-annotations="enabled" />
      <sec:http auto-config="true" use-expressions="true">
        <sec:intercept-url pattern="/**" access="hasRole('ROLE_EDITOR')"/>
        <sec:http-basic></sec:http-basic>
        <sec:logout logout-success-url="/logout" />
      </sec:http>
      <import resource="classpath:META-INF/cxf/cxf.xml" />
      <import resource="classpath:META-INF/cxf/cxf-servlet.xml"/>
      <jaxrs:server address="/" id="myService">
        <jaxrs:serviceBeans>
          <ref bean="bookserviceImpl"/>
        </jaxrs:serviceBeans>
        <jaxrs:providers>
          <ref bean="jacksonProvider"/>
        </jaxrs:providers>
      </jaxrs:server>
      <bean id="jacksonProvider" class="org.codehaus.jackson.jaxrs.JacksonJaxbJsonProvider"/>
      <bean id="bookserviceImpl" class="org.springframework.booksservice.BookServiceImpl"/>
      <sec:authentication-manager>
        <sec:authentication-provider>
          <sec:user-service>
            <sec:user name="anjana" password="packt123" authorities="ROLE_EDITOR" />
          </sec:user-service>
        </sec:authentication-provider>
      </sec:authentication-manager>
    </beans>
  6. 配置 Web.xml 文件。

        <!-- The definition of the Root Spring Container shared by all Servlets and Filters -->
      <context-param>
        <param-name>contextConfigLocation</param-name>
        <param-value>/WEB-INF/spring/application-security.xml</param-value>
      </context-param>
      <!-- Creates the Spring Container shared by all Servlets and Filters -->
      <listener>
      <listener-class>org.springframework.web.context.ContextLoaderListener</listener-class>
      </listener>
      <!-- Processes application requests -->
      <servlet>
        <servlet-name>cxf</servlet-name>
        <servlet-class>org.apache.cxf.transport.servlet.CXFServlet</servlet-class>
        <load-on-startup>1</load-on-startup>
      </servlet>
      <servlet-mapping>
        <servlet-name>cxf</servlet-name>
        <url-pattern>/services/*</url-pattern>
      </servlet-mapping>
      <!-- Spring child -->
      <!-- <servlet> <servlet-name>bookservice_cxf</servlet-name> <servlet-class>org.springframework.web.servlet.DispatcherServlet</servlet-class> <load-on-startup>1</load-on-startup> </servlet> <servlet-mapping> <servlet-name>bookservice_cxf</servlet-name> <url-pattern>/bookservice_cxf/*</url-pattern> </servlet-mapping>-->
      <filter>
        <filter-name>springSecurityFilterChain</filter-name>
        <filter-class>org.springframework.web.filter.DelegatingFilterProxy</filter-class>
      </filter>
      <filter-mapping>
        <filter-name>springSecurityFilterChain</filter-name>
        <url-pattern>/*</url-pattern>
      </filter-mapping>
    </web-app>

这个怎么运作...

RESTful 服务 本示例中的CXF 框架提供。然后将应用程序与 Spring Security 集成,以便为 RESTful Web 服务提供安全的身份验证和授权模块。 Spring Security 过滤器链管理身份验证和授权过程。当您访问该服务时,系统会提示您登录,如以下屏幕截图所示。登录后可以查看 RESTful 数据。 Mozilla Firefox 浏览器将提示用户以文件格式下载数据。

读书笔记《spring-security-3-x-cookbook》第 10 章使用 Spring Web 服务的 Spring Security

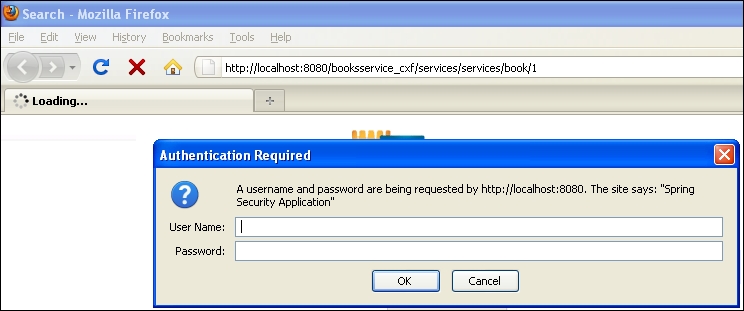
现在 访问 URL:http:// /localhost:8080/booksservice_cxf/services/services/book/1

读书笔记《spring-security-3-x-cookbook》第 10 章使用 Spring Web 服务的 Spring Security

也可以看看

  • 将 Spring Security 与 Apache CXF RESTful Web 服务集成 秘诀

  • 将 Spring Security 与 Apache Camel 集成 秘诀

将 Spring Security 与基于 Apache CXF SOAP 的 Web 服务集成


这部分,让我们创建一个基于SOAP的web服务。我们将演示 Spring Security 与基于 Apache CXF SOAP 的 Web 服务的集成。

使用 Apache CXF 创建基于 SOAP 的 Web 服务已成为一个简单的过程。

准备好

  • 将 CXF-SOAP 依赖项添加到 pom 文件中。

  • 基于 Spring Security 的依赖添加到 pom 文件中。

  • 使用 interfaceImpl 类设置基于 SOAP 的 Web 服务。

  • 配置 spring-security.xml 文件。

  • 作为设置的一部分,将 jars 添加到 Tomcat_7.0/lib 文件夹。 Tomcat 需要其 lib 文件夹中的以下 jar 文件才能使用 CXF Web 服务。没有这些罐子可能会导致一些错误:

    • streambuffer.jar

    • stax-ex

    • jaxws-ap-2.1

    • jaxws-rt

怎么做...

以下是将基于 Apache CXF SOAP 的 Web 服务与 Spring Security 集成的步骤:

  1. Book POJO 有 getter 和 setter 方法。它还有一个参数化的构造函数。 Book POJO用于​​BookService接口,提供Book 从客户端应用程序请求。

    package org.packt.cxf.domain;
    public class Book {
      private int book_id;
      private String book_name;
      private String book_publication;
      private String book_author;
      public Book() {
      }
      public Book(int book_id, String book_name, String book_publication, String book_author) {
        this.book_id = book_id;
        this.book_name = book_name;
        this.book_publication = book_publication;
        this.book_author = book_author;
      }
      public String getBook_author() {
        return book_author;
        }
        public void setBook_author(String book_author) {
            this.book_author = book_author;
      }
      public int getBook_id() {
        return book_id;
      }
      public void setBook_id(int book_id) {
        this.book_id = book_id;
      }
      public String getBook_name() {
        return book_name;
      }
      public void setBook_name(String book_name) {
        this.book_name = book_name;
      }
      public String getBook_publication() {
        return book_publication;
      }
      public void setBook_publication(String book_publication) {
        this.book_publication = book_publication;
      }
    }
  2. BookService 接口是 使用 @WebService 创建的注释,在 getBookDetails 是 WSDL 中的服务方法。

    package org.packt.cxf.service;
    import javax.jws.WebService;
    import org.packt.cxf.domain.Book;
    @WebService
    public interface BookService {
      public Book getBookDetails(int book_id);
    }
  3. BookServiceImpl类是BookService接口的实现类,使用@webservice 注释org.packt.cxf.service

    import java.util.HashMap;
    import java.util.Map;
    import javax.jws.WebService;
    import org.packt.cxf.domain.Book;
    @WebService(endpointInterface = "org.packt.cxf.service.BookService")
    public class BookServiceImpl implements BookService{
        private static final Map<Integer, Book> books = new HashMap<Integer, Book>();
        private static int index = 4;
        static {
          try {
            books.put(1, new Book(1, "Someone Like You", "Penguin", "Durjoy Datta-Nikita Singh"));
            books.put(2, new Book(2, "The Secret Wish List", "Westland", " Preeti Shenoy"));
            books.put(3, new Book(3, "Love Stories That Touched My Heart ", "Metro Reads", " Preeti Shenoy"));
          } catch (Exception e) {
            e.printStackTrace();
          }
        }
        @Override
        public Book getBookDetails(int book_id) {
          return books.get(book_id);
        }}
  4. Cxf-servlet.xml< /code> 文件,我们注册Web服务接口和实现类。

      <beans xmlns="http://www.springframework.org/schema/beans" xmlns:xsi="http://www.w3.org/2001/XMLSchema-instance" xmlns:jaxws="http://cxf.apache.org/jaxws" xsi:schemaLocation="http://www.springframework.org/schema/beans http://www.springframework.org/schema/beans/spring-beans.xsdhttp://cxf.apache.org/jaxwshttp://cxf.apache.org/schemas/jaxws.xsd">
      <import resource="classpath:META-INF/cxf/cxf.xml" />
      <import resource="classpath:META-INF/cxf/cxf-servlet.xml" />
      <import resource="classpath:META-INF/cxf/cxf-extension-http.xml" />
      <import resource="classpath:META-INF/cxf/cxf-extension-soap.xml" />
      <jaxws:endpoint id="bookService"implementor="org.packt.cxf.service.BookServiceImpl" address="/BookService" />
      </beans>
  5. Web.xml文件中,我们参考cxf-servlet.xml的位置并配置CXFSservlet

      <web-app version="2.5" xmlns="http://java.sun.com/xml/ns/javaee" xmlns:xsi="http://www.w3.org/2001/XMLSchema-instance" xsi:schemaLocation="http://java.sun.com/xml/ns/javaee http://java.sun.com/xml/ns/javaee/web-app_2_5.xsd">
        <display-name>SampleWSCxf</display-name>
        <listener>
          <listener-class>org.springframework.web.context.ContextLoaderListener</listener-class>
        </listener>
        <context-param>
          <param-name>contextConfigLocation</param-name>
          <param-value>WEB-INF/cxf-servlet.xml</param-value>
        </context-param>
        <servlet>
          <servlet-name>CXFServlet</servlet-name>
          <servlet-class>org.apache.cxf.transport.servlet.CXFServlet</servlet-class>
          <load-on-startup>1</load-on-startup>
        </servlet>
        <servlet-mapping>
          <servlet-name>CXFServlet</servlet-name>
          <url-pattern>/*</url-pattern>
        </servlet-mapping>
      </web-app>

这个怎么运作...

这部分我们演示了在网络服务上的基本身份验证。访问网址:http://localhost:8080/bookservice/

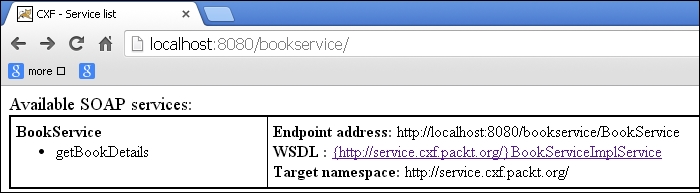
我们使用 CXF 框架创建了一个基于 SOAP 的 Web 服务。当用户访问 URL 时,预期的行为是授予对 WSDL 及其服务的访问权限。但是 Spring Security 会中断请求并为用户弹出一个登录对话框。认证成功后,用户可以访问 WSDL。

读书笔记《spring-security-3-x-cookbook》第 10 章使用 Spring Web 服务的 Spring Security

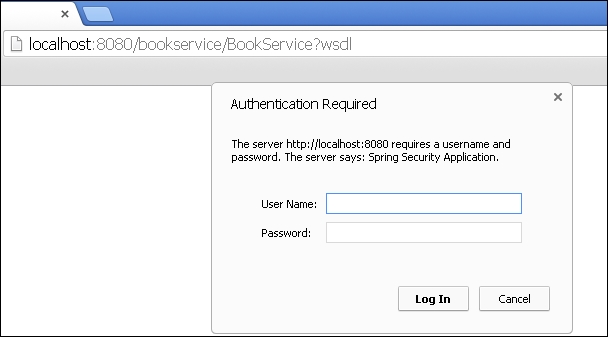
生成的 WSDL 可在以下 URL 获得:http://localhost:8080/bookservice/BookService?wsdl

<wsdl:definitions xmlns:ns1="http://cxf.apache.org/bindings/xformat" xmlns:soap="http://schemas.xmlsoap.org/wsdl/soap/"xmlns:tns="http://service.cxf.packt.org/" xmlns:wsdl="http://schemas.xmlsoap.org/wsdl/"xmlns:xsd="http://www.w3.org/2001/XMLSchema" name="BookServiceImplService" targetNamespace="http://service.cxf.packt.org/">
  <wsdl:types>
  <xs:schema xmlns:tns="http://service.cxf.packt.org/"xmlns:xs="http://www.w3.org/2001/XMLSchema"elementFormDefault="unqualified" targetNamespace="http://service.cxf.packt.org/" version="1.0">
  <xs:element name="getBookDetails"type="tns:getBookDetails"/>
  <xs:element name="getBookDetailsResponse" type="tns:getBookDetailsResponse"/>
  <xs:complexType name="getBookDetails">
    <xs:sequence>
      <xs:element name="arg0" type="xs:int"/>
    </xs:sequence>
  </xs:complexType>
  <xs:complexType name="getBookDetailsResponse">
    <xs:sequence>
      <xs:element minOccurs="0" name="return"type="tns:book"/>
    </xs:sequence>
  </xs:complexType>
  <xs:complexType name="book">
    <xs:sequence>
      <xs:element minOccurs="0" name="book_author" type="xs:string"/>
      <xs:element name="book_id" type="xs:int"/>
      <xs:element minOccurs="0" name="book_name" type="xs:string"/>
      <xs:element minOccurs="0" name="book_publication" type="xs:string"/>
      </xs:sequence>
    </xs:complexType>
  </xs:schema>
  </wsdl:types>
  <wsdl:message name="getBookDetails">
    <wsdl:part element="tns:getBookDetails" name="parameters"></wsdl:part>
  </wsdl:message>
  <wsdl:message name="getBookDetailsResponse">
    <wsdl:part element="tns:getBookDetailsResponse" name="parameters"></wsdl:part>
    </wsdl:message>
  <wsdl:portType name="BookService">
    <wsdl:operation name="getBookDetails">
      <wsdl:input message="tns:getBookDetails"name="getBookDetails"></wsdl:input>
      <wsdl:outputmessage="tns:getBookDetailsResponse"name="getBookDetailsResponse"></wsdl:output>
    </wsdl:operation>
  </wsdl:portType>
  <wsdl:bindingname="BookServiceImplServiceSoapBinding"type="tns:BookService">
    <soap:bindingstyle="document"transport="http://schemas.xmlsoap.org/soap/http"/>
      <wsdl:operationname="getBookDetails">
        <soap:operationsoapAction=""style="document"/>
      <wsdl:inputname="getBookDetails">
        <soap:bodyuse="literal"/>
      </wsdl:input>
      <wsdl:outputname="getBookDetailsResponse">
        <soap:bodyuse="literal"/>
      </wsdl:output>
    </wsdl:operation>
  </wsdl:binding>
  <wsdl:servicename="BookServiceImplService">
    <wsdl:portbinding="tns:BookServiceImplServiceSoapBinding"name="BookServiceImplPort">
      <soap:addresslocation="http://localhost:8080/bookservice/BookService"/>
    </wsdl:port>
  </wsdl:service>
</wsdl:definitions>

也可以看看

  • 将 Spring Security 与 Apache CXF RESTful Web 服务集成 秘诀

  • 将 Spring Security 与 Apache Camel 集成 秘诀

将 Spring Security 与 Apache Camel 集成


Apache Camel 可用于定义路由和中介应用程序的 规则。 Spring Security 可以与 Apache Camel 一起使用来对路由器进行身份验证。 Spring Security 身份验证策略对象控制对路由器的访问。 Spring Security 身份验证策略对象包含角色信息并引用 Spring 身份验证管理器。您可以从网站下载源代码。

准备好

  • 创建骆驼上下文

  • 使用 XML 配置添加路由规则

  • 在 Spring XML 文件中配置以下内容:

    • 访问决策管理器

    • 角色选民

    • 身份验证管理器

    • 用户详情服务

  • 配置具有权限的身份验证策略对象

  • 添加 camel-spring-security 依赖

怎么做...

以下是将 Apache Camel 与 Spring Security 集成的步骤:

  1. 创建 Camel–context.xml 文件并使用 Spring Security 定义路由规则。

      <spring-security:http realm="User Access Realm">
        <spring-security:intercept-url pattern="/apachecamel/**" access="ROLE_EDITOR"/>
        <spring-security:http-basic/>
        <spring-security:remember-me/>
      </spring-security:http>
      <spring-security:authentication-manager alias="authenticationManager">
        <spring-security:authentication-provider user-service-ref="userDetailsService"/>
      </spring-security:authentication-manager>
      <spring-security:user-service id="userDetailsService">
        <spring-security:user name="anju" password="anju123" authorities="ROLE_EDITOR,ROLE_AUTHOR"/>
        <spring-security:user name="shami" password="shami123" authorities="ROLE_EDITOR"/>
      </spring-security:user-service>
      <bean id="accessDecisionManager" class="org.springframework.security.access.vote.AffirmativeBased">
        <property name="allowIfAllAbstainDecisions" value="true"/>
        <property name="decisionVoters">
          <list>
            <bean class="org.springframework.security.access.vote.RoleVoter"/>
          </list>
        </property>
      </bean>
      <!-- The Policy for checking the authentication role of AUTHOR -->
      <authorizationPolicy id="author" access="ROLE_AUTHOR" authenticationManager="authenticationManager" accessDecisionManager="accessDecisionManager" xmlns="http://camel.apache.org/schema/spring-security"/>
      <!-- The Policy for checking the authentication role of EDITOR -->
      <authorizationPolicy id="editor" access="ROLE_EDITOR"xmlns="http://camel.apache.org/schema/spring-security"/>
      <camelContext id="myCamelContext" xmlns="http://camel.apache.org/schema/spring">
        <!-- Catch the authorization exception and set the Access Denied message back -->
        <onException>
        <exception>org.apache.camel.CamelAuthorizationException</exception>
        <handled>
          <constant>true</constant>
        </handled>
        <transform>
          <simple>Access Denied with the Policy of ${exception.policyId} !</simple>
          </transform>
        </onException>
        <route>
          <from uri="servlet:///editor"/>
          <!-- wrap the route in the policy which enforces security check -->
          <policy ref="editor">
            <transform>
              <simple>Normal user can access this service</simple>
            </transform>
          </policy>
        </route>
        <route>
          <from uri="servlet:///author"/>
          <!-- wrap the route in the policy which enforces security check -->
          <policy ref="author">
            <transform>
              <simple>Call the admin operation OK</simple>
            </transform>
          </policy>
        </route>
      </camelContext>
    </beans>
  2. Web.xml<中配置 Camel servlet /代码>。

    <!-- location of spring xml files -->
      <context-param>
        <param-name>contextConfigLocation</param-name>
        <param-value>classpath:camel-context.xml</param-value>
      </context-param>
      <!-- the listener that kick-starts Spring -->
      <listener>
        <listener-class>org.springframework.web.context.ContextLoaderListener</listener-class>
      </listener>
      <filter>
        <filter-name>springSecurityFilterChain</filter-name>
        <filter-class>org.springframework.web.filter.DelegatingFilterProxy</filter-class>
      </filter>
      <filter-mapping>
        <filter-name>springSecurityFilterChain</filter-name>
        <url-pattern>/*</url-pattern>
      </filter-mapping>
      <servlet>
        <servlet-name>CamelServlet</servlet-name>
        <servlet-class>org.apache.camel.component.servlet.CamelHttpTransportServlet</servlet-class>
        <load-on-startup>1</load-on-startup>
      </servlet>
      <servlet-mapping>
        <servlet-name>CamelServlet</servlet-name>
        <url-pattern>/apachecamel/*</url-pattern>
      </servlet-mapping>
    </web-app>

这个怎么运作...

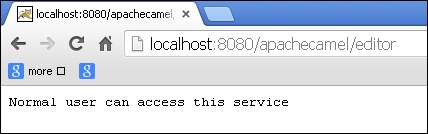
现在访问 URL:http://localhost:8080/apachecamel/editor

camel-context.xml文件有路由规则; camel-context.xml 文件的位置与 一起在 Web.xml 中配置CamelServlet 来处理路由机制。 <authorizationpolicy> 标签处理spring-security.xml文件中配置的资源的认证和授权。 <spring-security:user-service> 标签包含在路由请求之前可以授予访问权限的用户和角色的详细信息。以下是 Apache Camel 使用 Spring Security 中断路由过程 的工作流程。用户具有以下两个角色之一的授权:EDITORAUTHOR

读书笔记《spring-security-3-x-cookbook》第 10 章使用 Spring Web 服务的 Spring Security

也可以看看

  • 将 Spring Security 与 Apache CXF RESTful Web 服务集成 秘诀

  • 将 Spring Security 与 Apache Camel 集成 秘诀