读书笔记《building-distributed-applications-in-gin》第4章构建API身份验证
Chapter 4: Building API Authentication
本章专门介绍在构建公共 REpresentational State Transfer (REST) 应用程序编程接口(API)。它探讨了如何编写身份验证中间件来保护对 API 端点的访问以及如何通过 安全超文本传输协议 (HTTPS强>)。
在本章中,我们将重点关注以下主要主题:
- Exploring authentication
- Introducing JavaScript Object Notation (JSON) Web Tokens (JWTs)
- Persisting client sessions and cookies
- Authenticating with Auth0
- Building an HTTPS server
在本章结束时,您将能够构建一个带有私有和公共端点的 RESTful API。
Technical requirements
要遵循本章中的说明,您将需要以下内容:
- A complete understanding of the previous chapter—this chapter is a follow-up of the previous one and it will use the same source code. Hence, some snippets won't be explained, to avoid repetition.
- A basic understanding of API authentication concepts and the HTTPS protocol.
本章的代码包托管在 GitHub 上,地址为 https: //github.com/PacktPublishing/Building-Distributed-Applications-in-Gin/tree/main/chapter04。
Exploring authentication
在 上一章中,我们构建的 API 暴露了多个端点。目前,这些端点是公共的,不需要任何身份验证。在真实场景中,您需要保护这些端点。
下图说明了本章末尾要保护的端点:
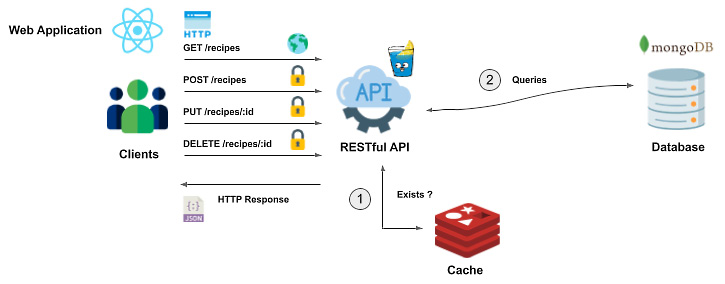
图 4.1 – 保护 RESTful API 端点
列出菜谱不需要身份验证,而负责添加的端点, 更新,或删除配方需要验证。
可以使用多种方法来保护前面的端点——以下是我们可以使用的一些方法:API 密钥、基本身份验证、客户端会话、OpenID Connect、开放授权(< strong class="bold">OAuth) 2.0 等等。最基本的身份验证机制是 API 密钥的使用。
Using API keys
在这个方法中,客户端在请求头中提供了一个秘密,称为API key。然后在发出 HTTP 请求时在端点处理程序处验证密钥。以下是 API 密钥认证的实现。 HTTP 处理程序检查 HTTP 请求中的 X-API-KEY 标头;如果密钥错误或在请求标头中未找到,则抛出未经授权的错误(401),如下面的代码片段所示(完整代码已被裁剪为简洁):
运行 MongoDB 和 Redis 容器后运行应用程序,但这次设置 X-API-KEY 环境变量如下:
笔记
您可以使用 OpenSSL 通过以下命令生成随机密钥字符串:openssl rand -base64 16。
如果您尝试添加新配方,则会返回 401 错误消息,如下图所示:
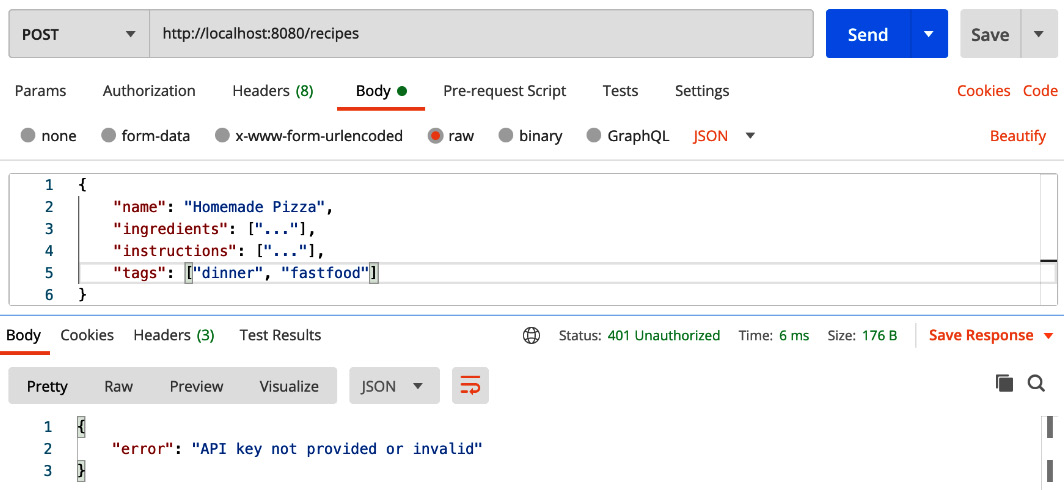
图 4.2 – 新配方
但是,如果您 在 POST
X-API-KEY 标头代码>请求,配方将被插入,如下图所示:
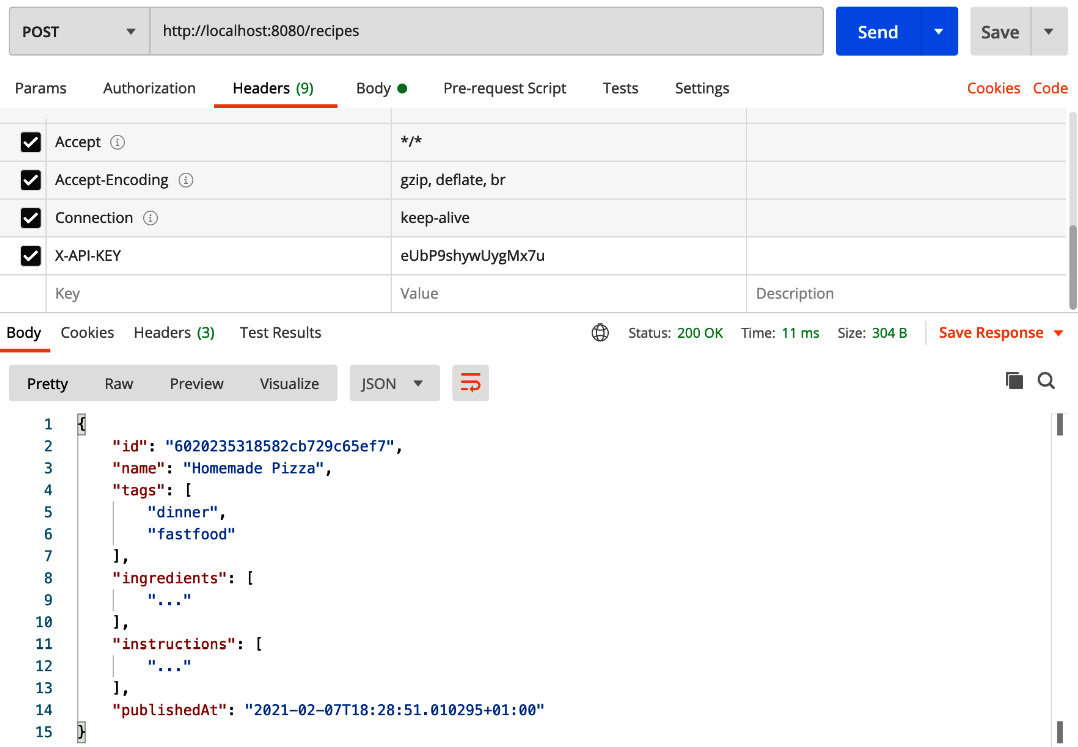
图 4.3 – POST 请求中的 X-API-KEY 标头
如果您不是 Postman 作为 HTTP/s 客户端的粉丝,您可以在终端上执行以下 cURL 命令:
目前,只有 POST /recipes 请求是安全的。为避免在其他 HTTP 端点中重复相同的代码片段,请通过编写以下代码来创建身份验证中间件:
在路由器定义中,使用认证中间件。最后,将端点重新组合到一个组中,如下所示:
在此阶段,重新运行 应用程序。如果您发出 GET /recipes 请求,将返回 401 错误,如以下屏幕截图所示。这是正常的,因为列表配方的路由处理程序位于身份验证中间件后面:

图 4.4 – GET /recipes 所需的 API 密钥
您希望 GET /recipes 请求是公开的,因此在组路由器之外注册端点,如下所示:
如果您对其进行测试,此时间端点将返回一个配方列表,如以下屏幕截图所示:
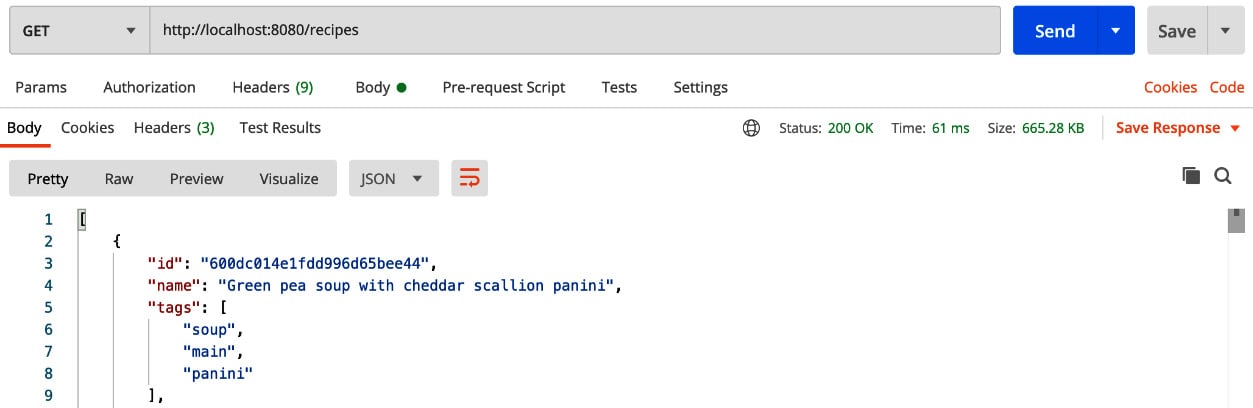
图 4.5 – 配方列表
API 密钥很简单;但是,任何向 API 发出请求的人都会传输他们的密钥,理论上, 密钥可以通过 man-in 轻松获取-the-middle (MITM) 在 未使用加密时进行攻击。这就是为什么在下一节中,我们将介绍一种称为 JWT 的更安全的身份验证机制。
笔记
MITM 是指攻击者将自己置于两方对话中以 窃取其凭据的情况。有关更多详细信息,请查看以下链接:https://snyk.io/学习/中间人攻击/。
Introducing JWTs
根据 征求意见 (RFC) 7519 (https://tools.ietf.org/html/rfc7519 ):
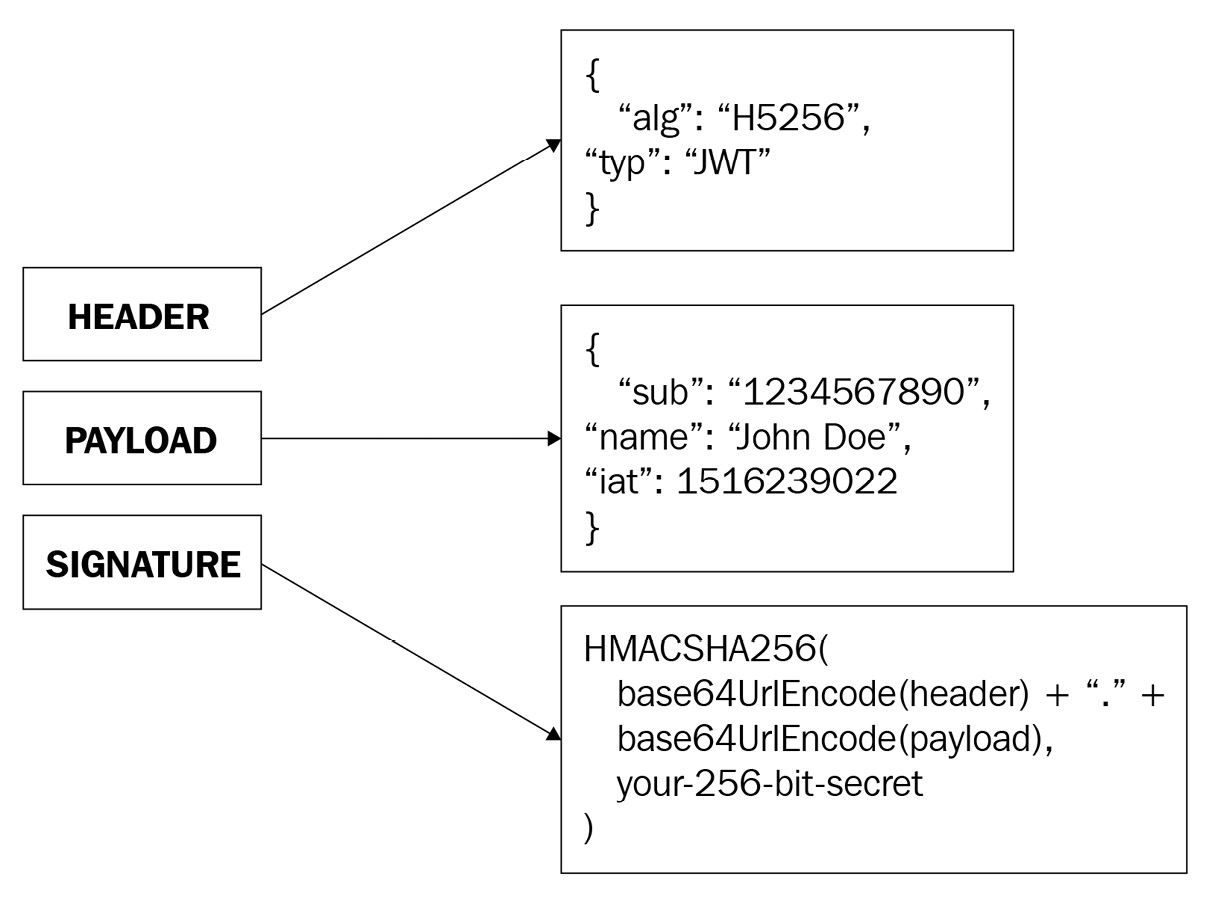
图 4.6 – JWT 部件
header 表示 用于生成签名的算法。 payload 包含关于用户的信息,以及令牌到期日期。最后,签名是使用密钥散列标题和有效负载部分的结果。
现在我们已经了解了 JWT 的工作原理,让我们将它集成到我们的 API 中。首先,使用以下命令安装 JWT Go 实现:
该包会自动添加到 go.mod 文件中,如下:
在弄脏之前,让我解释一下JWT身份验证将如何实现。基本上,客户端需要使用用户名和密码登录。如果这些凭据有效,则会生成并返回一个 JWT 令牌。客户端将通过包含 Authorization 标头在未来的请求中使用该令牌。如果向 API 发出请求,将通过将其签名与使用密钥生成的签名进行比较来验证令牌,并且 API 将返回目标响应。否则,将返回 401 错误。
以下序列图说明了客户端和 API 之间的通信:
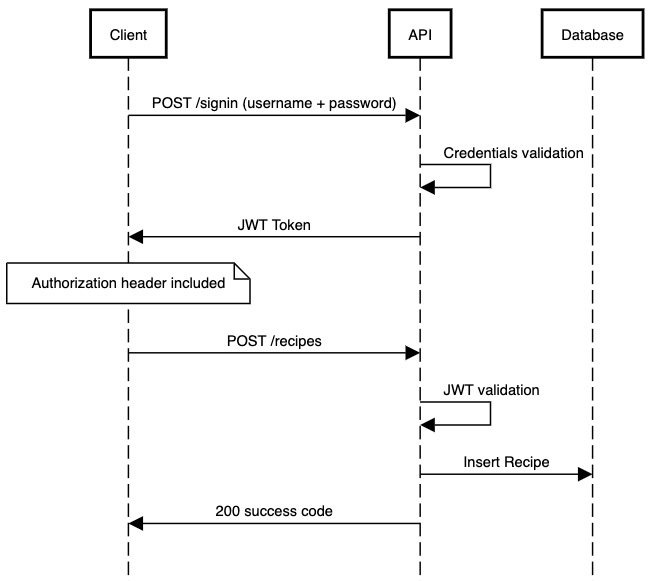
图 4.7 – 时序图
有了 ,在 handlers 下创建一个 auth.go 文件文件夹。该文件将公开处理身份验证工作流的函数。这是执行此操作的代码(为简洁起见,已裁剪完整代码):
接下来,您需要为用户凭据定义实体模型。在 models 文件夹中,创建一个带有用户名和密码属性的 user.go 结构体,如下所示:
定义模型后,我们可以继续实现身份验证处理程序。
Sign-in HTTP handler
SignInHandler 将 将请求正文编码为 User 结构并验证凭据是正确的。然后,它将颁发一个过期时间为 10 分钟的 JWT 令牌。 JWT 的签名是结合了标头和有效负载的 Base64 表示以及密钥的输出(注意 JWT_SECRET 环境变量的使用)。然后将组合传递给 HS256 散列算法。值得一提的是,作为一种安全措施,您必须将您的凭据保存在源代码之外。实现如下所示:
笔记
有关 哈希算法如何工作的更多信息,请查看官方 RFC:https://tools.ietf.org/html/rfc7518。
创建 SignInHandler 处理程序后,让我们通过 < 在 POST /signin 端点上注册此处理程序/a>更新 main.go 文件,如下(为简洁起见,代码已被裁剪):
接下来,我们更新handler/auth.go中的认证中间件来检查Authorization 标头而不是 X-API-KEY 属性。然后将标头传递给 ParseWithClaims 方法。它使用 Authorization 标头和密钥中的标头和有效负载生成签名。然后,它会验证签名是否与 JWT 上的签名匹配。如果不是,则认为 JWT 无效,并返回 401 状态码。 Go 实现如下所示:
使用以下命令重新运行应用程序:
服务器日志显示在以下屏幕截图中:
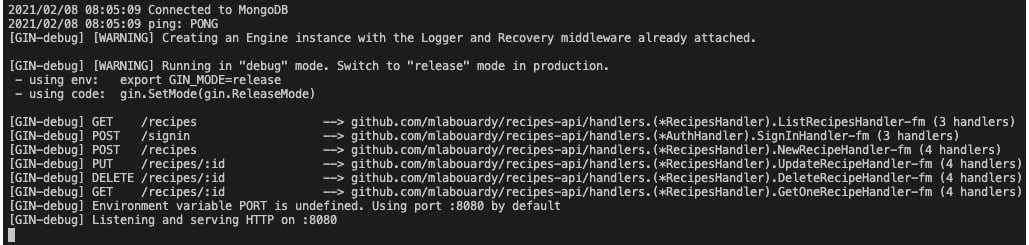
图 4.8 – 应用程序日志
现在,如果您尝试 插入新配方,则会返回 401 错误,如下所示:

图 4.9 – 未经授权的端点
您需要首先使用 admin/password 凭据登录,方法是在 POST 请求>/signin 端点。成功后,端点将返回一个如下所示的令牌:

图 4.10 – 登录端点
标记 由三个部分组成,由一个点分隔。您可以通过转到 https://jwt.io/ 来解码令牌以返回以下输出(您的结果可能看起来不同的):
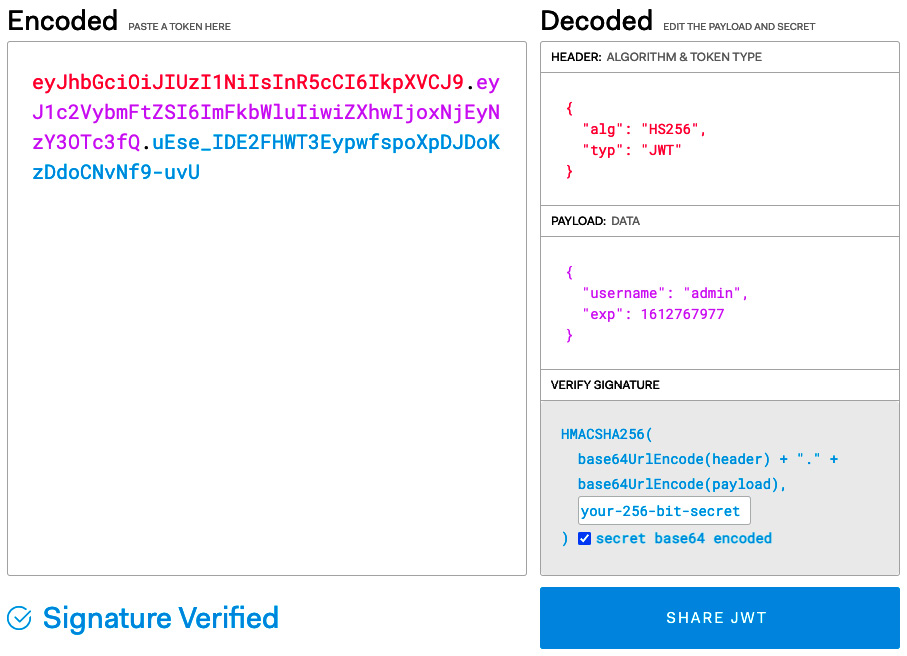
图 4.11 – 解码 JWT 令牌
笔记
标头和有效负载部分是 Base64 编码的,但您可以使用 base64 命令来解码它们的值。
现在,对于 进一步的请求,您需要在 Authorization 标头中包含令牌,以便能够访问安全端点,例如发布一个新配方,如以下屏幕截图所示:
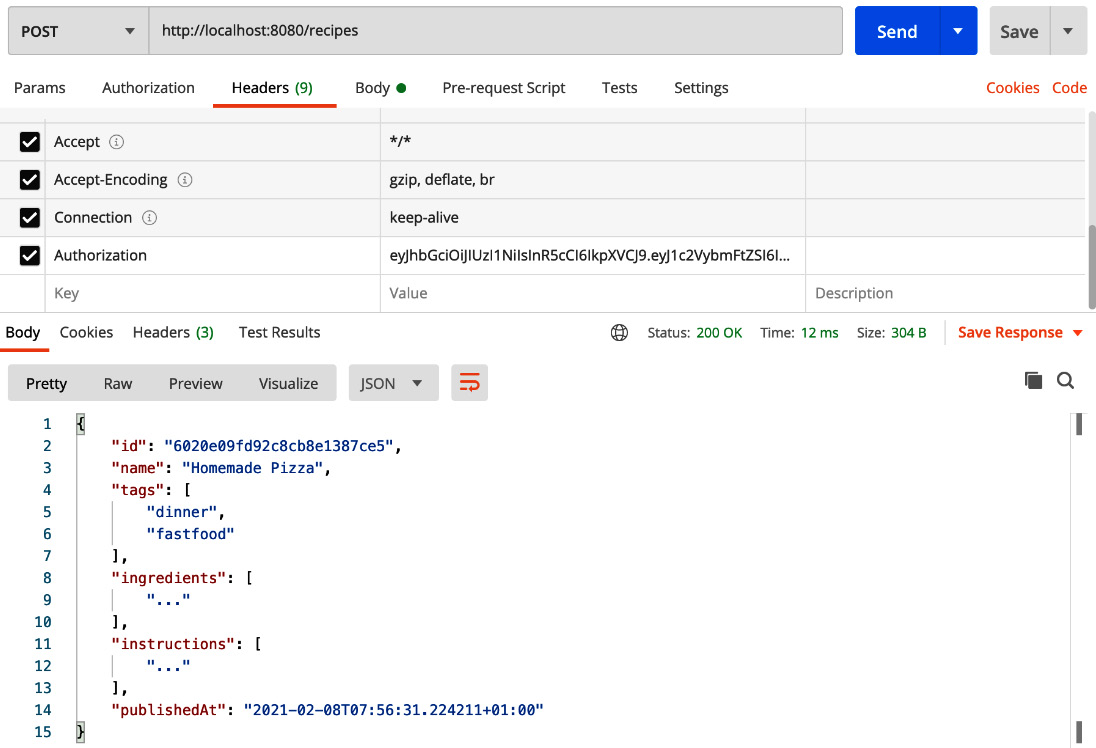
图 4.12 – 发布新食谱
到目前为止,一切都很顺利——但是,在 10 分钟后,令牌就会过期。例如,如果您尝试发布新食谱,即使您已包含 Authorization401 未经授权的消息> 标题,我们可以在以下屏幕截图中看到:
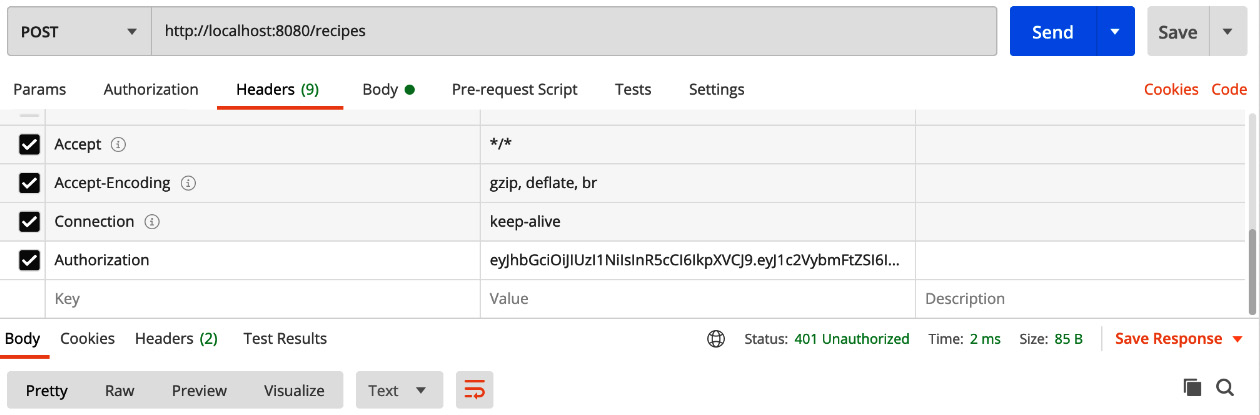
图 4.13 – 过期的 JWT
那么,让我们看看如何在此令牌过期后对其进行续订。
Renewing a JWT
您可以增加 过期时间以使 JWT 令牌最后;然而,这不是一个永久的解决方案。您可以做的是公开一个端点以允许用户刷新令牌,这将使客户端应用程序刷新令牌而无需再次询问用户用户名和密码。函数处理程序显示在以下代码片段中 - 它采用前一个令牌并返回一个具有更新到期时间的新令牌:
笔记
在 Web 应用程序中,/refresh 端点可用于在后台刷新 JWT 令牌,而无需每隔几分钟要求用户登录。
使用以下代码在 POST /refresh 端点上注册 RefreshHandler 处理程序:
如果您重新运行应用程序,/refresh 端点将被暴露,如以下屏幕截图所示:

图 4.14 – /refresh 端点
您现在可以在 /refresh 端点上发出 POST 请求,并且将生成并返回一个新令牌。
太棒了——您现在有了一个有效的身份验证工作流程!但是,用户凭据仍然硬编码在应用程序代码源中。您可以通过将它们存储在 MongoDB 服务器中来改进这一点。此处提供了更新的序列图:
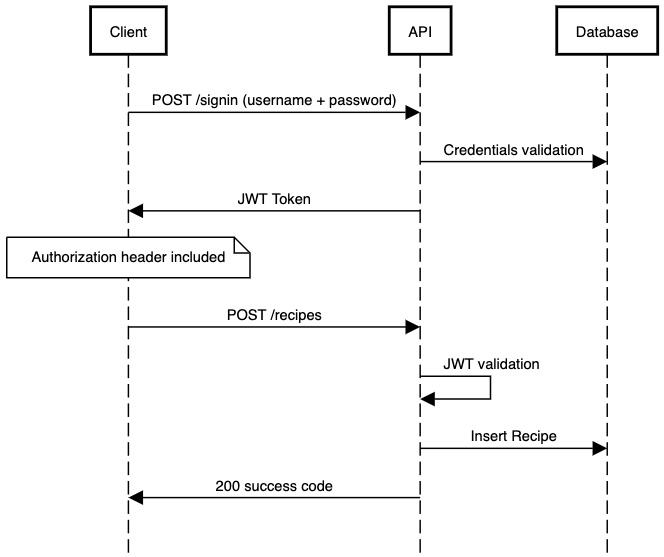
图 4.15 – 在 MongoDB 中存储凭据
要能够与 MongoDB 服务器交互,您需要将 MongoDB 集合添加到 AuthHandler 结构中="literal">auth.go 文件,如以下代码片段所示。然后,您可以对 users 集合发出 FindOne 操作,以验证给定凭据是否存在:
接下来,更新 SignInHandler 方法,通过将用户凭据与数据库中的条目进行比较来验证用户凭据是否有效。这是应该如何完成的:
在 init() 方法中,您需要建立与 users 集合的连接,然后传递该集合 实例到 AuthHandler 实例,如下:
确保保存 main.go 更改,然后 API 就准备好了!
Hashing and salting passwords
在运行应用之前,我们需要用一些初始化users集合用户。在 Visual Studio Code (VSCode) 中创建一个新项目,然后定义一个 main。 go 文件,内容如下:
上述代码将插入三个用户(admin、packt、mlabouardy)进入 users 集合。密码在使用 SHA256hashed 和 salted > 出于安全目的的算法。该算法为密码生成一个唯一的 256 位 签名,该签名可以解密回原始密码。这样,敏感信息可以保持安全。
笔记
不建议在数据库中存储明文密码。通过散列和加盐用户密码,我们确保黑客无法登录,因为被盗数据不包含凭据。
您可以使用 MONGO_URI="mongodb://admin:password@localhost:27017/test?authSource=admin" MONGO_DATABASE=demo go run main.go 命令运行代码。检查是否已使用 MongoDB Compass 插入用户(有关如何使用 MongoDB Compass 的分步指南,请返回 章节3,使用 MongoDB 管理数据持久性),如以下屏幕截图所示:
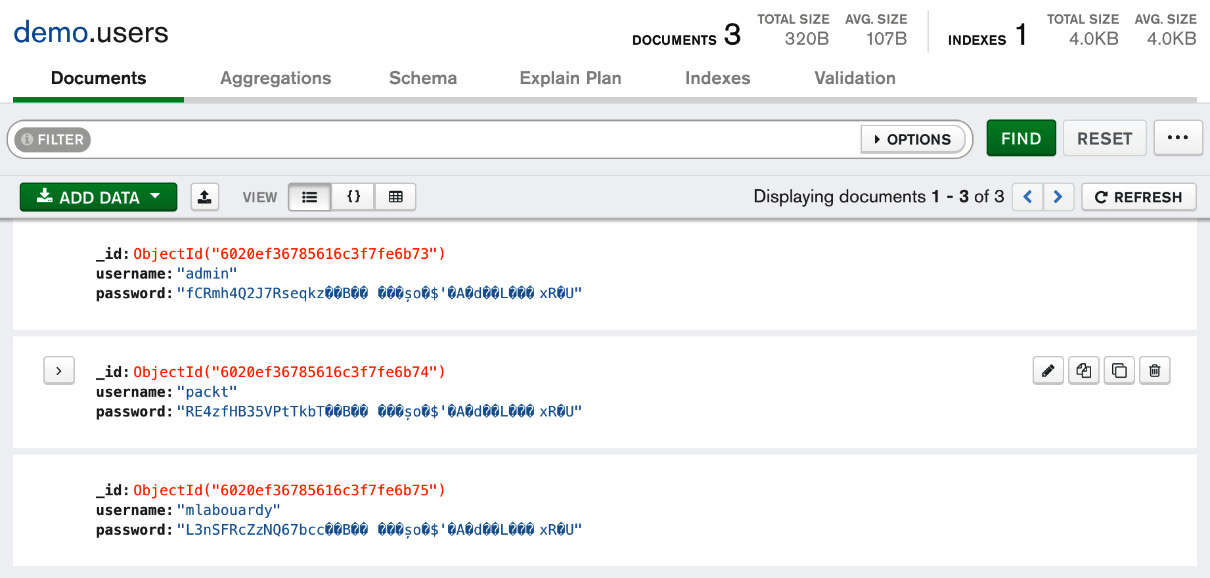
图 4.16 – 用户集合
正如您可能所注意到的,密码是经过散列和加盐处理的。将用户 插入 MongoDB 后,我们可以通过发出具有以下负载的 POST 请求来测试登录端点:
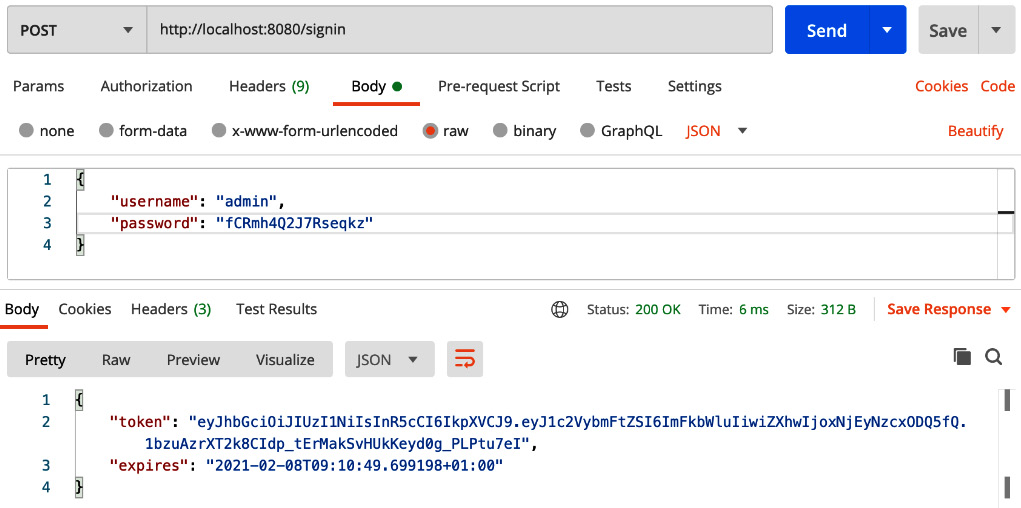
图 4.17 – 登录端点
笔记
我们可以通过在客户端设置一个带有 JWT 值的 cookie 来改进 JWT 的实现。这样,cookie 将与请求一起发送。
您可以更进一步,创建一个注册端点来创建一个新用户并将其保存到 MongoDB 数据库。您现在应该熟悉如何使用 JWT 实现身份验证机制。
Persisting client sessions and cookies
到目前为止,您必须在每个请求中包含 Authorization 标头。一个更好的解决方案是生成一个会话cookie。会话 cookie 允许用户在应用程序中被识别,而无需每次都进行身份验证。如果没有 cookie,每次您发出 API 请求时,服务器都会将您视为全新的访问者。
- Install Gin middleware for session management with the following command:
- Configure Redis as a store for users' sessions with the following code:
笔记
您可以使用环境变量,而不是硬编码 Redis Uniform Resource Identifier (URI)。这样,您可以将配置排除在 API 源代码之外。
- Then, update
SignInHandlerto generate a session with a unique ID, as illustrated in the following code snippet. The session starts once a user logs in and expires sometime after that. The session information of the logged-in user will be stored in the Redis cache: - Next, update
AuthMiddlewareto obtain the token from the request cookie. If the cookie is not set, we return a403code (Forbidden) by returning anhttp.StatusForbiddenresponse, as illustrated in the following code snippet: - Start the server on port 8080, and issue a
POSTrequest on the/signinendpoint with a valid username and password. A cookie should be generated, like the one shown in the following screenshot:

图 4.18 – 会话 cookie
现在会话将 在所有其他 API 路由中保持不变。因此,您可以在不包含任何授权标头的情况下与 API 端点交互,如以下屏幕截图所示:
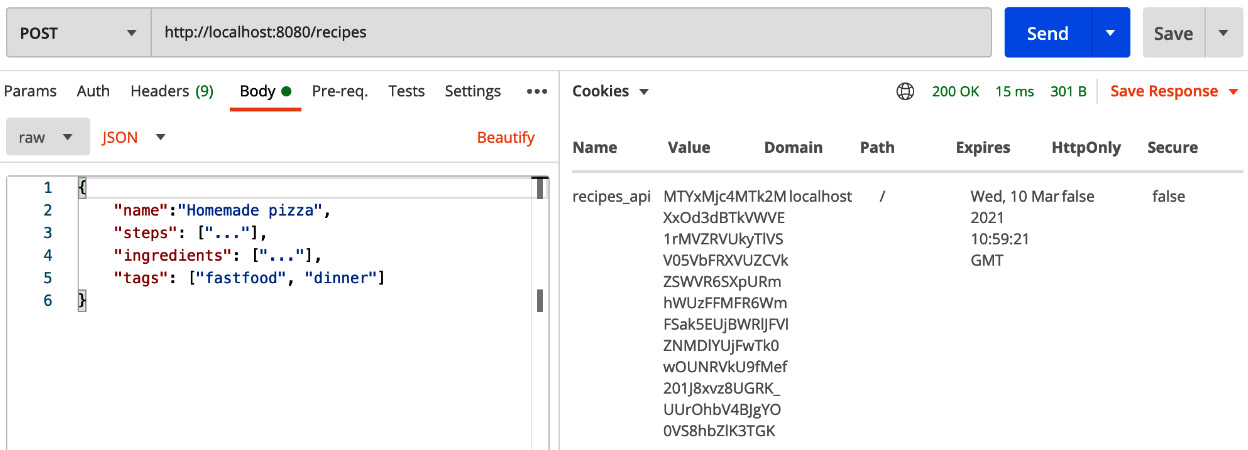
图 4.19 – 基于会话的认证
前面的示例使用 Postman 客户端,但如果您是 cURL 粉丝,请执行以下操作:
- Use the following command to store the generated cookie in a text file:
- Then, inject the
cookies.txtfile in future requests, like this:笔记
您可以实施刷新路由以生成具有更新到期时间的新会话 cookie。
API 生成的所有会话都将持久化在 Redis 中。您可以使用 Redis Insight 用户界面 (UI)(托管在 Docker 容器上)浏览保存的会话,如图所示在以下屏幕截图中:

图 4.20 – Redis 中存储的会话列表
- To log out, you can implement the
SignOutHandlerhandler to clear the session cookie with the following command: - Remember to register the handler on the
main.gofile, like so: - Run the application, and a sign-out endpoint should be exposed, as illustrated in the following screenshot:

图 4.21 – 退出处理程序
- Now, test it out with the Postman client by executing a
POSTrequest, like so:
图 4.22 – 退出
会话 cookie 将被删除,如果您现在尝试添加新配方,则会返回
403错误,如下图所示:
图 4.23 – 添加新配方
- Make sure to commit the changes to GitHub by creating a new feature branch. Then, merge the branch into development mode, as follows:
以下屏幕截图显示了包含 JWT 和 cookie 身份验证功能的拉取请求:
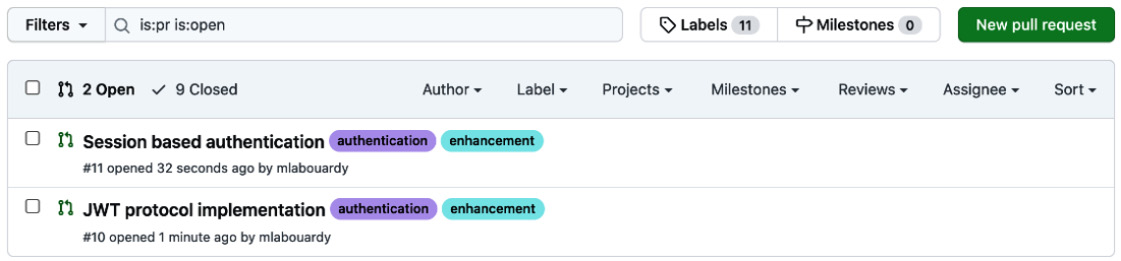
图 4.24 – GitHub 上的拉取请求
惊人的! API 端点现在是安全的,可以提供给公众。
Authenticating with Auth0
到目前为止,身份验证机制已内置在应用程序中。从长远来看,维护这样一个系统可能是一个瓶颈,这就是为什么您可能需要考虑一个外部服务,例如 作为 Auth0。这是一种一体化身份验证解决方案,可让您访问强大的报告和分析以及基于角色的访问控制 (RBAC)系统。
要开始,请按照下列步骤操作:
- Create a free account (https://auth0.com/signup). Once created, set up a tenant domain in the region where you're located, as illustrated in the following screenshot:

图 4.25 – Auth0 租户域
- Then, create a new API called
Recipes API. Set the identifier to https://api.recipes.ioand the signing algorithm toRS256, as illustrated in the following screenshot:
图 4.26 – Auth0 新 API
- Once the API is created, you need to integrate the Auth0 service into the API. Download the following Go packages:
- Next, update
AuthMiddleware, as illustrated in the following code snippet. The middleware will check if an access token exists and if this is valid. If it passes the checks, the request will proceed. If not, a401 Authorizationerror is returned:Auth0 使用 RS256 算法签名访问令牌。验证过程使用 JSON Web Key Set 中的公钥(位于
AUTH0_DOMAIN/.well-known/jwks.json) (JWKS) 格式 来验证给定的令牌。 - Run the application with
AUTH0_DOMAINandAUTH0_API_IDENTIFIER, as illustrated in the following code snippet. Make sure to replace those variables with the values you copied from your Auth0 dashboard:现在,如果您尝试在不发送访问令牌的情况下向 API 发出请求,您将看到以下消息:

图 4.27 – 未经授权的访问
- To generate an access token. Head back to the Auth0 dashboard, click on APIs, then select Recipes API. From there, click on the Test tab and copy the cURL command shown in the following screenshot:

图 4.28 – 使用 cURL 生成访问令牌
- Execute the following command on your terminal session to generate an access token that you can use to communicate with your backend API:
将生成访问令牌,如下所示(您应该具有不同的值):
- Now, update your API request to include the access token, as shown in the following screenshot:

图 4.29 – 授权访问
- This can also be tested straight from the command line with cURL. Just replace the
ACCESS_TOKENvalue shown in the following code snippet with your test token and then paste it into your terminal:
惊人的!您刚刚 使用 Go 和 Gin 框架开发了一个安全 API。
Building an HTTPS server
到目前为止,API 是通过 HTTP 本地提供的,但对于现实世界的应用程序,它应该通过 HTTPS 在域名下提供。
要进行此设置,请执行以下操作:
- Use the
ngroksolution to serve our local web API with a public Uniform Resource Locator (URL) that supports both HTTP and HTTPS.笔记
- Download the ZIP file based on your operating system (OS) from the official Ngrok page at https://ngrok.com/download. In this book, we will work with version 2.3.35. Once downloaded, unzip Ngrok from a terminal with the following commands:
- Verify if it's properly installed by executing the following command:
它应该输出以下消息:

图 4.30 – Ngrok 版本
- Configure Ngrok to listen and forward requests into port 8080, which is the port where the RESTful API is exposed, by running the following command:
将生成一个公共 URL,可用作代理与来自 互联网的 API 进行交互,如下所示:

图 4.31 – Ngrok 转发
- Navigate to the forwarding URL using the HTTPS protocol. A Connection is secure message should be displayed next to the URL, as illustrated in the following screenshot:
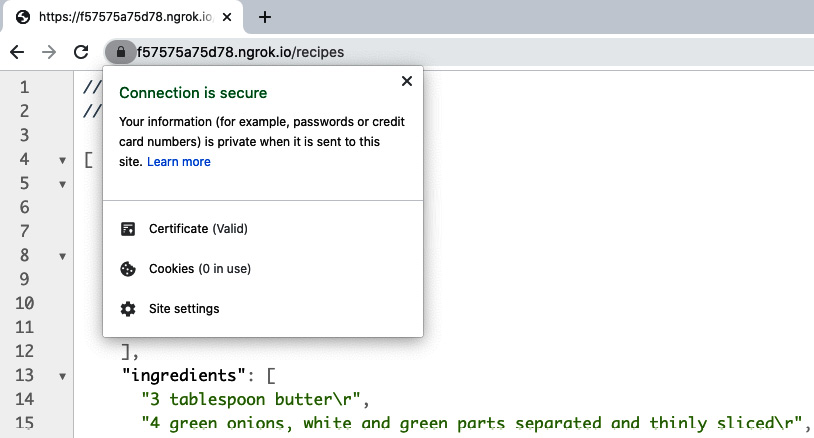
图 4.32 – 通过 HTTPS 提供服务
您现在可以从另一台机器或设备访问 API 或与他人共享。在下一节中,我们将介绍如何创建自己的 安全套接字层 (SSL) 证书来保护域名的运行本地。
Self-signed certificates
SSL 证书是 网站用来从 HTTP 和 HTTPS 迁移的。该证书使用 SSL/Transport Layer Security (TLS) 加密来保证用户数据的安全,验证网站的所有权,防止攻击者从创建网站的虚假版本,并获得用户信任。
- Create a directory where the certificates will be stored and use the OpenSSL command line to generate public and private keys, as follows:
- You'll need to fill a simple questionnaire—make sure to set the fully qualified hostname to
localhost, as shown here:
图 4.33 – 生成自签名证书
这样做会生成两个文件,如下所示:
localhost.crt:自签名证书localhost.key:私钥笔记
在高级章节中,我们将介绍如何使用 Let's Encrypt ( https://letsencrypt.org)免费。
- Update
main.goto run the server on HTTPS by utilizing the self-signed certificates, as follows (note that we use port 443 now, which is the default HTTPS port): - Run the application, and the logs will confirm the API is served through HTTPS, as illustrated here:

图 4.34 – 监听和服务 HTTPS
- Head to your browser, and then navigate to https://localhost/recipes. A secure-website icon will be shown on the left side of the URL bar, as illustrated in the following screenshot:

图 4.35 – 到 localhost 的加密连接
笔记
如果您使用 Google Chrome 作为默认浏览器,则需要启用
allow-insecure-localhost选项,以便浏览器接受自签名证书。如果您使用 cURL 与 API 交互,请跳过证书验证,否则 您将收到以下错误消息:

图 4.36 – 自签名证书验证
您可以通过使用以下命令在 命令行界面 (CLI) 上指定证书包来修复上述错误:
或者,您可以使用
–k标志跳过 SSL 验证,如下所示(不建议与外部网站交互): - For development, simply keep using the localhost, or access the API from a custom domain. You can create an alias with a domain name locally by adding the following entry to your
/etc/hostsfile: - Once the changes are saved, you can test it out by executing a
pingcommand onapi.recipes.io, as follows:
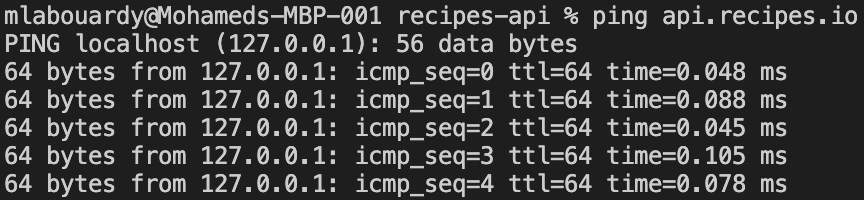
图 4.37 – ping 输出
域名可达并指向127.0.0.1。您现在可以通过导航到 https://api.recipes.io:8080 来访问 RESTful API,如下所示如以下屏幕截图所示:
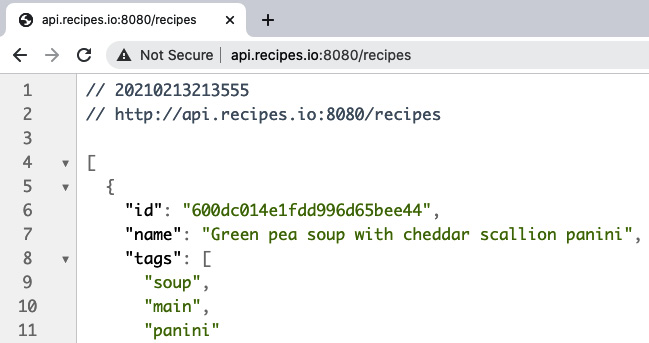
图 4.38 – 别名域名
伟大的!您现在将能够通过身份验证保护您的 API 端点,并通过本地自定义域名提供您的 API。
在结束本章之前,您需要更新 API 文档以包含我们在整章中实现的身份验证端点 ,如下所示:
- First, update the general metadata to include an
Authorizationheader in the API requests, as follows: - Then, write a
swagger:operationannotation on top of theSignInHandlerhandler, as follows: - Write a
swagger:operationannotation on top of theRefreshHandlerhandler, as follows: - The operation expects a request body with the following attributes:
- Generate the OpenAPI specification, then serve the JSON file with the Swagger UI by executing the following commands:
身份验证端点(
/refresh和/signin)应添加到操作列表,如以下屏幕截图所示:
图 4.39 – 认证操作
- Now, click on the
signinendpoint, and you will be able to fill the username and password attributes directly from the Swagger UI, as illustrated in the following screenshot:
图 4.40 – 登录凭证
- Next, click on Execute and a token should be generated that you can include in the
Authorizationheader to interact with endpoints that require authorization, as illustrated in the following screenshot:
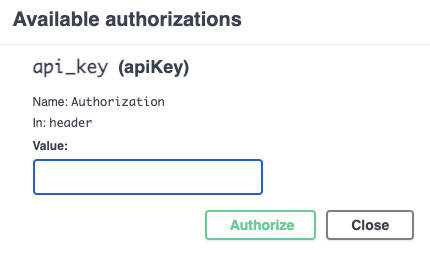
图 4.41 – 授权头
您现在可以构建一个安全的 Gin RESTful API 并通过 HTTPS 协议为其提供服务。
Further reading
- OAuth 2.0 Cookbook by Adolfo Eloy Nascimento, Packt Publishing
- SSL Complete Guide - HTTP to HTTPS by Bogdan Stashchuk, Packt Publishing