读书笔记《building-distributed-applications-in-gin》第8章在AWS上部署应用程序
Chapter 8: Deploying the Application on AWS
本章将教您如何在 Amazon Web Services (AWS 上部署 API强>)。它还继续解释如何使用自定义域名通过 HTTPS 为应用程序提供服务,并在 Kubernetes 和 Amazon 上扩展基于 Gin 的 API弹性容器服务(Amazon ECS)。
因此,我们将重点关注以下主题:
- Deploying a Gin web application on an Amazon Elastic Compute Cloud (Amazon EC2) instance
- Deploying on Amazon ECS (Elastic Container Service)
- Deploying on Kubernetes with Amazon Elastic Kubernetes Service (Amazon EKS)
Technical requirements
要遵循本章中的说明,您将需要以下内容:
- A complete understanding of the previous chapter—this chapter is a follow-up to the previous one and it will use the same source code. Hence, some snippets won't be explained, to avoid repetition.
- Previous experience of using AWS is mandatory.
- A basic understanding of Kubernetes is required.
本章的代码包托管在 GitHub 上,地址为 https: //github.com/PacktPublishing/Building-Distributed-Applications-in-Gin/tree/main/chapter08。
Deploying on EC2 instance
在本书的整个过程中,您学习了如何使用 Gin 框架 构建分布式 Web 应用程序以及如何扩展用于在本地加载和测试它的 API。在本节中,我们将介绍如何在云上部署以下架构并将其提供给外部用户。
可以在此处查看应用程序架构的概述:
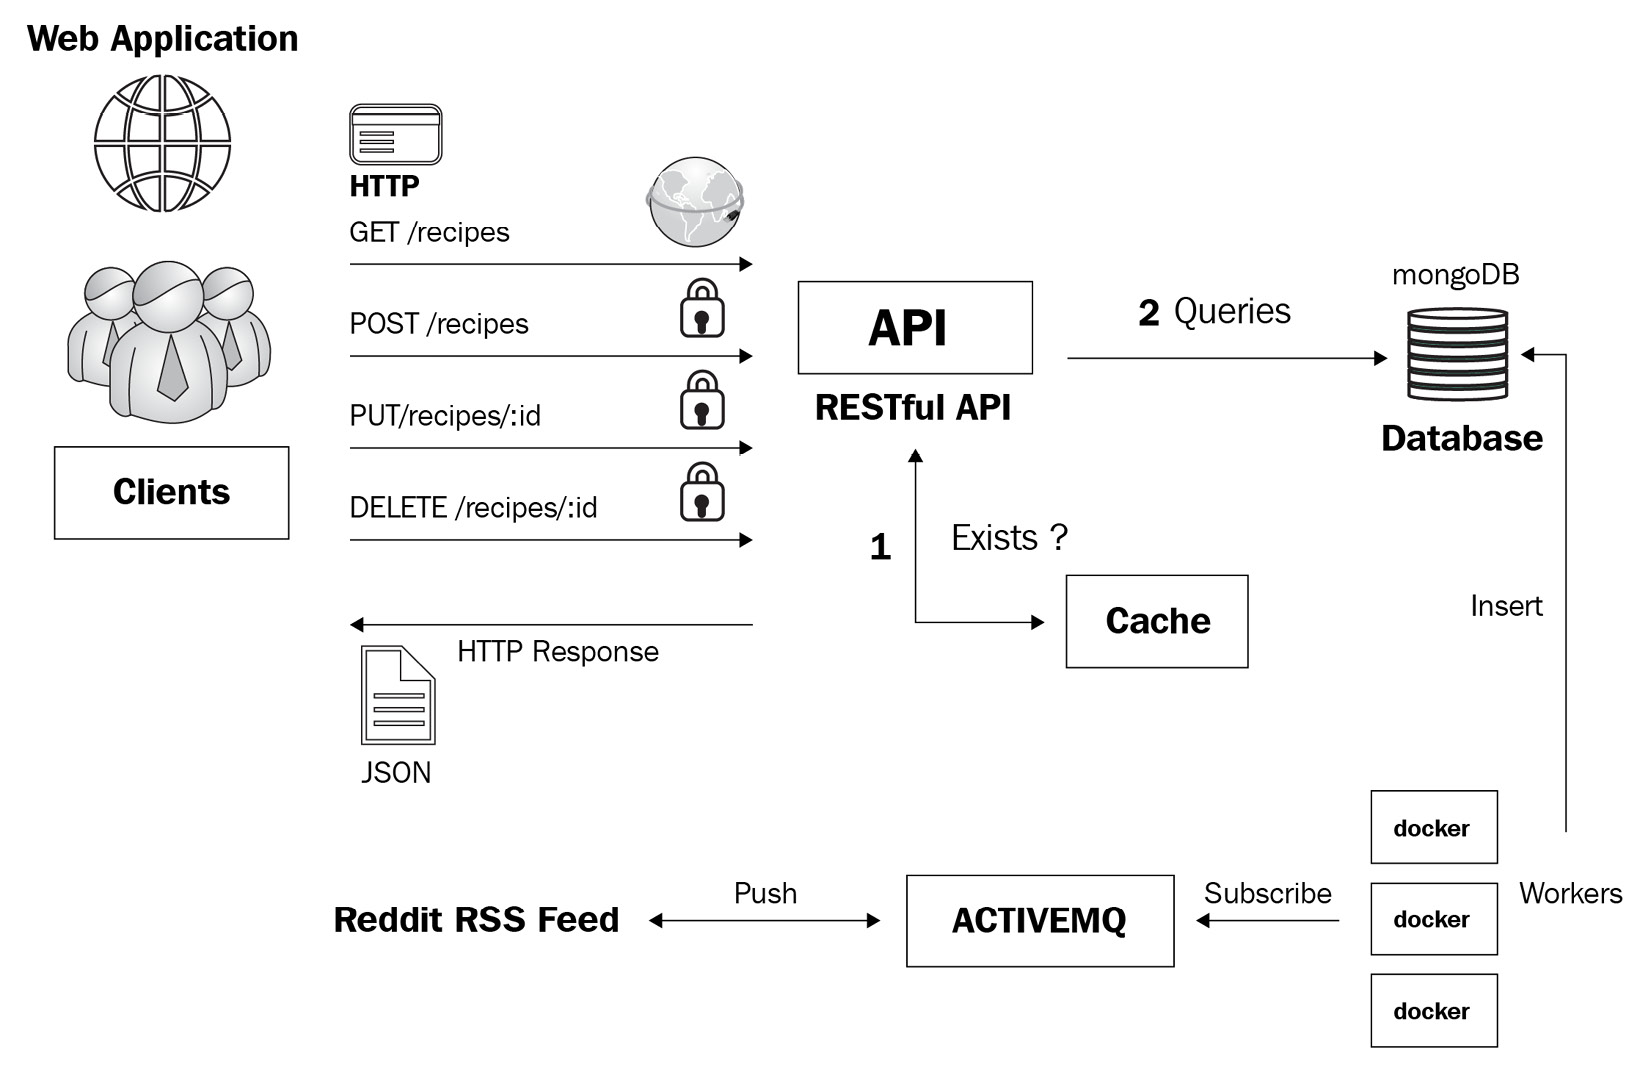
图 8.1 – 应用架构
AWS 在云提供商方面处于领先地位——它提供了大量的基础设施服务,例如负载均衡器、服务器、数据库和网络服务。
要开始使用,请创建一个 AWS 账户 (https://aws.amazon.com)。大多数 AWS 服务都提供了丰富的免费套餐资源,因此部署您的应用程序将花费很少或完全免费。
Launching an EC2 instance
创建 AWS 账户后,您现在可以启动 EC2 实例了。为此,请执行以下操作:
- Sign in to the AWS Management Console (https://console.aws.amazon.com) and search for EC2. In the EC2 dashboard, click on the Launch Instance button to provision a new EC2 instance.
- Choose Amazon Linux 2 AMI as an Amazon Machine Image (AMI). This is the operating system (OS) that will run the EC2 instance. The following screenshot provides an overview of this:

图 8.2 – AMI
- Next, select an instance type. You can start with a
t2.microinstance and upgrade later if needed. Then, click on Configure Instance Details and leave the settings at their defaults, as illustrated in the following screenshot:
图 8.3 – 实例配置
- Now, click on the Add Storage button and leave the Elastic Block Store (EBS) volume size as 8 gigabytes (GB). For Volume type, you might change it from
GP2toGP3or provisioned IOPS.笔记
MongoDB 需要快速存储。因此,如果您计划在 EC2 上托管 MongoDB 容器,则 EBS 优化的 类型可以改善 输入/输出 (I/O) 操作。
- Then, click on Add Tags and create a new one called
Name=application-sg, as illustrated in the following screenshot. Leave the security group at its default setting (allow inbound traffic on port 22 for SSH). Then, click on Review and launch:
图 8.4 – 安全组
笔记
- Click on Launch and assign a key pair or create a new SSH key pair. Then, click on Create instance.
- Head back to the Instances dashboard by clicking on the View instances button—it will take a few seconds for the instance to be up and running but you should then see it on the screen, as per the following screenshot:

图 8.5 – EC2 仪表板
- Once the instance is ready, open your terminal session and SSH to the instance using the public IP version 4 (IPv4) address. Replace
key.pemwith your SSH key pair, as illustrated here: - A confirmation message will appear—enter
Yes. Then, issue the following commands to install Git, Docker Community Edition (Docker CE), and Docker Compose:笔记
sudo su命令用于提供根级别的权限。在这里,我们使用 Docker
19.03.13-ce和 Docker Compose1.29.0版本:

图 8.6 – Docker 版本
您已成功预置并启动了一个 EC2 实例。
随着 EC2 实例启动并运行,您可以部署 章节中介绍的 Docker Compose 堆栈6,扩展 Gin 应用程序。为此,请执行以下步骤:
- Clone the following GitHub repository, which includes the components and files for the distributed Gin web application:
这是
chapter06/docker-compose.yml文件的内容:一个。 RESTful API 用 Go 和 Gin 框架编写
湾。使用 JavaScript 和 React 框架编写的仪表板
C。 MongoDB用于数据存储
d。 Redis 用于内存存储和 API 缓存
e. Nginx 作为反向代理
- Before deploying the stack, build the Docker images for the RESTful API and the web dashboard. Head to the corresponding folder of each service and run the
docker buildcommand. For instance, the following commands are used to build the Docker image for the RESTful API:命令输出如下所示:

图 8.7 – Docker 构建日志
- After building the images, issue the following command:
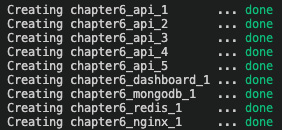
图 8.8 – Docker 应用程序
在应用程序启动并运行后,转到 Web 浏览器并粘贴用于连接到您的 EC2 实例的 IP 地址。然后,您应该会看到以下错误消息:

图 8.9 – 请求超时
要解决这个问题,您需要 允许端口 80 上的入站流量,这是 nginx 代理暴露的端口。从 EC2 仪表板前往 Security Groups,然后搜索分配给运行应用程序的 EC2 实例的安全组。找到后,添加入站规则,如下所示:
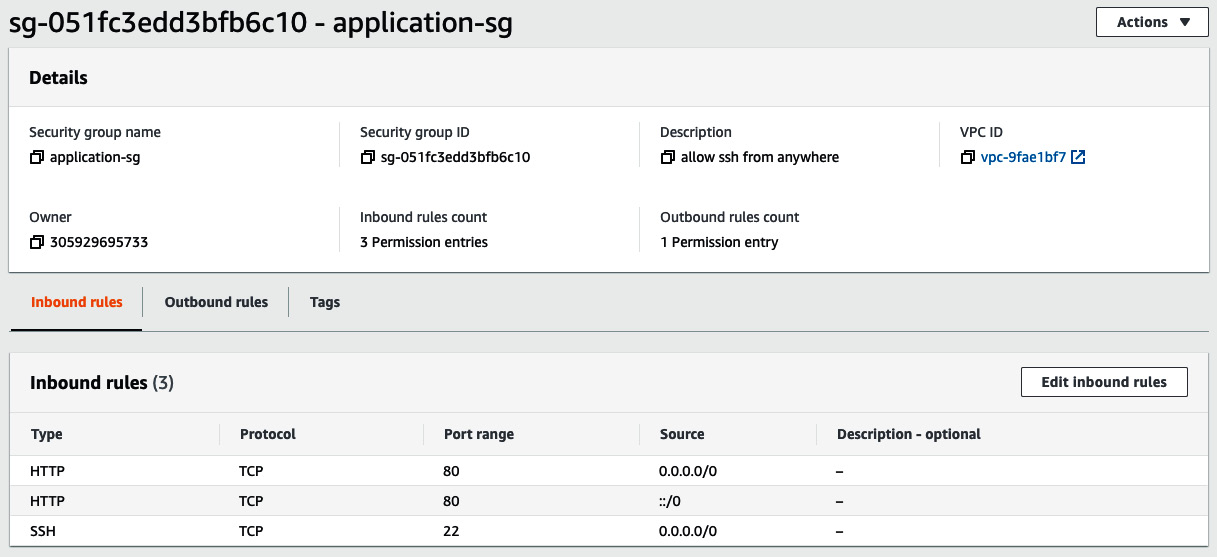
图 8.10 – 端口 80 上的入站规则
返回您的网络浏览器并向实例 IP 发出 HTTP 请求。这一次,将命中 nginx 代理并返回响应。如果您向 /api/recipes 端点发出请求,则应返回一个空数组,如以下屏幕截图所示:

图 8.11 – RESTful API 响应
MongoDB recipes 集合为空。因此,通过在 /api/recipes< 上发出 POST 请求 来创建新配方/code> 具有以下 JSON 有效负载的端点:
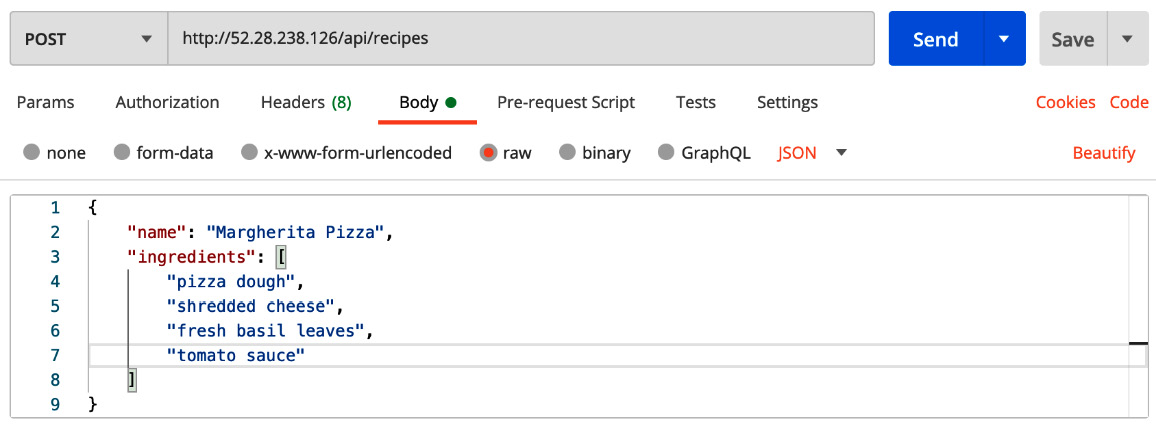
图 8.12 – 创建新配方的 POST 请求
确保在 POST 请求中包含 Authorization 标头。刷新网络浏览器页面 ,然后应在网络仪表板上返回一个食谱,如下面的屏幕截图所示:
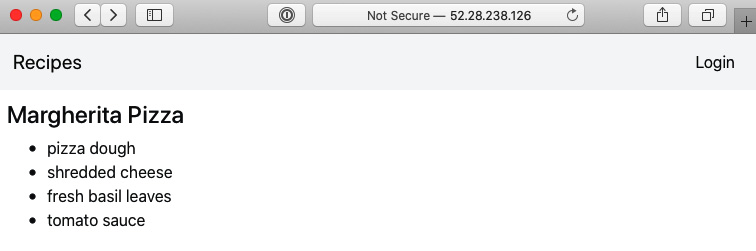
图 8.13 – 新配方
现在,点击 Login 按钮,您应该会看到 unsecure origin 错误,如下所示:
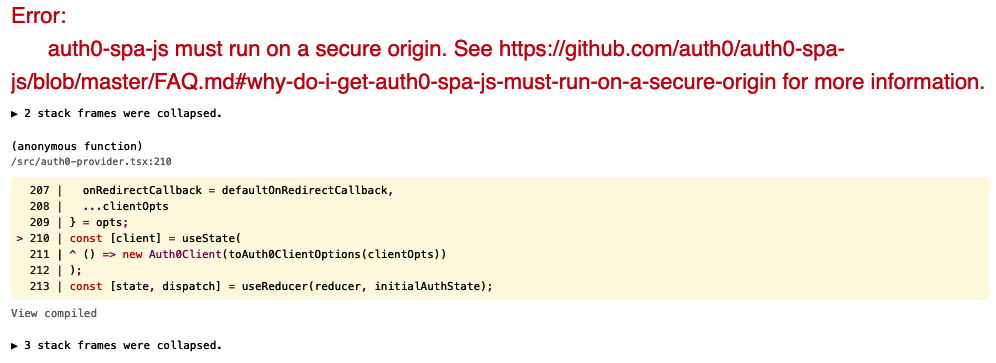
图 8.14 – Auth0 要求客户端通过 HTTPS 运行
错误是 ,因为 Auth0 需要在通过 HTTPS 协议提供的 Web 应用程序上运行。您可以通过 在 EC2 实例之上设置 负载均衡器,通过 HTTPS 为应用程序提供服务。
SSL offloading with an application load balancer
要通过 HTTPS 运行 API ,我们需要一个 安全套接字层 (SSL) 证书。您可以通过AWS Certificate Manager(ACM)轻松获得SSL证书.该服务使易于配置、管理和部署 SSL/传输层安全 ( AWS 托管资源上的 TLS) 证书。要生成 SSL 证书,请执行以下操作:
- Head to the ACM dashboard and request a free SSL certificate for your domain name by clicking on the Request a certificate button and choosing Request a public certificate.
- On the Add domain names page, enter a fully qualified domain name (FQDN), such as
domain.com.笔记
domain.com域名可以有多个子域,如sandbox.domain.com、production.domain.com和api.domain.com。 - On the Select validation method page, choose DNS validation and add a Canonical Name (CNAME) record provided by ACM to your Domain Name System (DNS) configuration. Issuing public certificates might take a few minutes, but once the domain name is validated, the certificate will be issued and will appear in the ACM dashboard with the status set to Issued, as illustrated in the following screenshot:

图 8.15 – 使用 ACM 请求公共证书
- Next, create an application load balancer from the Load Balancers section within the EC2 dashboard, as illustrated in the following screenshot:

图 8.16 – 应用负载均衡器
- On the subsequent page, enter a name for the load balancer and specify the scheme as Internet facing from the drop-down list. In the Availability Zones section, select a subnet from each availability zone (AZ) for resiliency. Then, under the Listeners section, add an HTTPS listener and an HTTP listener on ports 443 and 80, respectively, as illustrated in the following screenshot:

图 8.17 – HTTP 和 HTTPS 监听器
- Click on the Configure Security Settings button to proceed and select the certificate created in ACM from the drop-down list, as illustrated in the following screenshot:

图 8.18 – 证书配置
- Now, click on Configure Routing and create a new target group called application. Ensure the protocol is set to HTTP and the port to 80 because the nginx proxy is listening on port 80. With this configuration, traffic between the load balancer and the instance will be transmitted using HTTP, even for HTTPS requests made by the client to the load balancer. You can see the configuration in the following screenshot:

图 8.19 – 配置目标组
- In the Health checks section, define the protocol as
HTTPand the path as/api/recipes. - Click on Register Targets, select the EC2 instance on which the application is running, and click on Add to registered, as follows:

图 8.20 – 注册一个 EC2 实例
- When you have finished selecting instances, choose Next: Review. Review the settings that you selected and click on the Create button. The provisioning process should take a few minutes, but you should then see a screen like this:

图 8.21 – 负载均衡器 DNS 名称
- Once the state is active, copy the load balancer DNS name and create an
Arecord that points to the public DNS name of the load balancer in Route 53 (https://aws.amazon.com/route53/) or in your DNS registrar, as illustrated in the following screenshot:
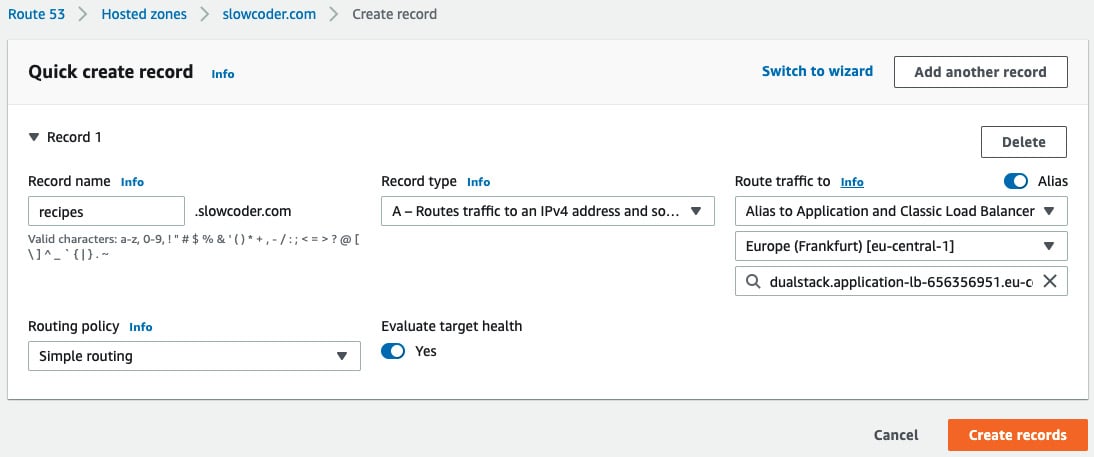
图 8.22 – Route 53 新 A 记录
一旦您进行了必要的更改,更改可能需要长达 48 小时才能传播到其他 DNS 服务器。
通过浏览到 HTTPS://recipes.domain.com,验证您的域名记录的更改是否已传播。这应该会导致负载均衡器显示应用程序的安全 Web 仪表板。点击浏览器地址栏中的 padlock 图标,它应该会显示域和 SSL 证书的详细信息,如下图所示:
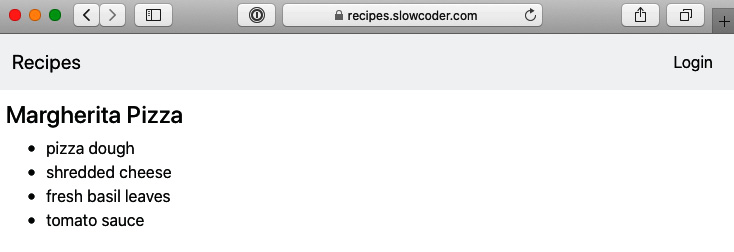
图 8.23 – 通过 HTTPS 提供服务
您的应用程序负载均衡器现在已经为您在 AWS 上运行的 Gin 应用程序配置了 SSL 证书。您可以使用 Auth0 服务登录并从 Web 仪表板添加新食谱。
Deploying on Amazon ECS
在上一节中,我们学习了如何部署 EC2 实例并将其配置为在其上运行我们的 Gin 应用程序。在本节中,我们将学习如何在不管理 EC2 实例的情况下获得相同的结果。 AWS 提出了两种容器编排服务:ECS 和 EKS。
在本节中,您将了解 ECS,它是一种完全托管的容器编排服务。在将我们的应用程序部署到 ECS 之前,我们需要将应用程序 Docker 镜像存储在远程存储库中。这就是 Elastic Container Registry (ECR) 存储库发挥作用的地方。
Storing images in a private repository
ECR 是一个广泛使用的私有Docker 注册中心。要将图像存储在私有存储库中,您需要先在 ECR 中创建一个存储库。为此,请按照下列步骤操作:
- Jump to the ECR dashboard from the AWS Management Console, click on the Create repository button, and choose
mlabouardy/recipes-apias a name for your Gin RESTful API repository, as illustrated in the following screenshot:
图 8.24 – 新的 ECR 存储库
笔记
您可以在 Docker Hub 中托管您的 Docker 映像。如果你采用这种方法,你可以跳过这部分。
- Click on the Create repository button, and then select the repository and click on View push commands. Copy the commands to authenticate and push the API image to the repository, as illustrated in the following screenshot:

图 8.25 – ECR 登录和推送命令
笔记
有关如何安装 AWS 命令行界面的分步指南(CLI),请参阅文档.amazon.com/cli/latest/userguide/cli-configure-files.html" target="_blank">https://docs.aws.amazon.com/cli/latest/userguide/cli-configure-files.html 。
- Follow the commands shown in Figure 8.25 to authenticate with ECR. Tag the image and push it to the remote repository, as follows (substitute the
ID,REGION, andUSERvariables with your own values):
命令日志显示在这里:

图 8.26 – 将图像推送到 ECR
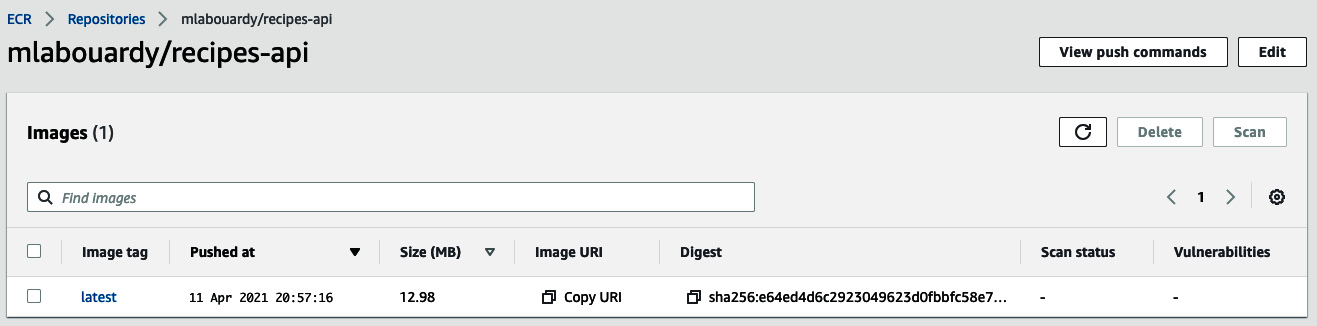
图 8.27 – 存储在 ECR 上的图像
使用存储在 ECR 中的 Docker 映像,您可以继续在 ECS 中部署应用程序。
现在,更新 docker-compose.yml 文件以引用 中的 ECR 存储库 URI图片部分,如下:
Creating an ECS cluster
我们的 docker-compose.yml 文件现在引用存储在 ECR 中的图像。我们已准备好启动 ECS 集群并在其上部署应用程序。
您可以从 AWS 管理控制台 或通过 AWS ECS CLI 手动部署 ECS 集群。按照来自 https 的官方说明安装基于您的操作系统的 Amazon ECS CLI: //docs.aws.amazon.com/AmazonECS/latest/developerguide/ECS_CLI_installation.htm。
安装后,通过提供 AWS 凭证和创建集群的 AWS 区域来配置 Amazon ECS CLI,如下所示:
在配置 ECS 集群之前,定义一个任务执行 IAM 角色以允许 Amazon ECS 容器 agent 在我们的代表。创建一个名为 task-execution-assule-role.json 的文件,其内容如下:
使用 JSON 文件创建任务执行角色,并为其附加 AmazonECSTaskExecutionRolePolicy 任务执行角色策略,如下所示:
使用以下命令、默认集群名称和启动类型完成配置。然后,使用 ecs-cli up 命令创建一个 Amazon ECS 集群:
随着您的资源(EC2 实例、负载均衡器、安全组等)的创建,此命令可能需要几分钟才能完成。此命令的输出如下所示:

图 8.28 – 创建 ECS 集群
跳转到 ECS 仪表板 — 沙盒集群应该已启动并运行,如以下屏幕截图所示:
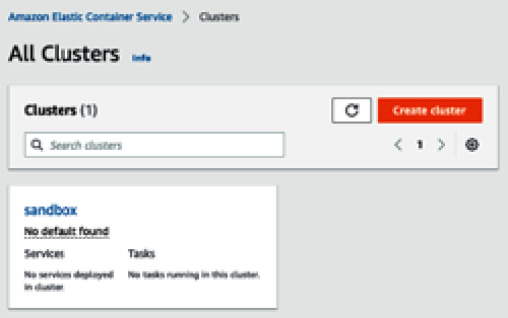
图 8.29 – 沙盒集群
要部署应用程序,您可以使用上一节中提供的 docker-compose 文件。除此之外,您还需要在配置文件中提供特定于 Amazon ECS 的某些参数,例如:
- Subnets: To be replaced with a list of public subnets where the EC2 instances should be deployed
- Security group and resource usage: Central processing unit (CPU) and memory
创建 一个 ecs-params.yml 文件,其内容如下:
接下来,使用以下命令将 docker compose 文件部署到集群。 --create-log-groups 选项为容器日志创建 CloudWatch 日志组:
部署日志显示在这里:

图 8.30 – 任务部署
将创建一个 application 任务 。 task 是一组元数据(内存、CPU、端口映射、环境变量),描述了如何部署容器。您可以在此处查看此概览:
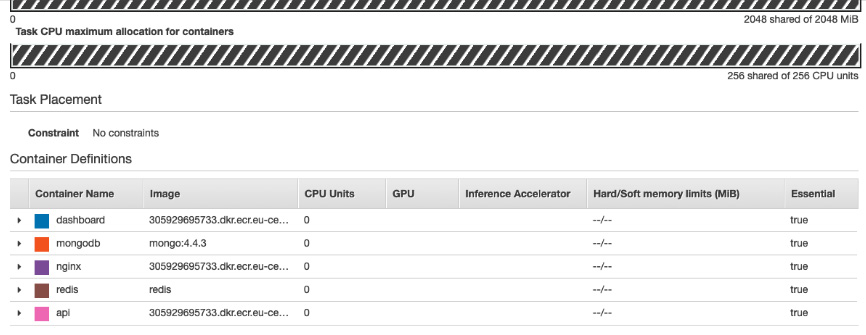
图 8.31 – 任务定义
使用 AWS CLI 添加安全组规则以允许端口 80 上的入站流量,如下所示:
发出以下命令以查看 ECS 中运行的容器:
该命令将列出正在运行的容器以及 nginx 服务的 IP 地址和端口。如果您将 Web 浏览器指向该地址,您应该会看到 Web 仪表板。
伟大的!您现在拥有一个正在运行的 ECS 集群,其中包含 Dockerized Gin 应用程序。
Deploying on Kubernetes with Amazon EKS
对于初学者和小型工作负载,ECS 可能是一个很好的解决方案。但是,对于大型部署和一定规模,您可能想考虑转移到Kubernetes(也称为K8s)。对于 AWS 高级用户来说,Amazon EKS 是天作之合。
AWS 在 EKS 服务下提供托管 Kubernetes 解决方案。
首先,我们需要部署一个 EKS 集群,如下所示:
- Jump to the EKS dashboard and create a new cluster with the following parameters:

图 8.32 – EKS 集群创建
集群
IAM角色应包括以下身份和访问管理(< strong class="bold">IAM) 策略:AmazonEKSWorkerNodePolicy、AmazonEKS_CNI_Policy和AmazonEC2ContainerRegistryReadOnly。 - On the Specify networking page, select an existing virtual private cloud (VPC) to use for the cluster and subnets, as illustrated in the following screenshot. Leave the rest at their default settings:

图 8.33 – EKS 网络配置
- For cluster endpoint access, enable public access for simplicity. For a production usage, restrict access to your network Classless Inter-Domain Routing (CIDR) or enable only private access to the cluster API.
- Then, on the Configure Logging page, enable all log types to be able to troubleshoot or debug network issues from the CloudWatch console easily.
- Review the information and click on Create. The status file will show Creating while the cluster provisioning process is running. Once completed, the status will become Active, as illustrated in the following screenshot:

图 8.34 – 新的 EKS 集群
或者,通过单个命令使用 EKS CLI 创建 一个 EKS 集群 ,如下所示:
笔记
有关如何使用
eksctl配置 EKS 的分步指南,请访问 https://docs.aws.amazon.com/eks/latest/userguide/create-cluster.html。 - Once the cluster is in an Active state, create a managed Node Group on which the containers will be running.
- Click on the cluster name and select the Configuration tab. On the Compute tab, click on Add Node Group. Set the group name to
workersand create a Node IAM role, as illustrated in the following screenshot:
图 8.35 – EKS 节点组
笔记
有关如何配置节点组的更多信息,请参阅 https 上的官方文档: //docs.aws.amazon.com/eks/latest/userguide/create-node-role.html#create-worker-node-role。
- On the subsequent page, choose
Amazon Linux 2as an AMI and selectt3.mediumOn-Demandinstances, as illustrated in the following screenshot:
图 8.36 – 工人配置
笔记
对于生产用途,您可以使用
Spot-Instances而不是<代码类="literal">按需。Spot-Instances通常会提供很好的价格折扣,因为可能会发生自发中断。 Kubernetes 可以优雅地处理这些中断,从而为您节省额外的资金。下图显示了如何扩展配置:

图 8.37 – 缩放配置
- Finally, specify the subnets where the two nodes will be deployed. On the Review and create page, review your managed Node Group configuration and click on Create.
现在您已经配置了 EKS 集群,您需要配置 kubectl。
Configuring kubectl
kubectl 是一个 命令行实用程序,用于与集群 API 服务器通信 .要安装该实用程序,请执行以下命令:
在本书中,我们使用的是最新版本的 kubectl,即 1.21.0,如您所见:
接下来,生成一个 kubeconfig 文件,其中包含 kubectl 与 EKS 集群交互所需的凭据,如下所示:
该命令将按预期列出两个节点,如下所示:

图 8.38 – EKS 节点
惊人的!您已成功配置 kubectl。
现在您已经设置了 EKS 集群,要在 Kubernetes 上运行服务,您需要将 compose service 定义转换为 Kubernetes 对象。 Kompose 是一个开源的工具,可以加快翻译过程。
笔记
而是 编写多个 Kubernetes YAML Ain't Markup Language (YAML)文件,您可以将整个应用程序打包在 Helm 图表中 (https://docs.helm.sh/)并将其存储在远程注册表中以供分发。
Migrating a Docker Compose workflow to Kubernetes
Kompose 是一个开源工具,可以转换docker-compose.yml文件进入 Kubernetes 部署文件。要开始使用 Kompose,请执行以下操作:
- Navigate to the project's GitHub release page (https://github.com/kubernetes/kompose/releases) and download the binary based on your OS. Here, version 1.22.0 is used:
- With Kompose installed, convert your service definitions with the following command:
- After running this command, Kompose will output information about the files it has created, as follows:

图 8.39 – 使用 Kompose 将 Docker Compose 转换为 Kubernetes 资源
以下是生成的
Deployment文件的示例: - Now, create Kubernetes objects and test whether your application is working as expected by issuing the following command:
您将看到以下输出,表明对象已创建:

图 8.40 – 部署和服务
- To check that your Pods are running, deploy the Kubernetes dashboard with the following command:
- Next, create an
eks-adminservice account and cluster role binding that you can use to securely connect to the dashboard with admin-level permissions, as follows: - Save the content in an
eks-admin-service-account.ymlfile and apply the service account to your cluster with the following command: - Before connecting to the dashboard, retrieve an authentication token with the following command:
以下是 Kubernetes 仪表板令牌的外观:

图 8.41 – Kubernetes 仪表板令牌
- Run the proxy locally with the following command:
- Go to
http://localhost:8001/api/v1/namespaces/kubernetes-dashboard/services/https:kubernetes-dashboard:/proxy/#!/loginand paste the authentication token.
您应该被重定向到仪表板,您可以在其中查看分布式应用程序容器及其指标和状态,如以下屏幕截图所示:
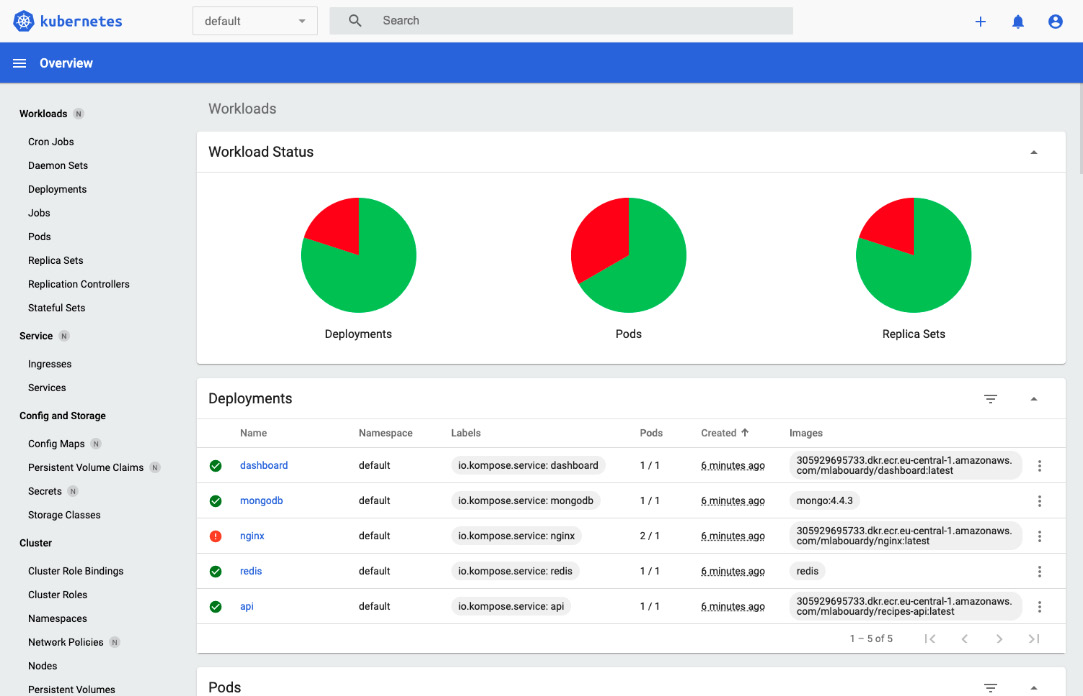
图 8.42 – Kubernetes 仪表板
您可以轻松监控在 EKS 中运行的应用程序,并在需要时扩展 API Pod。
笔记
完成 EKS 试验后,最好删除您创建的所有资源,以免 AWS 向您收取费用。
Further reading
- Docker for Developers, by Richard Bullington-McGuire, Andrew K. Dennis, and Michael Schwartz. Packt Publishing
- Mastering Kubernetes – Third Edition, by Gigi Sayfan. Packt Publishing
- Docker on Amazon Web Services, by Justin Menga. Packt Publishing