读书笔记《distributed-data-systems-with-azure-databricks》第2章创建Azure数据库工作区
Chapter 2: Creating an Azure Databricks Workspace
在本章中,我们将应用我们在 中探讨的所有概念第 1 章,Azure Databricks 简介。我们将使用 UI 创建我们的第一个 Azure Databricks 工作区,然后通过 Azure CLI 探索资源管理的不同可能性,如何使用 ARM 模板部署这些资源,以及我们如何使用 VNet 注入将 Azure Databricks 集成到我们的虚拟网络中.
在本章中,我们将讨论以下主题:
- Using the Azure portal UI
- Examining Azure Databricks authentication
- Working with VNets in Azure Databricks
- Azure Resource Manager templates
- Setting up the Azure Databricks CLI
我们将首先从 Azure 门户 UI 创建我们的工作区。
Technical requirements
本章最重要的先决条件是已经拥有具有资金和权限的 Azure 订阅。请记住,这是一种即用即付服务,但是,您可以创建免费试用订阅;在 Azure 门户中查看有关此选项的更多信息 (https://azure.microsoft.com/ zh-CN/免费/)。
Using the Azure portal UI
让我们首先通过 Azure 门户 UI 设置一个新的 Databricks 工作区:
- Log in to the Azure portal of your subscription and navigate to the Azure services ribbon.
- Click on Azure Databricks:

图 2.1 – 创建 Azure Databricks 服务
- This will lead you to the Azure Databricks default folder in which you will see all your resources listed. Click on Create new resource to create an Azure Databricks workspace environment:

图 2.2 – 您的 Azure Databricks 部署的资源
- Once you click on Create azure databricks service, you will have to fill in a couple of details regarding the workspace you are creating. The settings will look something like this:
- Workspace name
- Subscription
- Resource group
- Location
- Pricing Tier
- Deploy Azure Databricks workspace in your Virtual Network (Preview)
工作区的名称可以是您喜欢的任何名称,但最好选择一个简单的名称并引用它将具有的用途。例如,这些环境可以是验收环境或生产环境,每个环境都有自己的订阅类型。资源组可以在此时创建,并且必须在逻辑上涵盖具有相同目的的所有资源。
部署资源的位置也很重要,因为它必须靠近服务点或必须与之协同工作的其他已部署资源。
笔记
关于定价层:有标准、高级和试用三个选项。最大的区别之一是 Premium 允许您应用访问控制。这使其成为企业环境中的常见选择。
选项之一是,您可以选择将其部署在您自己的专用虚拟网络中。在这一步中,我们将选择否,但我们将在本章后面讨论 VNet 以及如何将所有 Azure 资源置于相同的网络安全策略下是一种良好的安全实践。
- Finally, you can create the resource, and the workspace will be automatically configured and deployed:
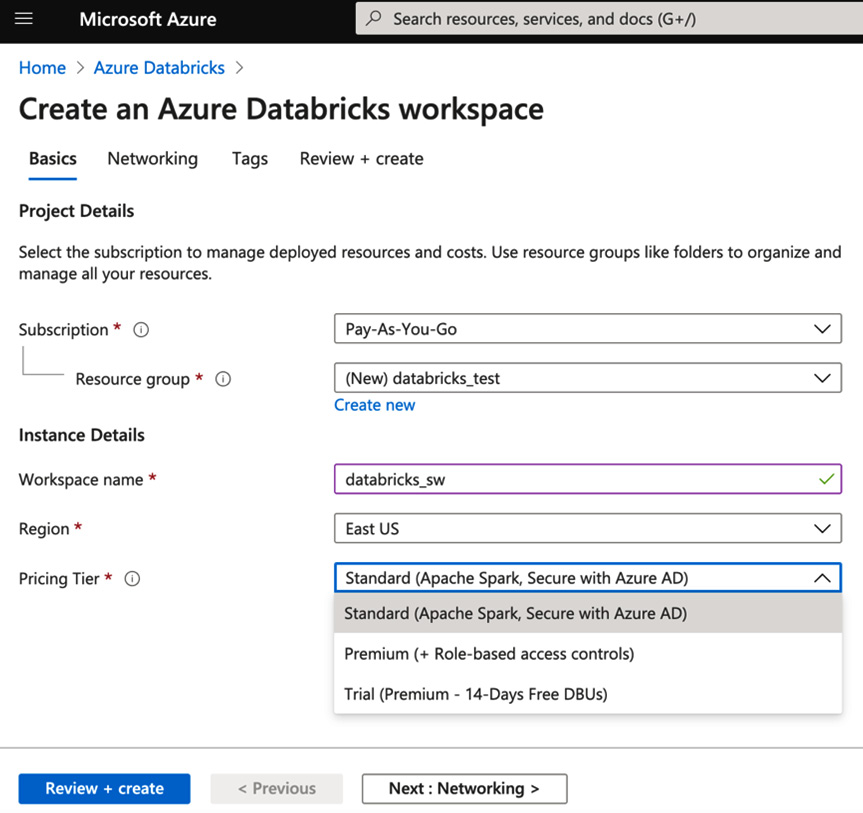
图 2.3 – 创建 Azure Databricks 工作区
现在我们已成功创建了我们的工作区,我们可以通过 Azure CLI 的工作区 UI 访问它。
Accessing the Workspace UI
成功部署 Azure Databricks 资源后,即可访问工作区。您可以通过单击 Azure 门户中资源中心的“启动工作区”按钮直接访问它,也可以使用资源左中角显示的 URL 来访问它。此 URL 会将您带到您将使用 Azure AD 登录访问的工作区:

图 2.4 – Azure Databricks 服务主面板
一旦您可以访问工作区,您将看到访问资产的不同选项。您可以使用左侧的选项功能区或中心选项来打开笔记本、创建新集群、新作业等。左侧主功能区中可访问的完整选项列表如下:
- Azure Databricks
- Home
- Workspace
- Recent assets
- Data
- Clusters
- Jobs
- Search:
我们可以在这里看到 UI:
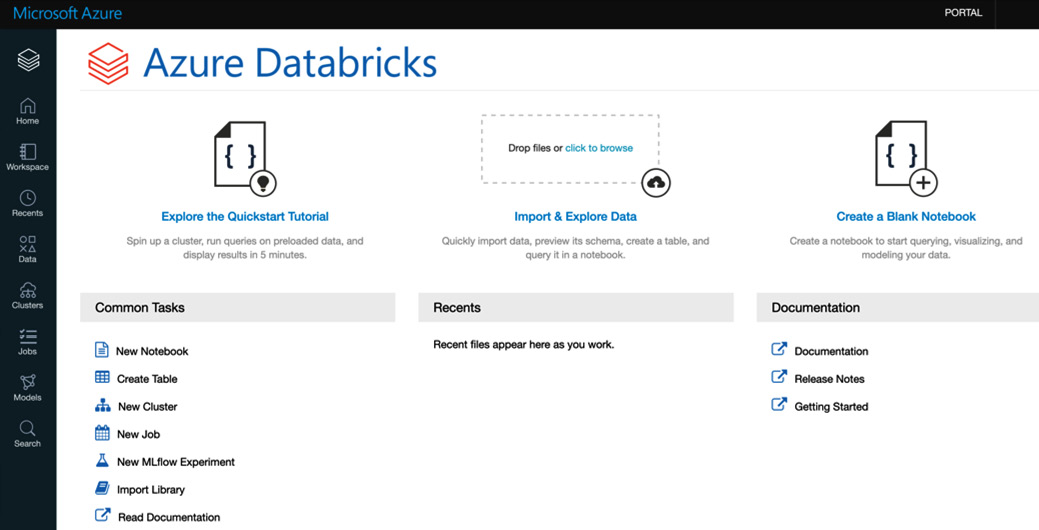
图 2.5 – Azure Databricks 工作区
一旦我们创建了我们的工作区环境,在我们可以专注于创建我们的第一个笔记本之前,首先您需要创建一个集群。集群是必要的,因为我们的笔记本中的代码将在那里运行。创建集群后,下一步将是创建一个新笔记本,这是 Azure Databricks 所基于的协作脚本。
Configuring an Azure Databricks cluster
正如我们之前提到的 ,集群是我们笔记本中的代码运行的地方。它可以被认为是一组在后台运行并平衡我们计算负载的虚拟机。此资源在打开时是可计费的,因此请记住在不使用时将其终止。
让我们单击左侧功能区上的集群图标。这将打开一个窗口,其中包含创建新集群的选项。唯一必要的字段是集群的名称,其余字段具有默认值,我们可以保持原样,但是我们更仔细地查看它们是好的。我们拥有的选项如下:
- Cluster Mode: We can choose from a Standard to a High Concurrency cluster.
- Pool: This is the number of standby compute machines ready and waiting to be used if the computing needs increase during the process. It reduces spin-up time for the cluster.
- Databricks Runtime Version: The version of Scala or Spark running in the cluster. Most available options now just allow Python 3.
- Autopilot Options: Enables autoscaling of the resource up and down and terminates following a predefined number of minutes of inaction.
最终的 配置是我们将使用的驱动程序和工作程序的类型。司机负责协调和分配工作给工人。更多的worker,或者更好的worker或driver,会提高集群的计算性能,但会影响这些资源的成本,所以一定要先查看定价:

图 2.6 – 创建集群
集群创建成功后,我们可以创建一个新笔记本并将其附加到新集群并开始在其上运行代码。
Creating a new notebook
- The first option is to create it directly from the home workspace by clicking on the New Notebook link under Common Tasks. This will open a dialog box from where we can select the default language of the notebook and the cluster to which it will be attached:

图 2.7 – 创建一个笔记本
我们拥有的另一个选项是直接在特定目录中创建笔记本:

图 2.8 – 在特定位置创建笔记本
- Once the notebook has been created, we attach it to a cluster, and we can start creating cells and running code in them:

图 2.9 – 连接到集群的笔记本
您可以使用 Python,因为它是我们刚刚创建的 notebook 的默认语言,但如果您想使用其他语言,例如 Scala,请记住您可以使用神奇的 %scala 命令。要在单元格中执行代码,您可以使用快捷键 Ctrl + Enter 或 Shift + Enter。如果笔记本连接到的集群未运行,系统将提示您确认是否希望它再次运行。
我们现在几乎准备好处理数据,但要做到这一点,我们必须牢记几件事。
我们可以通过三种不同的方式处理来自 PySpark 的 Azure 存储中的数据:
- Using a WASB file path, which is a way to specify the path to a file in the Windows Azure storage blob.
- Using a mount point on worker nodes with the FS protocol. We can use the magic %fs command to specify commands such as ls, and we can use the files stored there, using file paths such as dbfs:/mnt//<containername>/<partialPath>.
- Using a mount point and requesting files using a regular file path: /dbfs/mnt/<containername>/<partialPath>.
我们还可以通过使用 Create Table UI 创建表来直接上传数据:
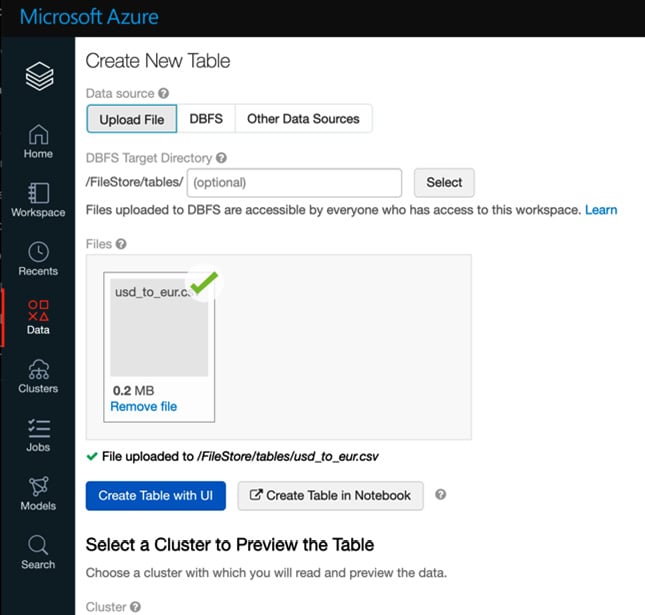
图 2.10 – 创建一个新的表格 UI
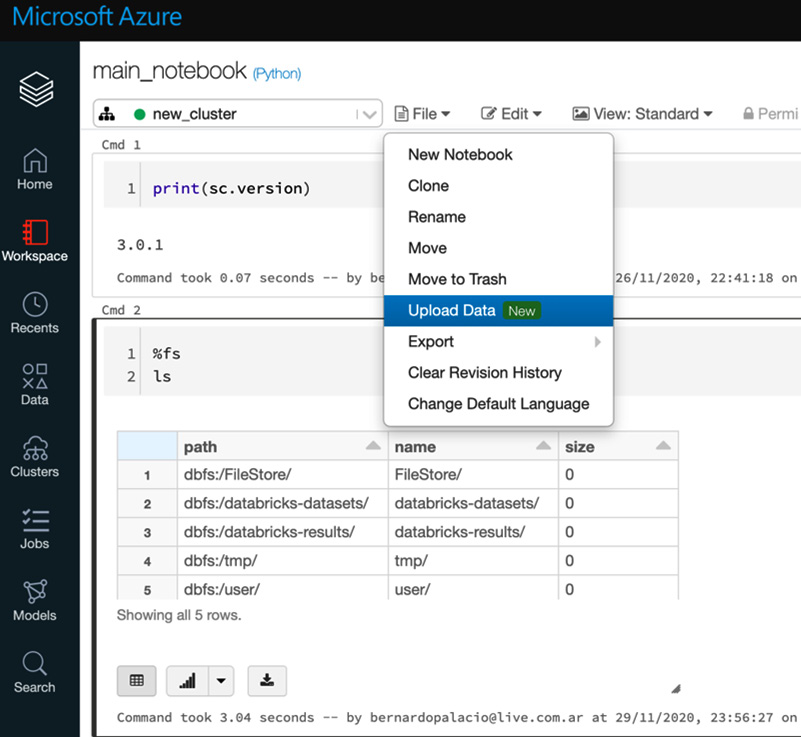
图 2.11 – 将数据上传到笔记本
- The other nice option we have is that Databricks already has some datasets to start with! We can use fs utils to explore this; by way of an example, we can use one of the coronavirus datasets:

图 2.12 – Azure Databricks 数据集
- After that, we are ready to use the data. We will load it as a Spark DataFrame. The code to do this is as follows:
file_path = "dbfs:/databricks-datasets/COVID/coronavirusdataset/PatientInfo.csv"
df = spark.read.format("csv").load(file_path,header = "true",inferSchema = "true")
display(df)
结果在以下屏幕截图中可见:

图 2.13 – 冠状病毒数据集
- After that we can run some statistics on the data frame:
df.printSchema()
df.describe().show()
df.head(5)
您可以在以下屏幕截图中看到结果:
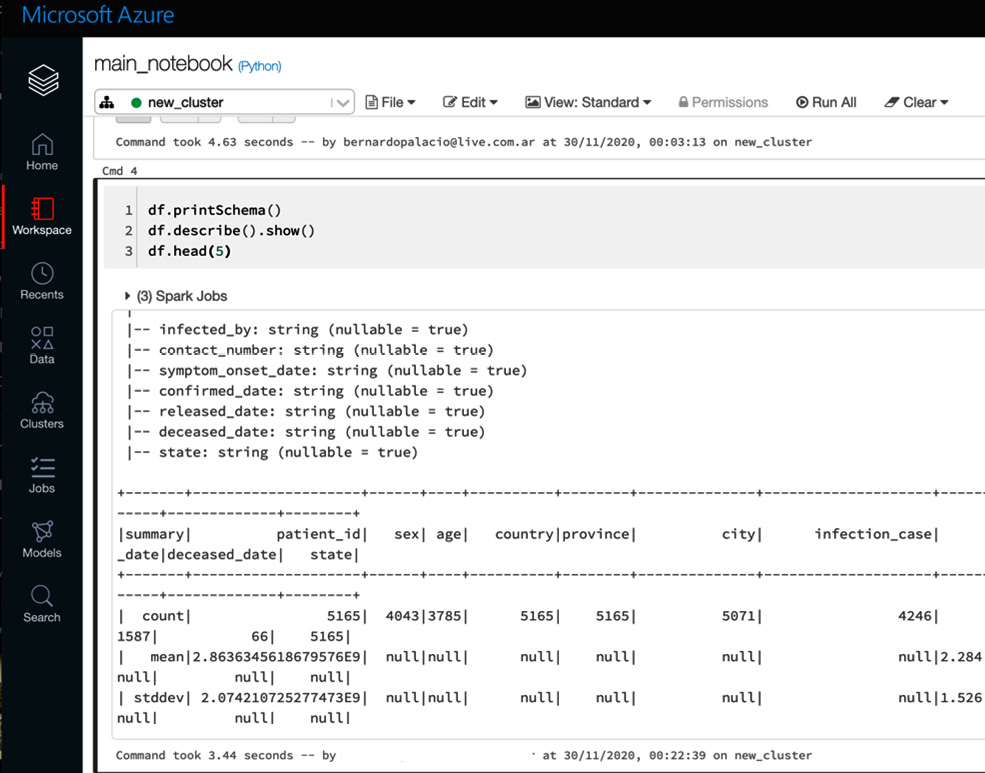
图 2.14 – Spark 数据帧信息
到目前为止,我们已经了解了 如何创建 Azure 工作区并创建一个可以在其中运行代码和处理数据的笔记本。在本章的以下部分中,我们将深入探讨如何通过 Azure CLI、使用 ARM 模板进行部署和 VNet 注入来控制这些资源。
现在我们将了解如何通过 Azure Databricks 身份验证共享这些笔记本。
Examining Azure Databricks authentication
在 Azure Databricks 中,身份验证通过我们的 Azure AD 帐户进行,在某些情况下,该帐户可以链接到我们的 Microsoft 帐户。 Premium 等订阅允许我们通过访问控制以更详细的方式管理对我们资产的访问。
Access control
如果我们与用户共享工作空间的 URL 以进行协作,首先我们必须授予该用户访问权限。为此,我们可以授予他们我们想要共享的资产的所有者或贡献者角色,或者在管理控制台中执行此操作:
- You can access Admin Console by clicking on the resource name icon in the top-right corner:

图 2.15 – 管理控制台
- After that, users can be added by clicking on the Add User button and then selecting the role you would like that user to have. You can create internal groups and apply a more detailed control over folder and workspace assets:

图 2.16 – 添加用户
Working with VNets in Azure Databricks
Azure Databricks 可以部署在自定义虚拟网络中。这称为 VNet 注入,从安全角度来看,非常重要。当我们使用默认设置部署时,入站流量是关闭的,但出站流量是开放的,没有限制。当我们使用 VNet 注入并直接部署到自定义虚拟网络时,我们可以围绕所有 Azure 服务应用相同的安全策略,以满足合规性和安全性要求。
如果您在数据科学或探索性环境中工作,最好让出站流量保持开放,以便能够下载 Python、R 和 Maven 以及 Ubuntu 包的包和库。
正如我们之前提到的,Azure Databricks 在两个服务平面上工作。第一个是控制页面,我们通过 Databricks API 使用它来处理工作区资产。第二个是部署集群的数据平面。正是第二个平面部署到您的自定义虚拟网络。这样做的好处如下:
- A secure connection to other Azure services, such as Azure Storage, through service endpoints
- A connection to on-premises data sources to be used in Azure Databricks
- Connecting Azure Databricks to a network virtual appliance to monitor and control outbound traffic
- Configuring Azure Databricks to use custom DNS
- Configuring network security group (NSG) rules
- Deploying Azure Databricks clusters in your existing virtual network
这是可能的,因为 Azure Databricks 委派允许联合控制子网。网络所有者允许将资源部署在特定子网中,并通过指定此委托发生的条件以及添加或修改安全策略来进行控制。
Virtual network requirements
您打算在其中部署 Azure Databricks 工作区的 VNet 应满足以下条件才能正常工作:
- It should have the same location as the Azure Databricks resource we are creating.
- The VNet must belong to the same subscription as the Azure Databricks resource.
- The VNet should have private and public dedicated subnets for Azure Databricks, to allow communication with the control plane.
- Address space: A CIDR block between /16 – /24 for the virtual network, and a CIDR block up to /26 for the private and public subnets.
虚拟网络允许我们在所有 Azure 资源中实施相同的策略。
Deploying to your own VNet
我们将展示如何将集群部署到特定虚拟网络的基础知识。 Azure Databricks 将使用你提供的 CIDR 范围在此网络中创建两个子网,一个网络安全组,将入站和出站流量列入白名单,并在虚拟网络更新后进行部署。
Deployment requirements
要部署 Azure Databricks,您首先必须按以下方式配置您的虚拟网络:
- The virtual network can be an existing one or a newly created one but, as mentioned before, the location and subscription must be the same as the Azure Databricks workspaces that you plan to create.
- A CIDR range between /16 – /24 is required for the virtual network.
Configuring the virtual network
当 我们创建 Azure Databricks 资源时,系统会提示我们一个名为 Networking 的选项选项卡。在此选项卡中,如果我们选择部署到我们自己的虚拟网络,我们将看到部署到我们自己的虚拟网络的选项:
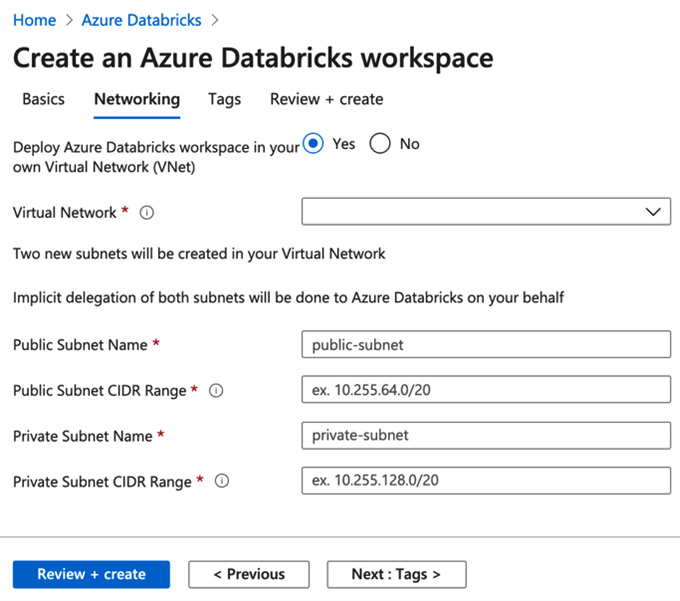
图 2.17 – 自定义虚拟网络中的 Azure Databricks
从这里,我们可以选择我们要使用的网络、对互联网公开的子网、私有子网和 CIDR 范围。设置完成后,您可以单击查看 + 创建并等待您的 Azure Databricks 部署到您的网络中。
我们可以使用 Azure 资源管理器 (ARM) 更详细地指定虚拟网络的配置。这些是我们可以用来将服务部署到 Azure 的模板。使用这些模板,我们可以指定是否要使用现有子网、使用现有安全组等等。在下一节中,我们将深入了解 Azure Databricks 的 ARM 模板。
Azure Resource Manager templates
ARM 模板是基础设施即代码,允许我们以敏捷的方式自动部署资源。这些模板是 JSON 文件,以声明方式定义基础设施和配置,指定资源和属性。我们可以将多个资源部署为单个资源,并修改现有配置。就像代码一样,它可以存储在存储库中并进行版本控制,任何人都可以运行代码来部署类似的环境。
然后将 ARM 模板传递给部署指定资源的 ARM API。这些可以包括虚拟网络、VM 或 Azure Databricks 工作区。
这些模板有两种操作模式,即完整模式或增量模式。当我们在 Complete 模式下部署时,这 会删除模板中未指定的所有对象以及要部署到的资源组。增量部署向现有资源添加额外资源。
这些模板的局限性在于它们不会将代码与资源一起部署。
同样重要的是要提到,如果我们使用 ARM 模板部署资源,最好先在 Azure 中的另一个测试订阅中对其进行测试。这可以帮助我们验证模板是否可通过 Azure CLI 部署,并避免例如在完整模式下部署,然后由于 Azure 订阅配额的限制而无法创建新资源。我们将在下一节中看到如何做到这一点。
Creating an Azure Databricks workspace with an ARM template
我们将了解我们如何使用 ARM 模板创建 Azure Databricks 工作区,然后验证它是否已正确部署。为此,我们将使用 Azure 快速入门模板中的 ARM 模板作为示例。
像往常一样,要创建 Azure Databricks 工作区,我们需要一个 Azure 订阅:
- Go to the Azure portal and, in the search tab, look for Deployment of Custom Template. From here, we can select to build our own template or use one from the GitHub Quickstart Template. We will select this option and look for 101-databricks-workspace, but there are options for using VNet injection and managed keys:

图 2.18 – 自定义部署
- After selecting the template, you need to provide the required values and then select Review + create, and finally Create:
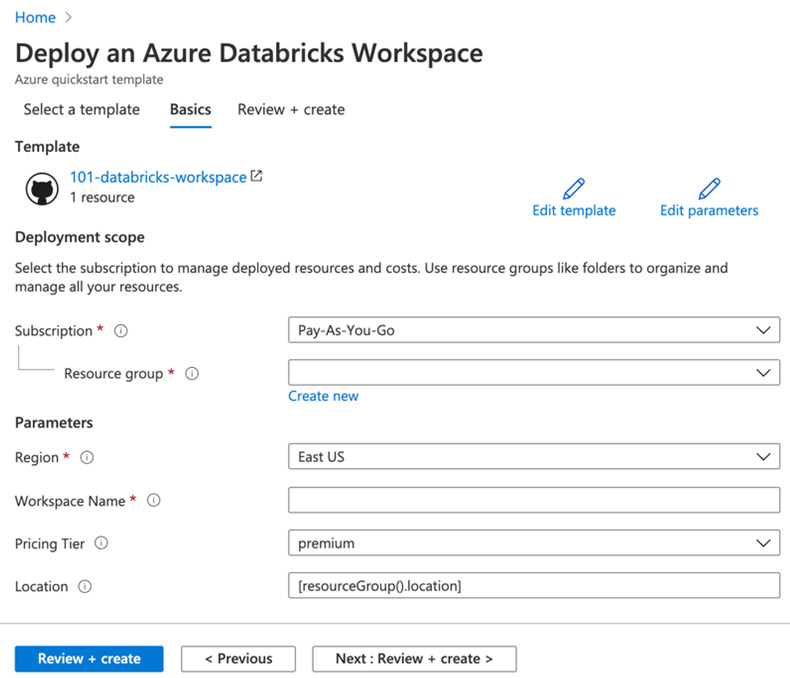
图 2.19 – 从 ARM 模板创建 Azure Databricks
正如我们之前可能经历过的,工作区的创建需要一些时间。如果部署失败,工作区将处于失败状态,我们需要将其删除并创建一个新的。删除此工作区时,托管资源组和任何其他已部署资源也将被删除。
Reviewing deployed resources
您可以检查 Azure Databricks 工作区是否已成功部署在 Azure 门户中,或使用以下 Azure CLI 脚本列出资源:
echo "Enter your Azure Databricks workspace name:" &&
read databricksWorkspaceName &&
echo "Enter the resource group where the Azure Databricks workspace exists:" &&
read resourcegroupName &&
az databricks workspace show -g $resourcegroupName -n $databricksWorkspaceName
Cleaning up resources
如果您将这些作为 教程进行操作,并且您不打算使用之前创建的资源,则可以使用下一个 Azure CLI 脚本将其删除:
echo "Enter the Resource Group name:" &&
read resourceGroupName &&
az group delete --name $resourceGroupName &&
echo "Press [ENTER] to continue ..."
让我们多谈谈 Azure CLI。它是一种工具,可用于与 Azure Databricks 中的资源进行交互。在下一节中,我们将更详细地描述如何使用它来管理我们的工作区资产。
Setting up the Azure Databricks CLI
Azure Databricks 附带一个 CLI 工具,它允许我们管理我们的资源。它构建在 Azure Databricks API 之上,允许你访问工作区、作业、群集、库等。这是一个托管在 GitHub 上的开源项目。
Azure Databricks CLI 基于 Python 3,通过以下 pip 命令安装:
pip3 install databricks-cli
您可以通过检查版本来确认安装是否成功。如果安装成功,您将看到当前版本的 Azure Databricks CLI:
databricks --version
请记住,不能将 Databricks CLI 与启用防火墙的存储容器一起使用,在这种情况下,建议使用 Databricks Connect 或 AZ 存储。
为了能够安装 Azure CLI,您需要已安装 Python 3 并将其添加到您将使用的环境的路径中。
Authentication through an access token
让我们设置 CLI:
- To be able to use CLI commands, we will have to authenticate ourselves by setting an Azure Databricks personal access token. This token is generated in your Azure Databricks profile, in the access token section:

图 2.20 – 用户账户设置
- After this, we click on the Generate New Token button in the top-left corner. This will require us to complete a comment on what this access token will be used for and establish a lifetime period for our token:

图 2.21 – 生成新令牌
- Next, you will see the generated token. Copy and store it in a safe place as this will be the only time that the token will be shown to you. Once created, the token will be listed in the Access Token list in your User Settings tab in your account.
- Now that we have the token, we can use it to authenticate ourselves in the Azure CLI. To do this, in our terminal, we can write the following command:
databricks configure --token我们需要提供主机和令牌。主机是我们尝试访问的 Azure Databricks 资源的 URL。
Authentication using an Azure AD token
我们用于配置 CLI 的另一个选项 是使用 Azure AD 令牌:
- You can generate this access token in the Azure portal and once this is done, we can store it as an environment variable called DATABRICKS_AAD_TOKEN:
export DATABRICKS_AAD_TOKEN=<azure-ad-token> - After we have set the environment variable, we can run the next command to configure the Databricks CLI using the AD token. This command will require you to provide the URL of the Azure Databricks resource we are trying to access, which will have the format adb-<workspace-id>.<random-number>.azuredatabricks.net:
databricks configure --aad-token. - After completing all the required fields prompted to you, your access credentials will be stored in a file, ~/.databrickscfg. This file should contain entries such as the following:
host = https://<databricks-instance>
token = <azure-ad-token>
在 0.8.1 及以上版本的 CLI 中,可以通过将环境变量 DATABRICKS_CONFIG_FILE 设置为我们想要的路径来更改此文件的路径。
Validating the installation
一旦我们提供了这些参数,我们将能够使用 Azure Databricks CLI 与我们的资源进行交互:
- We can test this by running the next command, which will show us the assets in our user folder in the workspace:
databricks workspace ls /Users/<your_username>结果,您将获得用户文件夹中所有资产的列表。
- We can always get the help documentation related to the available commands by running the following command:
databricks <resource> -h例如,此资源可能是 DBFS,为此我们需要用 fs 将资源填充在括号中,命令如下:
databricks fs -h
Workspace CLI
正如我们之前所见,工作区是我们的 Azure Databricks 环境的根文件夹,并且是笔记本和文件夹所在的位置。我们可以通过 Databricks CLI 管理这些资产。例如,我们可以使用 CLI 工具将 Python 脚本复制到工作区中的特定文件夹:
- The command to do this would be as follows:
databricks workspace import <source_path>/script.py <target_path> -l PYTHON这里,-l 选项用来表示我们上传的文件的语言。
- After this, we can validate that the file has been correctly imported by running the following command:
databricks workspace list /<target_path>正如我们之前所见,这将向我们显示目标路径中的所有文件和文件夹。
除此之外,我们还有允许我们删除、导出和创建文件夹等的命令。下面会提到其中一些,但您可以使用 -h 命令在 CLI 工具中查看所有这些。
Using the CLI to explore the workplace
您可以通过以下其他方式使用 Azure CLI 获取有关工作区的信息:
- List workspace files:
databricks workspace ls /Users/[email protected] - Import a local directory of notebooks: The databricks workspace import_dir command allows us to import all the files and directories from a local filesystem to the workspace. It's worth mentioning that only directories and files with the extensions of .scala, .py, .sql, .r, and. R are imported and when this is done, these extensions are stripped from the notebook name.
我们可以通过添加标志 -o 来选择删除目标路径中的所有现有笔记本:
databricks workspace import_dir . /Users/[email protected]/example - Export a workspace folder to the local filesystem: You can export a folder of notebooks from the workspace to a local directory. The command to do this is as follows:
databricks workspace export_dir /Users/[email protected]/example .
Clusters CLI
可以列出和创建集群,并且可以从 Clusters CLI 检索关于它们的信息。如果要创建集群,则必须为该集群提供 JSON 配置文件。您可以在 Azure Databricks 文档中阅读有关此文件的更多信息:
- To list all the commands available to work with clusters, run the following command in your terminal:
databricks clusters -h - We can also list all the runtime versions of our clusters:
databricks clusters spark-versions - And we can also list all the node types that exist in our resource:
databricks clusters list-node-types
Jobs CLI
Jobs CLI 允许在 Azure Databricks 中创建、编辑和运行作业。作业比 Databricks 可用的其他 API 更复杂,因为 许多命令需要传递 JSON 配置文件,正如我们在创建集群时看到的那样。正如我们习惯的那样,可以使用 Jobs CLI 中的 -h 选项访问完整的命令列表:
databricks jobs -h
Listing and finding jobs
databricks 作业列表命令 有两种输出格式,JSON 和 TABLE。默认输出 TABLE 格式,返回一个两列表(作业 ID、作业名称)。 Jobs CLI 允许我们使用正则表达式来查找一项特定的工作。
要按名称查找作业,请运行以下命令:
databricks jobs list | grep "JOB_NAME"
Groups API
Groups API 允许对用户组进行管理,可以在其中添加和删除其成员。可以创建、删除和列出组。以下命令将列出 admins 组中的所有成员:
databricks groups list-members --group-name admins
Databricks 有五个权限级别,按层次排列:无权限、读取、运行、编辑和管理。阅读允许查看单元格并在笔记本上进行评论。运行增加了从集群中附加和分离笔记本和运行笔记本的可能性。编辑为以前的权限添加了编辑单元格的可能性。 Manage 可以执行所有操作并更改其他人的权限。
The Databricks CLI from Azure Cloud Shell
我们 在 Azure 中的优势之一是我们可以直接从 Azure 门户使用 Databricks CLI:
- The button next to the search bar is the Cloud Shell icon:

图 2.22 – Azure Cloud Shell
- If we click on it, we will be prompted with the option of Bash or PowerShell. To use the CLI, we must select Bash:

图 2.23 – Azure Cloud Shell Bash
- If you have no storage created, you will be prompted with a message that says that we require storage to persist files and we can create it there directly.
- Once the storage has been created, we have access to the Azure Cloud Shell in which we can create a virtual environment and install the Databricks CLI in the same way that we would do in a local terminal.
完成这些步骤后,您可以开始使用 Azure Cloud Shell 中的 Databricks CLI。
Summary
在本章中,我们探讨了通过 UI 或 ARM 模板创建 Azure Databricks 服务的可能性,并探讨了对资源实施访问控制的选项。我们还回顾了不同的身份验证方法、使用 VNet 在处理整个 Azure 资源的访问策略时采用一致的方法,以及我们如何使用 Databricks CLI 创建和管理集群、作业和其他资产。这些知识将使我们能够有效地部署所需的资源来处理 Azure Databricks 中的数据,同时保持对这些资产如何访问和转换数据的控制。
在下一章中,我们将应用这个概念和前面的概念来运行更高级的笔记本、创建 ETL、数据科学实验等等。我们将从 第 3 章 中的 ETL 管道开始>,使用 Azure Databricks 创建 ETL 操作。