vlambda博客
学习文章列表

读书笔记《hands-on-full-stack-development-with-spring-boot-2-0-and-react》保护您的应用程序

Chapter 13. Securing Your Application

本章说明当我们在后端使用 JWT 身份验证时,如何对我们的前端实施身份验证。一开始,我们打开后端的安全性以启用 JWT 身份验证。然后,我们为登录功能创建一个组件。最后,我们修改我们的 CRUD 功能以将请求的 Authorization 标头中的令牌发送到后端。

在本章中,我们将看到以下内容:

  • How to create a login functionality on our frontend
  • How to implement conditional rendering after authentication
  • What is needed for CRUD functionalities when the JWT authentication is enabled
  • How to show messages when authentication fails

Technical requirements


我们在 第 4 章中创建的 Spring Boot 应用程序, 安全和测试您的后端,(GitHub: https://github.com/PacktPublishing/Hands-On-Full-Stack-Development-with-Spring-Boot-2.0-和-React/tree/master/Chapter%204)。

我们在上一章中使用的 React 应用程序 (GitHub: https://github.com/PacktPublishing/Hands-On-Full-Stack-Development-with-Spring-Boot-2.0-和-React/tree/master/Chapter%2011)。

Securing the backend

我们使用不安全的后端为我们的 前端实现了CRUD 功能。现在,是时候为我们的后端再次打开安全性并返回到我们在 第 4 章中创建的版本,< span class="emphasis">保护和测试您的后端

  1. Open your backend project with the Eclipse IDE and open the SecurityConfig.java file in the editor view. We commented the security out and allowed everyone access to all endpoints. Now, we can remove that line and also remove the comments from the original version. Now your SecurityConfig.java file's configure method should look like the following:
@Override
  protected void configure(HttpSecurity http) throws Exception {
    http.csrf().disable().cors().and().authorizeRequests()
    .antMatchers(HttpMethod.POST, "/login").permitAll()
    .anyRequest().authenticated()
    .and()
    // Filter for the api/login requests
    .addFilterBefore(new LoginFilter("/login", authenticationManager()),
       UsernamePasswordAuthenticationFilter.class)
    // Filter for other requests to check JWT in header
    .addFilterBefore(new AuthenticationFilter(),
       UsernamePasswordAuthenticationFilter.class);
}

让我们测试一下当后端现在再次受到保护时会发生什么。

  1. Run the backend by pressing the Run button in Eclipse and check from the Console view that the application started correctly. Run the frontend by typing the npm start command into your terminal and the browser should be opened to the address localhost:3000.


  1. You should now see the list page and the table are empty. If you open the developer tools, you will notice that the request ends in the 403 Forbidden HTTP error. This is actually what we wanted because we haven't done the authentication yet to our frontend:
读书笔记《hands-on-full-stack-development-with-spring-boot-2-0-and-react》保护您的应用程序

Securing the frontend

身份验证是使用 JWT 实现到后端的。在第 4 章中, 保护和测试您的后端 span>,我们创建了 JWT 身份验证, /login endpoint 允许所有人无需身份验证。在前端的登录page 我们要先调用/login获取令牌的端点。之后,令牌将包含在我们发送到后端的所有请求中,如 Chapter 4 中所示, < span class="emphasis">保护和测试您的后端

让我们首先创建一个登录组件,该组件要求用户提供凭据以从后端获取令牌:

  1. Create a new file, called Login.js, in the components folder. Now, your file structure of the frontend should be the following:
读书笔记《hands-on-full-stack-development-with-spring-boot-2-0-and-react》保护您的应用程序
  1. Open the file in the VS Code editor view and add the following base code to the login component. We are also importing SERVER_URL because it is needed in a login request:
import React, { Component } from 'react';
import {SERVER_URL} from '../constants.js';

class Login extends Component {
  render() {
    return (
      <div>        
      </div>
    );
  }
}

export default Login;
  1. We need three state values for authentication. Two for the credentials (username and password) and one Boolean value to indicate the status of authentication. The default value of the authentication status state is false. Create the constructor and introduce states inside the constructor:
constructor(props) {
  super(props);
  this.state = {username: '', password: '', 
    isAuthenticated: false};
}
  1. In the user interface, we are going to use the Material-UI component library, as we did with the rest of the user interface. We need text field components for the credentials and a button to call a login function. Add imports for the components to the login.js file:
import TextField from '@material-ui/core/TextField';
import Button from '@material-ui/core/Button';
  1. Add imported components to a user interface by adding these to the render() method. We need two TextField components, one for the username and one for the password. One RaisedButton component is needed to call the login function that we are going to implement later in this section:
render() {
  return (
    <div>
      <TextField name="username" placeholder="Username" onChange={this.handleChange} /><br/> 
      <TextField type="password" name="password" placeholder="Password" onChange={this.handleChange} /><br/><br/> 
      <Button variant="raised" color="primary" onClick={this.login}>
        Login
     </Button>
    </div>
  );
}
  1. Implement the change handler for the TextField components to save typed values to the states:
handleChange = (event) => {
  this.setState({[event.target.name] : event.target.value});
}
  1. As shown in Chapter 4, Securing and Testing Your Backend, the login is done by calling the /login endpoint using the POST method and sending the user object inside the body. If authentication succeeds, we get a token in a response Authorization header. We will then save the token to session storage and set the isAuthenticated state value to true. The session storage is similar to local storage but it is cleared when a page session ends. When the isAuthenticated state value is changed, the user interface is re-rendered:
login = () => {
  const user = {username: this.state.username, password: this.state.password};
  fetch(SERVER_URL + 'login', {
    method: 'POST',
    body: JSON.stringify(user)
  })
  .then(res => {
    const jwtToken = res.headers.get('Authorization');
    if (jwtToken !== null) {
      sessionStorage.setItem("jwt", jwtToken);
      this.setState({isAuthenticated: true});
    }
  })
  .catch(err => console.error(err)) 
}
  1. We can implement conditional rendering, which renders the Login component if the isAuthenticated state is false or the Carlist component if isAuthenticated state is true. We first have to import the Carlist component to the Login component:
import Carlist from './Carlist';

然后对 render() 方法进行如下更改:

render() {
  if (this.state.isAuthenticated === true) {
    return (<Carlist />)
  }
  else {
    return (
      <div>
        <TextField type="text" name="username" placeholder="Username" onChange={this.handleChange} /><br/> 
        <TextField type="password" name="password" placeholder="Password" onChange={this.handleChange} /><br/><br/> 
        <Button variant="raised" color="primary" onClick={this.login}>
          Login
        </Button>
      </div>
    );
  }
}
  1. To show the login form, we have to render the Login component instead of the Carlist component in the App.js file:
// App.js
import React, { Component } from 'react';
import './App.css';
import Login from './components/Login';
import AppBar from '@material-ui/core/AppBar';
import Toolbar from '@material-ui/core/Toolbar';

class App extends Component {
  render() {
    return (
      <div className="App">
        <AppBar position="static" color="default">
          <Toolbar>CarList</ Toolbar>
        </ AppBar>
        <Login /> 
      </div>
    );
  }
}

export default App;

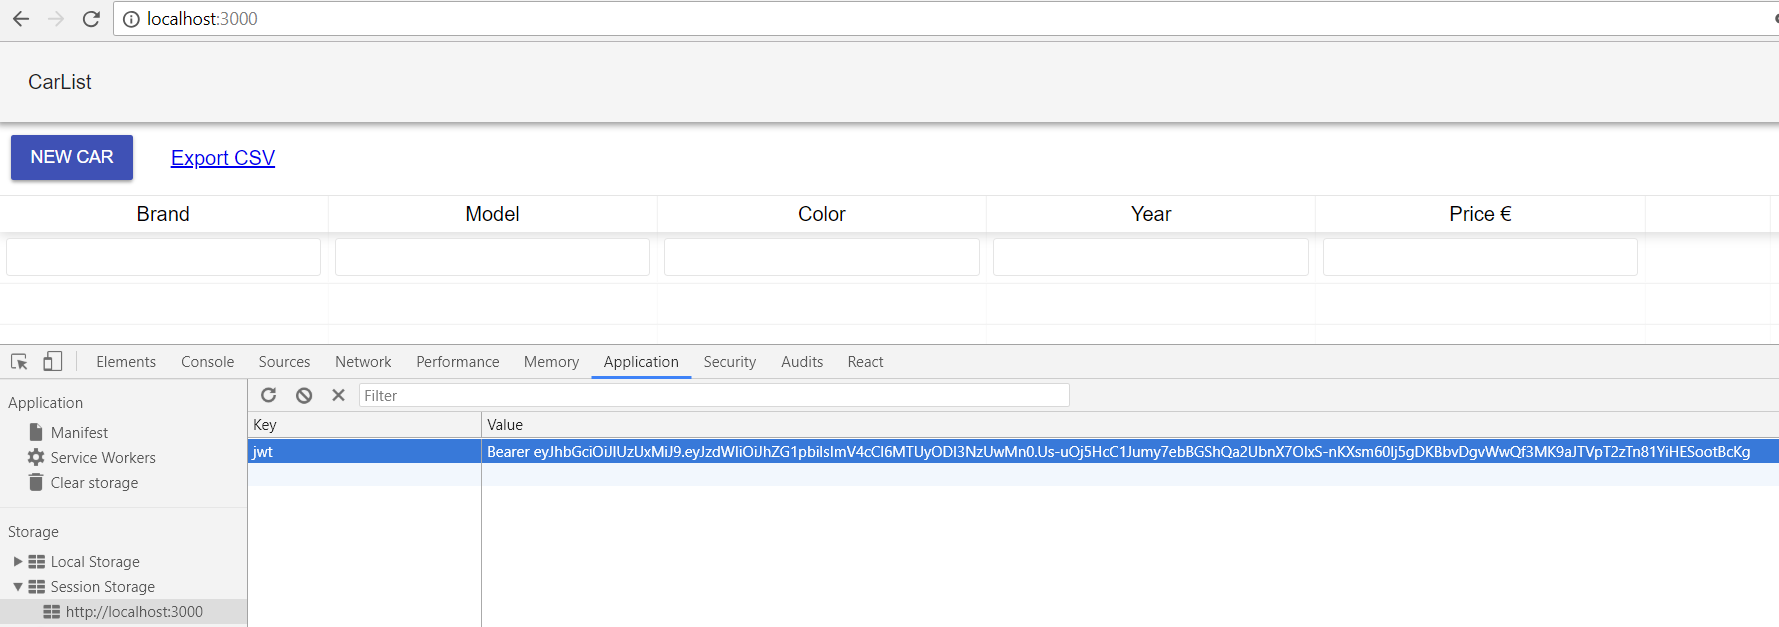
现在,当您的前端和 backend 正在运行时,您的前端应该如下所示:

读书笔记《hands-on-full-stack-development-with-spring-boot-2-0-and-react》保护您的应用程序

如果您使用 user/useradmin/admin 凭据登录,您应该会看到汽车列表页面。如果您打开开发者工具,您可以看到令牌现在已保存到会话存储中:

读书笔记《hands-on-full-stack-development-with-spring-boot-2-0-and-react》保护您的应用程序

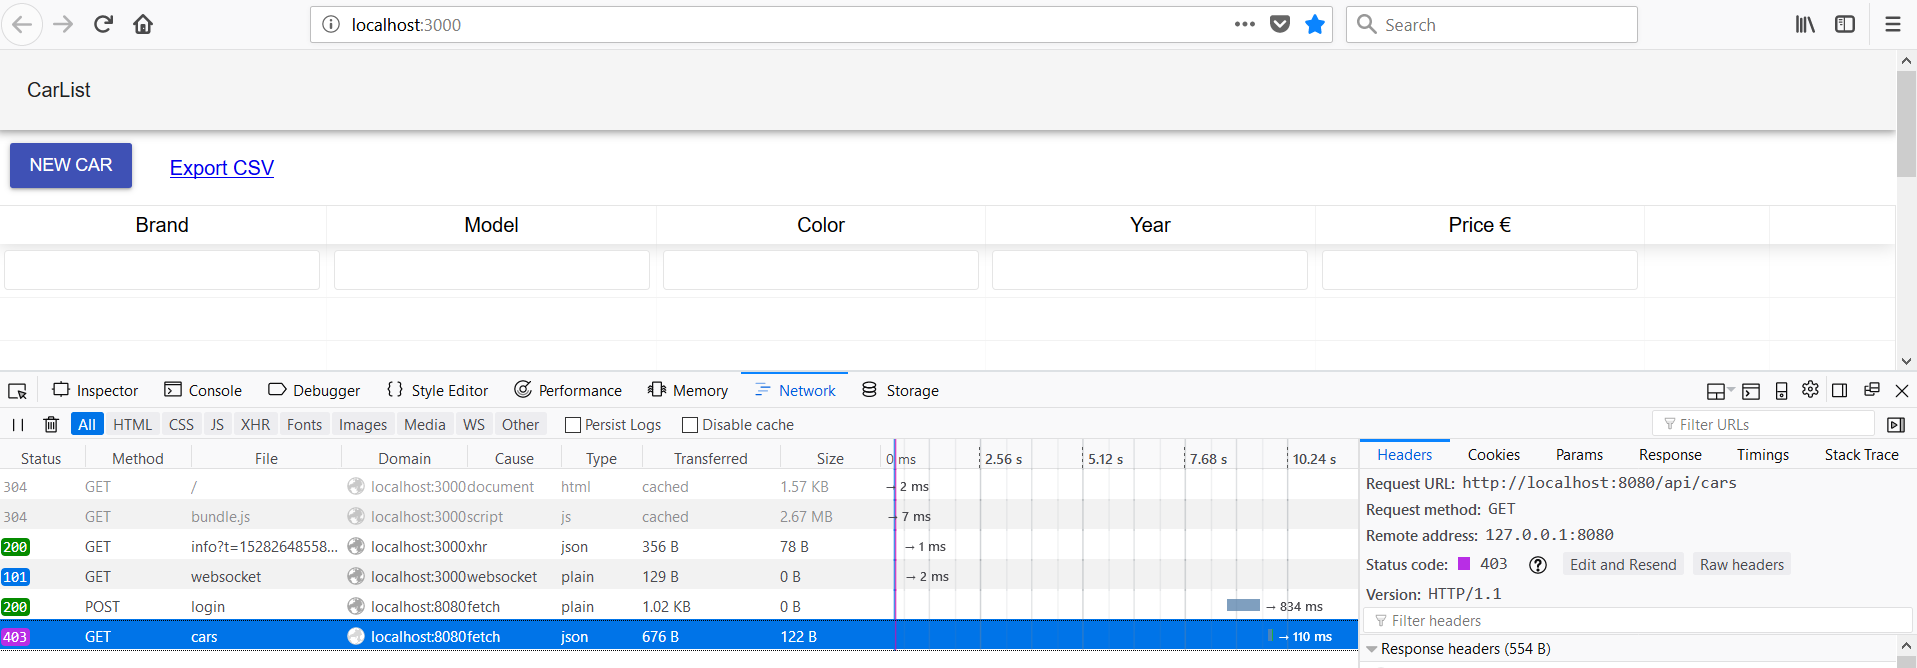
汽车列表仍然是空的,但这是正确的,因为我们还没有将令牌包含在请求中。这是 JWT 身份验证所必需的,我们在下一阶段实施:

  1. Open the Carlist.js file in the VS Code editor view. To fetch the cars, we first have to read the token from the session storage and then add the Authorization header with the token value to the request. You can see the source code of the fetch function here:
// Carlist.js 
// Fetch all cars
fetchCars = () => {
  // Read the token from the session storage
 // and include it to Authorization header
  const token = sessionStorage.getItem("jwt");
  fetch(SERVER_URL + 'api/cars', 
  {
    headers: {'Authorization': token}
  })
  .then((response) => response.json()) 
  .then((responseData) => { 
    this.setState({ 
      cars: responseData._embedded.cars,
    }); 
  })
  .catch(err => console.error(err)); 
}
  1. If you log in to your frontend, you should see the car list populated with cars from the database:
读书笔记《hands-on-full-stack-development-with-spring-boot-2-0-and-react》保护您的应用程序

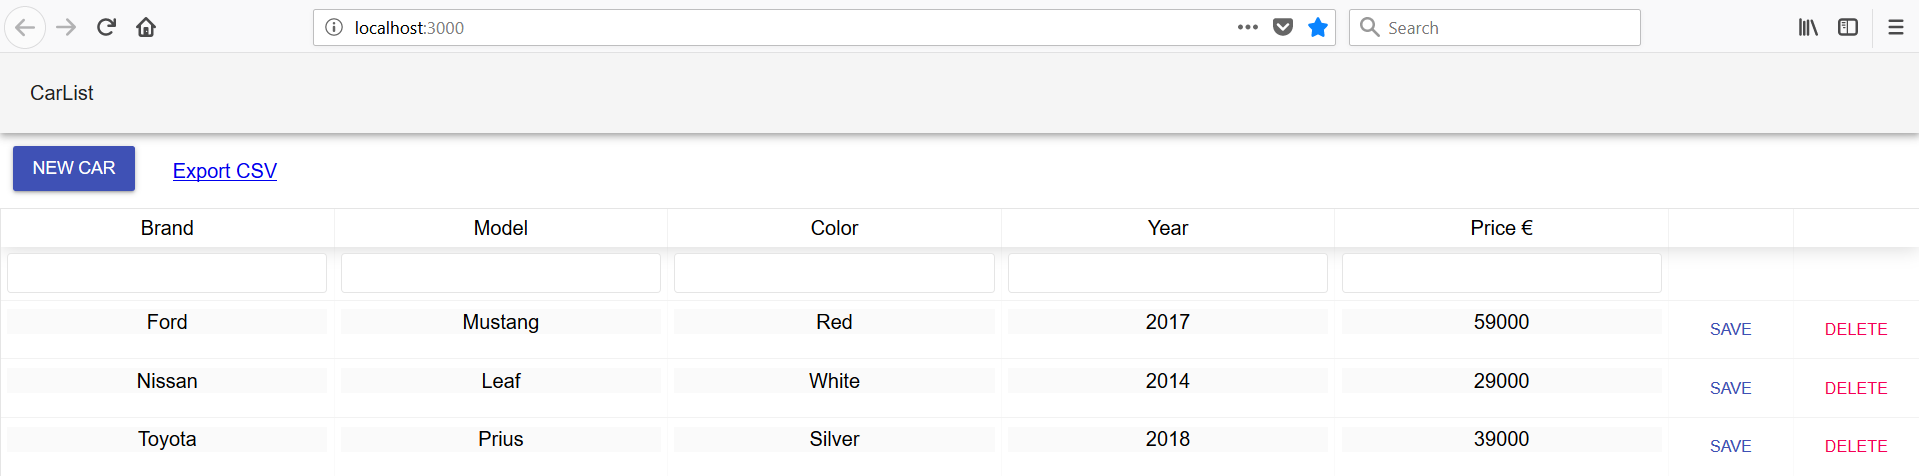
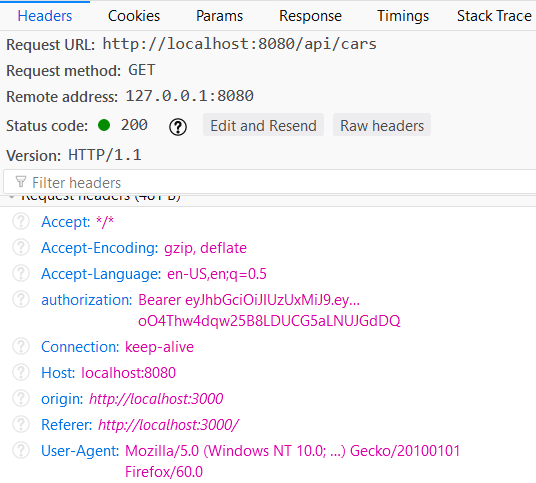
  1. Check the request content from the developer tools; you can see that it contains the Authorization header with the token value:
读书笔记《hands-on-full-stack-development-with-spring-boot-2-0-and-react》保护您的应用程序

所有其他 CRUD 功能都需要 same 修改才能正常工作。修改后删除函数的源代码如下:

// Delete car
onDelClick = (link) => {
  const token = sessionStorage.getItem("jwt");
  fetch(link, 
    { 
      method: 'DELETE',
      headers: {'Authorization': token}
    }
  )
  .then(res => {
    this.setState({open: true, message: 'Car deleted'});
    this.fetchCars();
  })
  .catch(err => {
    this.setState({open: true, message: 'Error when deleting'});
    console.error(err)
  }) 
}

修改后的add函数源代码如下:

// Add new car
addCar(car) {
  const token = sessionStorage.getItem("jwt");
  fetch(SERVER_URL + 'api/cars', 
  { method: 'POST', 
      headers: {
        'Content-Type': 'application/json',
        'Authorization': token
      },
      body: JSON.stringify(car)
  })
  .then(res => this.fetchCars())
  .catch(err => console.error(err))
} 

最后,更新函数的源代码如下所示:

// Update car
updateCar(car, link) {
  const token = sessionStorage.getItem("jwt");
  fetch(link, 
  { method: 'PUT', 
    headers: {
      'Content-Type': 'application/json',
      'Authorization': token
    },
    body: JSON.stringify(car)
  })
  .then( res =>
    this.setState({open: true, message: 'Changes saved'})
  )
  .catch( err => 
    this.setState({open: true, message: 'Error when saving'})
  )
} 

现在,在您登录到应用程序后,所有 CRUD 功能都可以正常工作。

在最后阶段,我们将实现一个 error 消息,如果身份验证失败,该消息会显示给最终用户。我们正在使用 Material-UI SnackBar 组件来显示消息:

  1. Add the following import to the Login.js file:
import Snackbar from '@material-ui/core/Snackbar';
  1. Open the state for Snackbar, as we did in Chapter 10, Adding CRUD Functionalities:
// Login.js  
constructor(props) {
  super(props);
  this.state = {username: '', password: '', 
  isAuthenticated: false, open: false};
}

我们还需要 Snackbar 打开状态的状态处理程序以在我们在 Snackbar ="literal">SnackbarautoHideDuration 道具:

handleClose = (event) => {
  this.setState({ open: false });
}
  1. Add Snackbar to the render() method:
<Snackbar open={this.state.open} onClose={this.handleClose} autoHideDuration={1500} message='Check your username and password' />
  1. Set the open state value to true if the authentication fails:
login = () => {
  const user = {username: this.state.username, 
      password: this.state.password};
  fetch('http://localhost:8080/login', {
    method: 'POST',
    body: JSON.stringify(user)
  })
  .then(res => {
    const jwtToken = res.headers.get('Authorization');
    if (jwtToken !== null) {
      sessionStorage.setItem("jwt", jwtToken);
      this.setState({isAuthenticated: true});
    }
    else {
      this.setState({open: true});
    }
  })
  .catch(err => console.error(err)) 
}

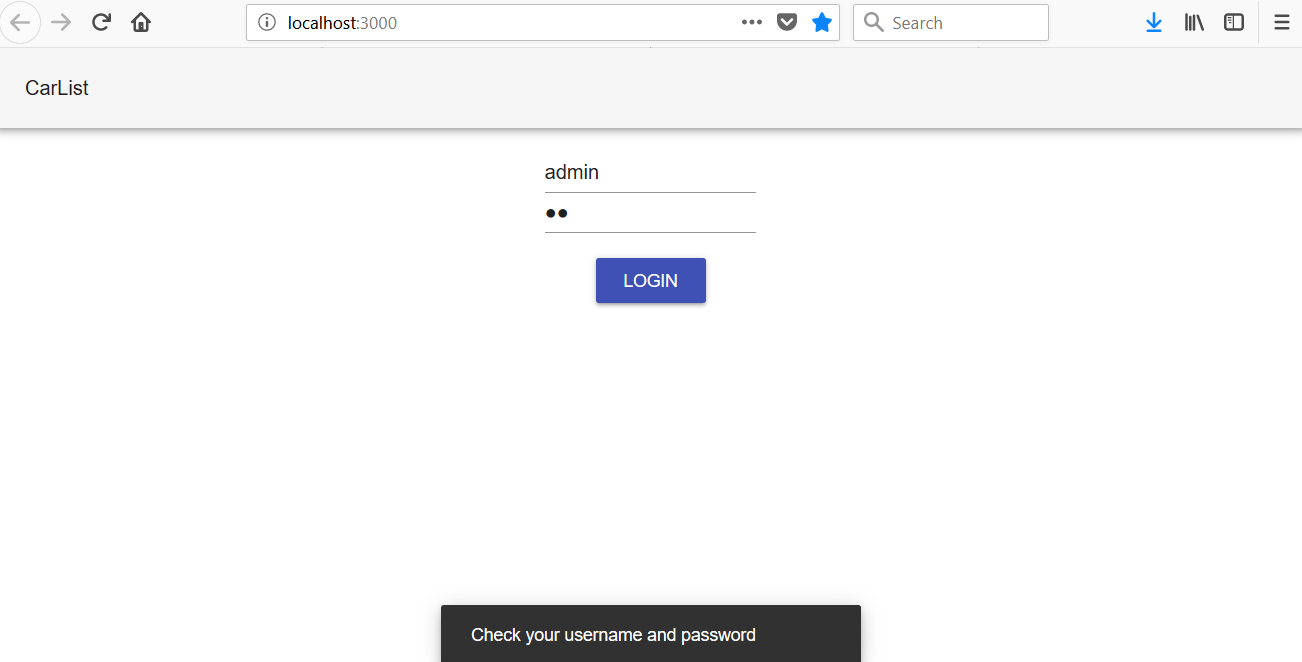
如果您现在使用错误的凭据登录,您可以看到 toast 消息:

读书笔记《hands-on-full-stack-development-with-spring-boot-2-0-and-react》保护您的应用程序

注销功能更多 易于实现。您基本上只需从会话存储中删除令牌并将 isAuthenticated 状态值更改为 false,如下面的源代码所示代码:

logout = () => {
    sessionStorage.removeItem("jwt");
    this.setState({isAuthenticated: false});
}

然后使用条件渲染,可以渲染 Login 组件,而不是 Carlist。 

如果您想使用 React Router 实现菜单,则可以实现所谓的安全路由,该路由只有在用户通过身份验证时才能访问。以下源代码显示了安全路由,如果用户通过身份验证,则显示路由组件,否则重定向到登录页面:

const SecuredRoute = ({ component: Component, ...rest, isAuthenticated }) => (
  <Route {...rest} render={props => (
    isAuthenticated ? (
      <Component {...props}/>
    ) : (
      <Redirect to={{
        pathname: '/login',
        state: { from: props.location }
      }}/>
    )
  )}/>
)

这是使用我们在上一个示例中定义的 SecuredRoute 的 Switch 路由器的示例。  Login 和 Contact 组件无需身份验证即可访问,但 Shop 需要认证:

 <Switch>
    <Route path="/login" component={Login} />
    <Route path="/contact" component={Contact} />
    <SecuredRoute isAuthenticated={this.state.isAuthenticated} path="/shop" component={Shop} />
    <Route render={() => <h1>Page not found</h1>} />
  </Switch>

Summary


在本章中,我们学习了在使用 JWT 身份验证时如何为前端实现登录功能。身份验证成功后,我们使用会话存储来保存从后端收到的令牌。然后在我们发送到后端的所有请求中使用该令牌,因此,我们必须修改我们的 CRUD 功能以与身份验证一起正常工作。在下一章中,我们将把我们的应用程序部署到 Heroku,并演示如何创建 Docker 容器。

Questions


  1. How should you create a login form?
  2. How should you log in to the backend using JWT?
  3. How should you store tokens to session storage?
  4. How should you send a token to the backend in CRUD functions?