读书笔记《distributed-data-systems-with-azure-databricks》第3章使用Azure数据库创建ETL操作
Chapter 3: Creating ETL Operations with Azure Databricks
在本章中,我们将学习如何设置不同的连接以使用外部数据源,例如 Simple Storage Service (S3 ),设置我们的 Azure 存储帐户,并使用 Azure Databricks 笔记本创建提取、转换和加载(ETL)操作清理和转换数据。我们将利用 Azure 数据工厂 (ADF),最后,我们将看一个设计 ETL 操作的示例,该操作是事件驱动。通过探索本章中的各个部分,您将能够对如何从外部源加载数据然后转换为数据管道、使用 Azure Databricks 构建和编排数据有一个高层次的理解。让我们先简要概述一下 Azure Data Lake Storage Gen2 (ADLS Gen2) 以及如何在 Azure Databricks 中使用它。
在本章中,我们将研究以下主题:
- Using ADLS Gen2
- Using S3 with Azure Databricks
- Using Azure Blob storage with Azure Databricks
- Transforming and cleaning data
- Orchestrating jobs with Azure Databricks
- Scheduling jobs with Azure Databricks
Using ADLS Gen2
要在 Azure Databricks 中持久保存数据 ,我们需要一个数据湖。我们将使用 ADLS Gen2,因此我们的第一步是设置一个帐户。这将允许我们存储永久数据并使用它来运行 ETL 管道、获取分析或使用它 来构建机器学习 (ML) 模型。
Setting up a basic ADLS Gen2 data lake
要设置 ADLS Gen2 订阅,我们首先需要在 Azure 门户中创建一个新资源。为此,请按照以下步骤操作:
- Search for Storage accounts and select Create a new Storage account.
- Attach it to a resource group, set up a name, set the Account kind field to StorageV2 (general-purpose v2) and, finally, set Replication to Locally-redundant storage (LRS), as illustrated in the following screenshot:

图 3.1 – 创建 ADLS Gen2 订阅
- Before finalizing, in the Advanced tab, set the Hierarchical namespace option to Enabled so that we can use ADLS Gen2 from our notebooks. The following screenshot illustrates this:

图 3.2 – 启用分层命名空间选项
- After this, you can click on the Review + create button. Your resource will be validated and you can then start the deployment, which usually takes a couple of minutes. Finally, we will have our ADLS Gen2 storage account set up. Now, we can upload files to it, for which we will use Storage Explorer.
Uploading data to ADLS Gen2
要上传我们将在演示中使用的文件,请搜索Storage Explorer 在 Azure 门户中,然后按照以下步骤操作:
- Select a subscription from the left tab—this will show all the containers related to that subscription. Right-click on the container in the ADLS Gen2 storage account and create a new filesystem that will contain our data. The process is illustrated in the following screenshot:

图 3.3 – 创建文件系统
- After the filesystem has been created, select the Upload button from the options bar at the top of the main panel, as illustrated in the following screenshot. This will prompt us with a message to download Storage Explorer, which is a program that allows us to upload files stored locally and manage our storage account:

图 3.4 – 选择 Upload 按钮下载 Storage Explorer
- Follow the steps to install Storage Explorer on your local machine.
- Once it is installed, log in to your Azure account and navigate to the left tab until you find the subscription in which we have created our ADLS Gen2 account. There, we will see the filesystem that we have created, and from there, we can upload local files using the Upload button in the top-left bar, as illustrated in the following screenshot:
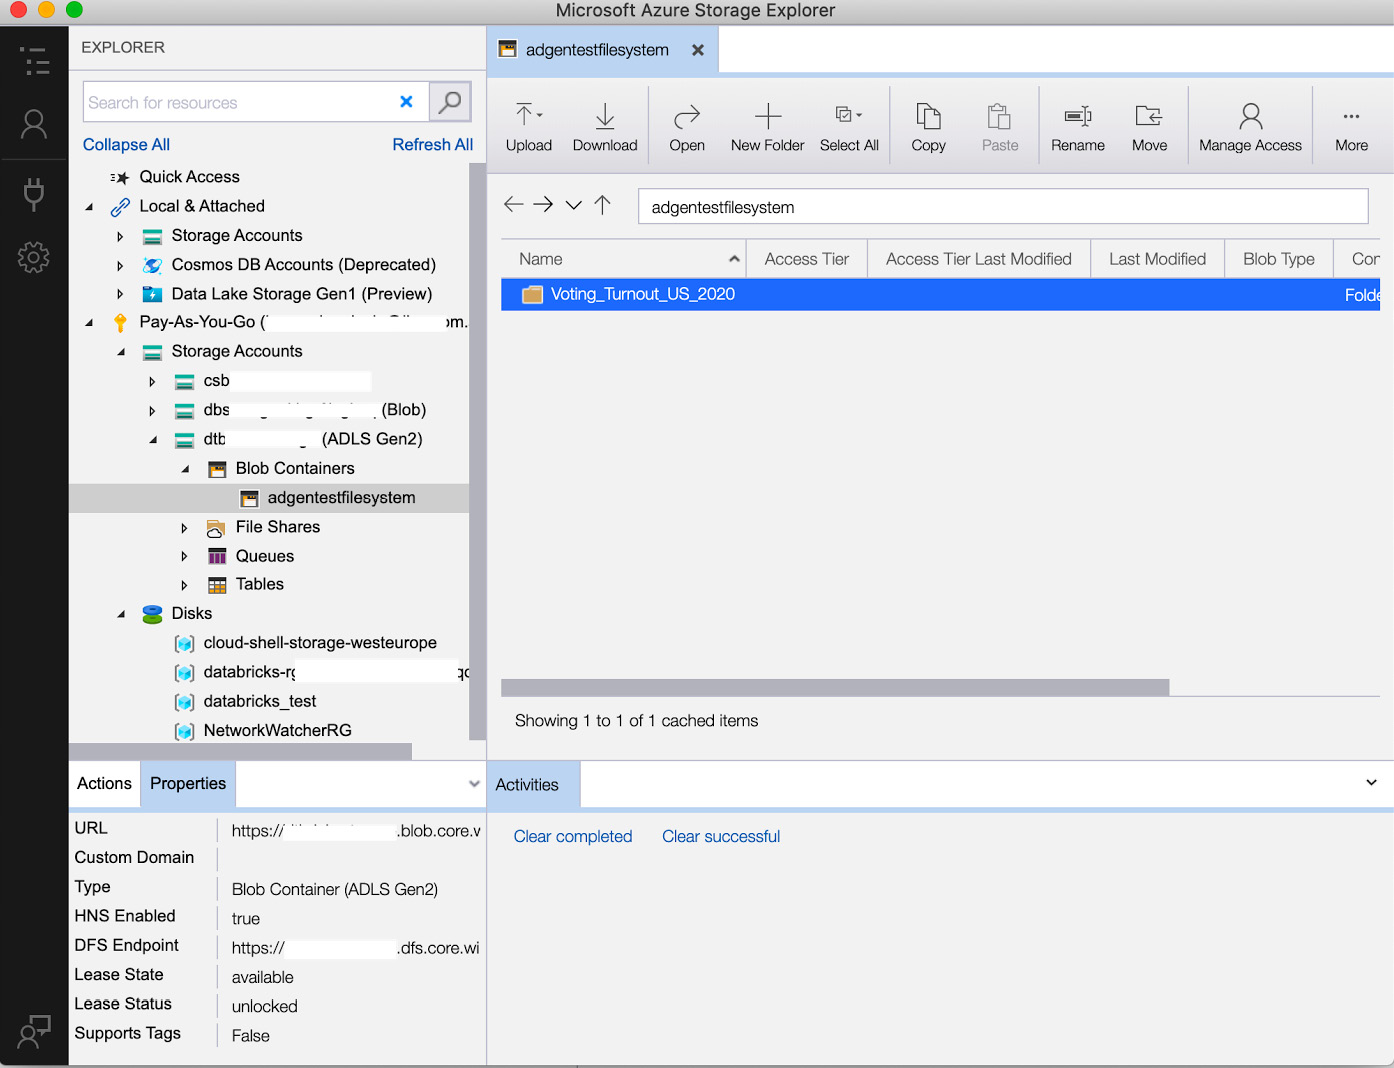
图 3.5 – Azure 存储资源管理器
我们将使用的数据是2020年美国大选投票率 数据,其中包括 2020 年 美国(US)唐纳德·特朗普之间的选举中符合投票条件的人群的投票率和乔拜登。选民投票率是在选举中投票的合格选民的百分比,美国政府从美国独立初期的选举开始就一直在公布这一数据。
数据来自人口普查局的当前人口调查(CPS); 11 月投票和登记补充材料可从以下链接下载:https://data.world/government/vep-turnout。
现在我们已经设置了存储帐户并上传了文件,我们需要从 Azure Databricks 笔记本访问它们。让我们看看如何做到这一点。
Accessing ADLS Gen2 from Azure Databricks
根据到的文档,我们有三种从Azure Databricks访问ADLS Gen2的方法,概述如下:
- Using ADLS Gen2 access keys on the notebook
- Mounting the ADLS Gen2 filesystem into the Databricks file system at a cluster level
- Using a service principal to access data without mounting
我们将使用第一个选项,这是最直接的,因此我们需要来自我们想要访问的存储帐户的访问密钥。
值得一提的是,在生产环境中,最好将这些密钥保存在 Azure Key Vault 中,然后使用 Azure Databricks 链接它们,并将这些密钥用作我们笔记本中的环境变量。步骤如下:
- To get the keys to access our ADLS Gen2, select the Storage account option from the resource panel in the Azure portal and then go to Access keys in the left tab. Copy key1, which is the key that we will be using to access the data from the notebook. The process is illustrated in the following screenshot:

图 3.6 – ADLS Gen2 访问密钥
- In our notebook, we can set the connection to our ADLS Gen2 account. Replace your storage account name in the connection string and paste key1 from the account into the following command to set up the connection:
spark.conf.set(
  "fs.azure.account.key.<storage-account-name>.dfs.core.windows.net",
  <key-1>
)
通过这种方式,凭据将存储在会话配置中,除非集群重新启动,否则我们不需要重新输入它们。
- After this has been run successfully, we can use
dbutilsto list the directory where our data is stored. Replace the filesystem name and storage account name in the connection string of the following command to list all the files in the directory where the data is stored:dbutils.fs.ls("abfss://<file-system-name>@<storage-account-name>.dfs.core.windows.net/<directory-name>")
结果,我们将看到该目录中的文件列表。我们可以保存它,允许我们将它加载到 our 笔记本中。
Loading data from ADLS Gen2
现在 我们已将 密钥存储在 Azure Key Vault 中,我们可以从 ADLS Gen2 将该数据加载到 ADFS 中,如下所示:
- After you have listed all the files in your directory, copy and save the path of the file that we uploaded to a variable. We will name this variable
file_location, as can be seen in the following code snippet:file_location = "<your-file-path>"
- After that, we can read it and load it into a Spark dataframe and display it by running the following code:
df = spark.read.format("csv").option("inferSchema", "true").option("header", "true").option("delimiter",",").load(file_location) display(df) - With the following command, we can see the schema of data types that were inferred, and if they're not correct, we can make the necessary corrections:
df.printSchema()
现在,我们 可以直接从 Azure Databricks 笔记本中使用存储在 ADLS Gen2 中的数据,这将允许我们将其用作数据构建 数据管道时的接收器或数据湖。
Using S3 with Azure Databricks
要使用 S3,我们假设您已经在 AWS S3 中拥有一个存储桶,其中包含我们要访问的对象和您已经设置了访问密钥 ID 和访问密钥。我们会将这些访问密钥作为变量存储在笔记本中,并使用它们直接访问我们在 S3 中的文件,使用 Spark 数据帧。
Connecting to S3
要与 S3 建立 连接,请将您的 AWS 凭证存储在名为 aws_access_key_id 和 aws_secret_access_key 的两个变量中 进入 Hadoop 配置环境。使用以下命令,假设您已将凭据保存为变量:
sc._jsc.hadoopConfiguration().set("fs.s3n.awsAccessKeyId", aws_access_key_id)
sc._jsc.hadoopConfiguration().set("fs.s3n.awsSecretAccessKey", aws_secret_access_key)
设置好之后,我们可以通过读取文件的位置直接访问我们的存储桶。
Loading data into a Spark DataFrame
在我们的凭据保存在 Hadoop 环境中后,我们可以使用 Spark 数据帧< /strong> 直接从 S3 中提取数据并开始执行转换和可视化。
在以下代码行中,我们将读取存储在 S3 存储桶中的文件并将其加载到 Spark 数据帧中以最终显示它。 PySpark 将使用我们之前存储在 Hadoop 配置中的凭据:
my_bucket = "<your-bucket-name>"
my_file = "<your-file>"
df = spark.read.csv(f"s3://{my_bucket}/{my_file}",
                    header=True, inferSchema=True)
display(df)
这会产生以下输出:
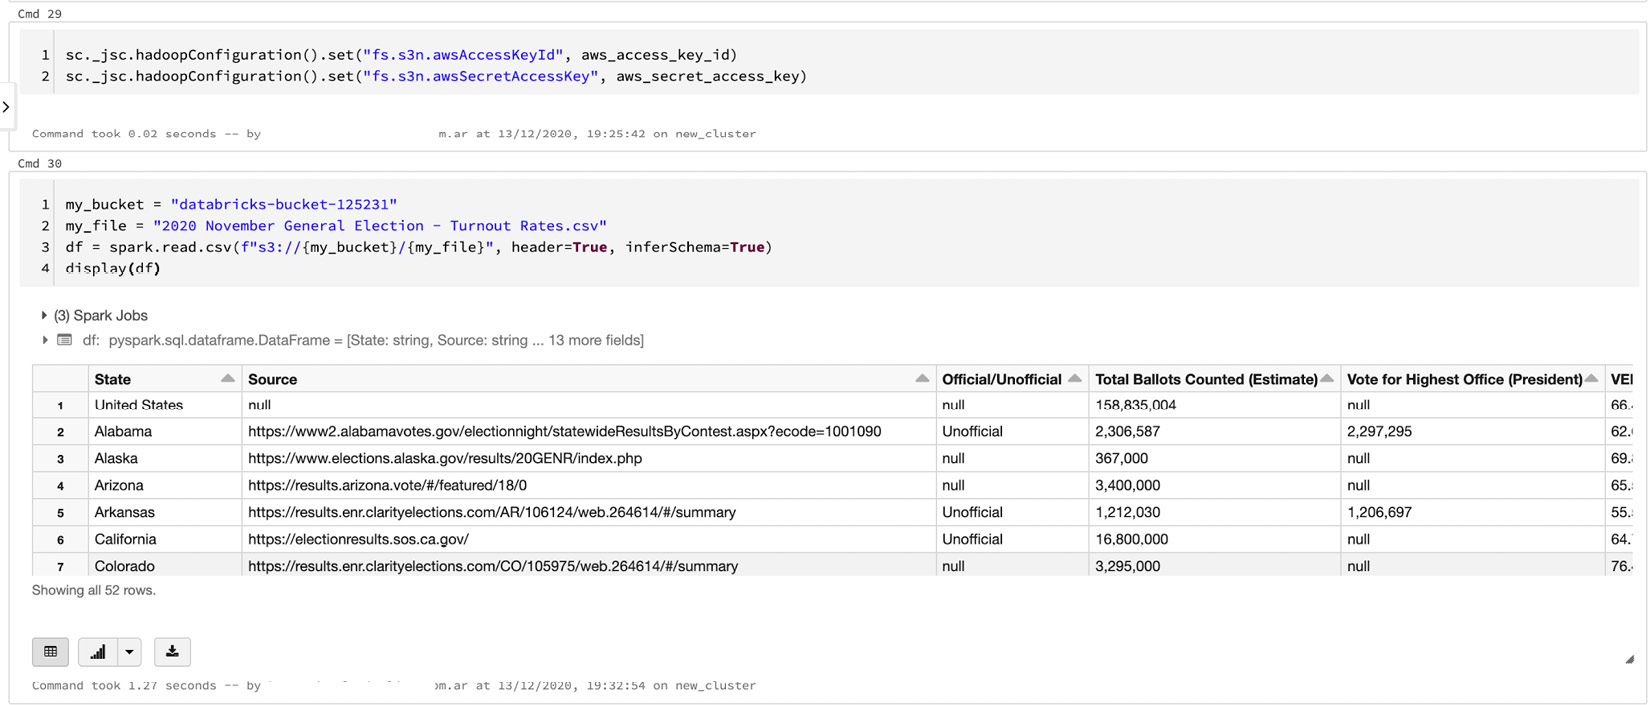
图 3.7 – 从 S3 获取的数据
我们已将字符串连接格式化为要在存储桶中读取的文件,并成功将其加载到 Spark 数据帧中。现在我们将看到连接到 Azure Blob storage 的方式非常相似。
Using Azure Blob storage with Azure Databricks
我们可以访问存储在AWS S3中的对象,我们可以访问Azure Blob 存储。这两个选项都允许我们拥有一个可以从任何地方访问的冗余数据存储。它们的区别在于它们将使用的工具以及某些可能使它们更适合在某个项目中使用的特性。 Azure Blob 存储更具成本效益且冗余度高,而 S3 被多个组织广泛使用且学习曲线较小。我们将了解如何设置 Azure Blob 存储帐户,上传我们正在使用的文件,然后 r从我们的笔记本。
Setting up Azure Blob storage
- Search for Storage account in the Azure portal and select Create a new storage account.
- In the Create storage account options, fill out the details and set the Replication option to Locally-redundant storage (LRS), and for the Account kind option select Blob storage, as illustrated in the following screenshot:

图 3.8 – 创建 Azure Blob 存储帐户
- After this, select the Review + create button, wait for the validation to be successful, and deploy the storage account.
Uploading files and access keys
接下来,我们将上传我们的文件和访问密钥。为此,请遵循 这些步骤:
- After our storage account has been deployed, navigate to the resource and in the left tab, select Containers and create a new one, as illustrated in the following screenshot:

图 3.9 – 在 Azure Blob 存储中创建容器
- After we have selected a name, we can create a new container.
- Once it's created, we can upload files by clicking the Upload button from the top bar, which will deploy a tab at the right where we can select a file to upload, as illustrated in the following screenshot:

图 3.10 – 将文件上传到 Azure Blob 存储
- Once our file has been uploaded, go to Access keys in the left panel and copy key1, which we will use to read the files from our Azure Databricks notebook. The process is illustrated in the following screenshot:
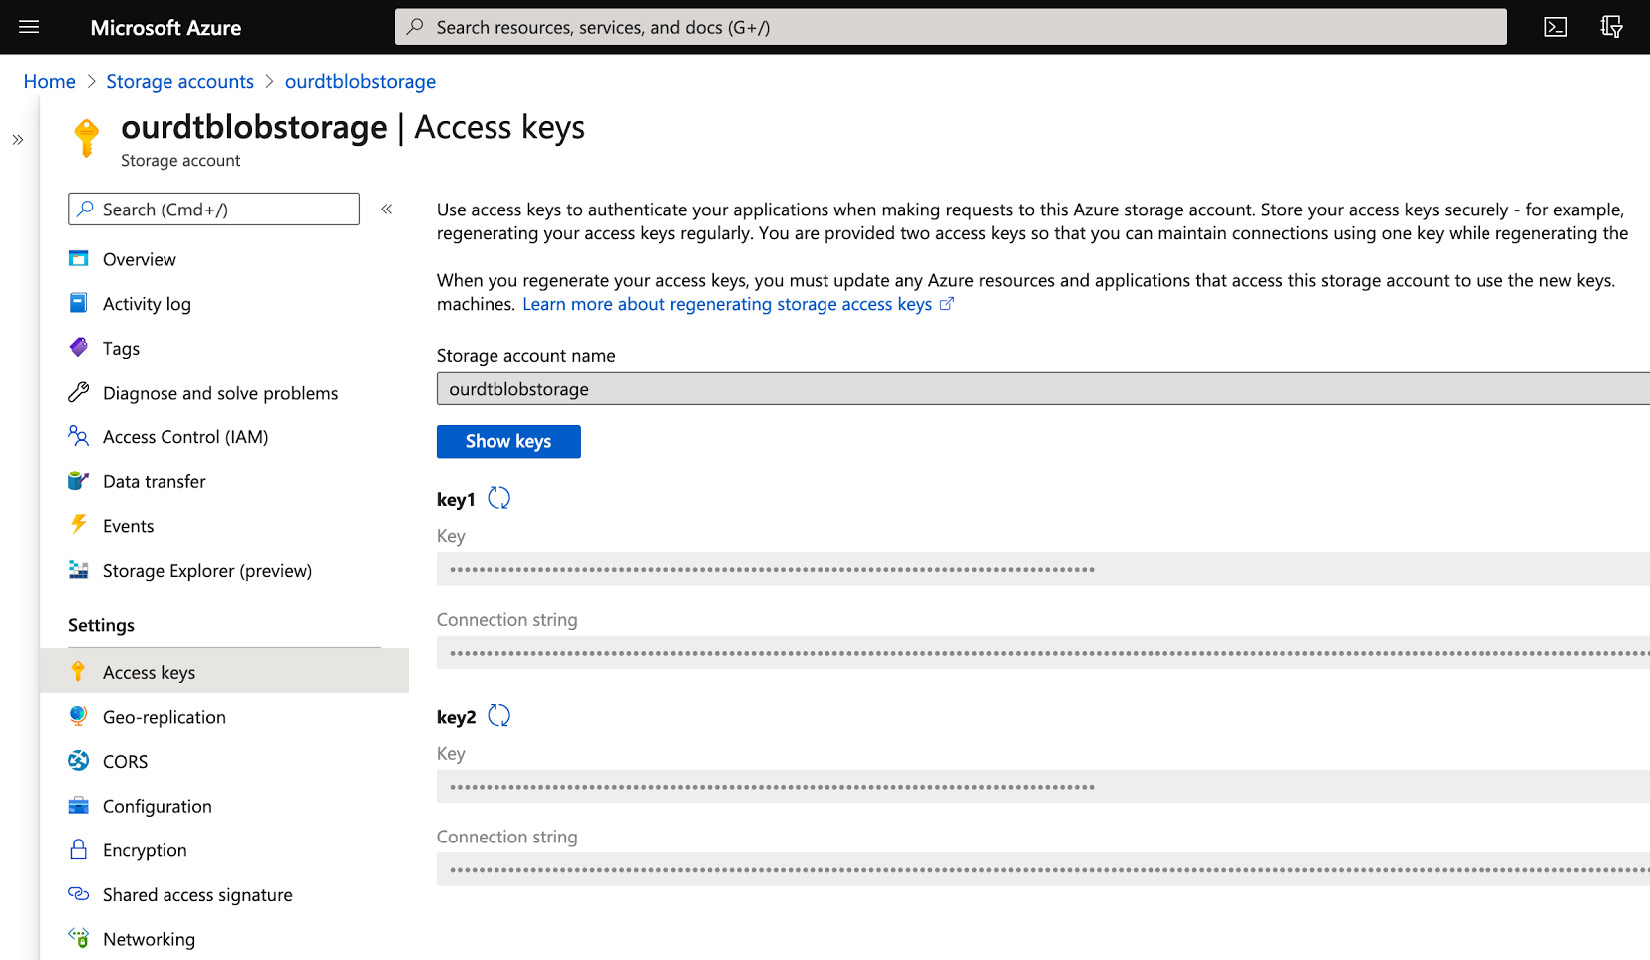
图 3.11 – Azure Blob 存储访问密钥
一旦我们设置 Azure Blob存储帐户,将文件上传到它,并复制访问密钥,我们可以设置从 t他的 Azure Databricks 笔记本建立我们的连接。
Setting up the connection to Azure Blob storage
在我们的文件 上传到 Blob 存储并且我们拥有访问密钥之后,我们可以连接我们的 Azure Databricks 笔记本。为此,我们将使用以下命令:
spark.conf.set(
  "fs.azure.account.key.<your-storage-account-name>.blob.core.windows.net",
  "<your-storage-account-access-key>")
因此,按照前面的示例,配置命令将如下所示:
spark.conf.set("fs.azure.account.keyourdtblobstorage.blob.core.windows.net","<key-1>")
此命令将连接设置为我们与 Azure Blob 存储的连接。请记住使用存储帐户的名称和存储访问密钥更改连接字符串(请记住,这是来自 Azure 门户中资源的 key1)。
设置完成后,我们可以使用 dbutils 工具通过 以下命令列出 Blob 存储中的容器:
dbutils.fs.ls("wasbs://<your-container-name>@<your-storage-account-name>.blob.core.windows.net/<your-directory-name>")
Transforming and cleaning data
在我们的 数据被加载到 Spark 数据帧之后,我们可以以不同的方式对其进行操作。我们可以直接操作我们的Spark数据帧或将数据保存到表中,并使用结构化查询语言(SQL)语句执行查询,数据定义语言< /strong>(DDL),数据ma操纵语言(DML) 等等。
您需要将 Voting_Turnout_US_2020 dataset 加载到 Spark 数据帧中。
Spark data frames
Spark 数据 框架是按行组织的数据的表格集合,具有命名列,而这些列又具有自己的数据类型。所有这些信息都存储为元数据,我们可以使用 displaySchema 访问以显示每列的数据类型或显示实际数据,或 describe 以查看数据的统计摘要。它的特点之一是由于其分布式特性,它能够处理大量数据。
借助 PySpark,我们可以执行转换,例如选择行和列、按名称或按数字访问存储在 单元格中的值、过滤等等应用程序编程接口(API)。
我们将使用这些转换与SQL 语句相结合来传输在我们的文件中形成和持久化数据。
Querying using SQL
我们将使用我们之前使用过的投票率选举数据集。我们将创建数据的 view 并使用 SQL 对其进行查询。
Creating views
我们可以 使用 Spark Dataframe 中的数据创建视图,以便能够使用 SQL 对其进行查询,如下所示:
- To create a view that we will call
voter_turnout, we can use the following command:df.createOrReplaceTempView("voter_turnout") - After this, we can use a
SELECTcommand to get every record in the view that we have just created, as follows:
图 3.12 – 从 Spark 数据框创建一个临时视图
现在我们已经创建了数据视图,我们可以使用 SQL 命令对其进行查询。
- We will select everything, and then we will filter using a
WHEREclause to get all the results from the state of Arizona, as illustrated in the following screenshot:
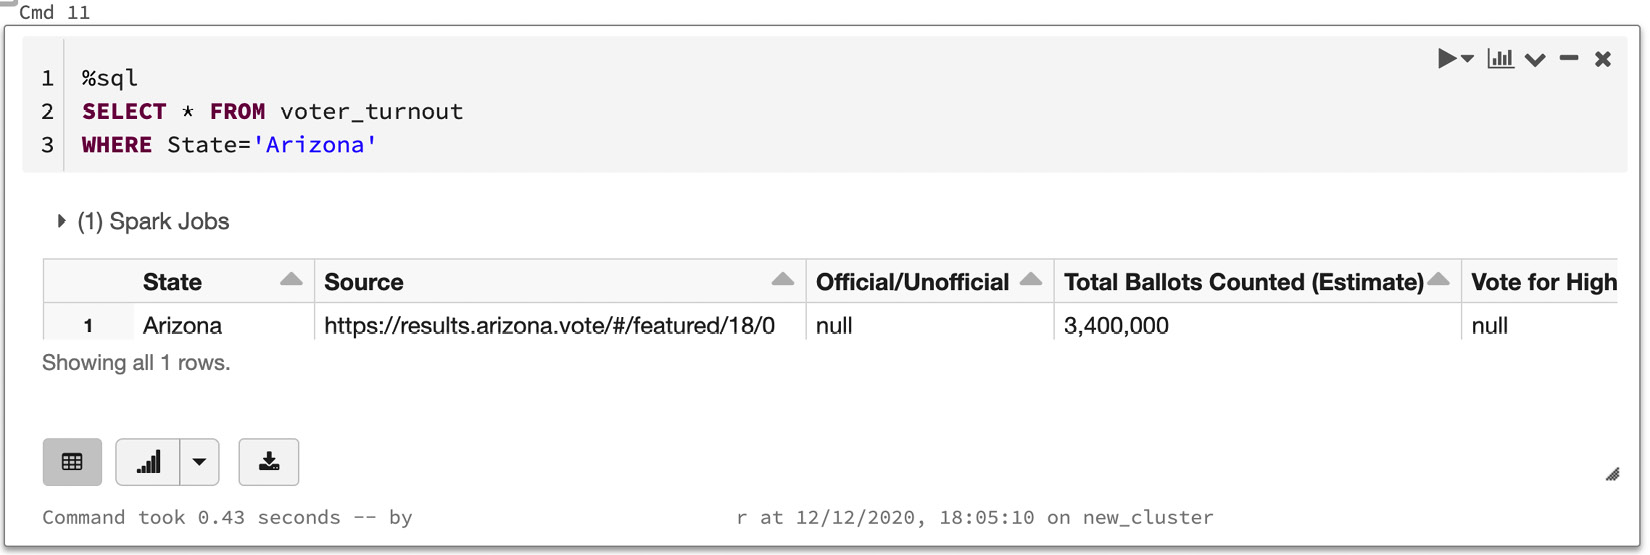
图 3.13 – 使用 SQL 语句查询数据
当我们想要运行实验或测试时,创建数据的 临时视图很有帮助,但在集群重新启动后,我们将失去视图。要持久化 的数据,我们可以创建一个永久表。
Creating tables in a data lake
永久 表允许我们拥有可供多个用户查询的持久数据,并在需要频繁访问数据时为我们提供帮助。当我们创建一个表时,我们所做的是在 Hive 元存储中声明元数据,这是存储我们所有数据的地方。我们将用于创建表的投票结果文件存储在 ADLS Gen2 中,这是一种 blob 存储,但它也可能存储在 Azure DBFS 中,这是我们设置工作区时创建的存储.步骤如下:
- Before creating our table, we will create a database that will contain it. We will call the
voting_datadatabase, and it can be created using the following command:%sql CREATE DATABASE voting_data如果一切顺利,我们应该看到
OK作为我们运行命令的单元格的输出。 - After the database has been created, we can define a table named
voting_turnout_2020, which will be constructed using a comma-separated values (CSV) file that we have uploaded to ADLS Gen2. Remember that the file path we will use is the one we obtained when running the list directory command usingdbutilspreviously. That said, we can create a permanent table using the following command:%sql CREATE TABLE IF NOT EXISTS voting_data.voting_turnout_2020 USING CSV LOCATION 'abfss://<your-filesystem>@<you-storage-account>.dfs.core.windows.net/Voting_Turnout_US_2020/2020 November General Election - Turnout Rates.csv'
这给了我们以下输出:

图 3.14 – 从 CSV 文件创建数据库和表
- After this is done, we can double-check that everything went well by clicking on the Data button in the left ribbon of our Azure Databricks workspace. We will see the recently created database and the table it contains, as illustrated in the following screenshot:

图 3.15 – Azure DBFS 中创建的表
这将 允许我们再次在我们的表上运行 SQL 查询,但不同之处在于该表现在是永久的。该表可以在以下屏幕截图中看到:

图 3.16 – 从永久表中查询数据
- One of the issues that we can see here is that the creation of the table from the CSV file failed to recognize the first rows as headers. The solution for this is simple, because we have an option in SQL in which we can state that our data has headers. To solve this, we will first need to drop the table using the following command:
%sql
DROP TABLE voting_data.voting_turnout_2020
- And then, we need to rerun our
CREATE TABLEcommand, but with an added option at the end to clarify that our file has headers, as illustrated in the following code snippet:%sql CREATE TABLE IF NOT EXISTS voting_data.voting_turnout_2020 USING CSV LOCATION 'abfss://[email protected]/Voting_Turnout_US_2020/2020 November General Election - Turnout Rates.csv' OPTIONS (header "true", inferSchema "true")
- After this, selecting all the records from our table will show us that we were successful, and our data now has headers, as can be seen in the following screenshot:

图 3.17 – 固定表格中的标题
- If we want to check whether Spark was able to correctly infer the information schema of our file, we can run a
DESCRIBEcommand on our table. This, in our case, would be the following command:%sql DESCRIBE voting_data.voting_turnout_2020
其输出将是我们表中每一列的数据类型,如以下屏幕截图所示:
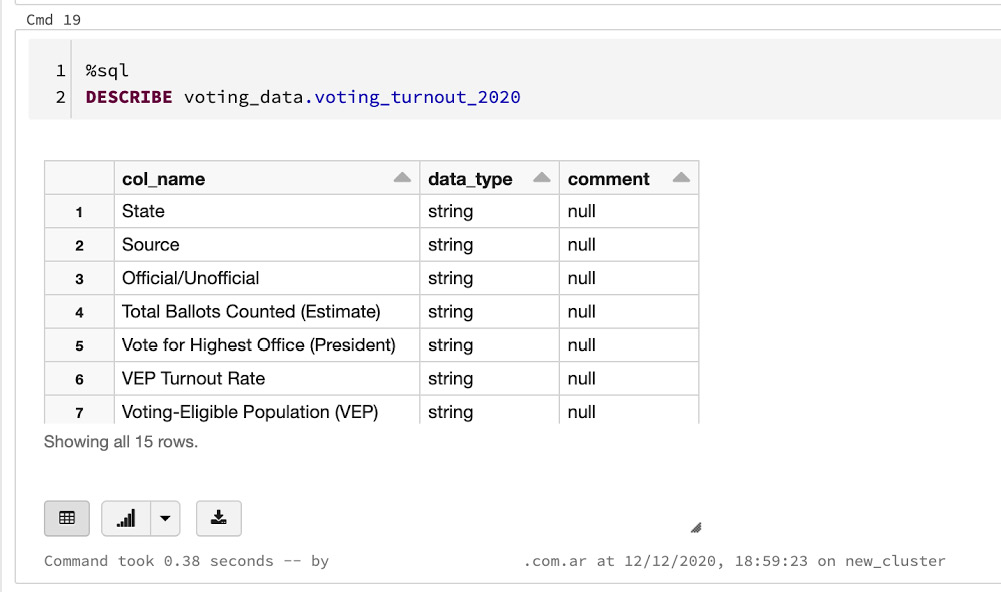
图 3.18 – 描述表的模式
Writing back table data to Azure Data Lake
在我们对我们的数据执行了必要的转换之后,我们可能希望将其写回 ADLS Gen2。为此,我们可以采取以下步骤:
- Let's suppose we have filtered the results to have only entries for which the result is still
Unofficial. We will execute the following command, which will copy the table into a Spark dataframe:from pyspark.sql.functions import col df_filtered = spark.table('voting_data.voting_turnout_2020') - After this, we can apply the filtering, which can be done using the PySpark
colfunction, and finally display the result, as follows:# Filter all records that are not "Unofficial" df_filtered = df_filtered.filter(col("Official/Unofficial") == "Unofficial") display(df_filtered)这给了我们以下输出:

图 3.19 – 在 Spark 数据框中过滤行
- One thing to bear in mind is that if we try to directly export this dataframe to ADLS Gen2, we will encounter an error because the column names have invalid characters on them. We will quickly rename the columns with names that have these characters replaced, using regular expressions. The code to do this is shown in the following snippet:
import re
oldColumns = df_filtered.schema.names
newColumns = [re.sub(r'\W', '', i) for i in oldColumns]
df_filtered = df_filtered.toDF(*newColumns)
display(df_filtered)
在下面的截图中,我们可以看到列名发生了变化,现在它们上面只有字母:

图 3.20 – 重命名 Spark 数据框列
- After this, and to improve the efficiency of the storage, we can convert the data frame to Parquet format and store it in a location that we specify in ADLS Gen2. This can be done in the following way:
#declare data lake path where we want to write the data
target_folder_path = 'abfss://[email protected]/Voting_Turnout_Filtered/'
#write as parquet data
df_filtered.write.format("parquet").save(target_folder_path)
在单元格上执行此操作后,我们可以在 Azure Storage Explorer 中确认已在我们指定的新文件夹中创建了一个新 Parquet 文件,如下所示截屏:
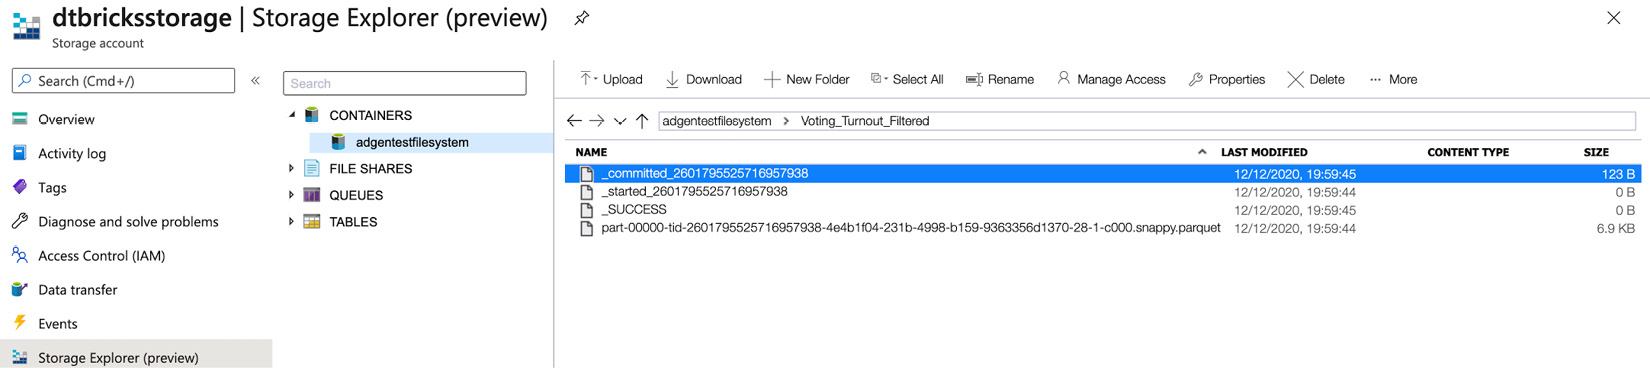
图 3.21 – 存储资源管理器中显示的已创建数据
现在我们的数据已上传,我们可以在使用 ADF 调度和编排 c的作业中使用它。
Orchestrating jobs with Azure Databricks
直到 现在,我们已经能够使用存储在 S3 存储桶或 Azure Blob 存储中的数据,使用 PySpark 或SQL,然后将转换后的数据持久化到表中。现在,问题是:我们必须使用哪些方法将其集成到完整的 ETL 中? 我们拥有的选项之一是使用 ADF 将我们的 Azure Databricks 笔记本集成为一个我们的数据架构中的步骤。
在下一个示例中,我们将使用 ADF 通过直接传递包含我们要处理的数据的文件的名称来触发我们的笔记本,并使用它来更新我们的投票率选项卡 乐。为此,您将需要以下内容:
- An Azure subscription
- An Azure Databricks notebook attached to a running container
- The
Voting_Turnout_US_2020dataset loaded into a Spark dataframe
ADF
ADF 是用于集成无服务器数据转换和聚合过程的 Azure 云平台。它可以集成许多服务并提供无代码的user界面(UI ) 以创建我们的 ETL。
Creating an ADF resource
第一步是 创建一个 ADF 资源。为此,请按照下列步骤操作:
- In the Azure portal, search for Azure Data Factory and select Create Resource.
- Select a name for our ADF resource and attach it to the resource group in which you're using Azure Databricks, as illustrated in the following screenshot:

图 3.22 – 创建 ADF 资源
- Before creating the resource, go to the Git configuration tab and select Configure Git later, as illustrated in the following screenshot:

图 3.23 – 稍后配置 Git 选项
- After this is set up, we can click on the Review + create button, wait for it to be validated, and deploy it.
Creating an ETL in ADF
- Once it's deployed, go to the ADF resource and click on Author & Monitor in the main panel, as illustrated in the following screenshot:

图 3.24 – 前往 Author & ADF 中的监视器
- This will take us to the Author & Monitor panel, from which we can create and monitor ETL pipelines. On the left tab, select the Author button to create our ETL pipeline, as illustrated in the following screenshot:

图 3.25 – 转到左侧选项卡中的作者按钮
- This will take us to the canvas UI, in which we can create our pipelines. Select Pipelines from the panel at the left of the window and set up a name and a description.
- Then, click on Search for the Databricks panel at the left of the canvas, which will show our notebook in the canvas, as illustrated in the following screenshot:

图 3.26 – 创建管道并添加 Databricks 服务
- Select the Azure Databricks notebook in the canvas, and from the options at the bottom of the canvas, click on the + New button on Databricks linked service to link our Azure Databricks workspace to ADF. In order to do this, we will need an authentication token, as illustrated in the following screenshot:

图 3.27 – 将 Azure Databricks 服务与访问令牌链接
- To generate the token, go to the Azure Databricks workspace and click on the User Settings option in your profile to take you to the screen shown in the following screenshot. Once there, generate a new token and paste it into the ADF Link new service dialog box, and finally, click on the Create button:

图 3.28 – 创建 Azure Databricks 访问令牌
- Now, we can select our Azure Databricks workspace from the Linked services list and test the connection. If everything went well, the connection will be successful, as illustrated in the following screenshot:

图 3.29 – 测试 Azure Databricks 服务连接
- Once our Azure Databricks notebook has been correctly set up in our pipeline, we must establish a connection between it and ADF. We will use a variable that we will use when the ETL is triggered, and this will be the file that we want to process and persist on a table.
如果我们点击画布的空白区域,在底部我们会看到一个 Parameters 选项。我们将创建一个新参数,它将是一个名为
input_file的字符串,并将我们想要的文件的位置作为默认值 过程,如 如下截图所示:
图 3.30 – 为 ETL 管道创建参数
- After that, click on the Azure Databricks notebook on the canvas and go to the Settings tab. There, we will browse and set up the notebook that we will use and add a base parameter that will point to the variable we have set up, as illustrated in the following screenshot:

图 3.31 – 在 Azure Databricks 作业中使用参数作为变量
- Until this point, we haven't discussed how this variable will be consumed in the notebook. To do this, we will add a piece of code into our notebook. We will specify that this variable is the name of the file that we need to process and will use it to format the full path of the file to be read. The code that we will use is shown in the following snippet:
# Creating widgets for leveraging parameters
dbutils.widgets.text("input", "","")
input_file = dbutils.widgets.get("input_file")
print ("Param -\'input':")
print (input_file)
这样,我们使用
dbutils创建一个小部件,它将查找名为input_file的变量,这是我们拥有的变量在 ADF 中指定。 - We will use this variable to format the path of the file that we will read and process in our notebook. The way in which we do this in our notebook is shown in the following code snippet:
#set the data lake file location: file_location = f'abfss://<file-system-name>@<storage-account-name>.dfs.core.windows.net/{input_file}' #read in the data to dataframe df df = spark.read.format("csv").option("inferSchema", "true").option("header", "true").option("delimiter",",").load(file_location) - After this step, we will apply the transformations that we consider necessary, and finally drop the existing table and save our transformed dataframe as a permanent table. The drop of the table can be done in SQL, using the following code:
%sql DROP TABLE voting_data.voting_turnout_2020 And then we can save our spark dataframe as a table. df.write.format("parquet").saveAsTable("voting_data.voting_turnout_2020") - After our notebook is ready, as well as our ADF ETL, we can trigger this by clicking on the Add Trigger button, and then Trigger Now. ADF will prompt a dialog box in which we can specify the file and directory as the variable that we have established as a parameter previously. After this is set, we can click on Run and our pipeline will be triggered, as illustrated in the following screenshot:

图 3.32 – 运行管道
- We can check the status of our pipeline by clicking on the Monitor tab in ADF, which will show us the status of our pipeline, as illustrated in the following screenshot:

图 3.33 – 在 Monitor 选项卡中查看管道日志
- As we can see, our pipeline was successfully executed, which means the file that we have specified was read, processed, and used to update our table.
接下来,我们将了解如何使用 Databricks 来安排作业。
Scheduling jobs with Azure Databricks
如果我们已经知道我们要处理的文件将被传送到blob存储,我们可以直接调度notebook到定期运行。为此,我们可以使用 Azure Databricks 作业,这是一种安排笔记本运行的简单方法。我们假设n我们将文件的文件路径消耗是固定的。
Scheduling a notebook as a job
- To schedule a new job, click on the Jobs tab in the left ribbon of our workspace and then click on Create Job, as illustrated in the following screenshot:

图 3.34 – 创建 Azure Databricks 作业
- After this, the rest is quite straightforward. We will be required to specify which notebook we will use, set up an execution schedule, and specify the computational resources we will use to execute the job. In this case, we have chosen to run the job in an existing cluster, but we can create a dedicated cluster for specific executions. We select the notebook that will execute the job, as illustrated in the following screenshot:

图 3.35 – 选择笔记本
- Next, we schedule the job to run at a certain time, with a specific starting date and frequency, as illustrated in the following screenshot:
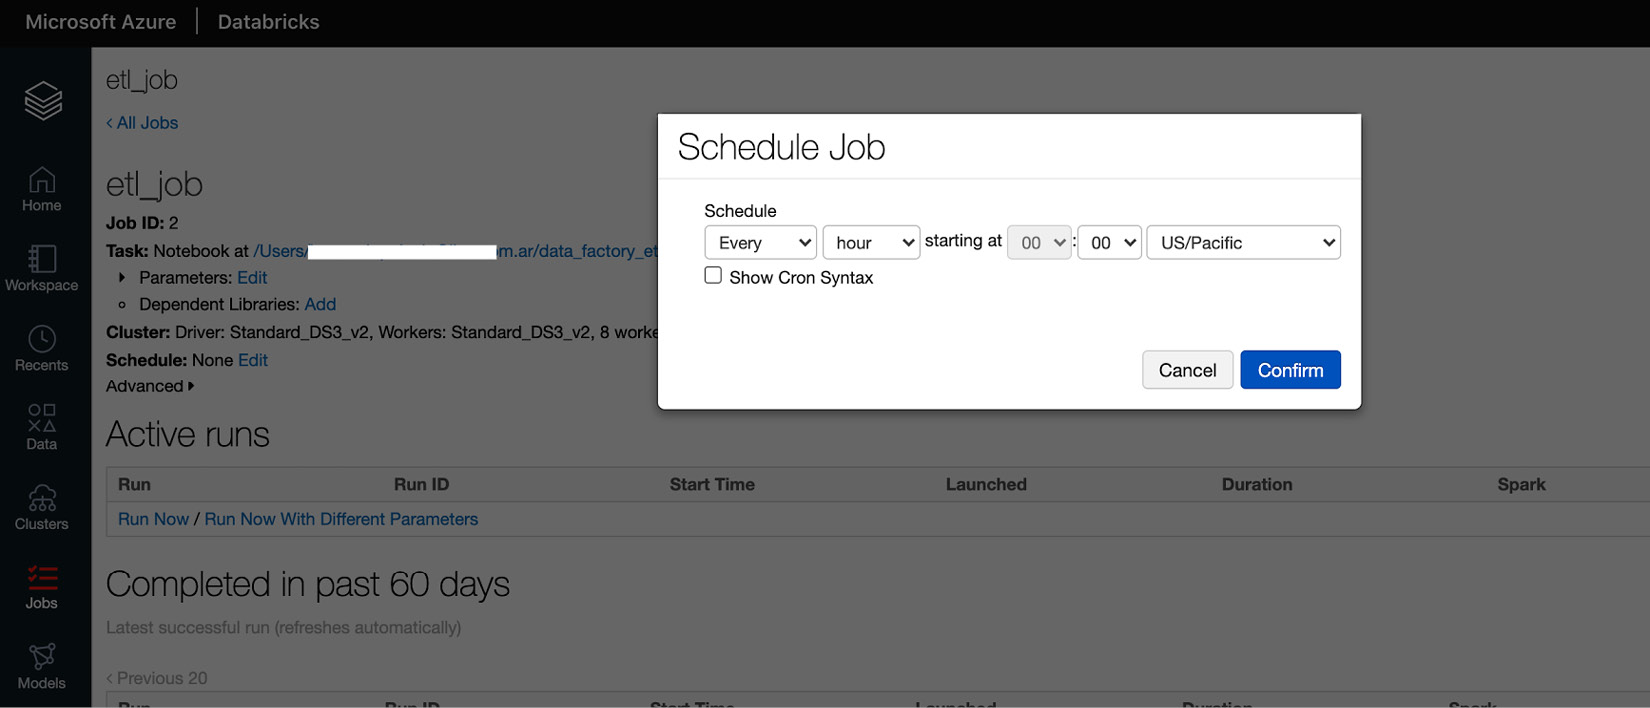
图 3.36 – 调度作业
一切设置好后,我们就可以运行我们的作业并等待执行完成以检查状态。
Job logs
如果一切顺利,我们将看到状态标记为Succeeded,如下图所示。否则,它将被标记为 Failed,我们需要检查该特定运行的日志以找出问题所在:
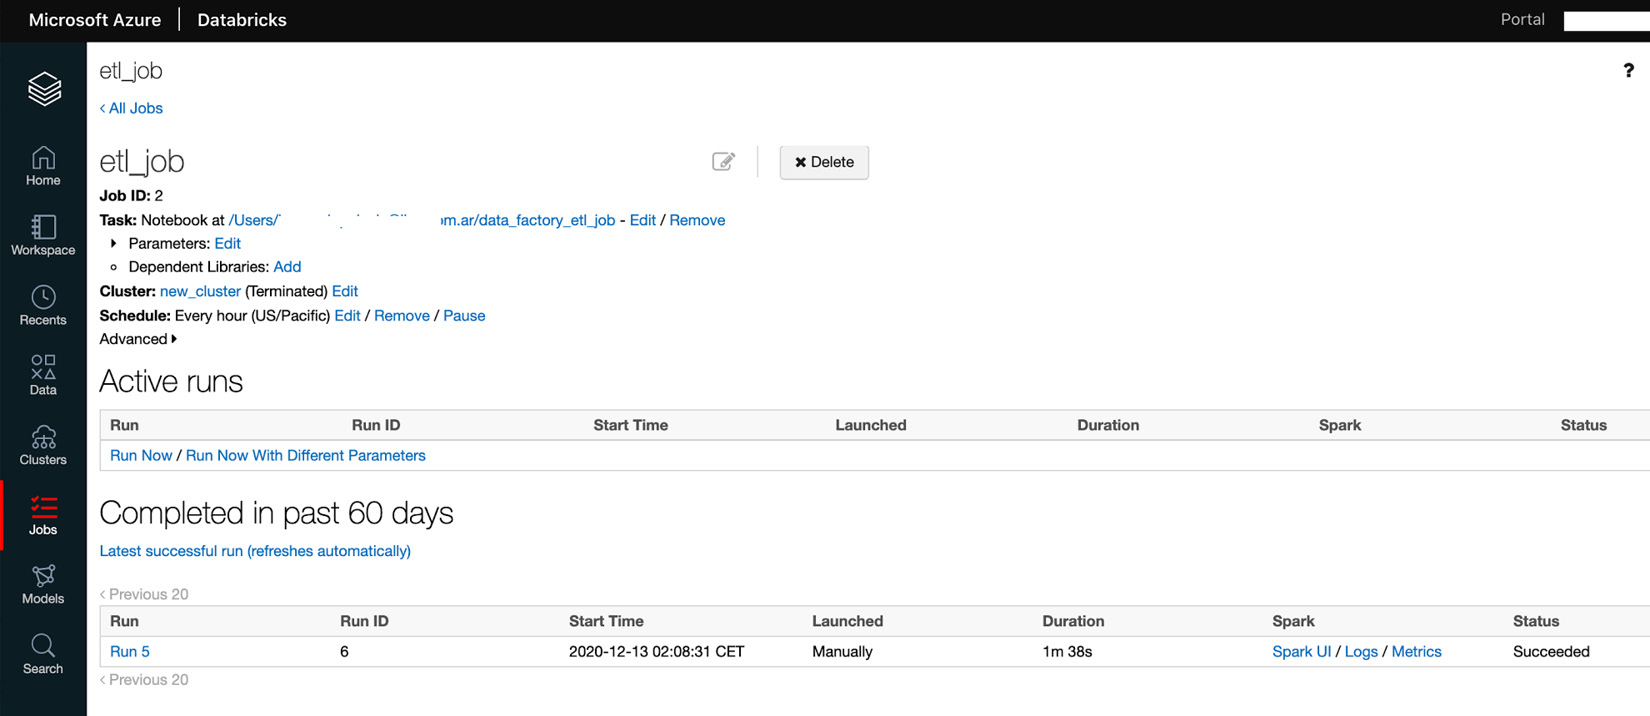
图 3.37 – 正在进行和已完成的作业运行
幸运的是,我们的工作成功了,这意味着我们的文件 将被处理并且我们的表格将每小时更新一次。
Summary
在本章中,我们应用了之前学到的概念来创建和连接 Azure Databricks 资源来存储我们的数据,例如 ADLS Gen2、AWS S3 和 Azure Blob 存储。我们还学习了如何从存储中摄取数据到 Spark 数据帧,使用 Spark 方法或使用 SQL 脚本对其进行转换,然后将数据持久化到表中。最后,我们了解了如何使用 Azure Databricks 作业安排我们的作业,以及如何在 ADF 中创建管道并使用定义的变量触发它。
在下一章中,我们将了解 Azure Delta Lake 以及如何使用它来使用 Azure Databricks 创建可靠的 ETL 管道。