读书笔记《hands-on-full-stack-development-with-spring-boot-2-0-and-react》添加CRUD功能
本章描述了如何在我们的前端实现 CRUD 功能。我们将使用我们在Chapter 8, 有用的第三部分中学到的组件-React 的派对组件。我们将从后端获取数据并将数据呈现在表格中。然后,我们将实现删除、编辑和添加功能。在最后一部分中,我们将添加将数据导出到 CSV 文件的功能。
在本章中,我们将看到以下内容:
- How to fetch data from the backend and present it in the frontend
- How to delete, add, and update data using the REST API
- How to show toast messages to the user
- How to export data to the CSV file from the React app
我们在第 4 章中创建的 Spring Boot 应用程序,保护和测试您的后端< /em> 需要与上一章的修改(不安全的后端)。
我们还需要在上一章中创建的 React 应用程序 (carfront)。
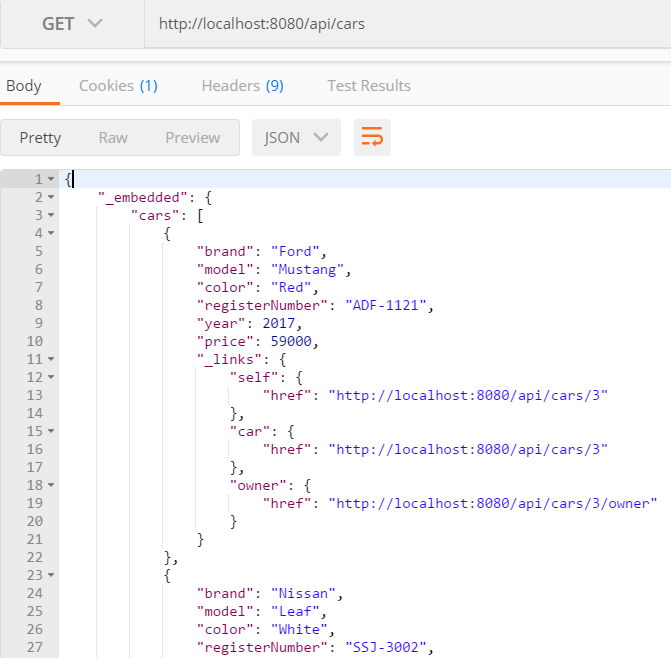
在第一阶段,我们将创建列表 page 来显示汽车with 分页、过滤和排序功能。运行您的 Spring Boot 后端,可以通过向 http://localhost:8080/api/cars< 发送 GET 请求来获取汽车/code> URL,如Chapter 3, 用春季启动。
让我们检查响应中的 JSON 数据。汽车数组可以在 JSON 响应数据的 _embedded.cars 节点中找到:
现在,一旦我们知道如何从后端获取汽车,我们就准备好实现列表页面来显示汽车。以下步骤在实践中描述:
- Open the carfront React app with the VS Code (the React app created in the previous chapter).
- When the app has multiple components, it is recommended to create a folder for them. Create a new folder, called
components, in thesrcfolder. With the VS Code, you can create a folder by right-clicking the folder in the sidebar file explorer and selectingNew Folderfrom the menu:

- Create a new file, called
Carlist.js, in thecomponentsfolder and now your project structure should look like the following:

- We need a state for the
carsthat are fetched from the REST API, therefore, we have to add the constructor and define one array-type state value:
- Execute
fetchin thecomponentDidMount()life cycle method. The cars from the JSON response data will be saved to the state, calledcars:
- Use the map function to transform
carobjects into table rows in therender()method and add the table element:
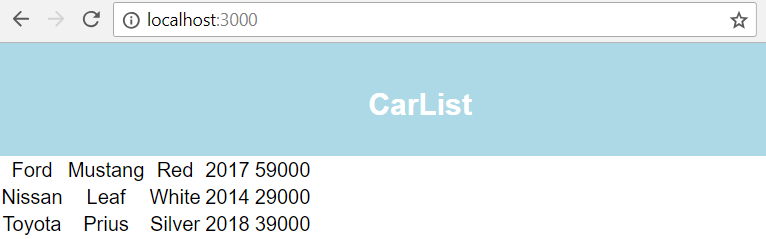
现在,如果您使用 npm start 命令启动 React 应用程序,您应该会看到以下列表页面:
当我们创建更多的 CRUD 功能时,URL 服务器可以重复多次,并且当 后端部署到 span>server 不是本地主机。因此,最好将其定义为常数。然后,当 URL 值发生变化时,我们只需要修改一处即可。让我们在应用程序的根文件夹中创建一个名为 constants.js 的新文件。在编辑器中打开文件并将以下行添加到文件中:
然后,我们将它导入我们的 Carlist.js 文件并在 fetch 方法中使用它:
最后,您的 Carlist.js 文件源代码应如下所示:
现在我们将使用 React Table 来获得开箱即用的分页、过滤和排序功能。在终端中按 Ctrl + C 停止开发服务器,然后键入以下命令来安装 React Table。安装后,重启应用:
将 react-table 和样式表导入到您的 Carlist.js 文件中:
然后从 render() 方法中删除 table 和 tableRows。 React Table 的 data 属性是 this.state.cars,其中包含获取的汽车。我们还要定义表的columns,其中accessor是的字段car 对象和 header 是标题的文本。为了启用过滤,我们将表的 filterable 属性设置为 true。请参阅以下 render() 方法的源代码:
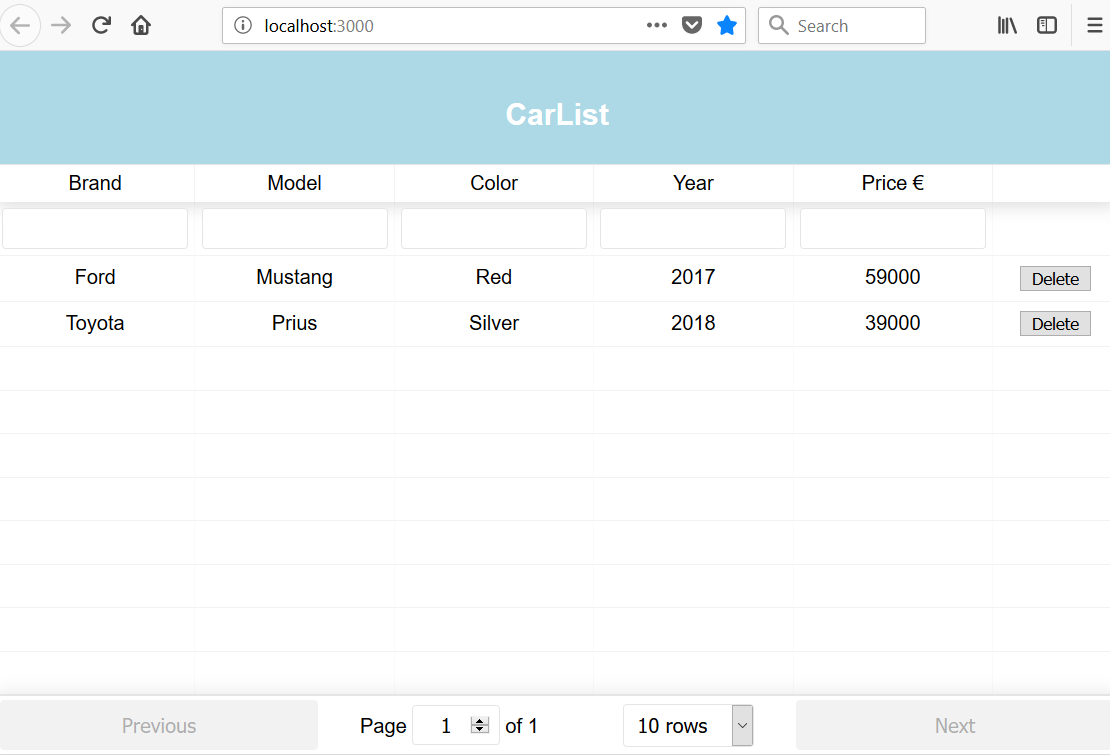
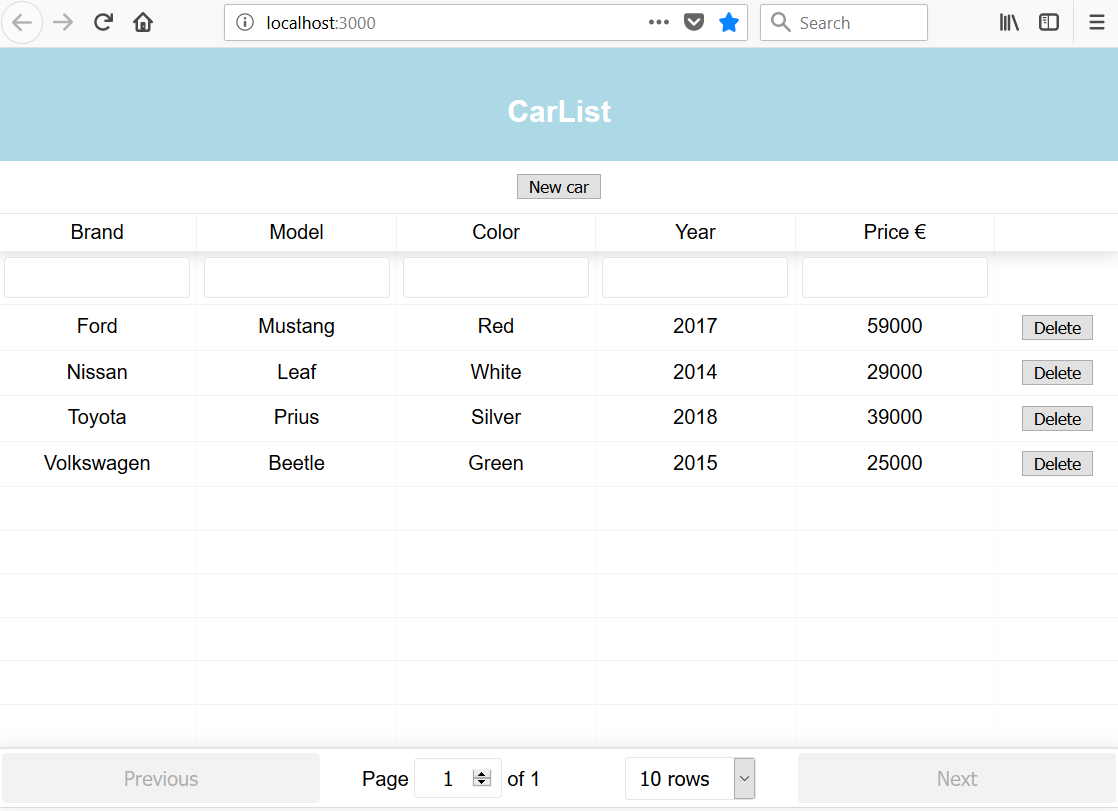
通过 React Table 组件,我们获得了所有必要的功能 到我们的表中,只需少量编码。现在列表页面如下所示:

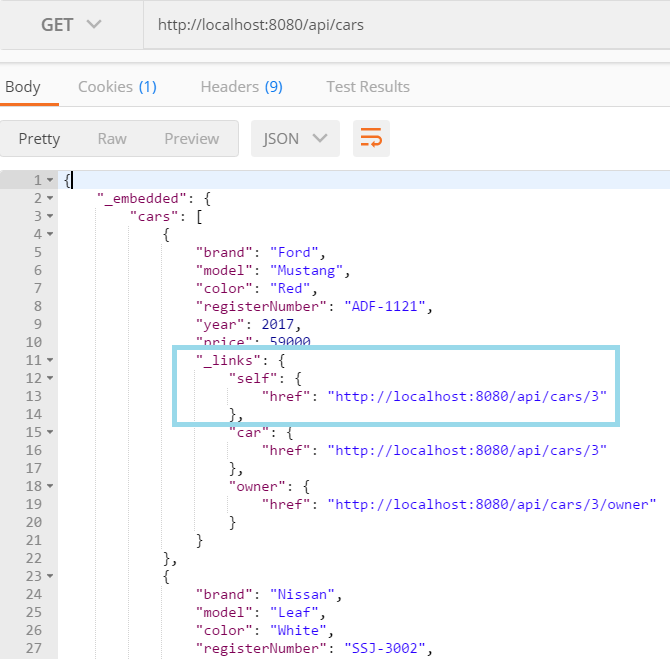
可以通过发送 DELETE 方法请求从 database 删除项目http://localhost:8080/api/cars/[carid] 端点。如果我们查看 JSON 响应数据,我们可以看到每辆车都包含一个指向 自身 的链接,并且可以从_links.self.href 节点,如以下屏幕截图所示:
以下步骤显示了如何实现删除功能:
- We will create a button for each row in the table and the accessor of the button will be
_links.self.href, which we can use to call the delete function that we will create soon. But first, add a new column to the table usingCellto render the button. See the following source code. We don't want to enable sorting and filtering for the button column, therefore these props are set to befalse. The button invokes theonDelClickfunction when pressed and sends a link to the car as an argument:
- Implement the
onDelClickfunction. But first, let's take thefetchCarsfunction out from thecomponentDidMount()method. That is needed because we want to call thefetchCarsfunction also after the car has been deleted to show an updated list of the cars to the user. Create a new function, calledfetchCars(), and copy the code from thecomponentDidMount()method into a new function. Then call thefetchCars()function from thecomponentDidMount()function to fetch cars initially:
当您启动您的应用程序时,前端应类似于以下屏幕截图,当按下 Delete 按钮时,汽车将从列表中消失:
在成功删除或有任何错误时向用户显示一些反馈会很好。让我们实现一个 toast 消息来显示删除状态。为此,我们将使用 react-toastify 组件 (https://github.com/fkhadra/react-toastify)。通过在您使用的终端中键入以下命令来安装组件:
安装完成后,启动您的应用程序并在编辑器中打开 Carlist.js 文件。我们必须导入 ToastContainer、toast 和样式表才能开始使用 react-toastify
。将以下导入语句添加到您的 Carlist.js 文件中:
ToastContainer 是容器组件 for 显示 toast 消息,应该是在 render() 方法中。在ToastContainer中,可以定义toast消息的duration,单位为毫秒使用 autoClose 道具。在 render() 方法的 return 语句中添加 ToastContainer 组件,就在 ReactTable 之后
:
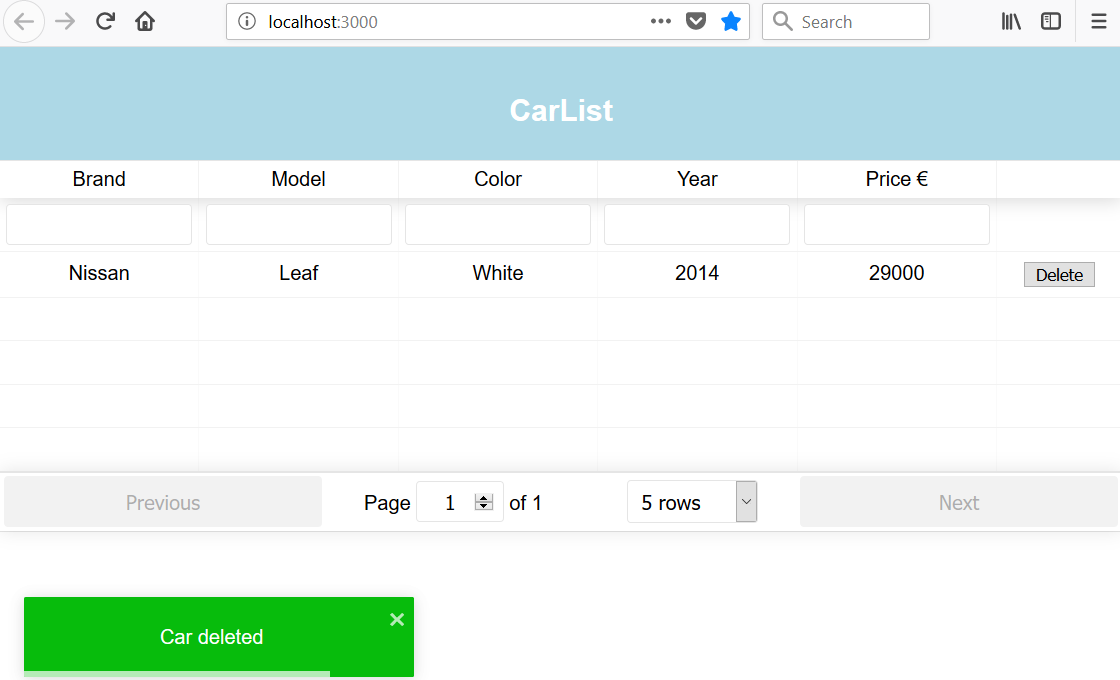
然后,我们将调用 onDelClick() 函数中的 toast 方法来显示 toast 消息。您可以定义消息的类型和位置。删除成功时显示成功信息,出错时显示错误信息:
现在您将看到删除汽车后的 toast 消息,如下面的屏幕截图所示:
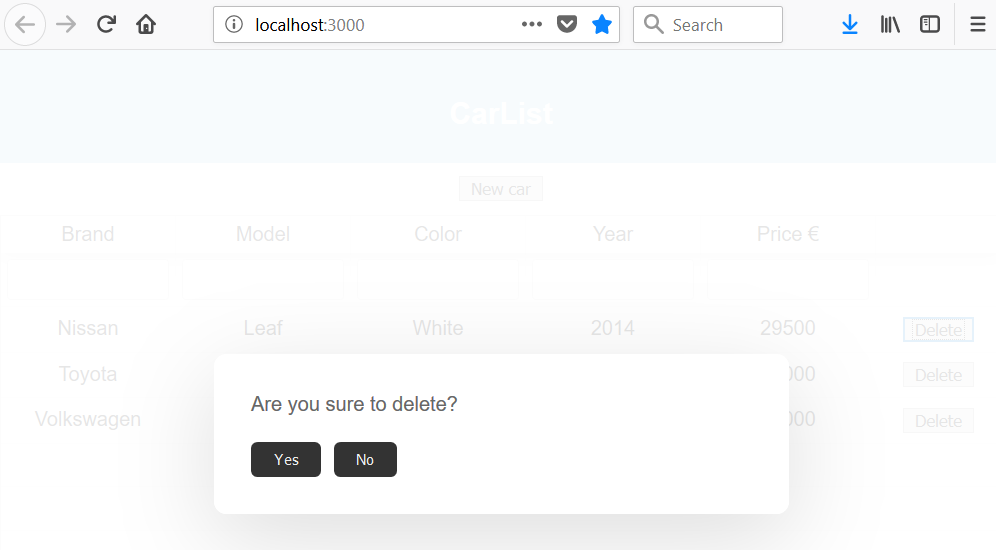
为了避免汽车的意外deletion,它会nice 在按下删除按钮后有一个确认对话框。我们将使用 react-confirm-alert 组件(https://github.com/GA-MO/react-confirm-alert)。如果您的应用正在运行,请按Ctrl + C< 停止开发服务器/span> 在终端中输入以下命令来安装 react-confirm-alert。安装后,重启应用:
将 confirmAlert 和 CSS 文件导入 Carlist 组件:
创建一个名为 confirmDelete 的新函数,用于打开确认对话框。如果按下对话框的 Yes 按钮,则调用 onDelClick 函数,汽车将被删除:
然后,将 Delete 按钮的 onClick 事件中的函数更改为 确认删除:
如果您现在按下 Delete 按钮,确认 dialog 将被打开 并且 只有按下 才会删除汽车是按钮:
下一步是为前端创建一个 add 功能。我们将使用 React Skylight 模态组件来实现它。我们已经去在第 8 章,适用于 React 的有用的第三方 React 组件。我们将 New Car 按钮添加到用户界面,当按下它时会打开模态表单。模态表单包含保存汽车所需的所有字段以及保存和取消按钮。
在终端中按Ctrl + C停止开发服务器,然后键入以下命令来安装 React Skylight。安装后,重启应用:
以下步骤展示了如何使用模态表单组件创建添加功能:
- Create a new file, called
AddCar.js, in thecomponentsfolder and write a component-class base code to the file, as shown here. Add the import for thereact-skylightcomponent:
- Introduce a state that contains all car fields:
- Add a form inside the
render()method. The form contains theReactSkylightmodal form component with buttons and the input fields that are needed to collect the car data. The button that opens the modal window, and will be shown in the carlist page, must be outsideReactSkylight. All input fields should have thenameattribute with a value that is the same as the name of the state the value will be saved to. Input fields also have theonChangehandler, which saves the value to state by invoking thehandleChangefunction:
- Insert the
AddCarcomponent to theCarlistcomponent to see whether that form can be opened. Open theCarlist.jsfile to editor view and import theAddCarcomponent:
- Implement the
addCarfunction to theCarlist.jsfile that will send thePOSTrequest to the backendapi/carsendpoint. The request will include the newcarobject inside the body and the'Content-Type': 'application/json'header. The header is needed because thecarobject is converted to JSON format using theJSON.stringify()method:
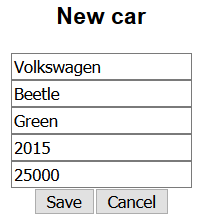
如果您启动前端应用程序,它现在应该如下所示,如果您按下 New Car 按钮,它应该会打开模态表单:
- Implement the
handleSubmitandcancelSubmitfunctions to theAddCar.jsfile. ThehandleSubmitfunction creates a newcarobject and calls theaddCarfunction, which can be accessed using props. ThecancelSubmitfunction just closes the modal form:
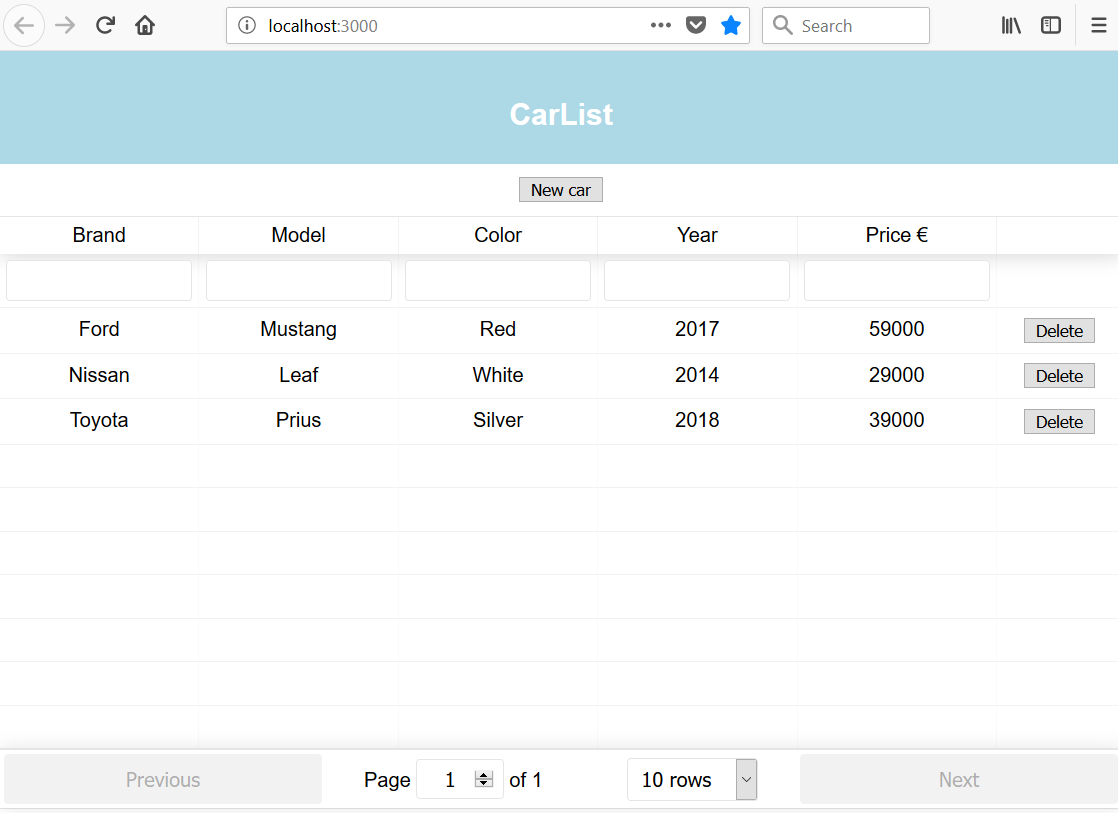
现在,您可以通过按 New Car
modal 表单代码> 按钮。然后您可以用数据填写表单,然后按 Save 按钮。到目前为止,表单 does 看起来不太好,但我们将在下一章中设置它的样式:
列表页面刷新,可以在列表中看到新车:
我们将通过将表格更改为可编辑并将保存按钮添加到每一行来实现 edit 功能。保存按钮将调用发送PUT请求的函数用于将更改保存到数据库的后端:
- Add the cell renderer, which changes the table cells to editable. Open the
Carlist.jsfile and create a new function calledrenderEditable. See the source code for the following function. The cell will be thedivelement and thecontentEditableattribute makes it editable.suppressContentEditableWarningsuppresses the warning that comes when the element with the child is marked to be editable. The function inonBluris executed when the user leaves the table cell, and this is where we will update the state:
- Define the table columns that are going to be editable. This is done using the
Cellattribute of the column in React Table, which defines how the cell of the column will be rendered:
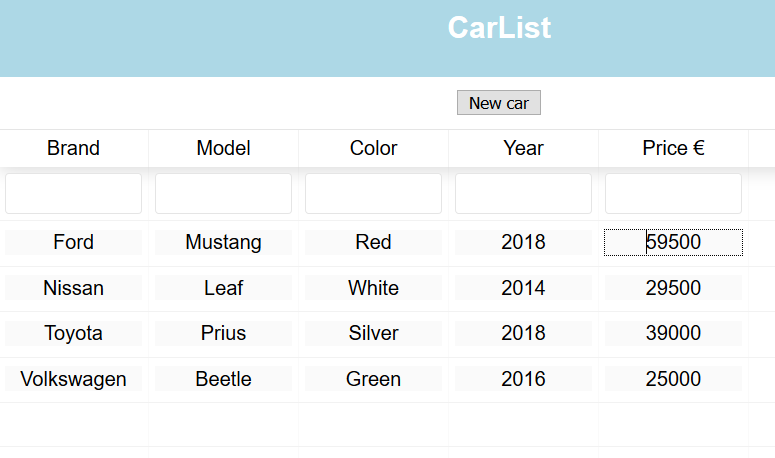
现在,如果您在浏览器中打开应用程序,您可以看到表格单元格是可编辑的:
- To update car data, we have to send the
PUTrequest to thehttp://localhost:8080/api/cars/[carid]URL. The link will be the same as with the delete functionality. The request contains the updatedcarobject inside the body, and the'Content-Type': 'application/json'header that we had in the add functionality. Create a new function, calledupdateCar, and the source code of the function is shown in the following code snippet. The function gets two arguments, the updatedcarobject and the request URL. After the successful update, we will show a toast message to the user:
- Add the
Savebutton to the table rows. When the user presses the button, it calls theupdateCarfunction and passes two arguments. The first argument isrow, which is all values in the row as anobject (=car object). The second argument isvalue, which is set to be_links.href.self, which will be the URL of the car that we need in the request:
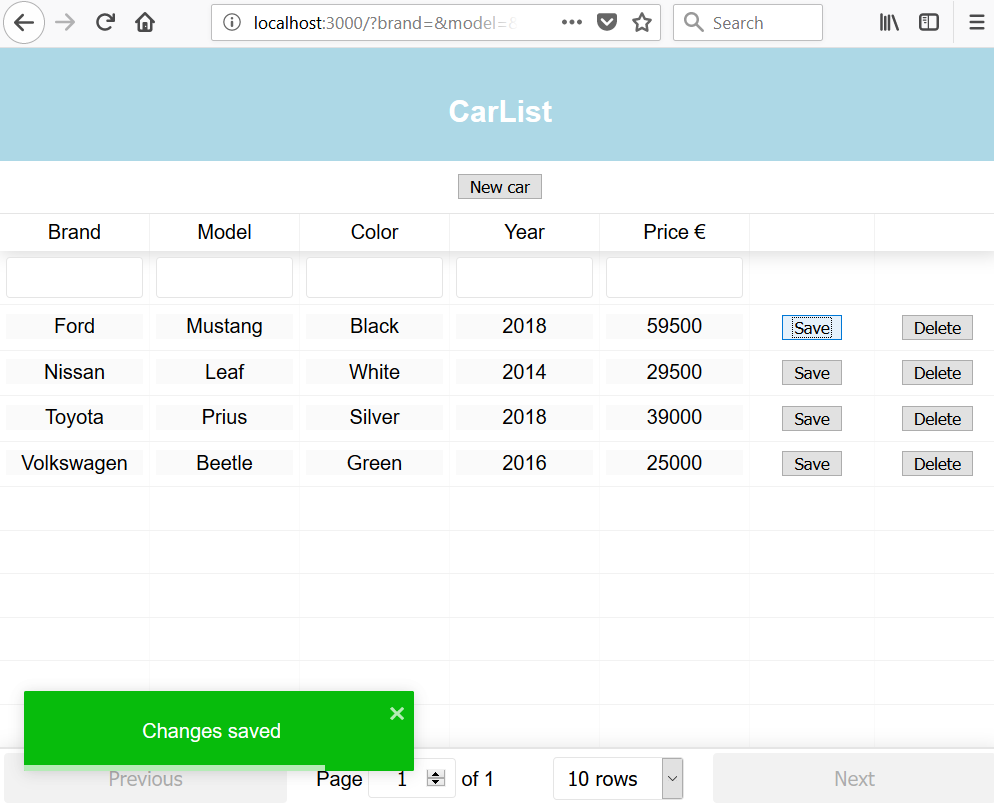
如果您现在编辑 table 中的值并按 Save 按钮,您应该会看到 toast 消息,并且更新的值已保存 到数据库:
我们还将实现的一项功能是数据的 CSV 导出。有一个包,叫做 react-csv (https://github.com/abdennour/react-csv),可用于将数据数组导出到 CSV 文件。
如果您的应用已启动,请按Ctrl
server em> + C 在终端中,输入以下命令安装react-csv< /代码>。安装后,重启应用:
react-csv 包包含两个组件 - CSVLink 和 CSVDownload。我们将在我们的应用程序中使用第一个,因此将以下导入添加到 Carlist.js 文件中:
CSVLink 组件采用 data 属性,其中包含将导出到 CSV 文件的数据数组。您还可以使用 separator 属性定义数据分隔符(默认分隔符是逗号)。在 render() 方法的 return 语句内添加 CSVLink 组件. data 属性的值现在将是 this.state.cars:
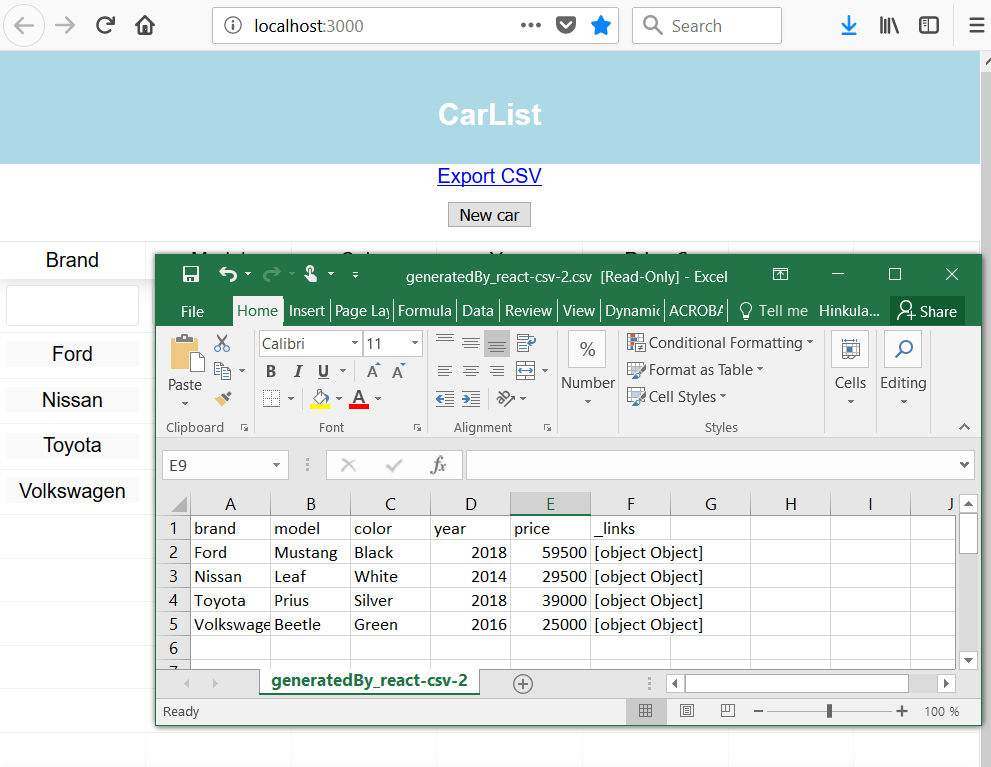
在浏览器中打开应用程序,您应该会在我们的应用程序中看到 Export CSV 链接。样式不是很好,但我们将在下一章中处理它。如果您点击链接,您将获得 CSV 文件中的数据:
现在所有的功能都已经实现了。
- How should you fetch and present data using the REST API with React?
- How should you delete data using the REST API with React?
- How should you add data using the REST API with React?
- How should you update data using the REST API with React?
- How should you show toast messages with React?
- How should you export data to a CSV file with React?
Packt 还有其他学习 React 的好资源: