读书笔记《developing-java-applications-with-spring-and-spring-boot-ebook》使用弹簧Boot进行测试
对 java 生态系统最具创新性的贡献:spring Boot #jaxlondon
– @JAXenter
如果我们回到 10 多年前,我们会发现测试过程主要由大量测试工程师进行。但随着 JUnit 的兴起,采用 持续集成 (CI ) 服务器、大量的测试断言库和集成的测试覆盖服务,我们可以看到广泛采用自动化测试.
在本章中,我们将通过提供多层次的支持来了解 Spring Boot 如何看待自动化测试。我们要做到以下几点:
- Write some basic unit tests
- Introduce slice testing
- Embark upon WebFlux testing
- Leverage complete embedded container testing
- Draft some autoconfiguration tests
到目前为止,我们已经使用 Spring Initializr (http://start.spring.io) 来创建我们的社交媒体平台。我们挑选了几个依赖项,并一路添加了其他的。但是我们还没有调查测试库。
事实证明,Spring Boot 非常重视测试,以至于它不是网站上的一个选项。自动创建的所有项目都具有 this 测试范围的依赖项:
那么单行包含什么?
- JUnit: De-facto standard for testing Java apps
- JSON Path: XPath for JSON
- AssertJ: Fluent assertion library
- Mockito: Java mocking library
- Hamcrest: Library of matcher objects
- JSONassert: Assertion library for JSON
- Spring Test and Spring Boot Test: Test libraries provided by the Spring Framework and Spring Boot
除了这些自动提供的各种测试库之外,还包括许多可选的依赖项。这意味着可以将它们添加到我们项目的依赖项列表中,而无需指定版本。可选依赖项列出如下:
- HTMLUnit: Testing toolkit for HTML outputs
- Selenium: Browser automation for UI testing
- Flapdoodle: Embedded MongoDB database for testing
- H2: Embedded SQL database for testing
- Spring REST Docs: Generates REST documentation using automated tests
we 可以编写的最小范围测试称为单元测试。事实上,人们多年来一直在编写小型测试。一个常见的范例是在给定的单元测试中尝试只测试一个类。
首先,让我们测试一下我们拥有的最小代码单元:启用 Lombok 的 Image 域对象。
提醒一下,代码如下所示:
这个小小的 POJO 使用 Spring Data MongoDB 注释以及 Lombok 提供 getter 和 setter 的 @Data 注释进行标记。
单元测试不应该太难。我们可以首先在 /src/test/java 中创建 ImageTests.java,并在与原始类相同的包中( com.greglturnquist.learningspringboot),如下:
@Testindicates thatimagesManagedByLombokShouldWorkis a JUnit test case, ensuring it is automatically picked up and run either from our IDE when we choose or from Gradle when we build the system- The test creates a new
Imageobject - Then it uses AssertJ's
assertThat()method to prove the values are as expected
让我们运行它!
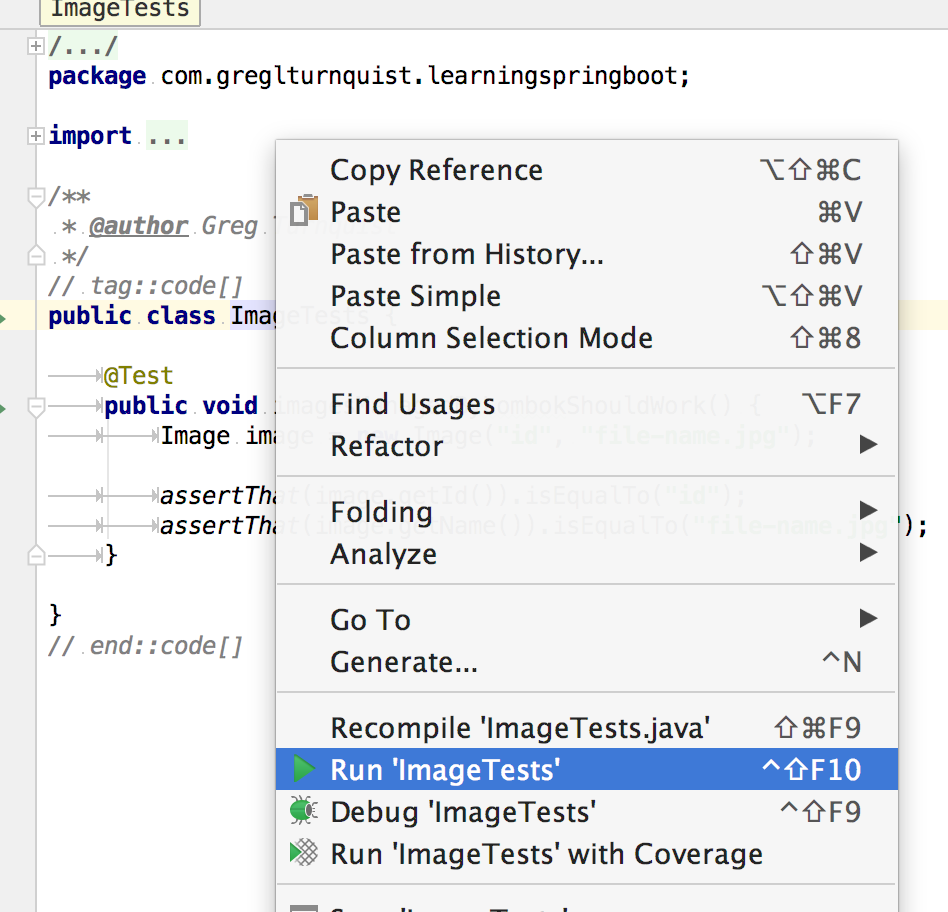
如上图所示,我们仅仅右击类ImageTests
,选择 Run 'ImageTests',然后观察输出(如下所示):
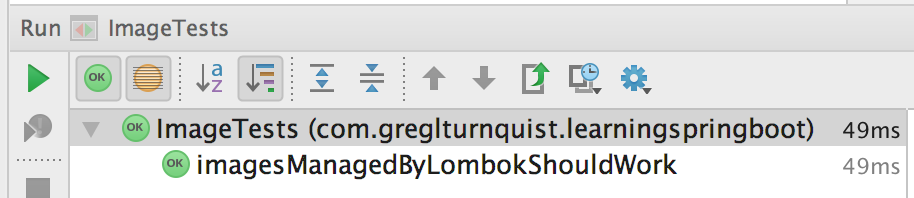
万岁!当我们的自动化测试变成绿色时,总会有一点快乐。
在整个行业中,许多表示对测试感兴趣。然而,当事关重大,我们遇到棘手的情况时,很容易举手大喊,这太难了!
Spring Boot 旨在提供帮助!
JUnit 本身就赋予了我们声明测试和断言通过/失败场景的能力。但实际上,并非所有东西都可以直接开箱即用。例如,我们的部分代码很容易依赖于 Boot 自动配置各种 bean 以及拥有强大的属性支持。
一个敏锐的例子是需要做一些 MongoDB 操作。如果我们可以要求 Spring Boot 自动配置足够的 bean 来支持 MongoDB 进行我们的测试,那将非常方便。
嗯,今天是我们的幸运日。
Spring Boot 1.5 引入了切片测试。这是可以打开 Spring Boot 自动配置功能的子集的地方,同时还可以完全访问其属性支持。以下测试注释列表中的每一个都启用了不同的代码片段:
@DataMongoTest@DataJpaTest@JdbcTest@JsonTest@RestClientTest@WebFluxTest@WebMvcTest
这些注释中的每一个都可以配置不同的 beans 切片。例如,@DataJpaTest 将:
- Enable transactions by applying Spring's
@Transactionalannotation to the test class - Enable caching on the test class, defaulting to a
NoOpcache instance - Autoconfigure an embedded test database in place of a real one
- Create a
TestEntityManagerbean and add it to the application context - Disable the general Spring Boot autoconfiguration, confining things to the autoconfiguration policies found in
spring-boot-test-autoconfigure
需要理解的重要一点是,测试在限制在相对狭窄的范围内时效果最好。因此,不建议使用多个这些 @...Test 注释。相反,将事情分解成多个测试类。
above 列出的第一个用于切片测试的注释是 @DataMongoTest。在本节中,我们要编写一些涉及 MongoDB 特定代码的测试方法。
在测试 MongoDB 代码时,我们有 Spring Boot 提供的以下两个选项:
- Testing against an embedded MongoDB instance
- Testing against a live MongoDB instance
默认情况下,Spring Boot 将检查嵌入式 MongoDB 数据库 Flapdoodle 是否在类路径上。如果是这样,它将尝试使用它运行测试。如果 Flapdoodle 不在我们的类路径中,它将尝试连接到一个真实的 MongoDB 实例。
因此,让我们开始将 flapdoodle 添加到我们项目的依赖项列表中,如下所示:
由于我们要测试基于 Reactor 的 API,我们还想利用 Reactor Test,这是一个由 Project Reactor 提供的实用程序库。让我们添加以下测试依赖项:
将最后一个依赖项添加到我们的项目中后,我们现在可以开始在 src/test/java 中编写 EmbeddedImageRepositoryTests.java,在com.greglturnquist.learningspringboot 包,像这样:
该测试类第一部分的上述代码可以描述如下:
@RunWith(SpringRunner.java)is needed to ensure that Spring Boot test annotations run properly within JUnit@DataMongoTestwill disable the general Spring Boot autoconfiguration, and instead, use Spring Boot's test-based autoconfigurations to create aMongoTemplate, a MongoDB connection, MongoDB property settings, aReactiveMongoTemplateand an embedded MongoDB instance; it will also enable the MongoDB repositories- With the Spring Data MongoDB repositories enabled, Spring Boot will automatically instantiate an
ImageRepository, and inject it into our autowiredrepositoryfield
通过访问干净的 MongoDB 实例(嵌入式),我们现在可以执行一些设置工作,如下所示:
上述设置方法可以描述如下:
- The
@Beforeflags this method to be run before every single@Testmethod in this class - The
operationsis used todropCollectionand then insert three new entries in the database, turn around and fetch them all, and print them to the console
正确预加载,我们可以开始编写我们的第一个测试用例,如下所示:
前面的测试用例可以描述如下:
@Testindicates this is a test method and the method name describes our overall goal.- We use Reactor Test's
StepVerifierto subscribe to theFluxfrom the repository and then assert against it. - Because we want to assert against the whole collection, we need to pipe it through Reactor Test's
recordWithmethod, which fetches the entireFluxand converts it into anArrayListvia a method handle. - We verify that there were indeed three entries.
- We write a lambda to peek inside the recorded
ArrayList. In it, we can use AssertJ to verify the size ofArrayListas well as extract each image's name withImage::getNameand verify them. - Finally, we can verify that
Fluxemitted a Reactive Streams complete signal, meaning that it finished correctly.
StepVerifier 使用 Reactive Streams 并将执行所有各种信号以与封闭的 Publisher 对话。在这种情况下,我们询问了 Flux,但这也可以用于 Mono。
最后,我们将测试我们的自定义查找器,findByName,如下所示:
repository.findByName()is used to fetch one record- We again use
StepVerifierto create a subscriber for ourMonoand then expect the next signal to come through, indicating that it was fetched - Inside the lambda, we perform a couple of AssertJ assertions to verify the state of this
Image
顺便说一句,我们到底需要测试多少种 CRUD 方法?我们介绍了 findAll 和 findByName。原则上,我们可以避开 findAll,因为它可以被认为是 Spring Data MongoDB 的一部分。但它在本书中为测试 Reactor Flux 结果提供了一个很好的例子。
一般来说,我们不应该咬掉testing 框架代码。但是验证我们的自定义查找器非常有意义。并且总是有端到端测试的空间,我们将在本章中进一步探讨。
针对嵌入式 MongoDB 实例进行测试非常方便。但是那里是我们需要使用真实实例的时候,并且出于多种原因:安全设置,一批实时数据,自定义配置。不管是什么原因,都没有必要破坏我们的测试工作。
我们可以编写另一个测试类,LiveImageRepositoryTests,让它看起来像这样:
上述现场测试的详细信息如下:
@RunWith(SpringRunner.class)is our familiar annotation to integrate Spring with JUnit.@DataMongoTest(and the other@...Testannotations) lets us exclude explicit autoconfiguration classes. To switch off Flapdoodle, all we need to do is excludeEmbeddedMongoAutoConfiguration
该类的其余代码与EmbeddedImageRepositoryTests相同,此处不再赘述。 (事实上,如果在嵌入式和实时 MongoDB 实例上都运行完全相同的测试,那就太好了。)
让我们运行最新的 batch 嵌入式和实时 MongoDB 测试:
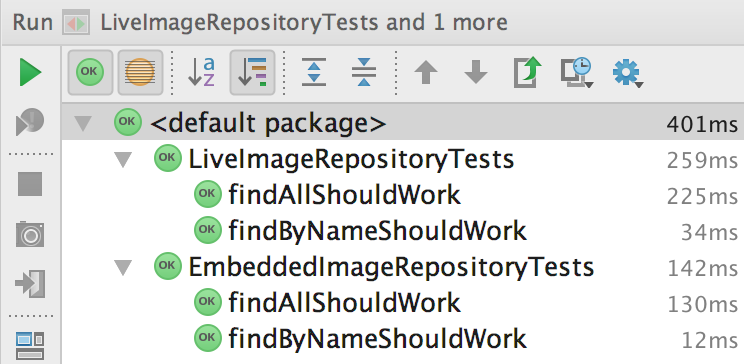
全绿色(以及 OK 图标)!
到目前为止,我们已经了解了 unit 测试以及 MongoDB 的切片测试。这些对于覆盖服务和后端逻辑很有用。我们需要确保的最后一部分是 Web 控制器是否正常工作。
Spring Boot 提供了自动支持来帮助我们选择我们想要运行的确切类型的测试。让我们从一个例子开始:
@RunWith(SpringRunner.class)ensures all of our Spring Framework and Spring Boot test annotations integrate properly with JUnit.@WebFluxTest(controllers = HomeController.class)is another slice of testing which focuses on Spring WebFlux. The default configuration enables all@Controllerbeans and@RestControllerbeans as well as a mock web environment, but with the rest of the autoconfiguration disabled. However, by using thecontrollersargument, we have confined this test case to ONLY enableHomeController.@Import(...)specifies what additional bits we want configured outside of any Spring WebFlux controllers. In this case, the Thymeleaf autoconfiguration is needed.- A
WebTestClientbean is autowired into our test case, giving us the means to make mock web calls. @MockBeansignals that theImageServicecollaborator bean needed by ourHomeControllerwill be replaced by a mock, which we'll configure shortly.
Note
尽管 @WebFluxTest 是另一个类似于 @DataMongoTest 的切片,但我们将其从上一节切片测试中分离出来,因为 WebFlux测试附带了广泛的配置选项,我们将在后面更详细地探讨。
让我们看一个获取基本 URL / 的测试用例:
我们可以按如下方式介绍最后一个测试用例的细节:
@Testmarks this method as a JUnit test case.- The method name,
baseRouteShouldListAllImages, gives us a quick summary of what this method should verify. - The first three lines mock up the
ImageServicebean to return aFluxof two images whenfindAllImagesgets called. webClientis then used to perform aGET /using its fluent API.- We verify the HTTP status to be a 200 OK, and extract the body of the result into a string.
- We use Mockito's
verifyto prove that ourImageServicebean'sfindAllImageswas indeed called. - We use Mockito's
verifyNoMoreInteractionsto prove that no other calls are made to our mockImageService. - Finally, we use AssertJ to inspect some key parts of the HTML page that was rendered.
这个测试方法让我们很好地摆脱了 GET /。我们能够验证网页是否以正确的内容呈现。我们还可以验证我们的 ImageService bean 是否按预期调用。两者都是在没有真正的 MongoDB 引擎和完全运行的 Web 容器的情况下完成的。
Spring 的 WebFlux 机器已经过验证,因为它仍然包含接收 / 的传入请求并将其路由到 HomeController.index(),产生一个 Thymeleaf 生成的 HTML 页面。这样,我们就知道我们的控制器已正确接线。通常,这足以证明网络通话有效。
要探索的一个关键场景实际上是模拟地获取文件。这是我们的应用在请求单个图像时所做的。查看以下测试用例:
前面的测试用例可以描述如下:
@Testflags this method as a JUnit test case.- The method name,
fetchingImageShouldWork, hints that this tests successful file fetching. - The
ImageService.findOneImagemethod returns aMono<Resource>, so we need to assemble a mock resource. That can be achieved using Spring'sByteArrayResource, which takes abyte[]. Since all Java strings can be turned into byte arrays, it's a piece of cake to plug it in. webClientcallsGET /images/alpha.png/raw.- After the
exchange()method, we verify the HTTP status isOK. - We can even check the data content in the body of the HTTP response given that the bytes can be curried back into a Java string.
- Lastly, we use Mockito's
verifyto make sure our mock was called once and in no other way.
由于我们是针对一个非常简单的接口 Resource 进行编码,因此我们不必经历任何复杂的准备虚假测试文件并提供服务的过程。虽然这是可能的,但 Mockito 可以很容易地站起来存根和模拟。此外,Spring 的各种 Resource 实现让我们能够选择正确的实现。这加强了针对接口而不是实现编码服务的好处。
测试文件检索时硬币的另一面是验证我们是否正确处理文件错误。如果我们尝试获取图像但由于某种原因服务器上的文件已损坏怎么办?在下面的测试代码中检查它:
前面的失败测试可以描述如下:
@Testflags this method as a JUnit test case.- The method name,
fetchingNullImageShouldFail, hints that this test is aimed at a failure scenario. - We need to mock out the file on the server, which is represented as a Spring
Resource. That way, we can force it to throw anIOExceptionwhengetInputStreamis invoked. - That mock is returned when
ImageService.findOneImageis called. Notice how we use Mockito'sany()to simplify inputs? webClientis again used to make the call.- After the
exchange()method is made, we verify that the HTTP status is a400 Bad Request. - We also check the response body and ensure it matches the expected body from our controller's exception handler.
- Finally, we use Mockito to verify that our mock
ImageService.findOneImage()was called once (and only once!) and that no other calls were made to this mock bean.
这个测试用例展示了我们都需要打磨的一项关键技能:验证故障路径是否得到了正确处理。当经理问如果文件不存在怎么办?,我们可以向他们展示一个测试用例,表明我们已经涵盖了它。假设我们在代码中编写了一个 try...catch 子句,就像 HomeController.oneRawImage() 中的这个子句:
我们应该立即开始考虑两个测试用例:一个用于 try 部分的测试用例,当我们可以找到文件并返回 OK 时,另一个用于 catch 部分的测试用例,当 IOException被抛出,我们返回一个错误的请求。
虽然想出所有成功的场景并不难,但捕获失败的场景并对其进行测试很重要。 Mockito 使得模拟失败行为变得非常容易。事实上,一个模拟返回另一个模拟是一种常见的模式,就像我们在这个测试用例中所做的那样。
另一种一直发生的网络行为是处理呼叫,然后将客户端重定向到另一个 Web 位置。这正是我们向我们的站点发出 HTTP DELETE 时的行为。 URL 应该带有必须删除的资源。完成后,我们需要指示浏览器返回主页。
查看以下测试用例:
我们可以这样描述前面的重定向网络呼叫:
- The
@Testflags this method as a JUnit test case. - We prep our
ImageServicemock bean to handle adeleteImageby returningMono.empty(). This is the way to construct aMono<Void>object, which represents the promise that our service hands us when deletion of the file and its corresponding MongoDB record are both completed. webClientperforms aDELETE /images/alpha.png.- After the
exchange()is complete, we verify the HTTP status is303 See Other, the outcome of a Spring WebFluxredirect:/directive. - As part of the HTTP redirect, there should also be a
Locationheader containing the new URL,/. - Finally, we confirm that our
ImageServicemock bean'sdeleteImagemethod was called and nothing else.
这证明我们已经正确调用了我们的服务,然后将其重定向回主页。实际上可以获取 Location 标头并发出另一个 webClient 调用,但是在这个测试用例中没有意义。我们已经验证了这种行为。
但是,假设重定向包含一些上下文内容,例如 redirect:/?msg=Deleted 表示希望返回主页但需要显示额外数据。那将是发出第二个电话并证明此特殊消息已正确呈现的好时机。
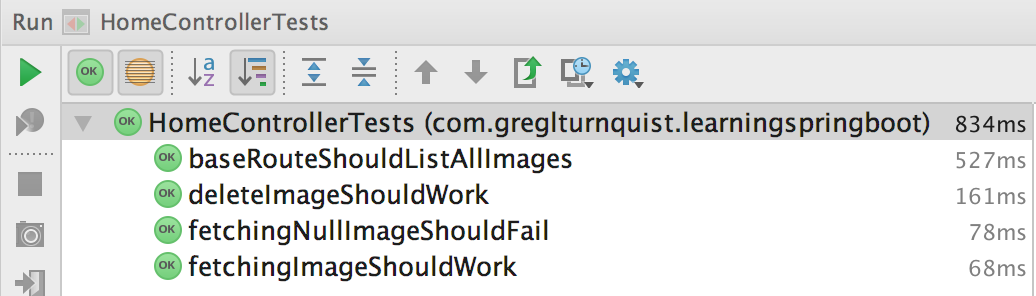
现在我们可以运行整个 test 案例并看到绿色气泡一直向下:
我们对 web 控制器进行了一些很好的测试,并验证了它的行为是否正常。但这只是另一片。在某些时候,最好端到端地测试整个事情。使用今天的现代测试工具套件,它是完全可行的。
Spring Boot 并不总是支持所有工具。例如,在 servlet 之外尚不支持流行的浏览器自动化工具包 Selenium WebDriver。
没问题!我们真正需要的是让 Spring Boot 启动我们的应用程序,最好是在一个未占用的端口上,并在我们进行一些测试时让开。所以让我们这样做。
我们可以从制作一个新的测试用例开始,如下所示:
这个前面的测试类可以描述如下:
@RunWith(SpringRunner.class)ensures the Spring Boot annotations integrate with JUnit.@SpringBootTestis the test annotation where we can activate all of Spring Boot in a controlled fashion. WithwebEnvironmentswitched from the default setting of a mocked web environment toSpringBootTest.WebEnvironment.RANDOM_PORT, a real embedded version of the app will launch on a random available port.
此配置将在开放端口上启动我们的应用程序副本,并具有完整的自动配置,并且我们所有的 CommandLineRunners 都将运行。这意味着我们的预加载 MongoDB 的 InitDatabase 类将启动。
首先,我们需要一些测试对象声明为我们测试类的字段。这些是通过以下方式获得的:
ChromeDriverService: This gives us a handle on the bridge between Selenium and the Chrome handling libraryChromeDriver: This is an implementation of theWebDriverinterface, giving us all the operations to drive a test browser@LocalServerPort: This is a Spring Boot annotation that instructs Boot to autowire the port number of the web container intoport
Note
要使用 ChromeDriver,我们不仅需要将浏览器 Chrome 下载并安装在默认位置,还需要一个单独的可执行文件:chromedriver
。假设您访问了 https://sites.google.com/a/chromium.org/chromedriver/downloads,下载了捆绑包(在我的例子中是 macOS),解压缩,然后将可执行文件放在名为 ext 的文件夹中,您可以继续。
在 ext 中安装 chromedriver 后,我们可以将其配置为启动和停止,如下所示:
这种设置/拆卸行为可以描述如下:
@BeforeClassdirects JUnit to run this method before any test method inside this class runs and to only run this method once- Inside the
setUpmethod, it sets thewebdriver.chrome.driverproperty to the relative path ofchromedriver - Next, it creates a default service
- Then it creates a new
ChromeDriverto be used by all the test methods - Finally, it creates a test directory to capture screenshots (as we'll soon see)
@AfterClassdirects JUnit to run thetearDownmethod after ALL tests have run in this class- It commands
ChromeDriverServiceto shut down. Otherwise, the server process will stay up and running
这听起来有点令人费解吗?我们将在本章后面探讨简化这一点的选项。
现在,让我们专注于编写这个测试用例:
前面的这个测试用例可以详细描述如下:
@Testindicates this is a JUnit test casedrivernavigates to the home page using the injectedport- It takes a screenshot so we can inspect things after the fact
- We verify the title of the page is as expected
- Next, we grab the entire page's HTML content and verify one of the links
- Then we hunt down that link using a W3C CSS selector (there are other options as well), move to it, and click on it
- We grab another snapshot and then click on the back button
这是一个非常基本的测试。 除了 验证主页和签出一个链接并没有多大作用。但是,它表明我们可以自动测试整个系统。请记住,我们已经建立了整个系统,包括一个实时的 MongoDB 数据库(如果你认为嵌入式数据库是真实的)。这不仅验证了我们自己的代码,而且验证了我们对自动配置、自动装配和初始化的内容的假设。
作为测试必杀技的高潮,我们甚至可以抓取屏幕快照来证明我们在这里。或者至少我们的测试用例在这里。该代码显示在这里:
截图可以解释如下:
driver.getScreenshotAs(OutputType.FILE)taps theTakesScreenshotsubinterface to grab a snapshot of the screen and put it into atempfile- Spring's
FileCopyUtilsutility method is used to copy thattempfile into the project'sbuild/test-resultsfolder using the input argument to give it a custom name
截屏是使用 ChromeDriver、FirefoxDriver 或 SafariDriver。所有这些现实世界的浏览器集成都支持此功能。 感谢,我们得到了以下快照结果:
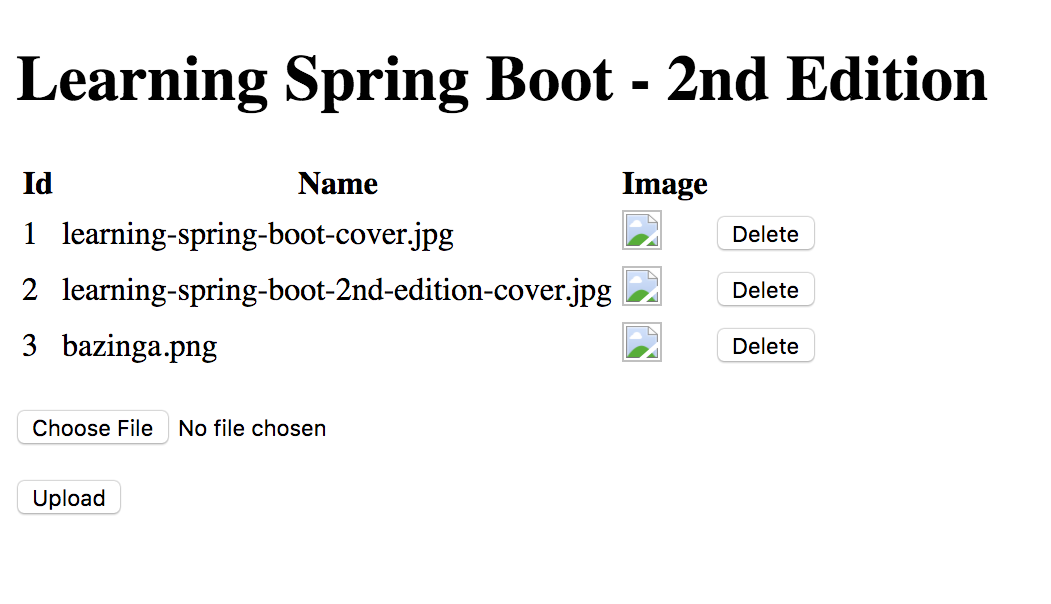
第一个镜头显示了整个网页。以下屏幕截图显示了单击后的单个图像:
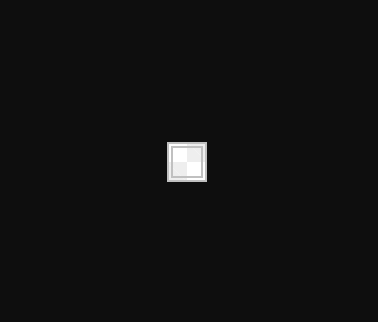
这张图片的截图可能看起来有点尴尬,但请记住;这些图像不是真正的 JPG。相反,它们是填充到文件系统中的字符串。
如果我们运行我们的整个测试用例套件,我们可以看到整个过程只需要不到 2.5 秒:
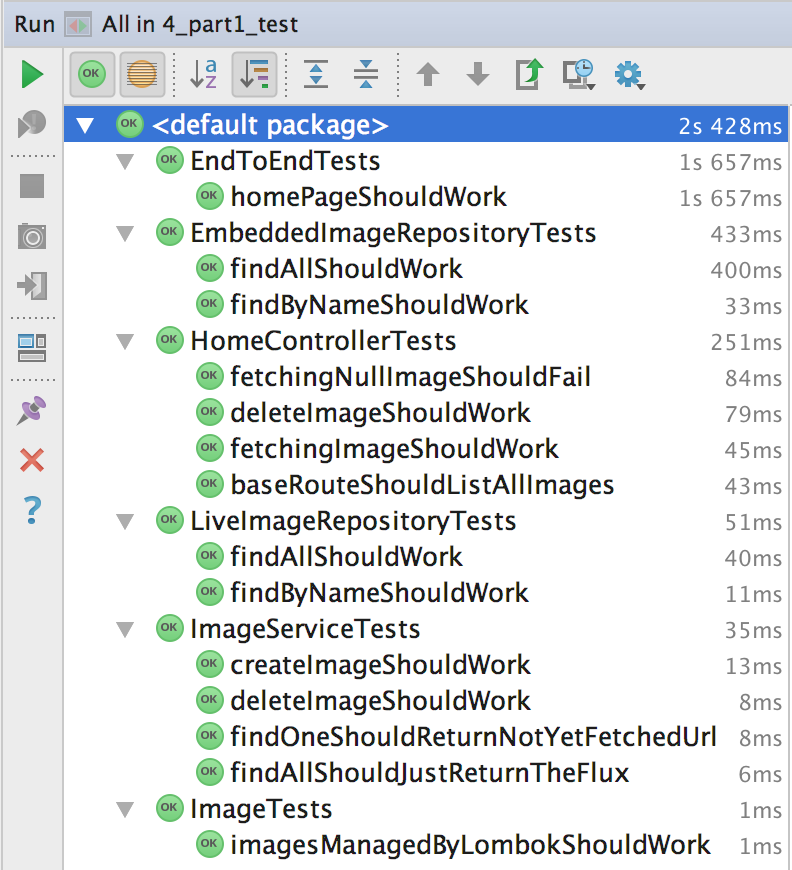
印象深刻吧?
测试套件有多好?使用 IDE,我们可以运行 相同的测试套件,但打开了覆盖分析:
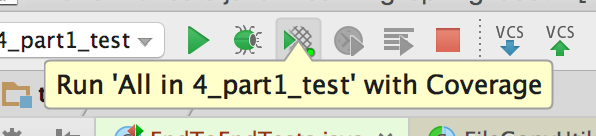
在运行相同的测试套件但启用了 IDE 的覆盖工具后,我们可以在源代码列表中读取,如下图所示:
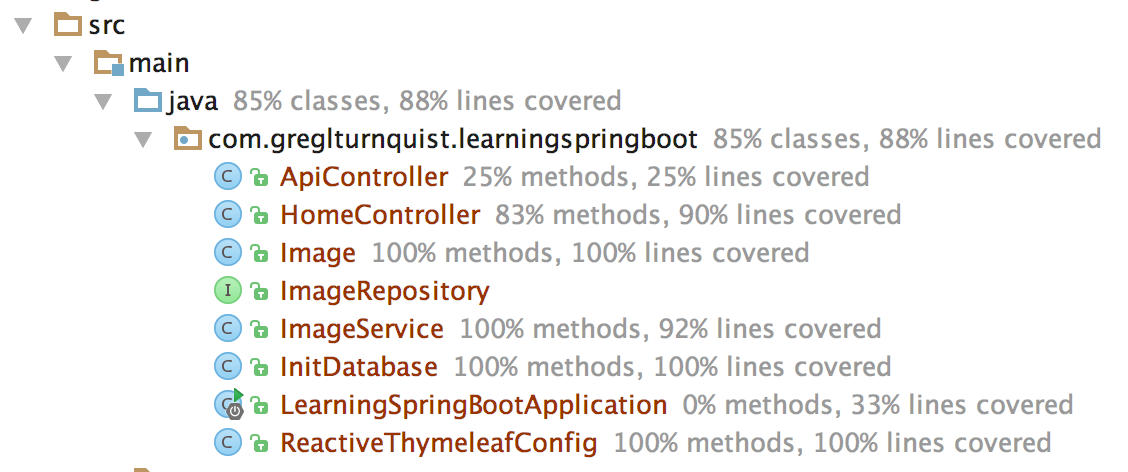
这很方便。我们甚至可以深入每个类,看看缺少什么。尽管这很灵巧,但我们不会再深入研究测试覆盖率。这最好留给一本更面向测试的书。
Note
不要让测试覆盖率消耗你。正如我在另一本书Python 测试手册中提到的,在第9章 在 Coverage is not all 部分下,测试覆盖率应该用于识别应该检查的新的、合理的场景,而不是游戏系统再挤出一两个百分点。覆盖率报告绝不应该用于比较一个系统或测试方案与另一个,更不用说用作发布的大门。我们都应该寻求随着时间的推移增加测试覆盖率,作为增加信心和降低风险的手段,而不是作为发布的大门。
我们刚刚提到了 getting Chrome 运行的所有仪式。我们为什么这样做?因为一个 WebDriver 实现不需要这样的努力就可以在线不支持截屏 .也无法知道检查您的代码的人是否安装了相同的浏览器。
如果我们围绕 Chrome 编写所有代码是因为我们不喜欢 Firefox,但另一个队友没有 Chrome,那么我们就有问题了。
一方面,如果屏幕截图不重要,那么 HtmlUnitDriver 是要走的路。它开箱即用,与任何其他 WebDriver 一样好用,并且不需要任何第三方可执行文件或驱动程序。但这是按最小公分母计算的惩罚。
whateverWebDriver 我们可以根据我们安装的任何东西获得不是更好吗?在我们的 system 上并自动将其加载到我们的测试用例中?毕竟,Spring Boot 旨在降低构建应用程序时的 Java 复杂性。
如果您感觉到针对这种疯狂的面向 Spring Boot 的解决方案进展缓慢,那么您是对的。在下一节中,我们将探讨如何根据可用的内容自动配置 WebDriver,然后我们将对该自动配置策略进行单元测试。
如果在几个 WebDriver 实现 sounds 虚伪且不必要的复杂之间进行选择,那么让我们做 Spring Boot 最擅长的事情:自动配置它!
好的,如果我们要自动配置某些东西,我们肯定想要测试我们正在做的事情。这样,我们可以确保它按预期执行。为此,需要进行一些测试设置。一探究竟:
前面的测试用例设置如下:
- It starts off very different from what we've seen up until now. Instead of using various Spring Boot test annotations, this one starts with nothing. That way, we can add only the bits of Boot that we want in a very fine-grained fashion.
- We'll use Spring's
AnnotationConfigApplicationContextas the DI container of choice to programmatically register beans. - The
@Afterannotation flags theclose()method to run after every test case and close the application context, ensuring the next test case has a clean start. load()will be invoked by each test method as part of its setup, accepting a list of Spring configuration classes as well as optional property settings, as it creates a new application context.load()then registers aWebDriverAutoConfigurationclass (which we haven't written yet).- After that, it registers any additional test configuration classes we wish.
- It then uses Spring Boot's
EnvironmentTestUtilsto add any configuration property settings we need to the application context. This is a convenient way to programmatically set properties without mucking around with files or system settings. - It then uses the application context's
refresh()function to create all the beans. - Lastly, it assigns the application context to the test class's
contextfield.
在这段代码中,我们以编程方式从头开始构建 Spring 应用程序上下文。在这个测试类中,我们将全新的 WebDriverAutoConfiguration 类注册为我们所有测试的核心。然后我们可以自由地运行各种测试用例,确保它正常运行。我们甚至可以注册不同的配置类来覆盖任何自动配置 bean。
现在让我们开始我们的第一个测试用例。什么是开始的好地方?如果我们要禁用所有基于浏览器的 WebDriver 实例(如 Firefox 和 Chrome),而希望事情退回到通用的 HtmlUnitDriver?让我们尝试一下:
这个测试用例可以解释如下:
@TestmarksfallbackToNonGuiModeWhenAllBrowsersDisabledas a JUnit test method.- To start things, it uses the
load()method. Since we don't have any custom overrides, we supply it with an empty array of configuration classes. We also include a slew of properties, the first one beingcom.greglturnquist.webdriver.firefox.enabled:false. From a design perspective, it's nice to optionally exclude certain types, so having a well-qualified property (using a domain we own) and setting them all to false sounds like a good start. - Now we can ask the application context to give us a
WebDriverbean. - If it bypassed all those browser-specific ones and landed on
HtmlUnitDriver, then it shouldn't support theTakesScreenshotinterface. We can verify that with the AssertJassertThat()check, using Spring'sClassUtils.isAssignablecheck. - To make it crystal clear that we're getting an
HtmlUnitDriver, we can also write another check verifying that.
由于我们实际上并没有测试 Selenium WebDriver 的内容,因此不再需要检查该对象。我们有我们想要的,一个自动配置的 WebDriver 应该运行良好。
捕捉到我们的第一组预期条件后,是时候卷起袖子开始工作了。我们将从创建 WebDriverAutoConfiguration.java 开始,如下所示:
前面这个 Spring Boot 自动配置类可以描述如下:
@Configuration: This indicates that this class is a source of beans' definitions. After all, that's what autoconfiguration classes do--create beans.@ConditionalOnClass(WebDriver.class): This indicates that this configuration class will only be evaluated by Spring Boot if it detectsWebDriveron the classpath, a telltale sign of Selenium WebDriver being part of the project.@EnableConfigurationProperties(WebDriverConfigurationProperties.class): This activates a set of properties to support what we put into our test case. We'll soon see how to easily define a set of properties that get the rich support Spring Boot provides of overriding through multiple means.@Import(...): This is used to pull in extra bean definition classes.
这个类现在已经准备好让我们真正定义一些bean,以创建一个WebDriver 实例。为了获得一个实例,我们可以想象一下从一个列表中尝试一个,例如 Firefox。如果失败,请继续下一个。如果它们都失败了,请使用 HtmlUnitDriver。
下面的课程完美地展示了这一点:
@Primary: This indicates that this method should be given priority when someone is trying to autowire aWebDriverbean over any other method (as we'll soon see).@Bean(destroyMethod = "quit"): This flags the method as a Spring bean definition, but with the extra feature of invokingWebDriver.quit()when the application context shuts down.@ConditionalOnMissingBean(WebDriver.class): This is a classic Spring Boot technique. It says to skip this method if there is already a definedWebDriverbean. HINT: There should be a test case to verify that Boot backs off properly!webDriver(): This expects three input arguments to be supplied by the application context--aFirefoxDriverfactory, aSafariDriverfactory, and aChromeDriverfactory. What is this for? It allows us to swap outFirefoxDriverwith a mock for various test purposes. Since this doesn't affect the end user, this form of indirection is suitable.- The code starts by invoking
firefoxDriverusing theFirefoxDriverfactory. If null, it will try the next one. It will continue doing so until it reaches the bottom, withHtmlUnitDriveras the last choice. If it got a hit, theseifclauses will be skipped and theWebDriverinstance returned.
如果我们希望这样做,可以很容易地添加新的浏览器。但在我们调查之前,比如说 firefoxDriver(),让我们先看看 FirefoxDriverFactory,该方法的输入参数:
前面的驱动工厂可以这样描述:
- This class implements Spring's
ObjectFactoryfor the type ofFirefoxDriver. It provides the means to create the named type. - With constructor injection, we load a copy of
WebDriverConfigurationProperties. - It implements the single method,
getObject(), yielding a newFirefoxDriver. - If the
firefoxproperty is enabled, it attempts to create aFirefoxDriver. If not, it skips the whole thing and returns null.
这个工厂使用尝试创建对象的老技巧来查看它是否存在。如果成功,则返回它。如果不是,它会吞下异常并返回 null。同样的策略用于实现 SafariDriver bean 和 ChromeDriver bean。由于代码几乎相同,因此此处未显示。
为什么我们又需要这个工厂?因为在本章稍后我们希望证明它会创建这样一个项目时,我们不希望测试用例需要安装 Firefox 才能正常工作。因此,我们将提供一个模拟解决方案。由于这不会影响接收自动配置的 WebDriver 的最终用户,因此使用这样的机制非常好。
请注意我们如何使用 properties.getFirefox().isEnabled() 来决定是否尝试?这是由我们的 com.greglturnquist.webdriver.firefox.enabled 属性设置提供的。要创建一组 Spring Boot 允许消费者根据需要覆盖的属性,我们需要创建一个 WebDriverConfigurationProperties 类,如下所示:
最后一个基于属性的类可以描述如下:
@Datais the Lombok annotation that saves us from creating getters and setters.@ConfigurationProperties("com.greglturnquist.webdriver")marks this class as a source for property values withcom.greglturnquist.webdriveras the prefix.- Every field (
firefox,safari, andchrome) is turned into a separately named property. - Because we want to nest subproperties, we have
Firefox,Safari, andChrome, each with anenabledBoolean property defaulted toTrue. - Each of these subproperty classes again uses Lombok's
@Dataannotation to simplify their definition.
Note
需要指出的是,属性类的名称 WebDriverConfigurationProperties 和 Firefox 等子类的名称并不是重要的。前缀由 @ConfigurationProperties 设置,各个属性使用字段的名称来定义自己。
使用这个类,很容易将这个强类型 POJO 注入到任何 Spring 管理的 bean 中并访问设置。
在这个阶段,我们的第一个测试用例 fallbackToNonGuiModeWhenAllBrowsersDisabled 应该可以运行了。我们可以测试一下。
假设我们验证了它,我们现在可以 code 另一个测试,验证 FirefoxDriver 是在适当的情况下创建的。让我们从定义我们的测试用例开始。我们可以从故意禁用其他选项开始:
前面的测试用例很容易描述如下:
@TestmarkstestWithMockedFirefoxas a JUnit test methodloadis used to addMockFirefoxConfiguration, a configuration class we'll soon write to help us mock out the creation of a realFirefoxDriver- We also disable Chrome and Safari using the property settings
- Fetching a
WebDriverfrom the application context, we verify that it implements theTakesScreenshotinterface and is actually aFirefoxDriverclass
可以想象,这很棘手。我们不能假设开发者已经安装了 Firefox 浏览器。因此,我们永远无法创建真正的 FirefoxDriver。为了使这成为可能,我们需要引入一点间接性。 Spring遇到多个bean定义方法时,最后一个获胜。因此,通过添加另一个配置类 MockFirefoxConfiguration,我们可以潜入并更改默认工厂的工作方式。
下面的课程展示了如何做到这一点:
上一个类可以描述如下:
@Configurationmarks this class as a source of bean definitions.@Beanshows that we are creating aFirefoxDriverFactorybean, the same type pulled into the top of ourWebDriverAutoConfigurationclass via the@Importannotation. This means that this bean definition will overrule the one we saw earlier.- We use Mockito to create a mock
FirefoxDriverFactory. - We instruct this mock factory to create a mock
FirefoxDriverwhen it's factory method is invoked. - We return the factory, so it can be used to run the actual test case.
使用此代码,我们可以能够 验证一切是否正常运行。有轻微的挥手声。另一种方法是找出确保每个浏览器都已安装的方法。在每个平台的测试代码中包含可执行文件并运行它们,可能会产生更多的信心。但价格是多少?它可能会违反浏览器的许可。确保覆盖每个平台,只是为了一个测试用例,有点极端。所以,总而言之,这个测试用例通过避免所有额外的仪式来充分地对冲这种风险。
留给读者作为练习,探索创建 Safari 和 Chrome 工厂及其相应的测试用例。
如果我们在 WebDriverAutoConfigurationTests 中运行所有的测试用例,我们希望找到什么?
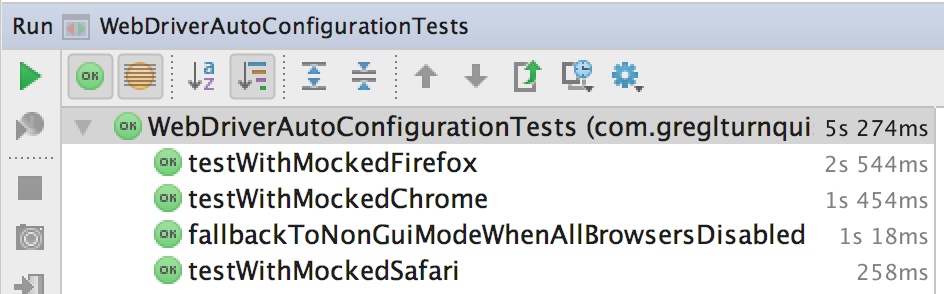
使用 Spring Boot 和 Spring Framework 测试模块以及 JUnit 和 Flapdoodle,我们已经成功地为 Selenium WebDriver 制定了一个自动配置策略,其中包含一套完整的测试方法。这使我们可以发布我们自己的第三方自动配置模块来自动配置 Selenium WebDriver。
那么我们涵盖了什么?单元测试、面向 MongoDB 的切片测试、面向 WebFlux 的切片测试、完整的容器端到端测试,甚至自动配置测试。
这是一个很好的测试集合,应该给任何团队带来信心。而且 Spring Boot 使它非常容易执行。
在本章中,我们使用 JUnit 和 AssertJ 制作了单元测试。然后,我们使用 Spring Boot 的 @DataMongoTest 注释对 MongoDB 执行基于切片的测试,有和没有嵌入式 MongoDB。我们测试了 WebFlux 控制器,确保它们正常运行。我们还使用 Spring Boot 编写了端到端测试,启动了整个嵌入式 Web 容器,以便 Selenium WebDriver 可以从浏览器驱动它。最后,我们使用测试优先实践为 Selenium WebDriver 制定了一个自动配置策略,以验证它是否有效。
在下一章中,我们将探索 Spring Boot 提供的开发人员工具,以简化我们必须处理的任务。