vlambda博客
学习文章列表

读书笔记《building-restful-web-services-with-spring-5-second-edition》用Maven在Spring5中构建REST风格的Web服务

Chapter 2. Building RESTful Web Services in Spring 5 with Maven

在本章中,我们将构建一个返回 Aloha 的简单 REST Web 服务。在开始实施之前,我们将关注创建 RESTful Web 服务所涉及的组件。在本章中,我们将介绍以下主题:

  • Building a RESTful web service with Apache Maven
  • Using the Eclipse IDE or STS for Spring REST project
  • Creating a new project in Eclipse/STS
  • Running and testing our REST API

Apache Maven


在构建 Jakarta Turbine 项目时,工程师发现管理 Ant 构建工具很困难。他们需要一个简单的工具来构建具有易于理解的清晰定义的项目。他们的尝试塑造了 Apache Maven,并且 JAR 可以在中心位置的 几个 项目之间共享。

Note

有关 Maven 的更多信息,请访问 https://maven.apache.org

创建 Apache Maven 是为了支持 Java 项目和构建管理。此外,它的简化定义使 Java 开发人员在构建和部署 Java 项目时变得轻松。

在编写本书时,Apache Maven 的最新版本是 3.5.0,可以从他们的网站下载:https://maven.apache.org/download.cgi

Note

Maven 3.3+ 需要 JDK 1.7 或更高版本。所以在使用 Maven 3.3 时请确保您的 Java 版本。

您可以从前面的链接获取二进制或源 ZIP 文件(或操作系统所需的任何格式)并将 Maven 安装到您的计算机上。

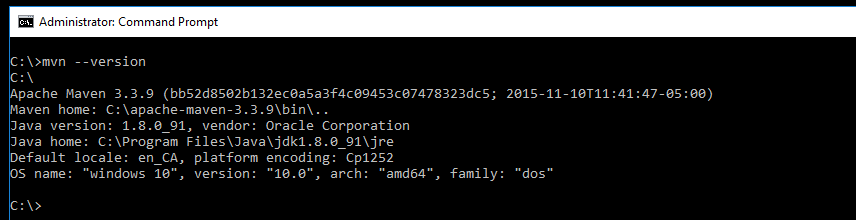
可以通过在控制台/命令提示符中输入 mvn --version 命令来验证 Maven 安装。如果安装成功,它将显示以下详细信息(仅在 Windows 操作系统上):

读书笔记《building-restful-web-services-with-spring-5-second-edition》用Maven在Spring5中构建REST风格的Web服务

为清楚起见,下图显示了在 Ubuntu 上执行的 Maven 版本检查:

读书笔记《building-restful-web-services-with-spring-5-second-edition》用Maven在Spring5中构建REST风格的Web服务

Creating a project with Maven

安装并验证 Maven 后,您将拥有 使用 Maven 创建项目。您可以在命令提示符本身中执行此操作。只需在您想要的位置运行以下命令,然后将自动创建项目:

mvn archetype:generate -DgroupId=com.packtpub.restapp -DartifactId=ticket-management -DarchetypeArtifactId=maven-archetype-quickstart -DinteractiveMode=false -Dversion=1.0.0-SNAPSHOT

如果您在创建项目时遇到任何问题,请使用 Maven 中的 –X 选项,如下所示。它将指出发生错误的位置:

mvn –X archetype:generate -DgroupId=com.packtpub.restapp -DartifactId=ticket-management -DarchetypeArtifactId=maven-archetype-quickstart -DinteractiveMode=false -Dversion=1.0.0-SNAPSHOT

在以下几点中,我们将介绍用于创建 Maven 项目的命令的每个部分:

  • archetype:generate: Use this if the goal is to create a new project on a specified archetype, in our case maven-archetype-quickstart.
  • -Dgroupid=com.packtpub.restapp: This part defines a project with a group identifier such as a package.
  • -DartifcatId=ticket-management: This part defines our project name (folder).
  • -DarchetypeArtifactId=maven-archetype-quickstart: This part will be used to select the archetype on the archetype:generate goal.
  • -Dversion=1.0.0-SNAPSHOT: The project version can be mentioned in this part. It will be helpful when you deploy the project and distribute it.

Viewing a POM file after creating a project

创建项目后,我们可以在项目文件夹中看到 pom.xml 文件。它将拥有所有基本细节,例如groupIdname 等等。此外,您可以在 dependencies 配置部分下看到默认的 Junit 依赖项:

<project xmlns="http://maven.apache.org/POM/4.0.0" xmlns:xsi="http://www.w3.org/2001/XMLSchema-instance" xsi:schemaLocation="http://maven.apache.org/POM/4.0.0 http://maven.apache.org/maven-v4_0_0.xsd">
  <modelVersion>4.0.0</modelVersion>
  <groupId>com.packtpub.restapp</groupId>
  <artifactId>ticket-management</artifactId>
  <packaging>jar</packaging>
  <version>1.0-SNAPSHOT</version>
  <name>ticket-management</name>
  <url>http://maven.apache.org</url>
  <dependencies>
    <dependency>
      <groupId>junit</groupId>
      <artifactId>junit</artifactId>
      <version>3.8.1</version>
      <scope>test</scope>
    </dependency>
  </dependencies> 
</project>

Note

Maven 工件属于一个组(通常是 com.organization.product),并且必须具有唯一标识符。

在前面的POM文件中,version中的SNAPSHOT后缀告诉Maven这个项目还在开发中。

POM file structure

在这里我们将检查 Project Object Model (POM) 文件结构,查看它的组织方式以及 pom.xml 文件中可用的部分。 POM 文件可以具有属性dependenciesbuildprofiles。但是,这些部分会因不同的项目而异。我们可能在其他项目中不需要其中一些:

<project>
  // basic project info comes here  
  <properties>
    // local project based properties can be stored here 
  <properties>  
  <dependencies>
    // all third party dependencies come here
  </dependencies>
  <build>
    <plugins>
      // build plugin and compiler arguments come here
    </plugins>
  </build>
  <profiles>
    All profiles like staging, production come here
  </profiles> 
</project>

Understanding POM dependencies

Maven 帮助管理操作系统中的第三方库。在过去,您可能必须手动将每个第三方库复制到您的项目中。当您有多个项目时,这可能是一个大问题。 Maven 通过将所有库保存在每个操作系统的中心位置来避免这种第三方库管理混乱。无论您的项目数量如何,第三方库都只会下载到系统一次。

Note

可以在 https://mvnrepository.com/ 找到 Maven 存储库。

每个操作系统都有自己的本地 Maven 存储库位置:

  • Windows Maven central repository location:C:\Users\<username>\.m2\repository\
  • Linux Maven central repository location:/home/<username>/.m2/repository
  • MAC Maven central repository location:/Users/<username>/.m2/repository

每当您将第三方库添加到您的 POM 依赖项时,指定的 JAR 和相关文件将被复制到位置 \.m2\repository 中。

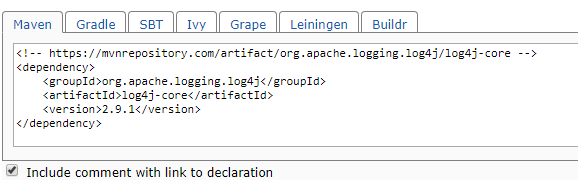
我们将通过查看一个示例来了解 Maven 依赖结构。假设我们需要在我们的应用程序中使用 Log4j 版本 2.9.1。为了使用它,我们需要将依赖项添加到我们的项目中。我们可以从 https://mvnrepository 搜索 log4j-core 依赖.com 并将依赖项复制到我们的 POM 中的 dependencies 下。

一个示例 Maven 依赖项如下:

读书笔记《building-restful-web-services-with-spring-5-second-edition》用Maven在Spring5中构建REST风格的Web服务

Adding Log4j 2.9.1 to POM dependency

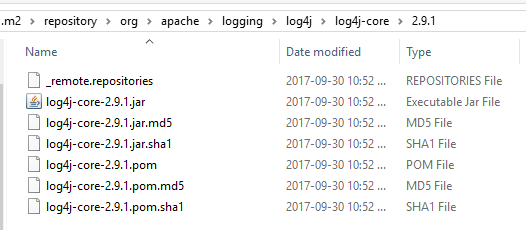
一旦添加了依赖项 并且项目更新 在你的 IDE 上,对应的库会被复制到 \.m2\repository 中:

<dependency>
    <groupId>org.apache.logging.log4j</groupId>
    <artifactId>log4j-core</artifactId>
    <version>2.9.1</version>
</dependency>

前面的依赖,log4j-core,将被添加到 POM 下。在这个依赖中可以看到groupIdartifactIdversion的解释如下:

  • groupId is used to make the JAR/WAR file unique across all projects. As it will be used globally, Maven recommends that the package names follow the same rules as that of domain names with subgroups. A sample groupId is com.google.appengine. However, some third-party dependencies don't follow the groupId package-naming policy. Check the following sample:
<dependency>
    <groupId>joda-time</groupId>
    <artifactId>joda-time</artifactId>
    <version>2.9.9</version>
</dependency>
  • artifactId is just the name of the JAR/WAR file without the extension.
  • version comes with number to show the JAR file version. Some JAR files come with extra information, such as RELEASE, for example, 3.1.4.RELEASE. The following code will download the spring-security-web library 3.1.4 JAR file to the repository location:
<dependency>
  <groupId>org.springframework.security</groupId>
  <artifactId>spring-security-web</artifactId>
  <version>3.1.4.RELEASE</version>
</dependency>

Log4j-core 文件(在 Windows 中)将如下所示:

读书笔记《building-restful-web-services-with-spring-5-second-edition》用Maven在Spring5中构建REST风格的Web服务

Note

有时,当您在 IDE 上更新项目时,您可能会看到 .jar 文件丢失。在这种情况下,删除整个文件夹(在我们的例子中是 log4j-core 文件夹)并再次更新它们。为了更新丢失的 JAR 文件,删除文件夹后,只需通过右键单击项目并选择 Maven 来更新您的 IDE(在我们的例子中为 STS /Eclipse) | 更新项目。最后,确保文件夹下有 .jar 文件。

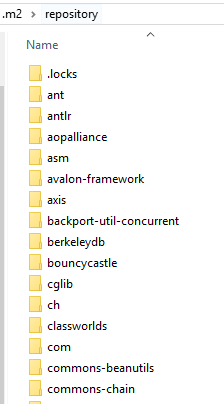
.m2\repository 中的示例存储库应如下所示:

读书笔记《building-restful-web-services-with-spring-5-second-edition》用Maven在Spring5中构建REST风格的Web服务

当您更新项目(在 Eclipse 或任何其他 IDE 中)时,它会将 JAR 和相关文件从远程 Maven 存储库获取到系统的中央存储库。

Dependency trees

依赖trees可以在项目中用来定位具体的依赖。如果您想知道任何特定的库,例如为什么使用它,您可以通过执行依赖树来检查。此外,可以扩展依赖关系树以显示依赖关系冲突。

以下代码显示了依赖库及其组织方式:

mvn dependency:tree

通过在您的项目文件夹(或 pom.xml 文件可用的任何地方)执行命令,您可以查看依赖关系树,其结构如下:

[INFO] --- maven-dependency-plugin:2.8:tree (default-cli) @ ticket-management ---
[INFO] com.packtpub.restapp:ticket-management:jar:0.0.1-SNAPSHOT
[INFO] +- org.springframework:spring-web:jar:5.0.0.RELEASE:compile
[INFO] | +- org.springframework:spring-beans:jar:5.0.0.RELEASE:compile
[INFO] | \- org.springframework:spring-core:jar:5.0.0.RELEASE:compile
[INFO] | \- org.springframework:spring-jcl:jar:5.0.0.RELEASE:compile
[INFO] +- org.springframework.boot:spring-boot-starter-tomcat:jar:1.5.7.RELEASE:compile
[INFO] | +- org.apache.tomcat.embed:tomcat-embed-core:jar:8.5.20:compile
[INFO] | +- org.apache.tomcat.embed:tomcat-embed-el:jar:8.5.20:compile
[INFO] | \- org.apache.tomcat.embed:tomcat-embed-websocket:jar:8.5.20:compile
[INFO] +- org.springframework.boot:spring-boot-starter:jar:1.5.7.RELEASE:compile
[INFO] | +- org.springframework.boot:spring-boot:jar:1.5.7.RELEASE:compile
[INFO] | +- org.springframework.boot:spring-boot-autoconfigure:jar:1.5.7.RELEASE:compile
[INFO] | +- org.springframework.boot:spring-boot-starter-logging:jar:1.5.7.RELEASE:compile
[INFO] | | +- ch.qos.logback:logback-classic:jar:1.1.11:compile
[INFO] | | | \- ch.qos.logback:logback-core:jar:1.1.11:compile
[INFO] | | +- org.slf4j:jcl-over-slf4j:jar:1.7.25:compile
[INFO] | | +- org.slf4j:jul-to-slf4j:jar:1.7.25:compile
[INFO] | | \- org.slf4j:log4j-over-slf4j:jar:1.7.25:compile
[INFO] | \- org.yaml:snakeyaml:jar:1.17:runtime
[INFO] +- com.fasterxml.jackson.core:jackson-databind:jar:2.9.2:compile
[INFO] | +- com.fasterxml.jackson.core:jackson-annotations:jar:2.9.0:compile
[INFO] | \- com.fasterxml.jackson.core:jackson-core:jar:2.9.2:compile
[INFO] +- org.springframework:spring-webmvc:jar:5.0.1.RELEASE:compile
[INFO] | +- org.springframework:spring-aop:jar:5.0.1.RELEASE:compile
[INFO] | +- org.springframework:spring-context:jar:5.0.1.RELEASE:compile
[INFO] | \- org.springframework:spring-expression:jar:5.0.1.RELEASE:compile
[INFO] +- org.springframework.boot:spring-boot-starter-test:jar:1.5.7.RELEASE:test
[INFO] | +- org.springframework.boot:spring-boot-test:jar:1.5.7.RELEASE:test
[INFO] | +- org.springframework.boot:spring-boot-test-autoconfigure:jar:1.5.7.RELEASE:test
[INFO] | +- com.jayway.jsonpath:json-path:jar:2.2.0:test
[INFO] | | +- net.minidev:json-smart:jar:2.2.1:test
[INFO] | | | \- net.minidev:accessors-smart:jar:1.1:test
[INFO] | | | \- org.ow2.asm:asm:jar:5.0.3:test
[INFO] | | \- org.slf4j:slf4j-api:jar:1.7.16:compile
[INFO] | +- junit:junit:jar:4.12:test
[INFO] | +- org.assertj:assertj-core:jar:2.6.0:test
[INFO] | +- org.mockito:mockito-core:jar:1.10.19:test
[INFO] | | \- org.objenesis:objenesis:jar:2.1:test
[INFO] | +- org.hamcrest:hamcrest-core:jar:1.3:test
[INFO] | +- org.hamcrest:hamcrest-library:jar:1.3:test
[INFO] | +- org.skyscreamer:jsonassert:jar:1.4.0:test
[INFO] | | \- com.vaadin.external.google:android-json:jar:0.0.20131108.vaadin1:test
[INFO] | \- org.springframework:spring-test:jar:4.3.11.RELEASE:test
[INFO] +- io.jsonwebtoken:jjwt:jar:0.6.0:compile
[INFO] \- org.springframework.boot:spring-boot-starter-aop:jar:1.5.7.RELEASE:compile
[INFO] \- org.aspectj:aspectjweaver:jar:1.8.10:compile

Spring Boot

Spring Boot 是一个快速且易于配置的 Spring 应用程序。与其他 Spring 应用程序不同,我们不需要太多配置即可构建 Spring Boot 应用程序,因此您可以非常快速轻松地开始构建它。

Spring Boot 帮助我们创建了一个独立的应用程序,可以快速嵌入到 Tomcat 或其他容器中。

Developing RESTful web services


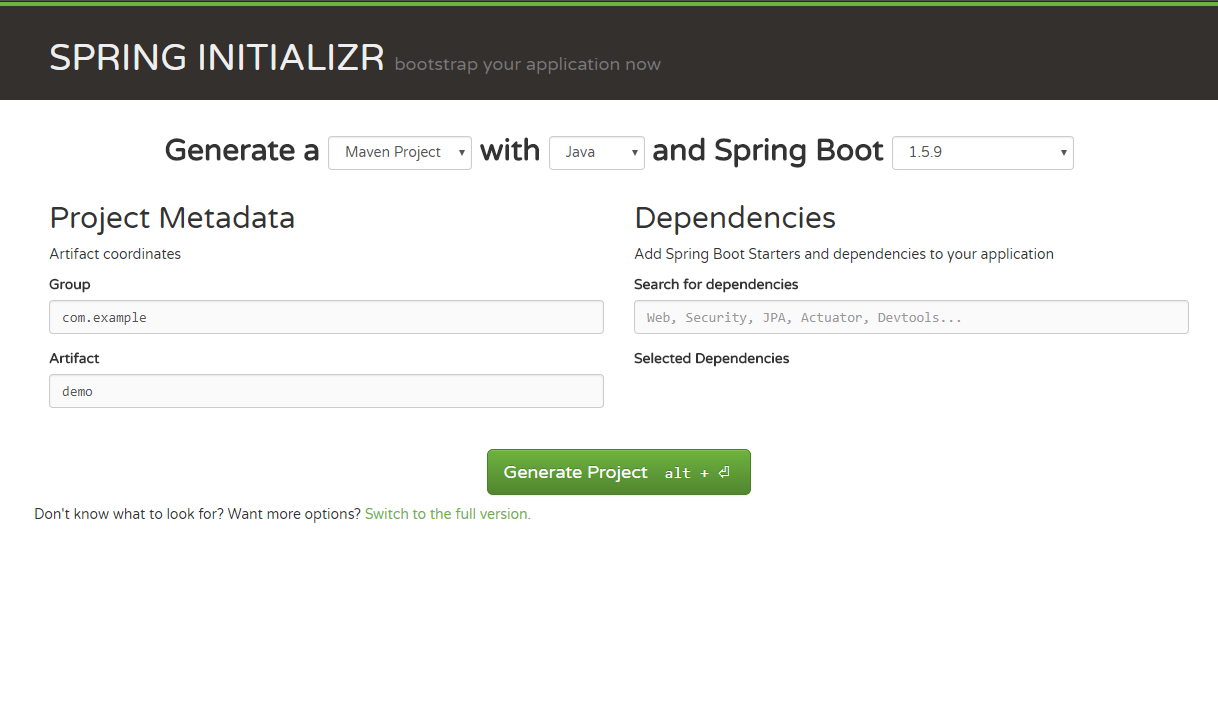
新建项目,我们可以使用Maven命令提示符或者在线工具,比如Spring Initializr(http://start.spring.io),生成项目库。这个网站 可以方便地创建一个简单的基于 Spring Boot 的 Web 项目来开始滚动。

Creating a project base

让我们在浏览器中访问 http://start.spring.io配置 我们的项目通过填写以下参数来创建项目库:

  • Group: com.packtpub.restapp
  • Artifact: ticket-management
  • Search for dependencies: Web (full-stack web development with Tomcat and Spring MVC)

配置我们的项目后,它将如下面的屏幕截图所示:

读书笔记《building-restful-web-services-with-spring-5-second-edition》用Maven在Spring5中构建REST风格的Web服务

现在您可以通过单击Generate Project 来生成项目。项目(ZIP 文件)应下载到您的系统。解压 .zip 文件,您应该会看到如下截图所示的文件:

读书笔记《building-restful-web-services-with-spring-5-second-edition》用Maven在Spring5中构建REST风格的Web服务

复制整个文件夹 (ticket-management) 并将其保存在您想要的位置。

Working with your favorite IDE

现在是时间 来选择IDE。虽然有 许多 IDE 用于 Spring Boot 项目,但我建议使用 Spring Tool Suite (STS),因为它是开源的并且易于管理项目。就我而言,我使用 sts-3.8.2.RELEASE。您可以从此链接下载最新的 STS:https://spring.io/tools/ sts/全部。大多数情况下,您可能不需要安装;只需解压缩文件并开始使用它:

读书笔记《building-restful-web-services-with-spring-5-second-edition》用Maven在Spring5中构建REST风格的Web服务

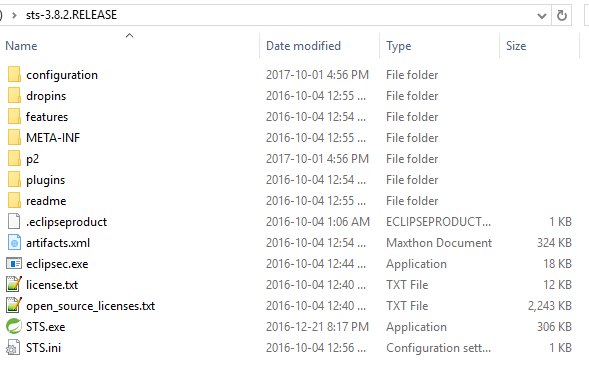
提取 STS 后,您可以通过运行 STS.exe 开始使用该工具(如上图所示)。

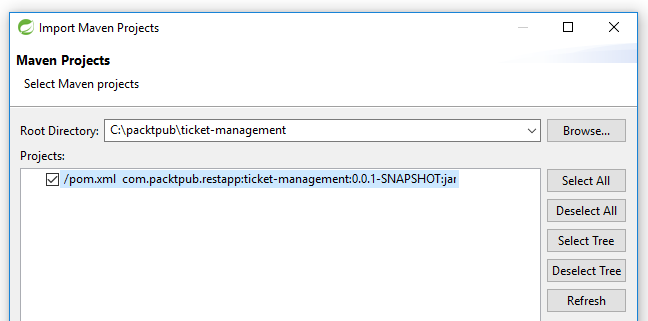
在 STS 中,您可以通过选择 Existing Maven Projects 来导入项目,如下所示:

读书笔记《building-restful-web-services-with-spring-5-second-edition》用Maven在Spring5中构建REST风格的Web服务

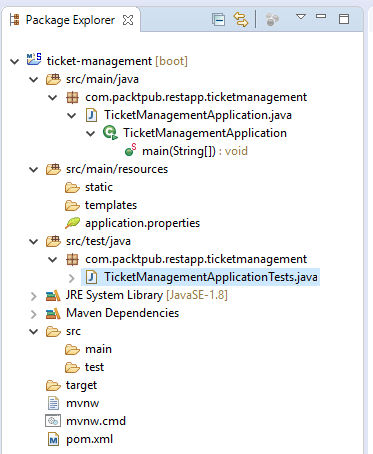
导入工程后,可以在Package Explorer中看到工程,如下截图所示:

读书笔记《building-restful-web-services-with-spring-5-second-edition》用Maven在Spring5中构建REST风格的Web服务

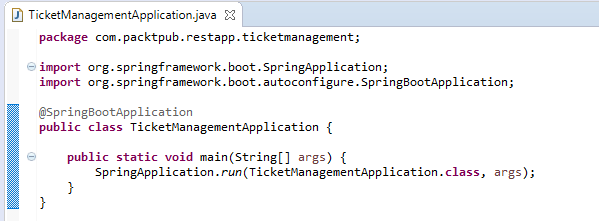
默认情况下,您可以看到主 Java 文件(TicketManagementApplication):

读书笔记《building-restful-web-services-with-spring-5-second-edition》用Maven在Spring5中构建REST风格的Web服务

为了简化项目,我们将清理现有的 POM 文件并更新所需的依赖项。将此文件配置添加到 pom.xml

<?xml version="1.0" encoding="UTF-8"?>
<project xmlns="http://maven.apache.org/POM/4.0.0" xmlns:xsi="http://www.w3.org/2001/XMLSchema-instance" xsi:schemaLocation="http://maven.apache.org/POM/4.0.0 http://maven.apache.org/xsd/maven-4.0.0.xsd">
  <modelVersion>4.0.0</modelVersion>
  <groupId>com.packtpub.restapp</groupId>
  <artifactId>ticket-management</artifactId>
  <version>0.0.1-SNAPSHOT</version>
  <packaging>jar</packaging>
  <name>ticket-management</name>
  <description>Demo project for Spring Boot</description>
  <properties>
    <project.build.sourceEncoding>UTF-8</project.build.sourceEncoding>
    <project.reporting.outputEncoding>UTF-8</project.reporting.outputEncoding>
  </properties>
  <dependencies>
      <dependency>
      <groupId>org.springframework</groupId>
      <artifactId>spring-web</artifactId>
      <version>5.0.1.RELEASE</version>
    </dependency>  
    <dependency>
      <groupId>org.springframework.boot</groupId>
      <artifactId>spring-boot-starter</artifactId>
      <version>1.5.7.RELEASE</version>
    </dependency>
    <dependency>
      <groupId>org.springframework.boot</groupId>
      <artifactId>spring-boot-starter-tomcat</artifactId>
      <version>1.5.7.RELEASE</version>
    </dependency>    
    <dependency>
      <groupId>com.fasterxml.jackson.core</groupId>
      <artifactId>jackson-databind</artifactId>
      <version>2.9.2</version>
    </dependency>
    <dependency>
      <groupId>org.springframework</groupId>
      <artifactId>spring-web</artifactId>
      <version>5.0.0.RELEASE</version>
    </dependency>
    <dependency>
      <groupId>org.springframework</groupId>
      <artifactId>spring-webmvc</artifactId>
      <version>5.0.1.RELEASE</version>
    </dependency>
    <dependency>
      <groupId>org.springframework.boot</groupId>
      <artifactId>spring-boot-starter-test</artifactId>
      <scope>test</scope>
      <version>1.5.7.RELEASE</version> 
    </dependency> 
  </dependencies>
  <build>
    <plugins>
      <plugin>
        <groupId>org.springframework.boot</groupId>
        <artifactId>spring-boot-maven-plugin</artifactId>
      </plugin>
    </plugins>
  </build>
</project>

在前面的配置中,您可以检查我们是否使用了以下库:

  • spring-web
  • spring-boot-starter
  • spring-boot-starter-tomcat
  • spring-bind
  • jackson-databind

由于项目运行需要上述依赖项,我们将它们添加到我们的 pom.xml 文件中。

到目前为止,我们已经为 Spring Web Service 准备好了基础项目。让我们向应用程序添加一个基本的 REST 代码。首先,从 TicketManagementApplication 类中移除 @SpringBootApplication 注解并添加以下注解:

@Configuration
@EnableAutoConfiguration
@ComponentScan
@Controller

这些注释将帮助该类充当 Web 服务类。在本章中,我不会过多地谈论这些配置将做什么。在添加注解之后,请添加一个简单的方法来返回一个字符串作为我们的基本Web服务方法:

@ResponseBody
@RequestMapping("/")
public String sayAloha(){
  return "Aloha";
}

最后,您的代码将如下所示:

package com.packtpub.restapp.ticketmanagement;
import org.springframework.boot.SpringApplication;
import org.springframework.boot.autoconfigure.EnableAutoConfiguration;
import org.springframework.context.annotation.ComponentScan;
import org.springframework.context.annotation.Configuration;
import org.springframework.stereotype.Controller;
import org.springframework.web.bind.annotation.RequestMapping;
import org.springframework.web.bind.annotation.ResponseBody;
@Configuration
@EnableAutoConfiguration
@ComponentScan
@Controller
public class TicketManagementApplication { 
  @ResponseBody
  @RequestMapping("/")
  public String sayAloha(){
    return "Aloha";
  }
  public static void main(String[] args) {
    SpringApplication.run(TicketManagementApplication.class, args);
  }
}

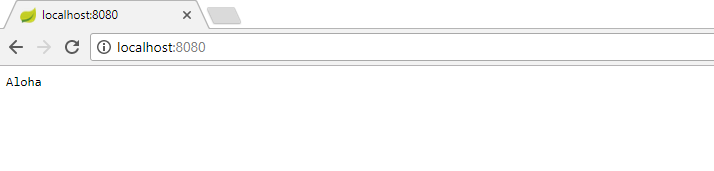
完成所有编码更改后,只需在 Spring Boot App 上运行项目 (Run As | Spring Boot 应用程序)。您可以通过在控制台中检查此消息来验证应用程序是否已加载:

Tomcat started on port(s): 8080 (http)

验证后,您只需键入 localhost:8080 即可在浏览器上检查 API。查看以下屏幕截图:

读书笔记《building-restful-web-services-with-spring-5-second-edition》用Maven在Spring5中构建REST风格的Web服务

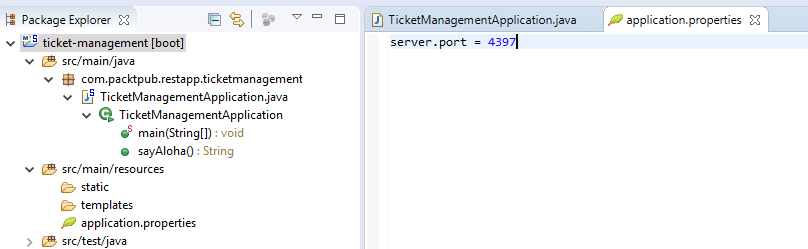
如果要更改端口号,可以在application.properties中配置不同的端口号,在src/main/resources/应用程序.properties。查看以下屏幕截图:

读书笔记《building-restful-web-services-with-spring-5-second-edition》用Maven在Spring5中构建REST风格的Web服务

Summary


在本章中,我们了解了如何设置 Maven 构建以支持 Web 服务的基本实现。此外,我们还了解了 Maven 如何在第三方库管理以及 Spring Boot 和基本 Spring REST 项目中发挥作用。在接下来的章节中,我们将更多地讨论 Spring REST 端点和 Reactor 支持。